Tuesday, December 31, 2013

Mixed Media Scripture Card Holder for Helmar

Wishing each of you a happy and blessed New Year!

Helmar asked me to create a New Years resolution project to share with you. I'm not big on resolutions; however, one of my goals this year is to commit more Scripture to memory. I created this lovely card holder for the window ledge above my kitchen sink. I'll place special verses there to think about and learn as I work. This would make a great recipe holder as well. I've used Helmar Decoupage & Craft Paste to adhere and seal my background papers.

Scripture Card Holder

Tips and Techniques
I found this giant clothes pin on clearance after Easter last year. It was decorated with some "lovely" cartoon Easter bunny paper. I peeled off the paper and sanded to get a smooth finish and also sanded all the painted edges to distress, revealing the wood below at all the edges. 

Once all my sanding was complete, I cut sections of cardstock weight patterned paper by Prima just a little larger than the flat panels on the clothes pin base. I brushed just the wood panels with Decoupage  Paste then laid the paper pieces onto the decoupaged wood. I rolled over the paper with a brayer to make sure it would be completely adhered without any air bubbles below. Here's a hint when using a brayer. I laid a sheet of computer paper over the patterned paper before using the brayer to make sure I wouldn't leave markings or transfer stray bits from the brayer. 

When this was completely dry, I trimmed close and sanded the edges to distress so the paper blended right into the wood edge. Then I brushed more Decoupage & Craft Paste over the top to seal the paper beneath. Since I plan to use this in the kitchen I want a nice sealed surface to protect the paper from splashes. Set aside and allow to dry completely.

When dry, I applied molding paste with a dot fade stencil, then used tinsel and gold Color Shine mists to add shimmer and drips. When this was dry, I sprayed with Helmar Crystal Kote Gloss Varnish

I stamped and heat embossed my sentiment and lantern, then colored with inks and watercolor pencils. I wanted to seal these to protect against those kitchen splashes, but didn't wanted to keep a natural finish to contrast against the glossy background, so sprayed with Helmar Crystal Kote Matte Varnish.

Finally, I selected some gorgeous flowers and arranged my elements onto the clothes pin. Everything is adhered into place with Helmar 450 Quick Dry Adhesive, which is my favorite go to adhesive when adhering to a mixed media surface. 

Helmar Products

Other Products
Prima ~ Ledger Pad 12 x 12
Petaloo ~ Botanica Faux Dried Blooms - Ivory; Canterbury Magnolia Blossoms - Burgundy; Color Me Crazy Mini Pearl Daisies - All Whites
Wild Orchid Crafts ~ 25mm Cottage rose - Mixed White/Cream
Clearsnap ~ Donna Salazar Designs - Mix'd Media Inx and MMI Embossing Powder, Leather
Ranger ~ Distress Ink - Gathered Twigs, Scattered Straw
Heidi Swapp ~ Color Shine - Gold, Tinsel
Prismacolor ~ Watercolor Pencils - Spanish Orange Crimson Red, Sienna, Goldenrod
Stampers Anonymous ~ Dot Fade Stencil
Inky Antics Clear Set Stamps ~ Shining Lantern
Giant Clothespin - craft store
Darice ~ Heat Tool, Brayer
Stampers Anonymous ~ Grid Blocks
Ranger ~ Water Brush
EK Success ~ Honey Bee Scissors
Monteverde Fountain Pen

Thanks for stopping by! I treasure your comments.
~ Blessings ~

Tuesday, December 24, 2013

Love Notes For Leaky Shed Studio featuring Heat Embossed Chipboard


I would like to wish each of you a blessed Christmas. I hope you'll take time to reflect on Christ's love this holiday season. 

Today I'd like to share some details from my Leaky Shed Studio project. It's always fun to send little notes to our loved ones to let them know how much we care, or to congratulate them on a special accomplishment. I've created a set of note card holders just for that purpose. I've cut the holders and coordinating note cards from the Prima Romance collection and decorated them with gorgeous Leaky Shed Studio chipboard.

Love Notes Set

Tips and Techniques
This first note card holder has a steampunk image, so I added one of the LSS crosses from the cross set. I heat embossed with with the wonderfully textured Fran-tage Aged Black Embossing Enamel. Each of these holders was fussy cut from design sheets from this gorgeous Prima paper, then scored and folded. Edges are inked in Walnut Stain Distress Ink. 

For each of these holders I cut out and inked additional sentiments like the Beautiful and Notes sentiments on this one. The Leaky Shed Studio Butterfly was heat embossed with Fran-tage Shabby Pink Embossing Enamel. Inking for this holder is done with Black Soot Distress Ink. 

This chipboard piece is the new Damask design that is an upcoming release. Don't you just adore the intricate detail? It's also heat embossed with Fran-tage Embossing Enamel in Aged Silver. The top part of the chipboard is not glued down so the envelope tab can be tucked underneath. I went back to the Walnut Stain Distress ink for this note holder. 

You may have noticed that I have not included much dimension with flowers and other embellishments so that they will be easy to slip into an envelope and send on their way, but still have so much elegant and gorgeous dimension with the lovely dressed up chipboard. 

Spring Butterfly Small (Set of 3)
Cross Set (Set of 5)
Damask - small

Other Products
Prima ~ Romance Novel - Messenger, Ime Travel, Bookplate
Ranger ~ Distress Ink - Walnut Stain, Black Soot
Ranger ~ Perfect Medium
Stampendous ~ Fran-tage Embossing Enamel - Aged Black, Shabby Pink, Aged Silver
Tombow Multi Mono Liquid Glue
Scotch ~ ATG
Darice ~ Heat Tool

I hope you've been inspired to add some Leaky Shed Studio chipboard to your next project!

Thanks for stopping by! I treasure your comments.

~ Blessings ~

Monday, December 23, 2013

Love Notes ~ Leaky Shed Studio Sneak Peek.

There are only two more sleeps til Christmas, and I hope you are enjoying your holiday preparations and taking the time to reflect on the real reason for this wonderful season.

I have a new project up on the Leaky Shed Studio blog today, and here's a little sneak peek from one of the three note card holders I've created.


Thanks for stopping by today. I hope you'll stop by the Leaky Shed Studio blog to check out more of my project. 

~ Blessings ~ 

Sunday, December 22, 2013

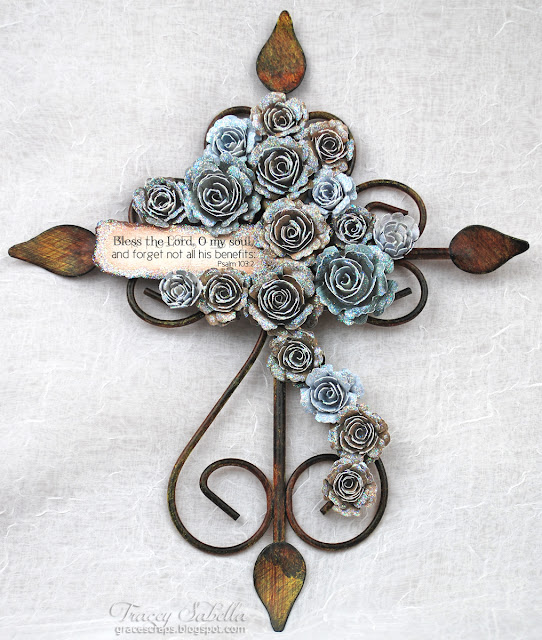
"Bless the Lord" Ironwork Cross for Donna Salazar Designs Featuring Bitty Blossoms

Christmas is nearly upon us. I hope that you are having a wonderful holiday season. I have a project to share with you today featuring Donna Salazar Designs products.

One of the things I enjoy about the holidays is creating one of a kind, handcrafted gifts. Today I have a trash to treasure gift to share with you. I found this ironwork cross for a dollar at a local thrift shop and decorated it with handcrafted flowers created with Donna's Spellbinders Bitty Blossoms dies.

Donna has a gorgeous gift bag project on this week's Wednesday Webisodes and an amazing prize package including a Zutter Bow-it-All. You can check out the details and enter for a chance for the prize here

"Bless the Lord" Ironwork Cross

Tips and Techniques
I have a stash of bitty blossom flowers created with project scraps, so this was a quick holiday project to pull together. A tutorial for my Bitty Blossoms Flowers can be found here. I used all three sizes of Bitty Blossoms. I adhered the blossoms to the ironwork cross with Helmar 450 Quick Dry Adhesive.

I printed out this verse from Word Art Wednesday onto white cardstock, tore it out, and rubbed several colors of Mix'd Media Inx on to coordinate with the flowers. I backed it with a strip of chipboard to hold it's shape and backed with foam tabs to raise before gluing onto the cross. 

Once I had the flowers and Word Art arranged and adhered to the cross, I applied Clearsnap Glue Gloss and sprinkled with Donna's Fairy Dust Glitter which adds so much gorgeous sparkle! 

Once final close-up.

Thanks for stopping by today!
I hope you've been inspired to pull out your Bitty Blossoms dies
and create a handcrafted gift this holiday season. 


Donna Salazar Products
GCD Studios ~  Natural Beauty, Family Jeans
Clearsnap ~ Mix'd Media Inx - Truffle, Honey, Leather
Clearsnap ~ Fairy Dust Glitter - Sugar Shimmer

Other Products
Ironwork Cross - Thrift Store
Clearsnap ~ Glue Gloss
Helmar ~ 450 Quick Dry Adhesive, Zapdots 
Verse from Word Art Wednesday

Thanks for stopping by! I treasure your comments

~ Blessings ~

Wednesday, December 18, 2013

Handcrafted Crochet Snowflake Ornaments For Helmar

The Holiday season us upon us, and I'd like to share a new family Christmas tradition begun last year. Now that all our children are out on their own, I thought it would be nice to create a special ornament for each of them to help decorate their trees. A friend taught me how to read a pattern to create a lovely crocheted snowflake and a tradition was born. I plan to find a new snowflake to handcraft each year. Of course they must be blocked and stiffened. Helmar Fabric Stiffener and Draping Fluid is the perfect product for that job. If you don't crochet, you can still create a similar ornament by using the Helmar Fabric Stiffener on a small crochet doily.

Handcrafted Snowflake Ornaments

Tips and Techniques
 As you can see with the snowflake right next to the Fabric Stiffener, before stiffening, they are quite soft and crumpled.

The first thing I did was to block the ornaments. I have lots of padding on my ironing board, so I laid a dish cloth over the padded board, then a layer of wax paper to keep the stiffener off of the ironing board. Any kind of foam or padded board would also work. Pin the ornament into shape.

The stiffener is thick, so I thinned it with 50% water and 50% Helmar Fabric Stiffener. I used a stiff paint brush to apply it to the snowflakes. Be sure to completely saturate. 

Allow to completely dry. I left mine overnight. 

 Here's a close-up shot. 

Helmar Products

Other Products
Crochet Pattern by Better Homes and Garden can be found here.
** (Please note H 3 in the pattern means chain 3) **
Size 10 Crochet Cotton Thread
Size 7 Steel Crochet Hook

Thanks for stopping by! I treasure your comments.

~ Blessings ~

Monday, December 16, 2013

Published at Scrapbooking.com

I'm so excited that Scrapbooking.com Magazine has featured two of my layouts in their December Issue. I hope you'll stop by to check them out and take a look at some of the other inspiring work while you're there.

Here Comes the Bride ~ Parties Department Featured Layout
Christmas Memories ~ Christmas Around the World Department

Thanks for stopping by! I treasure your comments.

~ Blessings ~

Friday, December 13, 2013

"Peace on Earth" Chipboard Christmas Ornament Tag for Leaky Shed Studio

Christmas is a special time of the year when we celebrate the birth of our Savior, Jesus Christ. One way that we celebrate is to give gifts to the special loved ones in our lives. Today I'm sharing with you a tag that has it's own special gift attached - a lovely ornament created with Leaky Shed Studio Chipboard.

"Peace on Earth Tag"

Tips and Techniques
I wanted to created an ornament with a homespun feel, so pulled out some of my grungy techniques to decorated this delightful piece from Leaky Shed. As you can see there are three distinctive parts to this intricate chipboard piece and I used a different approach to each.

I started with the snowflake, using a paint brush to cover it with Jasmine Mix'd Media Inx. This ink stays wet for a long time and MMI is my go to ink when embossing. While wet, I covered with Fran-tage Shabby White embossing enamel and heat set. I love the mix of colors and lumpy, grungy texture that this enamel provides.

Next, I painted the scroll work with a deep red metallic paint. When dry I covered it with Ranger Clear Rock Candy Distress Crackle Paint. When dry, I rubbed on brown ink to bring out the crackled texture. The outer rim is painted in gold metallic paint, then rubbed lightly with brown ink.

I had fun combining some Donna Salazar and Tim Holtz products to create the background for my gift tag. I started out with a plain manilla tag. First, I created a color wash on the background by spreading patches of Fired Brick, Forest Moss, and Vintage Photo Distress Inks on a craft sheet. I spritzed lightly with water then pulled the tag through the color and heat set. I wanted some splats and drips of green so again rubbed my Forest Moss ink pad onto the craft mat, spritzed with water, then used my fingers to flick and tap more of the green onto my tag and heat set.

Once completely dry, I stamped the sentiment using Leather MMI and MMI embossing powder, then heat set. It's important for the background to be dry or the embossing powder will stick everywhere instead of just to the stamped sentiment.

My sweet friend, Juliana Michaels (17 Turtles), gave me this Tim Holtz Burlap Stencil. I just laid it over the tag and used a foam blending tool to apply Vintage Photo ink.

I lightly distressed the edges, then rubbed Leather Mix'd Media Inx to darken the edges, then while still wet dipped the edges into Truffle Mix'd Media Inx Embossing Powder. I then used my finger to rub off some of the embossing powder as I wanted a grungy effect rather than a solid covering of embossing powder, then heat set.

Finally, I wanted just a simple, single bow to attach the ornament to the tag so it can be easily untied to release the ornament. Wendy from Leaky Shed used this great jute twine to help package the chipboard she sent to me, and I realized it would be perfect for the homespun look I was going for.

The chipboard ornament is a new release from Leaky Shed Studio. Stop by the store and check out their new ornaments and snowflakes. Just type ornament or snowflake into the search box.

Leaky Shed Studio Chipboard

Other Products
Ranger ~ Inkssentials - #8 Manilla Craft Tags
 Donna Salazar by Clearsnap ~ Mix'd Media Inx -Jasmine, Leather
Donna Salazar by Clearsnap ~ Mix'd Media Inx Embossing Powder - Leather, Truffle
Ranger ~ Distress Ink - Forest Moss, Fired Brick, Vintage Photo, Gathered Twigs
Ranger ~ Clear Rock Candy Distress Crackle Paint
DecoArt Dazzling Metallics ~ Champagne Gold
Lumiere ~ Bright Gold, Metallic Russet
Stampers Anonymous - Burlap Layering Stencil
CTMH Everlasting LIfe Holidays Stamp Set
Darice ~ Heat Tool
Ranger ~ Craft Sheet
Tonic ~ Paper Distresser

Thanks for stopping by! I treasure your comments.

~ Blessings ~

Thursday, December 12, 2013

Grungy Christmas Ornament Sneak Peek For Leaky Shed Studio

Winter is in the air here in Ohio with cold temperatures and a blanket of snow on the ground. Today, I have a project up on the Leaky Shed Studio blog. I hope you'll have a chance to stop on over there to check it out. Here's a sneak peak of the gorgeous Leaky Shed Christmas ornament featured on my project:


I so appreciate the sweet comments so many of my followers have been leaving over at the LSS Blog!! 

~ Blessings ~ 

Wednesday, December 11, 2013

"Sweet Moment" Mixed Media Layout for Donna Salazar Designs

Winter has settled upon our area with cold temperatures and more snow. I hope you're enjoying the preparations of the Christmas season. 

Today I'd like to share a layout from our daughter's wedding Featuring Donna Salazar's Distrezz-it-All and Spellbinder dies. Elizabeth is with her two young cousins who were her flower girl and junior bridesmaid. Don't you just adore those sweet smiles? 

"Sweet Moment"

Tips and Techniques
I included two borders seen above in the large project photo. On the right side I used mat gel medium to apply a piece of vintage lace which I then dry brushed with gesso, inked and splattered. The remainder of the layout is bordered with light molding paste, which when dry was randomly stamped with Donna's Woodgrain stamp in Storm Mix'd Media Inx. 

The flag strips and mats were all distrezzed with my handy Distrezz-it-All. I adore how this machine makes such quick work of my distressing and gives a thick shabby edge to the layers. I used several of Donna's Art Gone Wild stamps on the background. Here your can see her Stanza stamp. This Want2Scrap chipboard piece was given a light and spotty application of Jasmine Mix'd Media Inx. I then sprinkled lightly with Jasmine Embossing Powder, knocking some off in places to be sure some of the bare chipboard would show through. 

Another view of this lovely cluster. The flowers and leaves are created with a mix of vintage pattern paper, voile fabric, mulberry paper from Donna's Mix'd Media Stax 2, and regular printed cardstock paper using Donna's Grand Peony, Bitty Blossoms, and Rose Creation Dies. 

Here's a view of the smaller cluster. You can see just a little of the hearts stenciled with Donna's Want2Scrap Small Heart Stencil. I used light molding paste, then lightly inked with Chiffon Mix'd Media Inx. I then sprinkled on Clearsnap clear embossing powder and heat set to give a glossy shimmer to these sweet hearts. There's also a bit of splattered Smooch Spritz on these particular hearts. 

Don't you just adore Donna's Wonderful Wings dies and coordinating Bling from Want2Scrap? I die cut the background from Donna's Want2Scrap Canvas distressed with the edge of my scissors and inked with Chiffon and Stormy. The butterfly trail is a little scrap from a Want2Scrap border. I used a stiff paint brush to splatter Donna's Caramel Latte Smooch Spritz around the page. 

I drew inspiration from this lovely Flying Unicorn Mojo Monday Sketch from October.

Donna has now released her Distrezz-it-All V3.0.
For all the details and a demonstration of this handy machine, 
check  her Youtube video here.

Donna will be giving away a new Distrezz-it-All V3.0 when
her Distrezz-it-All Facebook page gets 2,000 likes.
For other ways to enter this drawing go here


Donna Salazar Design Products
GCD Studios ~ Natural Beauty Collection, Mix'd Media Stax 2
Want2Scrap ~ Wonderful Wings Nestabling
Want2Scrap ~ Canvas
Spellbinders ~ Wonderful Wings
Spellbinders ~ Grand Peony
Spellbinders ~ Bitty Blossoms
Spellbinders ~ Rose Creations
Clearsnap ~ Mix'd Media Inx - Stormy, Denim, Truffle, Chiffon, Jasmine
Clearsnap ~ Mix'd Media Inx Embossing Powder - Jasmine
Clearsnap ~ Smooch Spritz - Caramel Latte 
Want2Scrap ~ Small Heart Stencil
Art Gone Wild ~ Woodgrain Stamp
Art Gone Wild ~ Dear Sir Stamp
Art Gone Wild ~ Stanza Stamp
Zutter ~ Distrezz-it-All

Other Products
Vintage Pattern
Voile Fabric - Ivory
Doily
Heidi Grace Epoxy Stickers 
Want2ScrapFinesse Swirls - Rhinestones, Silver
Want2Scrap ~ Chipboard - Martha
Lace and Vintage Lace
Jewelry Pieces
Bead Landing - Textured Metal
Crystal Brads
EK Success ~ Swirl Border Punch
Clearsnap ~ Top Boss - Clear Embossing Powder
Golden Molding Paste
Helmar ~ 450 Quick Dry Adhesive, Zapdots, Premium Craft Glue
Spellbinders ~ Artisan X-plorer
Darice ~ Heat Tool

I hope you've been inspired to create with your favorite Donna Salazar products!!

Thanks for stopping by! I treasure your comments.

~ Blessings ~

Tuesday, December 10, 2013

"A Snowy Day" for Leaky Shed Studio with Enameled Chipboard

I'm back today to share the details of my layout featuring Leaky Shed Studio chipboard. It's been snowy in this part of the world - a perfect time to share this wintry page. This is an older photo of our daughter Grace enjoying an afternoon of sledding. 

"A Snowy Day"

Tips and Techniques
Here you can see the French Curve Scroll which I cut in half to use as a flourish. Don't be afraid to cut your chipboard to get different looks. Flowers and other elements were dry brushed with gesso to lighten and give a snowy feel. 

I thought the Clear Scraps Cracked Glass stencil had a wintry, icy feel and added some nice texture using molding paste. Paper strips were distressed and inked then dry brushed with gesso. I used BoBunny Cardstock Stickers for the title, adding rhinestones to the sticker strip below the title. 

These snowflakes are a brand new design at Leaky Shed. They'll be showing up in the LSS Store soon. To give them a shabby look, I sprinkled the embossing enamel with a light hand so some of the natural chipboard would show through. These snowflakes were absolutely perfect to fit the design of the flakes on this BoBunny Winter Wonderland paper. 

I distressed the photo edge and brushed with gesso. Texture is added with corrugated board, burlap and my handy Distrezz-it-All on the paper edges. The smallest LSS snowflake is perfect for the corner of my photo. The tiny snowflake on the tag and around the page are wood veneer pieces I picked up at Michaels. 

One of my favorite LSS chipboard pieces is this ornate corner with it's intricate design. Stampendous Fran-tage embossing enamel is a great product that makes dressing up chipboard so very easy. I simply pressed the chipboard into a Perfect Medium pad (Any clear embossing pad will work.), then sprinkled on Shabby White embossing enamel and heat set. This embossing enamel has several different colors and sizes of enamel and even some fine gold glitter, perfect for this wintry page. 

One final snowflake. Look at the wonderful cut detail on this piece! 

Leaky Shed Studio Chipboard
Snowflakes (Set of 6 different flakes)
Ornate Corner
French Curve Scroll

Other Products
Bo Bunny Woodland Winter~ Woodland Winter, Snowfall, Blizzard
Bo Bunny Woodland Winter ~ Cardstock Stickers
Zutter ~ Donna Salazar Designs - Corrugated Board
BoBunny ~ Buttons
BoBunny ~ Blossoms - Natural Earth Daisy
BoBunny ~ Chocolate Jewels
BoBunny ~ Lace - Denim Blue
Petaloo ~ Darjeeling - Medium Mix, Petites
Petaloo ~ Penny Lane Garden Collection - Ruffled Roses, Vanilla
White Thread
Ranger ~ Distress Ink - Frayed Burlap
Liquitex Gesso
Golden ~ Light Molding Paste
Stampendous ~ Fran-tage Embossing Enamel - Shabby White
Clear Scraps ~ Shattered Glass Stencil
Helmar 450 Quick Dry Adhesive
Helmar ~ Premium Craft Glue
Tombo Multi Mono Liquid Glue
Zutter ~ Donna Salazar Designs - Distrezz-it-All
Tim Holtz ~ Paper Distresser
Sewing Machine

Thanks for stopping by! I treasure your comments. 

~ Blessings ~

Monday, December 9, 2013

A Snowy Day Sneak Peak for Leaky Shed Studio

Last week was a quiet one here on my blog, but I've been busy creating and have several projects to share with you this week.

I have a post up over at Leaky Shed Studio today and hope you'll stop on over there to let me know what you think! 

Here's a sneak peek of my project.

"A Snowy Day"

Head on over to the Leaky Shed Studio Blog for all the details.

Thanks for stopping by! I treasure your comments.

~ Blessings ~ 

Sunday, December 1, 2013

Days to Remember for Once Upon A...Sketch

I always enjoy the Thanksgiving holiday. It's a time to reflect on the many blessings of the year and give thanks to our Lord. I also enjoy the fellowship with family and wonderful food!!

It's reveal day at Once Upon A...Sketch and Nadia has delivered with another fabulous sketch and journaling theme. Here is my take on this month's challenge:

"Days to Remember"


Journaling Theme ~ My Favorite Month

You are free to interpret our theme any way you like, but please make sure your layout is based on the sketch below and includes some journaling (hidden journaling is fine - please tell us where it is located).


Tips and Techniques
Here you can see my handwritten journaling. It says, "Songbirds return to fill the air with lovely melodies. Warm Breezes waft sweet fragrances. Flowers and blossom laden boughs dot the landscape with gorgeous color. This is April, my favorite month."

The title, cards, and calendar were cut from the gorgeous Maja Spring Vintage Basics collection, with inked and lightly distressed edges. Helmar Zapdots were used to help layer at different heights. 

Another angle of the lovely Prima and Wild Orchid Craft flowers. The ironwork piece is cut with the a Spellbinders die and the stone pathway inked using a Prima Stencil. 

I layered and tucked the fussy cut pieces to frame my photo. The lovely chipboard from Gina's designs was inked, then dry brushed with gesso. The splatter was created with glimmer mist and a stiff paint brush. 

The floral image was stamped, colored with Prismacolor Watercolor Pencils, then brushed with water for the lovely watercolor effect. 

I found this charming pendant in my jewelry findings collection and backed it with an image from the Maja paper. The BoBunny crocheted flower was cut in half to tuck in above and below the photo. 

Products Used
Maja Design ~ Vintage Spring Basics ~ 1st of March, 2nd of April, 1st of May, 2nd of May, Days to Remember
Prima Flowers ~ Caboodles A, Perle Bebe, Orange Bouquet
Wild Orchid Crafts ~ Cherry Blossoms - Mixed Pinks; 20mm Open Roses - Ivory, Pale Pink; Sweetheart Blossoms - White, 2-Tone Baby Pink
Gina's Designs - Delicate Frames
Distress Ink
Clearsnap ~ Donna Salazar ~ Mix'd Media Inx
Prismacolor Watercolor Pencils
Tattered Angels Glimmer Mist ~ Cork
Golden ~ Light Molding Paste
Liquitex ~ Gesso
The Crafter's Workshop ~ Tile Texture
Prima ~ Stencils - Lace Doily #3; Pathway
Glitz ~ Clear Stamps - Distressing
Stampendous Cling Rubber Stamps - Jumbo Zinnia
Spellbinders ~ Garden Weave
Helmar ~ 450 Quick Dry Adhesive; Zapdots 1/2" Round, White
Ranger ~ Inkssentials Fine Detail Waterbrush
Tonic ~ Tim Holtz - Paper Distresser

Thanks for stopping by. I look forward to seeing your projects
inspired by the December OUAS Challenge! 

Thanks for stopping by! I treasure your comments.

~ Blessings ~

Wednesday, November 27, 2013

Thanksgiving Wishes Card for Helmar

For those of us in the US, tomorrow is Thanksgiving. I'll be spending the day at the home of one of my husband's cousins where everyone, about 50 in all, will be gathered together for a special day of family fellowship and food. All of our children will be able to make it, and it's always so wonderful to spend time with them!! 

Today I'm sharing a card I created for Thanksgiving featuring Helmar products. As you've probably figured out, my go to adhesives these days are the Helmar liquid adhesives that work so well with my mixed media style. However, when putting a card together, the Helmar Quickfix Adhesive Runner works great to make quick work of putting all the paper layers together.

"A Day of Thanks"

Tips and Techniques
I prepared my layers by trimming to size, inking the edges, and stitching. Then to adhere, I simply ran the Helmar Quickfix Adhesive Runner around the edges. There are two things I appreciate about the Helmar Quickfix Adhesive Runner. First, it is very tacky, so I don't have to worry about my project coming apart. Second, it is just adhesive - no stiff tape component, so it's easy to apply to curvy shapes as well as straight lines. 


I also used the Helmar Quickfix Adhesive Runner to adhere my strip of ribbon.

I selected flowers, a berry sprig and jewelry pendant from my stash. These heavier items were adhered with Helmar 450 Quick Dry Adhesive

I stamped and heat embossed my sentiment on white cardstock, then centered and die cut it before rubbing with several shades of ink to color. 

I also stamped and embossed the inside sentiment. Here is where I really love using the adhesive runner - to build layered frames. I cut out my sentiment, then applied the adhesive runner to adhere to the darker cardstock and used a transparent ruler and craft knife to trim the mat for perfectly even edges. 

Before adhering my layers, I created the swirling leaf design on the top layer by dry embossing the grungy fall color paper. I then sanded the raised edges to expose the white paper core. 

Thanks for dropping by today to check out my project.
I hope you've been inspired to create!! 

Helmar Products:

Other Products:
BoBunny Vintage Double Dot - Buttercup (Thank you Juliana!)
We R Memory Keepers - Black Widow Collection
Brown Cardstock
BoBunny Blossoms - Wildberry Daisy (Thank you, Juliana!)
Petaloo Darjeeling Mini Mix
Cappuccino Satin with Grosgrain Edges ~ Really Reasonable Ribbon
Tonal Duets - Pendant
Creative Imaginations Clear Stamps - Thankful
Darice Embossing Folder - Fall Leaf
Ranger Distress Ink - Vintage Photo, Wild Honey
Clearsnap ~ Donna Salazar - Mixed Media Inx: Leather
Clearsnap ~ Donna Salazar - Mixed Media Inx Embossing Powder: Leather
Clearsnap ~ Donna Salazar - Mixed Media Inx CHOX: Sparrow
Spellbinders ~ Decorative Labels Twenty-Two
Sizzix - Big Shot
Core-dinations - Sanding Block
Tim Holtz - Grid Blocks
Sewing Machine

I'd like to give special thanks to Juliana Michaels for her gift of BoBunny goodies!!
If you'd like to see some of her amazing work stop by her blog:

Thanks for stopping by! I treasure your comments.
~ Blessings ~