Monday, February 28, 2022

Grungy Layered Butterfly Card for Amazing Paper Grace

Welcome to my creative space!

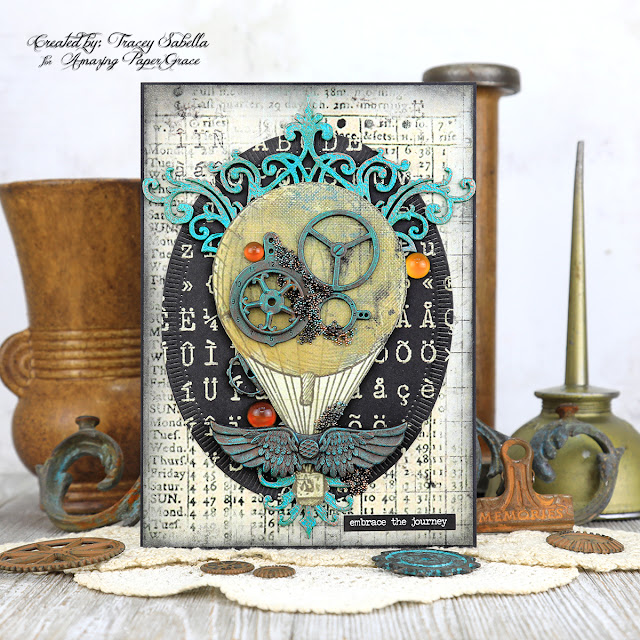
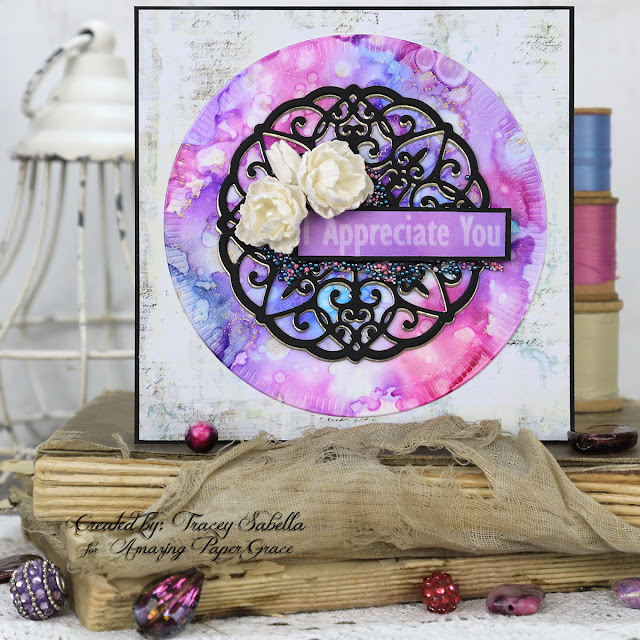
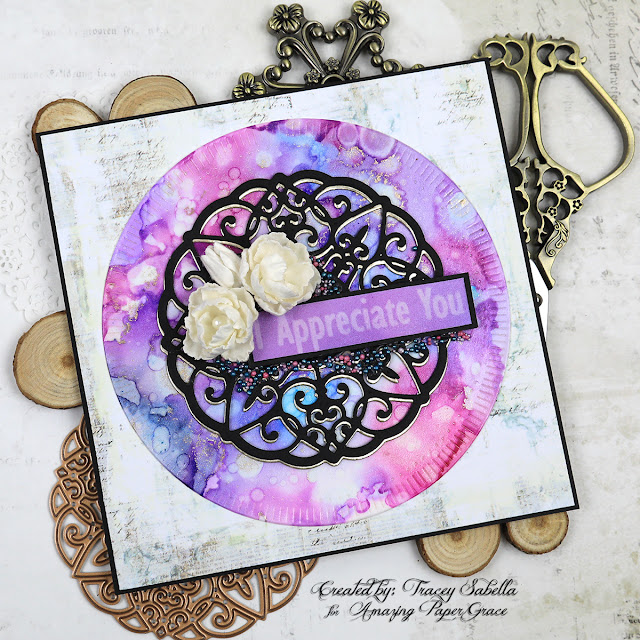
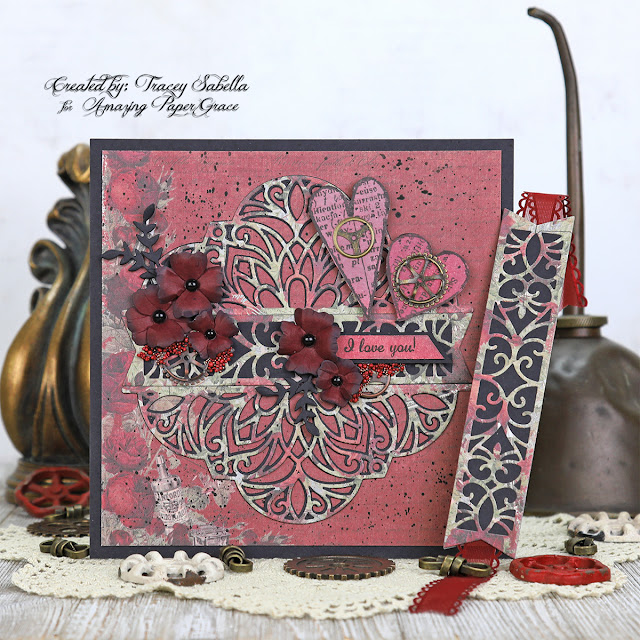
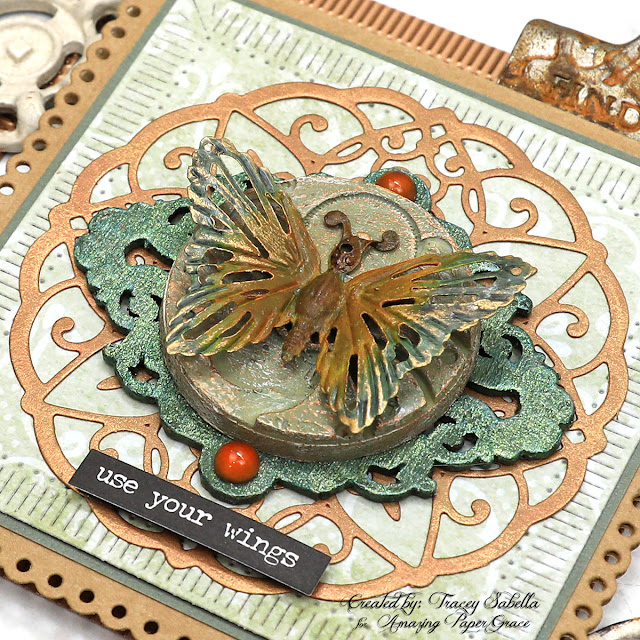
Spring is just around the corner. I'm looking forward to beautiful butterflies fluttering across our property, so I was inspired to created a grungy layered butterfly card to share with you featuring the fabulous Amazing Paper Grace Fluted Classics Squares die set (S4-1151). These fluted edges look so fabulous with grungy creations that I just couldn't help creating another one with this collection! The medium die in this set pairs perfectly with this base and medallion from the Scalloped Symphony Notecard set (S6-177). The layers include a painted metal butterfly, resin machine cog, and chipboard ironwork piece atop the die cut medallion and fluted background. Be sure to scroll down for close-ups and more details.

Tips and Techniques
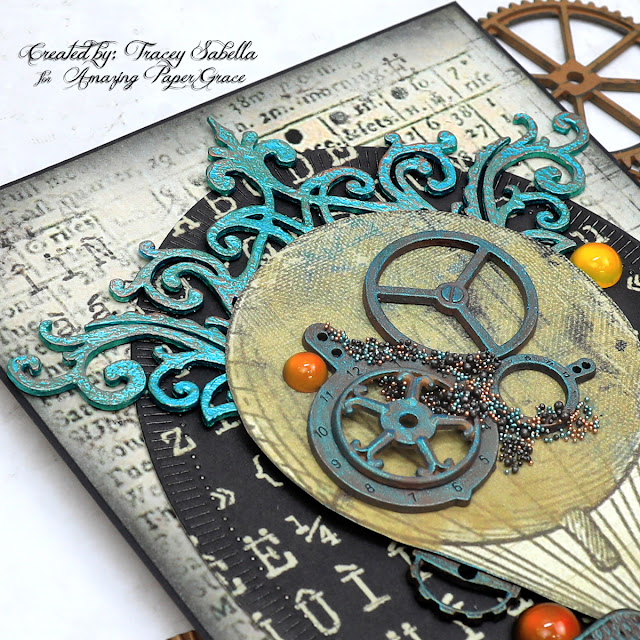
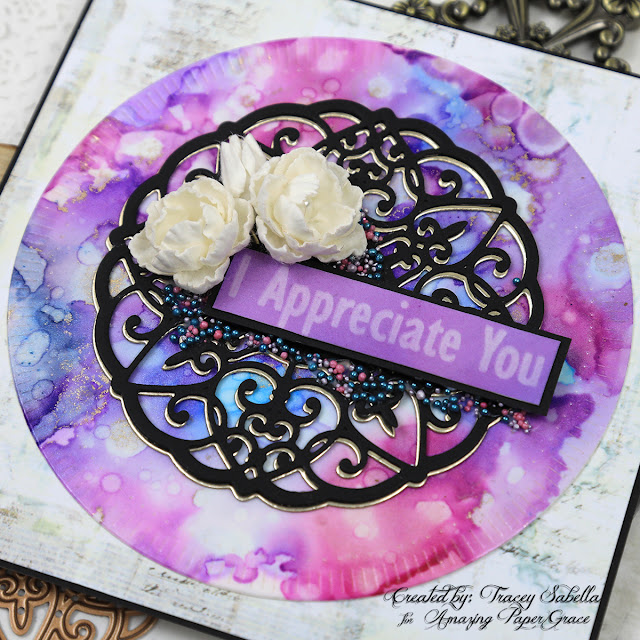
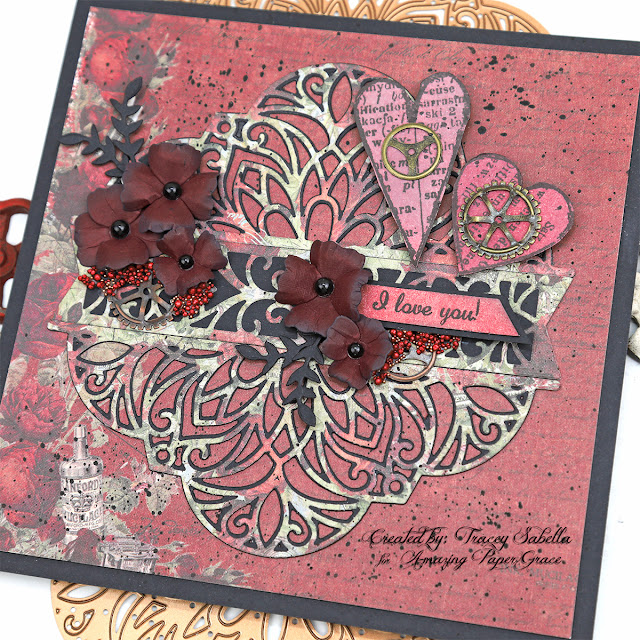
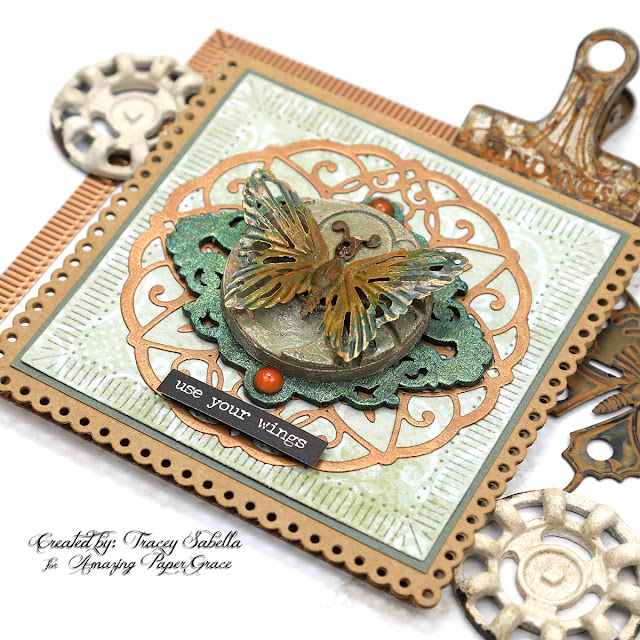
When I think of Becca's Amazing Paper Grace designs, I think elegant and sweet, but you can see how perfectly these die sets can also work with my grungy mixed media style as well. The medallion and base are cut from kraft cardstock and the scrolled medallion is brushed with aged brass and copper art wax to give it a metallic shimmer.

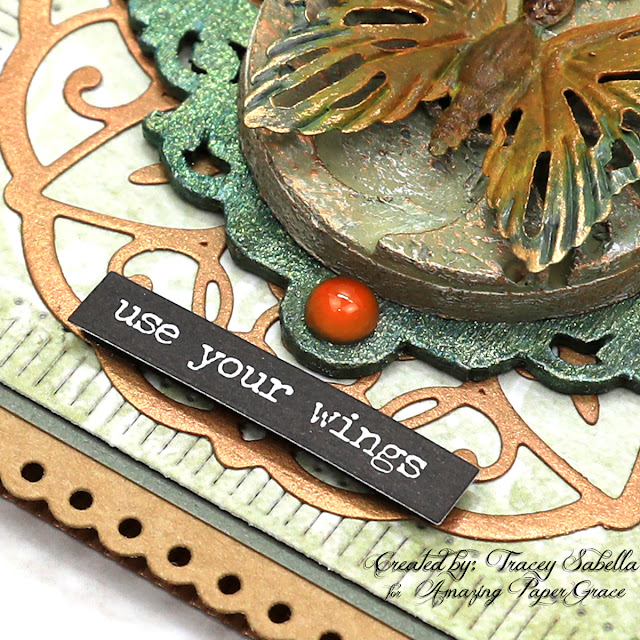
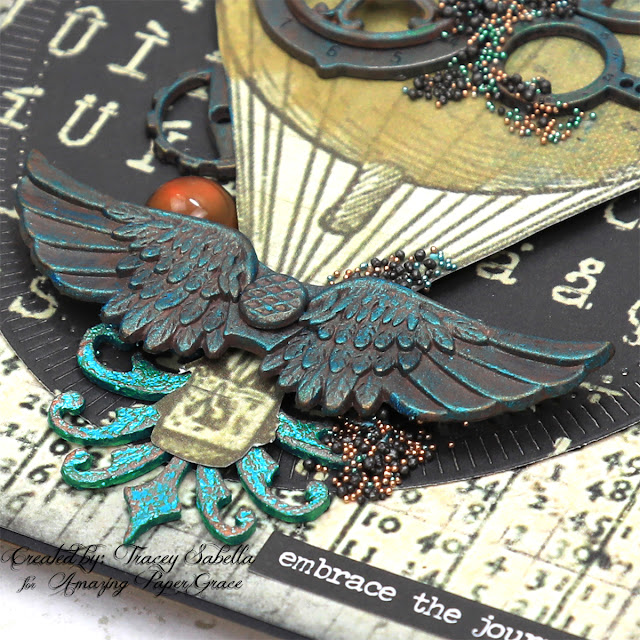
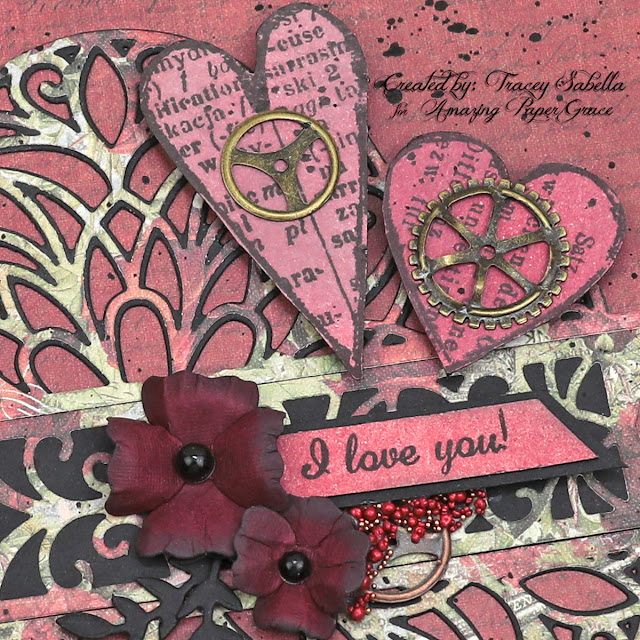
Just look at the amazing detail in these scalloped and fluted edges, and this medallion is perfect to alter for a metallic layer. A couple baubles are added to accent the coppery color.  I thought this sentiment from the Tim Holtz Small Talk set popped up on foam tape was perfect for this card.

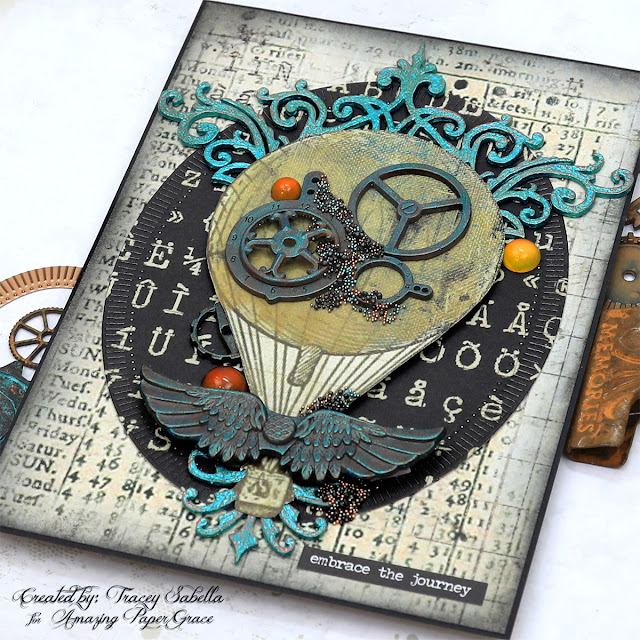
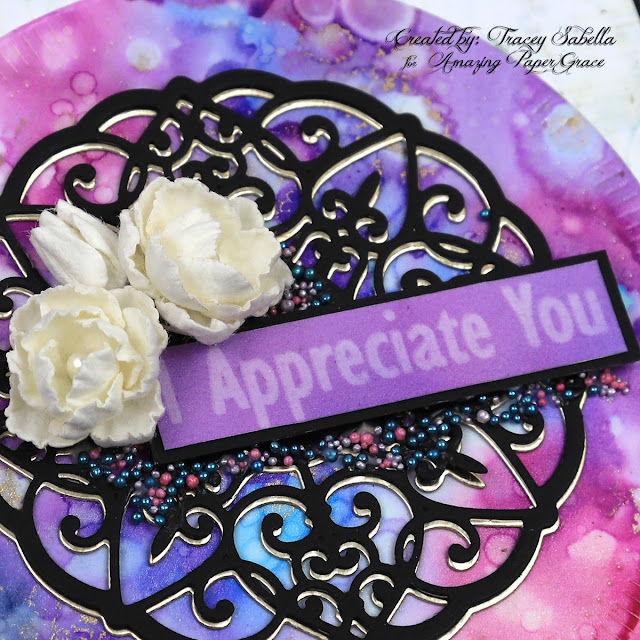
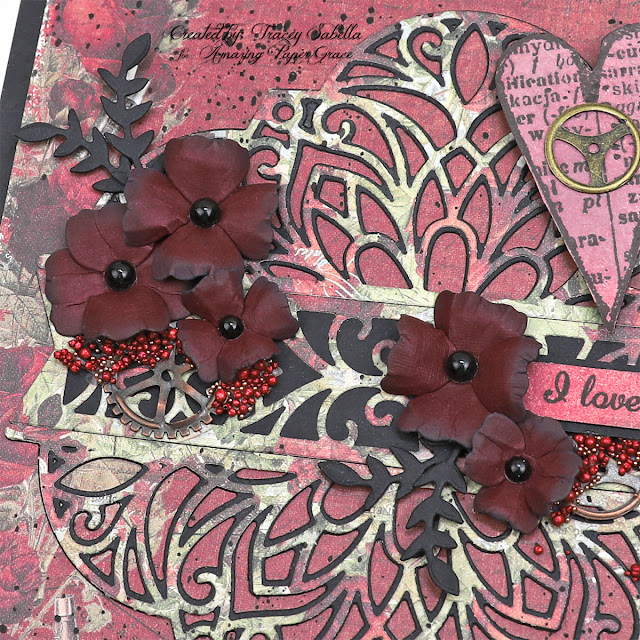
Here you can see the beautiful interplay of the layers. Over the die cut medallion is an ironwork chipboard shape that I painted with shimmery mica filled paint, then atop that is a resin machine cog that's painted with impasto paints, then rubbed with brass and copper art wax to highlight the textures and details. Then the feature piece is this gorgeous metal butterfly that I painted with liquid acrylics. I realized after putting everything together that the butterfly got a little lost above the green ironwork piece which was similar in color. That was an easy fix by highlighting the wing edges with a bit more of the metallic art wax to give a nice contrast. Those details really can make a difference.

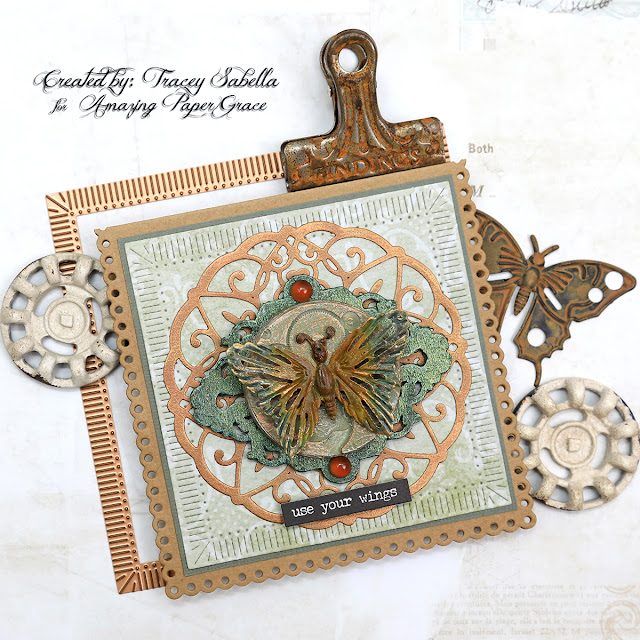
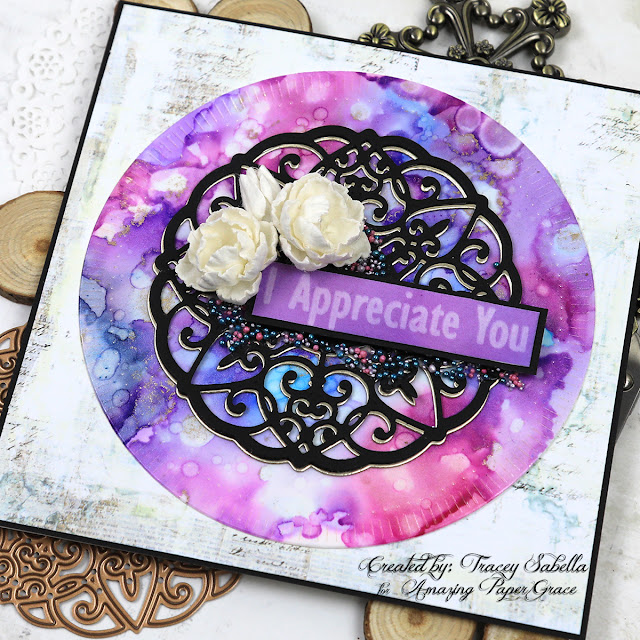
Here's one final view. Don't you just adore this mix of beautiful die cut layers and grungy painted pieces? 

Amazing Paper Grace Die Sets:

Paper: 
  • Tim Holtz with Idea-ology: Wallflower
  • Cardstock ~ Kraft

Mixed Media:
  • Finnabair with Prima Marketing ~ Impasto Paint: Burlap; Victorian Green; Lemon Peel
  • Finnabair with Prima Marketing ~ Liquid Acrylic: Avocado Green; Burnt Sienna; Tiger Orange; Emerald
  • Finnabair with Prima Marketing ~ Metallique Wax: Rich Copper; Aged Brass
  • Finnabair with Prima Marketing ~ Sparks Acrylic Paint: Green Goblin
  • Finnabair with Prima Marketing ~ Mould - Cogs and Wings
  • Amazing Casting Resin ~ White
  • Liquitex ~ Gesso, White

Embellishments:
  • Finnabair with Prima Marketing ~ Mechanicals - Grungy Butterflies
  • Finnabair with Prima Marketing ~ Melange Art Pebbles - Vintage
  • Blue Fern Studios ~ Chipboard: Ironwork Accents

Adhesives:
  • Double Sided Tape ~ 1/4" 
  • Beacon ~ 3-IN-1 Advanced Craft Glue
  • Beacon ~ Fabri-Tac
  • Tombo ~ Mono MULTI Liquid Glue
  • Scrapbook Adhesives by 3L ~ Crafty Foam Tape - Black
Tools:
  • Spellbinders ~ Platinum 6


Thanks for stopping by! I treasure your comments.

~ Blessings ~

Monday, February 21, 2022

"Embrace the Journey" Steampunk Card for Amazing Paper Grace

 Welcome to my creative space!

I simply adore the Amazing Paper Grace Fluted Classics die collection designed by Becca Feeken. Here I'm featuring the Fluted Classics Ovals set (S5-474). As soon as I saw these dies, I just knew the fluted design would work so perfectly in the steampunk style. What do you think?

My husband has a birthday coming up, so I created this card for him in a more masculine style, but I know a lot of gals who would simply adore this as well. The "embrace the journey" sentiment allows this card to be used for many occasions from birthdays to graduations, or anyone moving into a new phase of life. 

I wanted some nice contrasts so I used the largest fluted oval die to cut a dark panel to go behind the lighter hot air balloon so it pops and then cut a 5x7" panel in a lighter color trimmed with a sliver of a frame in black. Be sure to scroll through these photos for all the details on how I created this classic steampunk card.

Tips and Techniques
Just look how gorgeous these fluted edges look with the steampunk design! I fussy cut this hot air balloon from a paper in the older Prima Romance Novel collection and embellished it with gears and mechanical pieces to give it that steampunk feel. Any vintage hot air balloon can be transformed into a steampunk beauty by adding a few gears! The metal pieces were in different metals (silver, brass, copper) from a couple different manufactures, so I used art waxes to color them and give a cohesive feel. A few prills and microbeads in black and copper tie everything together with grungy texture. A few baubles add a nice touch of coppery color.

I cut apart an ornate corner chipboard piece to tuck in above and below the balloon, It's brushed with white gesso (to make the next color which is a little translucent be true to color and not muddied by the natural chipboard color), then metallic peacock paint. Finally I added patina by rubbing it with touches of brass and copper art wax.

These metal steampunk wings are also colored with art waxes and a screw brad placed into the center. You can see more of those fabulous fluted edges behind the wings. 

This gorgeous bit of chipboard was too fabulous to be hidden behind the balloon, so I snipped it off and placed it behind the basket to help draw your eye across the card with more of this rich patina at the bottom.


One final look. You can see how the contrasting layers work beautifully together to make all the steampunk details pop. While a simple oval might have worked for the dark center piece, the fluted edges from this fabulous die give a perfect steampunk edge to this layer.

Amazing Paper Grace Dies:

Paper:
  • Prima Marketing ~ Romance Novel Collection
  • Cardstock ~ Black

Ink:
  • Ranger ~ Distress Ink: Black Soot

Mixed Media:
  • Finnabair with Prima Marketing ~ Metallic Wax: Peacock; Copper; Bronze Age
  • Finnabair with Prima Marketing ~ Matte Wax: Patina Green; Rusty Red; Rusty Brown
  • Finnabair with Prima Marketing ~Soft Matte Gel 
  • DecoArt ~ Dazzling Metallics: Peacock Pearl
  • Liquitex ~ Gesso, White

Embellishments:
  • Finnabair with Prima Marketing ~ Mini Brads - Screws
  • Finnabair with Prima Marketing ~ Mechanicals: Winged; Machine Parts
  • Finnabair with Prima Marketing ~ Melange Art Pebbles: Vintage
  • Tim Holtz with Idea-ology ~ Clipping Stickers
  • 7gypsies ~ Gears - Industrial
  • Chipboard ~ Ornate Corner
  • Finnabair with Prima Marketing ~ Microbeads: Copper
  • Martha Stewart Crafts ~ Microbeads: Apatite
  • US Artiest ~ Prills - Power Outage

Adhesives:
  • Double Sided Tape ~ 1/4" 
  • Beacon ~ 3-IN-1 Advanced Craft Glue
  • Beacon ~ Fabri-Tac
  • Tombo ~ Mono MULTI Liquid Glue
  • Foam Tape ~ 1 inch

Tools:
  • Spellbinders ~ Platinum 6


Thanks for stopping by! I treasure your comments.

~ Blessings ~

Monday, February 14, 2022

Appreciation Card with Tutorial Link for Alcohol Pearls with Lift-Ink on Vellum


Welcome to my creative space!

I have adored working with alcohol inks for many years, but don't get them out as often as I used to. Alcohol pearls and inks are trending right now, so I thought I'd pull them out and try a new technique by using Alcohol Pearls with Vellum. I just adore the way this combination turned out to use as a gorgeous background to die cut with Amazing Paper Fluted Classics Circles (S4-1150).  I took things a step further by using this same technique with Alcohol Lift-Ink to stamp a lovely sentiment with the Just a Note Sentiments Tag Clear Stamp & Die Set (SDS-169) from the Sweet Serenade Collection.

You can find the full tutorial for using alcohol pearls and Lift-Ink using vellum exclusively in the Amazing Paper Grace Creative - Creative Encouragement Community Facebook Group.

This lovely group includes exclusive tutorial content. I share a mixed media tutorial there on the 13th of each month. The tutorial for this project includes a detailed step by step photo tutorial teaching you how to create this one of a kind patterned paper for your projects. If you're not a part of this fabulous and encouraging group you can join HERE.

To accent this beautiful alcohol pearl background, I wanted a strong contrast, so die cut the  beautiful medallion from black using the Scalloped Symphony Notecard set (S6-177) and created a shadow with gold. The gorgeous flowers are die cut from soft, textured mulberry paper using the Candlewick Rosebud Dies (S4-1015).

Thank you Amazing Paper Grace for providing the dies used in this project.

Close-Ups
Here you can see the how the vellum alcohol pearl background die cut beautifully with the fluted edges.

The Alcohol Lift-Ink created a beautiful sentiment. These flowers using the Candlewick Rosebud dies are so beautiful cut from mulberry paper. I like having a few handcrafted flowers on hand to use on projects, so I die cut a bunch of these blossoms in the smallest size, then sat down and formed a pile of roses and buds while watching some television. That made it quick and easy to finish off this lovely card with beautiful blossoms.

The black provides a beautiful contrast to the bold alcohol pearls. It doesn't photograph well, but there is so much pearlescent shimmer in the alcohol pearled background.

One final shot of this sweet card.

Amazing Paper Grace Dies and Stamps

Other Supplies:

Paper:
  • Vellum
  • Prima Marketing ~ Epiphany 6x6" Paper Pad
  • Tim Holtz with Idea-ology ~ Kraft-Stock Metallic 3, Champagne
  • Mulberry Paper ~ Cream

Ink:
  • Tim Holtz with Ranger ~ Alcohol Pearls: Intrigue; Tranquil; Celestial; Villainous
  • Tim Holtz with Ranger ~ Alcohol Lift-Ink
  • Tim Holtz with Ranger ~ Alcohol Blending Solution
  • Jacquard ~ Alcohol Ink - Piñata: Brass

Embellishments:
  • Large Stamen (for flower centers)

Mixed Media:

Adhesives:
  • Scrapbook Adhesives by 3L ~ Crafty Foam Tape - Black
  • Beacon ~ 3-IN-1 Advanced Craft Glue
  • Beacon ~ Fabri-Tac
  • Scotch ~ Quick Dry Adhesive
  • Tombo ~ Mono MULTI Liquid Glue
  • Double Sided Tape ~ 1/4" 

Tools:
  • Tim Holtz with Ranger ~ Alcohol Ink Air Blower
  • Spellbinders ~ Platinum 6
When purchasing from Little Birdie Crafts HERE
Use code TRACEY05 for a 5% discount.
I receive a small commission at no cost to you.

Thank you Little Birdie for providing some of the supplies used for this project.


Thanks for stopping by! I treasure your comments.

~ Blessings ~

Monday, February 7, 2022

"Let's Party" Birthday Card for Amazing Paper Grace

Welcome to my creative space!

Our sweet little granddaughter is turning five already. She's enamored by huge animals like dinosaurs, crocodiles, and hippos, so I just couldn't resist pulling out this fun paper with an adorable birthday croc. She's also quite girly, so I'm featuring flowers die cut with the beautiful Amazing Paper Grace Cinch and Go Blossoms set (S4-1163) from the Classically Becca Collection. These beautiful blossoms add a sweet feminine touch that works so well with this darling clean and simple birthday card.

To add texture to the layers, I die cut the green and red cardstock frames using the Fluted Classics Rectangles Dies (S5-475) from the Fluted Classics Collection

When I think of Becca's Amazing Paper Grace designs, I picture elegant feminine grace. If you've been following my work with her dies, you have seen some of her designs take on a more grungy and shabby chic feel. Today I'm taking yet another twist to show you how perfect they can be for a clean and simple card for a child. There are so many amazing ways to use these fabulous dies!

I appreciate all styles of paper crafting and while I don't typically create in the clean and simple style, it just seemed right to create a darling birthday card for our granddaughter.

Tips and Techniques
Here's a close-up of these sweet blossoms. They're die cut from red cardstock, then shaped. I've used two sets of petals for each blossom. Each one is centered with a green flatback pearl and the two larger flowers also have stamen die cut from green cardstock. This beautiful die set includes these two styles of flowers in a variety of sizes including these tiny blossoms. 

The green and red layers framing the focal image are die cut with Fluted Classics Rectangles Dies. Don't you think this fluted design is a perfect complement to the fun birthday croc image?

The balloons and flower embellished gift are popped up with foam squares and foam tape. The numeral 5 was a white cardstock sticker that I colored with a black marker to pop against the colorful bunch of balloons.

The dots and slits in this fluted die cut design allow you to see through to the next layer just a tiny bit, so I backed the red layer with a sheet of black cardstock to give a shadowed effect to the design, rather than a hint of bright white used for the card base. 

Amazing Paper Grace Dies:

Paper:
Jillibean Soup ~ Souper Celebration
Cardstock: Green; Red

Ink:
Faber Castell ~ Pitt Artist Pen - Big Brush, Black

Embellishments:
Jillibean Soup ~ Souper Celebration - Label Stickers
Jillibean Soup  ~ Souper Celebration - Pea Pods Die Cut Embellishments
Flatback Pearls: Green

Adhesives:
Scrapbook Adhesives by 3L ~ 3D Foam Squares
Double Sided Tape ~ 1/4" 
Scotch ~ Quick Dry Adhesive
Beacon ~ 3-IN-1 Advanced Craft Glue
Beacon ~ Fabri-Tac
Tombow ~ Mono MULTI Liquid Glue
Foam Tape ~ 1/4"

Tools:
Spellbinders ~ Platinum 6


Thanks for stopping by! I treasure your comments.

~ Blessings ~

Friday, February 4, 2022

Amazing Paper Grace February Die of the Month - Marvelous Medallion

Welcome to my creative space!

Love is in the air with this dramatic Valentine featuring the fabulous Amazing Paper Grace February Die of the Month: Marvelous Medallion. Valentine's Day is just around the corner so I couldn't resist pulling out beautiful reds and florals to create a Valentine with touches of steampunk by adding grungy hearts and gears with splashes of black to give this delicate die set a bit of a masculine feel. I've paired it with a sweet bookmark. I realize many people now read ebooks; however, bound books are precious in our home, and I don't want to chance any ink transferring to the pages, so there's no ink or texture on this double-sided bookmark.

Many thanks to Amazing Paper Grace for providing the dies used in this project!


Steampunk Valentine Card

Bookmark

Tips and Techniques
I just adore the sweet flower and foliage dies that Becca includes in her Amazing Paper Grace Die of the Month sets. I kept these simple since I was going for a more grungy effect. The blossoms are die cut from coordinating red cardstock, inked, then shaped. There are two sets of petals for each blossom that are adhered together with a black pearl in the center. The foliage is cut from black cardstock.

There are three dies to cut this gorgeous background so it is easy to layer with the shadow piece. The center piece is cut with two dies. I chose to include a black background layer to this center to provide contrast. There are so many creative ways to combine these beautiful die cuts. I abutted the three pieces together to create one continuous background piece.

I stamped two grungy text-filled hearts and fussy cut them to embellish my Valentine. If you don't have this type of stamp, you could draw a grungy heart outline and fill it with a text stamp, then fussy cut to get a similar embellishment. I layered gears onto the hearts as well as tucking in a few around the flowers. Around the clusters. Prills and microbeads are also addedfor grungy texture. I brushed soft gel medium around the flowers then sprinkled on the wine color Prills followed by a few copper microbeads.

I wasn't sure the stamped images would show up against the red focal paper since it already had black script across it, so I inked some white cardstock to coordinate, then stamped the hearts and sentiment on the inked paper.

I spattered on some black ink to enhance the grungy feel. I covered the sentiment with a small piece of scrap cardstock, then let the spatter fall over the rest of the card, especially in the red area outside of the die cut. I dip a long bristle liner brush into the ink, then tap it over the card to get the spatters.

I used patterned paper from a 6x6" pad, so cut 3/8" off of the top and right the side (with less patterning) and layered onto a 6x6" piece of black cardstock to frame the card.

To create the bookmark, I die cut two solid black pieces and two of the patterned intricate pieces. I applied glue to the backs of the solid pieces, then laid the ribbon down the center before sandwiching the two pieces together. Once set, I adhered a scrolled die cut to each side. 

Supplies:
Accessories:

Paper:
  • Prima Marketing ~ Stationer's Desk - 6x6" Paper Pad
  • Cardstock; Black, Dark Red; White

Stamps:
  • Finabair with Prima Marketing ~ Cling Stamps; Trust the Magic; Now Is the Right Time
  • Close to My Heart ~ Just to Say... 

Ink:
  • Versafine ~ Onyx Black Ink
  • Ranger ~ Distress Ink: Aged Mahogany; Fired Brick; Hickory Smoke
  • Ranger ~ Distress Oxide Ink: Black Soot

Embellishments:
  • The Paper Studio ~ Spare Parts - Gears
  • Queen & Co. ~ Pearls - Nightfall
  • Ribbon, Red

Mixed Media:
  • US ArtQuest ~ Mini Prills - Stop Wining
  • Finnabair with Prima Marketing ~ Microbeads - Copper
  • Finnabair with Prima Marketing ~ Soft Matte Gel
  • Higgins ~ Drawing Ink - Black

Adhesives:
  • Scrapbook Adhesives by 3L ~ Crafty Foam Tape, White
  • Double Sided Tape ~ 1/4" 
  • Scotch ~ Quick Dry Adhesive
  • Beacon ~ 3-IN-1 Advanced Craft Glue
  • Beacon ~ Fabri-Tac

Tools:
  • Spellbinders ~ Platinum 6
For more Marvelous Medallion Inspiration from the Creative Team:

Visit each blog linked below for their take on creative paper crafting ideas with Marvelous Medallion, the Amazing Paper Grace February 2022 Die of the Month!

Visit Kate Skonieczna
Visit Joanna Wisniewska
Visit Patricia Manhire
Visit Agnieszka Posluszny
Visit Elena Olinevich
Visit Anita Kejriwal
Visit Katarzyna Bobrowska
Visit Tracey Sabella <<That's me>>
Visit Robin Clendenning
Visit Rajni Chawla

The Amazing Paper Grace Die of the Month is available exclusively at Spellbinders Paper Arts during February 2022, Marvelous Medallion along with other membership perks.

For more information be sure to view this month’s
Amazing Paper Grace Die of the Month video:

I would adore hearing from you! Please leave a comment below letting me know how you will use these gorgeous dies!


Thanks for stopping by! I treasure your comments.

~ Blessings ~