Wednesday, September 28, 2011

Beautiful Memories ~ The Scraping Stamper September Reveal

I combined the September Scrapping Stamper Sketch with the Bird is the Word challenge to use the word "memory" for this LO of my parents taken at Biltmore Gardens in NC. (Click on photo and then click again to enlarge.)


Shannon is offering a new opportunity this month. If you created a LO using this sketch before the October 15 Sketch Reveal you can link it up on her site to share with her followers.

Techniques:
1) Alcohol Ink
Alcohol Ink is a great tool to modify your stash to coordinate with your layout. I took rhinestones and chandelier beads in different shades of light purples and applied alcohol ink to give them the same bright fuchsia color. Since none of my alcohol inks were the color I wanted, I put a drop each of two different colors on my nonstick craft mat and mixed them with a very fine tip paint brush, then "painted" the alcohol ink onto the rhinestones. I also used alcohol ink to color the wire coil and wires holding the chandelier beads. It can be used on any NONporous surface.

2) Beads
Don't overlook the jewelry section of your craft store. The oval beads and chandelier beads came from the jewelry section.

3) Craft Wire
I have been using craft wire more these days. The oval beads were connected using a fine craft wire and then the ends wrapped around a slim metal bar (for making jewelry coils) to secure the ends.

4) Glitter Letters
Glitter paper can be hard to cut on a Cricut or other cutting machine. For my "glitter": paper title letters, I cut them from cardstock weight pattern paper, then ran them through my Xron to apply adhesive the the back and finished up by using a fine tip paint brush to apply stickles. Stickles that have been painted on in a thin layer dry much faster than dots of stickles. The letters look like they have been cut from glitter paper. I also brushed some stickles across the butterfly wings for some extra shimmer.

5) Scalloped Photo Mat
This technique is inspired by the work of Gabrielle Pollacco. Simply cut your mat using scalloped deco scissors and put a dot of white ink in each scallop.

6) Cutting Lace
I like to cut lace on the pattern repeat and to keep it from unraveling, I put a tiny drop of Ranger Glossy Accents where I plan to cut and rub it into the fabric, give it a couple minutes to dry, then cut. Fray check would work as well, but while I don't keep this product in my scrappy supplies, I always have some Glossy Accents on hand, which has worked pretty well for me so far.

7) Misting
I mentioned in my last post how to back your pp onto chipboard before misting and to dry between each spritz. I did a lot more misting on this LO, and with this technique, and it did not warp at all. This is the first time I have misted this much without getting any warping.

Paper:
Die Cut ~ MME ~ Portobello Road "Boy" Dapper Dots (Scrap-Friendzy June Kit)
K & Company ~ Brenda Walton - Celest Paper Pad
Bo Bunny ~ Gabrielle Dot

Scrap-Friendzy June Kit Embellishments:
Cream Ribbon Flowers
Brad Flower Center
Burlap
Vintage Lace

Other Embellishments:
Fabric Flower Petals ~ Stash
Rhinestones ~ Stash
PLAID Inspired Classics Jewelry Collection ~ Charms, Pink Gem Drops (Chandelier Beads)
Darice ~ Flat Oval Bead Strand - Iced Lilac 12x9 mm

Technique Products:
Ranger Distress Ink ~ Faded Jeans, Broken China, Pumice Stone, Black Soot, Forest Moss, Frayed Burlap
Ranger Alcohol Ink ~ Purple Twilight, Raspberry, Pink Sherbet, Wild Plumb
Ranger Stickles ~ Black diamond, Paina, Mermaid
Tattered Angels Glimmer Mist
Sakura Gelly Roll Glaze Pen ~ White
Darice ~ 24 guage craft wire

Tools:
Tonic Studios Paper distresser
In Stitchz ~ Piercing Tool
Jellyka Delicious Cake Font
Cricut

If anyone knows how I can make my photos larger using this new blogger interface, I'd appreciate the help. I selected large, but I used the extra large size before and don't see that as an option now. ~ Thanks so much!!

Special Request. ~ My sweet and talented friend, Susie, is looking for a few more followers to push her over the 100 mark for a DT requirement where she would like to apply. You would be doing me a wonderful favor if you would hop over there and let her know I sent you to be a new follower.

Thanks for stopping by my blog. I treasure your comments!

~ Blessings ~

Thursday, September 15, 2011

ScrapFIT & Sketchy Thursday Blog Hop ~ My Sister My Friend ~ ScrapFIT Workout #52 Reveal

Welcome to the ScrapFIT & Sketchy Thursday Blog Hop!  

We have joined up with Sketchy Thursday this week to offer you a Workout with a sketchy twist!  

Here is my example combining the fabulous Sketchy Thursdays Sketch with the fun ScrapFIT Workout #52.

My Sister My Friend:


I hope you've been inspired to create a project, so here are the details:

You'll need to use this sketch from Sketchy Thursday:


combined with our ScrapFIT Workout #52 - F is for Friendship -Friends are the family members we pick out by hand. Let's dedicate this weeks layout to a special friend(s).  

Since this is a special joint Workout there are a few prizes up for grabs!  

You can win this Halloween kit full of goodies from our ScrapFIT sponsor, Paper Issues, by linking your layout to the Mr Linky on the ScrapFIT blog.


Be sure to visit each of the FITgirls blogs and comment on their Workouts because one lucky random winner that leaves a comment on every FITgirls blog will be get this prize kit! 


You can get to each girl's blog by clicking on their photo at ScrapFIT.  

Once you do that be sure to head on over to Sketchy Thursday for a chance at winning a prize from their sponsor and another chance at a prize by commenting on their Design Team blogs! 

This Workout (#52) will end on Wednesday 9/21 (this is earlier than our normal end of the month project completion date), and the winners will be announced on Thursday 9/22. We hope you will play along and remember you still have until the end of the month to play along with Workout #51.  

Now for some project details.

Techniques:
1) Flowers:

I took a sheet of coordinating paper with glitter embossed flowers in various sizes and fussy cut out the flowers. For the dimensional flowers, I inked the edges of each flower. (Because the flowers were embossed the ink only showed on the cut edges. Using a darker ink gave extra dimension.) I curled the petals around a toothpick and skewer to shape before adhering the layers together with adhesive dots, then placed a pearl in the center of each flower. The flat flowers were inked and cut, but not curled or layered.

2) Stitching: 
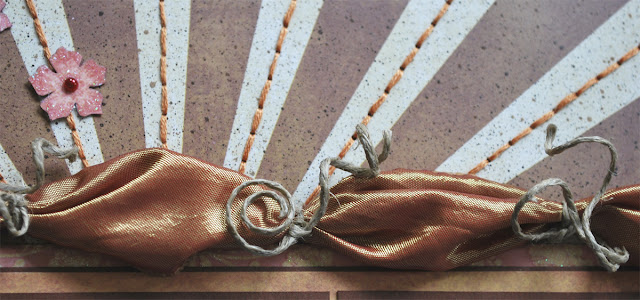
I used the Tim Holtz ruler to pierce holes spaced 1/4 inch apart down the center of each of the lighter color rays for stitching. I wanted a heavier stitching line than I usually use, so I used 6 strands of embroidery floss in place of the 2 strands I generally use. 

3) Ribbon: 

I received this ribbon wrapped around a gift. After removing the edge wires, I tied a length of jute around the ribbon every couple inches, wrapping the ends of the ribbon around to the back of the page. To curl the jute, I wrapped each end around a small metal bar pressing on it with my fingers for about 30 seconds or so until it was set into the curl shape. 

4) Leaves: 
The Martha Stewart rose leaf punch makes sweet little leaves. After punching the leaves from pale green card stock, I rubbed them with distress ink to get the color I wanted. I then folded the leaf in half lengthwise, where the natural vein would be in a leaf. Then I scrunched up each side where the smaller veins would be. Once I had the creases where I wanted them, I inked again in a darker green so the "veins" would be more visible.

5) Wire Mesh: 
The wavy mesh on the tag is some wire mesh tubing I purchased in the jewelry department. It is a very fine woven wire that holds the shape I molded with my fingers. I attached it with double sided tape (the red backed type).

6) Journaling: 
If you are hesitant to use your own handwriting, I learned this tip from my scrappy friend, Tiffany ~ use pencil with a light hand to write your journaling, then when you're happy with the way it looks, go over it with a fine tip marker. This has made such a big difference for me. For my title, I found a font I liked and used it as a guide to write it out, the rest of the journaling is in my own hand.

7) Punched Border:
When punching a 12 inch border, it does not automatically come out equally spaced on the ends, so I punch the border on a scrap to figure out where I need to start so the spacing will come out the same on both ends before punching the border on my project paper.

8) Misting:
I have always liked the look of misting, but not how it warps the paper. To reduce or even eliminate warping, spray a 12 x 12 or slightly larger piece of chipboard with temporary spray adhesive. (The back cardboard from a paper stack works perfectly for this.) Once the adhesive is dry, place your project paper on the chipboard (right side up). Mist in light coats, allowing to dry between each misting. If you want more intense color, used several light mistings, being sure to dry between each spritz. (If you are impatient like me, you can use a light hand with the heat tool to dry it faster. Don't get too close with the heat tool, as this can also warp your paper.) One you are done misting, and your project is completely dry, you can carefully remove it from the chipboard backing. 

9) Stamping:
You have probably discovered that Distress Ink does not create a crisp stamped image when using clear stamps. However, when I'm using a grungy stamp like the Forever Friends image in this layout, I didn't want a perfect, crisp image and the distress ink provided the type of image I was looking for. When in doubt, try it out on a scrap with a similar texture to your project paper.


Paper
DCWV ~ The Rustic Stack
Bazzill Smoothies ~ Chocolate Cream
Green CS ~ Scrap From Stash

Embellishments
US Art Quest ~ Mica Tiles, Medium
Vaessen Creative (Darice) ~ Mesh Ribbon, 6 mm Chestnut
Want 2 Scrap ~ Say it with Pearls - Red
Ribbon ~ From Stash
Jute ~ From Stash

Technique Products
7gypsies Clear Stamps ~ Ink - Friends
Tombo ABT #757, #993, #N15
Zig Millenium Marker ~ Pure Brown
Color Box Chalk Ink ~ Chestnut Roan
Distress Ink ~ Walnut Stain, Bundled Sage, Pine Needles
Smooch Spritz ~ Log Cabin
Glimmer Mist ~ Simply Khaki
DMC Embroidery Floss ~ #3776
Wire Leaf Stems ~ From Stash

Tools
EK Sucess ~ Honey Bee Scissors
EK Success Punch ~ Morocco Lace Edger
Martha Stewart Punch ~ Rose Leaf

Don't forget, over at Scrap-Freindzy, It's Design Star Month. Come join us for a month of fun design related challenges. I completed this LO for Kathy's Inquiring Minds journal challenge.

I've entered this at Paper Compulsions Link Up Party. Hop on over there to Show and Tell one of you projects.

Thanks for joining our Blog Hop and stopping by my blog. I treasure your comments.

~ Blessings ~

Friday, September 2, 2011

True Love ~ ScrapFIT Reveal

We have a new daughter in our family. Joseph recently asked Rachel to be his bride. I created this layout with one of their engagement photos for ScrapFIT Workout #51 Salt and Pepper.


Workout #51 Salt & Pepper
It's time to show some Salt & Pepper on your layout or card!  By this I mean Black & White as your main colors. You can use all ranges of Black & White and only 1 other color (in as many hues as you want).  Do you like a little salt or are more of a pepper fan – lets see your tastes!

Look at the gorgeous prize being sponsered by ScrapFIT for this challenge:


I hope I've inspired you to workout with us and create your own project for this challenge. You have until Setptember 30 to link your project to Mr. Linky at the bottom of the Workout #51 post at ScrapFIT for a chance to win.

I want to let you in on a little secret. Be sure to stop by ScrapFIT on September 15 to see an extra special twist on our Workout #52. I'm so excited and hope you will be too!

Be sure to head on over to ScrapFIT and check out the inspiring work by the DT.

Techniques:
1) Masking:
To create a mask template, I cut a ring of cardstock and punched the inside edge with a corner punch all the way around. Don't worry if it doesn't match perfectly at the end, since you can cover that spot with some kind of embellishment. Spray the back with temporary adhesive and place on the background paper. Use a foam applicator to rub distress ink of your choice across both sides being sure to cover all of the design as well, then remove the mask. It can be saved for another project.

2) Stitching:
Mark a stitching pattern around the outside edge of the masked circle. Pierce stitching holes, then stitch with 2 strands of embroidery floss.

3) Stamping:
I used a darker green distress ink across the top using Bo Bunny stamps. Under the special day sticker and the scroll box around "True Love"I used 7 Gypsies stamps using the same ink for my stamping that I used for the masking.

4) Flowers:
I cut cardstock circles every 1/4 inch from 1 to 3 inches, then used them as templates to cut circles from this beautiful cream crinkled voile. For the small and medium flowers I eliminated some of the larger circles depending on the size. I melted the edges with a tea light then glued them together using Fabri-Tac. I put another dab of Fabri-Tac glue in the center of each flower and sprinkled microbeads in each. I wanted them to look natural, so I deliberately made the glue spots uneven. (Not perfect circle dabs of glue.)

5) Wrapped/twisted wire with gems:
I wrapped thin craft wire with floral tape, then curled it around a small dowel or metal rod. Once you take it off the rod, you can gently bend to give a more natural look. The chandelier beads or drops are acrylic and found in the jewelry department at JoAnns. The holes were large enough to run the wrapped wire through. Then I twisted the wires to hole the beads in place and twisted the curled wire around this twisted wire to make the clusters.

6) Feather:
I attached the feather with a couple glue dots. Here's what NOT to do to attach a feather. Fortunately the feathers came 2 to a package!! Spray adhesive does not work. My first feather got all matted up when I sprayed the adhesive on the back of it and it lost it's fluffy appearance.

7) Leaves:
Funny story here. We needed a trash can for our scrapping area one evening at the craft store where I like to scrap. The craft coordinator nabbed the one from the floral department. You guessed ~ it was full of flower stems loaded with leaves. We stripped the leaves off the stems, and I added a pack to my stash. These lovely leaves came from that stash, just the right shade of green for this page!!

Paper:
Teresa Collins ~ World Traveler – Filmstrip
Teresa Collins ~ World Traveler – Luggage Tags

Embellishments:
Silk Flower Leaves – rescued from the floral department trash where I scrap
Plaid ~ Inspired Classics Jewelry Collection - Green Gem Drops (Chandelier beads)
Special Day Sticker – Stash
Darice ~ Ostritch Feather

Technique Products:
7gypsies ~ Clear Stamps ~ INK Naked
Bo Bunny ~ Stamp and Store – Ornamental
Ranger Distress Ink ~ Bundled Sage
Cream crinkled voile fabric
Tea light
Martha Stewart Metallic Glass Microbeads ~ Green Agate
Darice ~ 24 Gage Craft Wire
Pale Green Floral Tape
Ink Jet Transparency Paper ~ Stash
Bazzill ~ In Stitch’z Floss – Black

Tools:
Bazzill ~ In Stitch’z Piercing tool
Scriptina Font – Internet (True Love)
Martha Stewart Corner Punch - Swirling Lace
Martha Stewart ~ Large Circle Punch

I have entered this at
Bird is the Word in the "Love" challenge.
Scrapbook Sisters ~ Anything Goes

Thanks for dropping by. I treasure your comments.

~ Blessings ~