Monday, September 26, 2022

Merry Christmas Wintry Holiday Scene Card for Amazing Paper Grace

Welcome to my creative space!

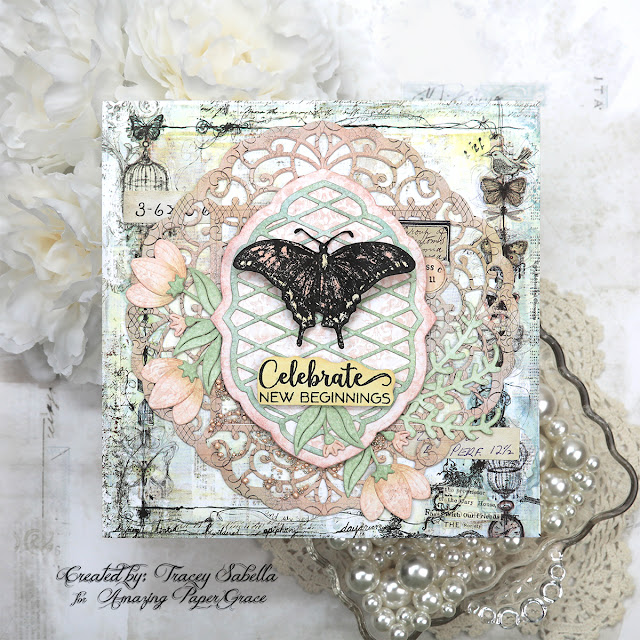
I like to get a jump start on creating my Christmas cards. This sweet card features the fabulous Amazing Paper Grace Winter Label Motifs die set (S4-1240) that includes so many lovely images to create this wonderful wintry scene. 

I cut out the label frame and embossed it with the Holly Flourish Embossing Folder (SES-046) which is part of the new Christmas flourish collection. It's popped up with foam tape to layer the wintry scene below the opening. I thought this sweet scene would be perfect for Christmas, so added this sentiment from the Silent Night Make a Scene die set (S5-462). The snow drifts and smaller building in the scene are also from this set.

Be sure to scroll down through the tips and techniques section below for close-ups and all the details on how to create this card including how I created the sparking snow drifts and shimmering holly berries.

Thank you Amazing Paper Grace for providing the dies used in this project.

Tips and Techniques
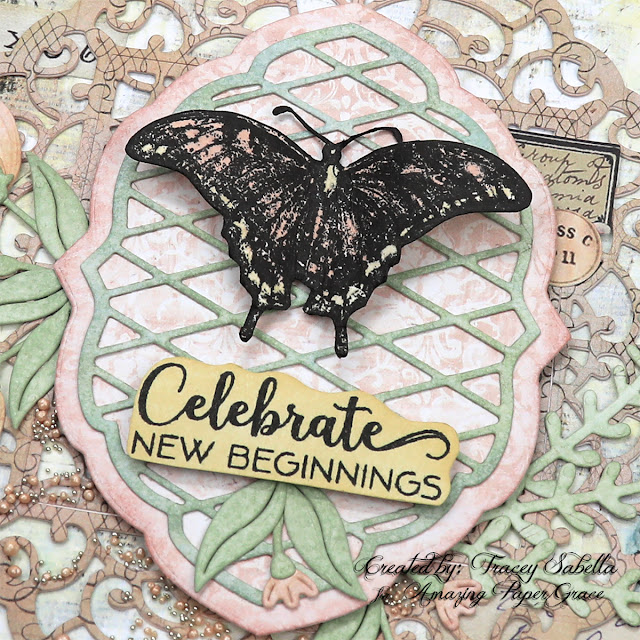
Here's a close-up of the wintry scene. The Winter Label Motifs (S4-1240) set includes the large house, trees, fence, snowflakes, label frame, and holly leaves, and berries. 

The snowflakes are cut from shimmer paper for just a hint of sparkle. Three snowdrifts are cut from white glitter paper that really sparkles and shines in the light. I've also used this paper for the snow cover building roofs. The smaller building is from the Silent Night Make a Scene set. I enlarged the window openings with a couple snips from my scissors so that the window frames from the Winter Label Motifs set would fit to add cohesiveness. There is no roof die for this smaller home, so I hand cut the snow. It's a right angle, so I just cut a corner off the paper and trimmed the inside edges to fit.

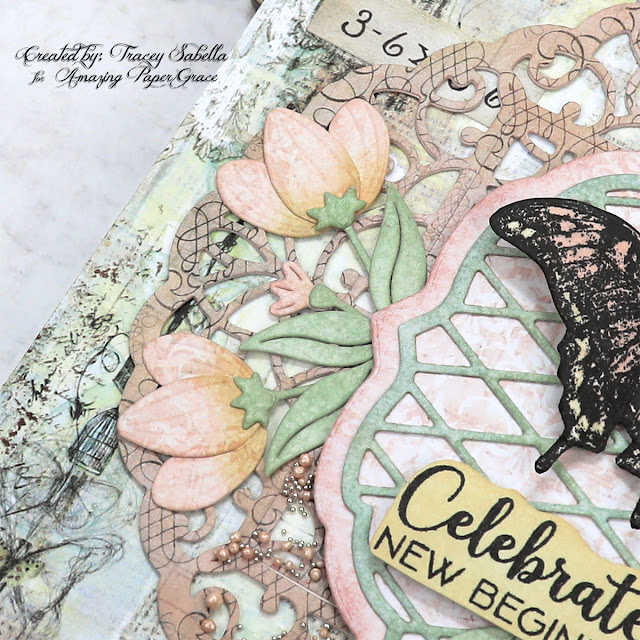
The trees are cut from two different green patterned papers and offset to layer them to look like a forest of pines surrounding the homes. The fence is also cut from a wood grain patterned paper. I thought this blue patterned paper looked like a wintry sky, so used it for the background.

The holly leaves and branches are included in the Winter Label Motifs set and are cut from the same darker green paper used for the trees. They are inked with Forest Moss Distress ink, then with a little Ground Espresso for a vintage feel and to give definition. 

The berries, label frame and chimneys are all cut from the same red patterned paper. The berries are edged with Ground espresso then to add sparkle, they're brushed with a clear Wink of Stella brush.

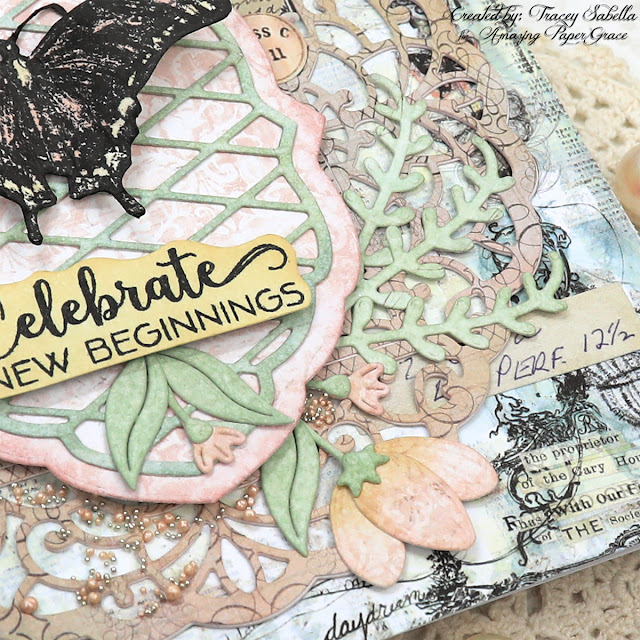
The frame is die cut from a cream patterned paper with the outside edges measuring 4" by 5 1/4". I cut the paper to size first, then die cut the center using the smallest of the label frame dies, then I ran it through the Holly Flourish Embossing Folder to add texture. Frayed Burlap Distress Ink is applied around the edges, then with a foam applicator, I rubbed lightly over the raised embossing to highlight the texture and add to the vintage feel I was looking for. The label frame is cut from red patterned paper and adhered around the opening. 

An outer frame is added by cutting a piece of the red patterned paper to 4 1/4" by 5 1/2 inches. The blue sky paper is cut to about 3 1/2" by 4 3/4" and adhered to the center of the red paper. The dimensions for the sky paper aren't that important. It just needs to be larger than the label opening and smaller than the embossed piece. 

The embossed frame piece is adhered using 1/4" foam tape around the outside edges. 

***Tip*** I adhered the foam tape directly to the the back of the embossed frame, then applied clear glue (Beacon Fabri-Tac) to top the foam tape, so when I set the embossed frame onto the red base, I can adjust it so that it's perfectly centered and the wet glue will set in a few minutes to continue working. Just make sure to adhere the blue sky piece before adding the embossed frame.

The Christmas sentiment is cut from the same green used for the foliage.

The scene was created after the embossed label frame was in place. I just used tweezers to help place everything. Because the frame is adhered on the outside edges, it gave me room to tuck the pieces in place since the inside edges were not adhered.

After creating the scene, I added the holly and sentiment around the outside. 

Below you can find the products I used to create this project including some with compensated affiliate links to Scrapbook.com and Spellbinders. These links are at absolutely no cost to you. When you shop through the links below, I receive a small commission from the companies.  These commissions help me cover the costs of my blog and other expenses, which allows me to continue to provide you with FREE inspiration along with detailed Tips and Techniques provided for every project. Thank you so much for your love and support!

Amazing Paper Grace:

Paper:

Ink:

Mixed Media

Adhesives:

Tools:
Thanks so much for stopping by to view my card. I hope you've been inspired.

Monday, September 19, 2022

'Celebrate New Beginnings' Spring Card for Amazing Paper Grace

Welcome to my creative space!

Spring is a time for new beginnings with the scent of sweet blossoms, leaves budding and popping, and new life as animal babies come along while butterflies emerge from their cocoons, so these sweet spring images from the gorgeous Amazing Paper Grace Spring Labels Motifs die set (S4-1238) are just so perfect to celebrate a new beginning in the life of someone special. This could be used for a graduation, new job or any new endeavor one may be entering. The sweet sentiment is from the coordinating Seasonal Motif Sentiments Stamp Set (STP-150). I also die cut the lovely background medallion using the Circle Meets Square Set (S5-491).

To learn more about the techniques used to create this shabby mixed media card including the gorgeous flowers and lovely butterfly, be sure to scroll down to view my 'Tips and Techniques' section below.

Thank you Amazing Paper Grace for providing the dies used in this project.

Tips and Techniques
This 6x6" card is created using older papers from my stash from a 6x6" paper pad, so the colors coordinate beautifully. I often add a frame around the edges of my card, but the focal base paper has a beautifully drawn frame around the edges, so I didn't feel that a border was needed here. 

What a sweet sentiment from the Seasonal Motif Sentiments (STP-150) stamp set. It is stamped onto smooth white cardstock with permanent ink. Once the ink was dry, I colored it with Scattered Straw Distress Ink using an ink blending brush. To anchor the sentiment, a tiny die cut blossom and leaves are added below to fill in this space beautifully. 

While this die set is focused on spring, the label and lattice pieces could be a focal point for any occasion or season. I like an organic feel to my die cuts, so randomly added Bundled Sage; Iced Spruce, and Speckled Egg to the lattice and Victorian Velvet just to the edges of the pink layer. This label layer is popped up by adhering with foam squares in the center leaving the edges free to tuck flowers under.

This die set works well for adding a focal element like this butterfly. You could use a pre-made embellishment of your choice. Here I stamped a butterfly from the Tim Holtz Botanic Collage set onto the smooth side of Distress Watercolor Paper with permanent black ink then colored it using coordinating distress inks. I smooshed an ink pad onto my craft mat and picked up the ink with a fine tip paint brush to apply the ink. Once colored, I fussy cut the image. 

***Tip*** The antenna are too thin to cut out, so leave a bit of a margin around them, then go back with a black marker and color them in. I also use the marker around the edges so the white core of the paper didn't show. I use the marker from the back side for this edging, so I don't slip and color onto the stamped image.

The flowers included in this die set are just so sweet. After die cutting, I brushed the base of each petal with Scattered Straw Ink and a little Victorian Velvet ink around the edges. The foliage is inked around the edges with Bundled Sage. This gives definition to make them more visible against the busy background.

***Tip*** I find that tweezers help me place these intricate blossoms.
 
Another blossom is added to the other side as well as a few sprigs of foliage.

Texture is added around the bottom nestled around the blossoms and over the medalion. Matte Soft Gel Medium is used to add the peachy prills and white gold microbeads to add some bling.

I've tucked in number and label snippets from Tim Holtz Idea-ology. You can see a couple of them in this shot.

The larger medallion piece is die cut using the gorgeous Circle Meets Square die set (S5-491). I darkened it up a little with Victorian Velvet Distress ink to make it more visible. 

***Tip*** If you have die cut a piece like this medallion, and it ends up blending into the background more than you expected, just brush on some coordinating ink in a darker shade of color to help it pop. 

Below you can find the products I used to create this project including some with compensated affiliate links to Scrapbook.com and Spellbinders. These links are at absolutely no cost to you. When you shop through the links below, I receive a small commission from the companies.  These commissions help me cover the costs of my blog and other expenses, which allows me to continue to provide you with FREE inspiration along with detailed Tips and Techniques provided for every project. Thank you so much for your love and support!

Supplies:

Amazing Paper Grace:

Paper:

Ink:

Stamps:

Mixed Media:

Embellishments:

Adhesives:

Tools:

Wednesday, September 14, 2022

Introducing the Amazing Paper Grace Christmas Flourishes Collection with Noel Mini Slimline Card and Gift Tag

 Welcome to my creative space!

Christmas is just around the corner, and I'm so excited to start working on my cards for this blessed season with the fabulous new Christmas Flourishes Collection from Amazing Paper Grace. This collection really does have so many wonderful designs. 

Today I'm sharing a Christmas card and coordinating gift tag created with the Noel Mini Slimline die set (S5-535) and coordinating Holly Flourish Embossing Folder (SES-046) which is also part of the new collection. The poinsettias are die cut using Cinch and Go Poinsettia (S4-960) and the gift tag Merry Christmas sentiment is from Silent Night Make a Scene (S5-462).

If you enjoy creating flowers, this card would be easy to create in multiples and could be simplified further by omitting the inking on the flowers, leaves, and card edges. I like to die cut the petals then while watching a bit of TV in the evenings, I ink, shape, and assemble the blossoms. Then when it's time to create cards, the flowers are ready to go. 

Be sure to scroll down through the Tips and Techniques section below for more close-ups and all the details on how I put this card/tag ensemble together. 

Today's projects were created with dies provided by Amazing Paper Grace.

My Projects for Today

Mini Slimline Card

Gift Tag

Eleven Dies are included in the Noel Mini Slimline Frame Set.

Tips and Techniques
The gorgeous green poinsettia leaves are part of this fabulous Noel Mini Slimline Frame die set (S5-535). I've partnered them with poinsettia blossoms created with the Cinch and Go Poinsettia dies. The leaves are cut in green patterned paper and inked with Gathered Twigs Distress Ink, then adhered to the base piece cut from cream cardstock that is also inked with Gathered Twig. The berry section is cut from red patterned paper. To add dimension, I placed a Gilt Trip prill in each hole of the berry piece. 

I wanted a natural organic feel for the blossoms, so cut the poinsettias from cream cardstock, and inked the edges. Next the petals are shaped with a stylus and the layers are adhered. Stamen are pulled through the center for the berries. The only round stamen I have are white, so I mixed a few metallic paints to get a light golden brown to color the "berries." 

This beautiful scrolled sentiment is cut from cream cardstock and gold. The pieces are offset to create a shadow effect with the gold.

In addition to the poinsettia leaves, this set also includes these beautiful holly leaves and berries. They are put together the same way as the poinsettia foliage with the three smaller berries nestled amongst the leaves.

A few coordinating pearls are scattered across the card for a little bling. 

The background frame section is cut from the same red paper used for the berries. This pierced design is so festive and gorgeous!! I cut it as one solid piece, but the center can be cut seperately from the same color to tuck things into or in a contrasting color if your design calls for that. There are so many ways to use this beautiful set! I popped up this section using foam tape squares for added dimension.

This Christmas collection includes a gorgeous scrolled holly embossing folder used behind the red frame to add gorgeous texture. The outer edges are inked in Gathered Twigs ink to highlight the beautiful design.

A layer of gold metallic cardstock is cut to 4x6" to frame the card and pick up the gold used to shadow the sentiment.

The base for this lovely gift tag is cut using just the outline die from  thin black chipboard. The frame is cut from the same red patterned paper used for the card. I again omitted the center die to create one solid piece which is adhered to the black chipboard that peeks through the holes. On the card there was a gorgeous contrast between the edge of the red frame and the cream background, so I did not ink the frame edges there. Since there's no background here, I decided to use more of the Gathered Twigs ink on the edges to give definition.

The sentiment is cut from cream paper from the Silent Night Make a Scene set (S5-462), part of the 2021 Amazing Paper Grace Christmas collection and still available to purchase.

I had extra holly leaf pieces from making the card, so only needed to create a couple poinsettia blossoms to finish off this gift tag. You could add a hole and cord to the top to get double duty from this tag to use it as an ornament.

These dies and embossing folder are available from Spellbinders right now! Click here: The Christmas Flourishes Collection.

Below you can find the products I used to create this project including some with compensated affiliate links to Scrapbook.com. These links are at absolutely no cost to you. When you shop through the links below, I receive a small commission from Scrapbook.com. These commissions help me cover the costs of my blog and other expenses, which allows me to continue to provide you with FREE inspiration along with Tips and Techniques provided for every project. Thank you so much for your love and support!

Supplies:

Amazing Paper Grace:

Paper:

Ink:

Mixed Media:

Embellishments:
  • From my Stash - Stamen
  • US Artquest - Gilt Trip
  • Close To My Heart - Adhesive Gems - Opaques, Mocha

Adhesive:

Tools:

For more The Christmas Flourishes Collection Inspiration
Visit each Creative Team blog linked below for their take on creative paper crafting ideas using The Christmas Flourishes Collection.

I would adore hearing from you! Please leave a comment below letting me know how you will use these gorgeous dies!


Thanks for stopping by! I treasure your comments.

~ Blessings ~

Monday, September 5, 2022

Amazing Paper Grace September 2022 Die of the Month: Pop Up 3D Vignette Bubble Gum Machine

Welcome to my creative space.

The Amazing Paper Grace September Die of the Month: Pop Up 3D Vignette Bubble Gum Machine is such a sweet die set. For my main project card I selected a teal metallic paper and used gold paper for the accents to give it a fun retro feel. What a fun card for a child or someone who adores nostalgic retro machines.

My second card is a nod to my passion for industrial rust and patina. I had been stumped on what to do for my accessory project until I walked through my studio and spied a recent vintage purchase, a rusty steam gauge piece. A light went off in my head and I wondered . . . "what if I transform the bubble gum machine into an industrial steam gauge machine?" I had just the right pieces to fit perfectly to make the transformation. I hope you adore it as much as I do.

Be sure to check out my Tips and Techniques section below for more close-ups and all the details on how I created these wonderful cards including the cracked vintage glass over the industrial steam gauge. 

Many thanks to Amazing Paper Grace for providing the dies used in this project!

There are 26 cutting dies included in the Pop Up 3D Vignette Bubble Gum Machine.

Pop Up 3D Bubble Gum Machine Card

Vintage Steam Gauge Machine Card

Tips and Techniques
I kept this card pretty straight forward by keeping with the beautiful die cut design. The fun and whimsical retro design comes from the teal metallic and gold papers that are die cut and embossed. This just looks so much like the gumball machines I grew up with. I pulled out my metallic paper scraps to cut the gumballs, so they also have the shiny gumball appeal. 

I adhered one gumball to each of the spots on the die cut, then filled in and added more to make it full. On the inner layers, I just adhered gumballs across the top of each layer, since the lower portion of these layers isn't seen.

The trim pieces are cut and embossed in metallic gold cardstock. The layers of the mechanism are popped up with thin foam squares for added dimension and a more realistic feel. I even added a few gumballs falling out of the opening. 

The penny is cut from copper cardstock, but was too shiny and bright for my taste, so I brushed a little Worn Penny metallic paint to add the patina found on a well used penny.

I just adore how these 3D Vignette cards fold over so that they can be tucked into an envelope to hand deliver or as suggested a padded envelope for mailing. The card pops right back into place after being folded and stands on its own to be displayed.

Of course a vintage bubble gum machine needs a little bling, so a rhinestone is added to the top and onto the money mechanism. There are three fun sentiments included in this die set. 

It's hard to tell in the photos, but there is a piece of clear acetate cut to fit the window of the front piece so it looks like the gumballs are behind glass.

I just can't express how happy I was to find that this gauge frame and dial from Tim Holtz fit the opening so perfectly. To create the bubbled and cracked glass front, I used a mica tile. Mica is slightly yellowed with beautiful natural imperfections and easy to cut, so was a great choice for the glass front here. I bent the mica in a couple places just enough to get a cracked look.

The machine is cut three times using the insert so that the gumballs are not diecut into the piece. Once with a lighter rusty patina paper for the top layer. Once from a darker rusty paper for the bottom piece that shows behind the gauge. And one more time from light weight chipboard. The top piece is adhered to the chipboard piece for more stability. The bottom layer is adhered directly to the card. I brushed black paint on the edges of the chipboard layer for a more finished look.

I popped up the top layer with a couple layers of thicker cardboard placed under this lower section. I also adhered two stacks of thin black chipboard cut into narrow strips that are the same height as this cardboard shim. Each one is abut 3/4 inch long. These were adhered under the top corners of the upper frame to keep the machine the same height and to add stability. The shims are high enough that the mica window sits slightly above the gauge so they are not touching.

The trim pieces are cut from black metallic cardstock and rubbed with silver wax to give a vintage feel. Most of the metal embellishments were already a tarnished silver color, but a couple were copper, so I rubbed those pieces with more of the silver wax for a cohesive look.

Decorative tape is placed on both sides of the machine. It's easiest to add this tape before adhering the bottom machine layer to the card. To keep things more simple, I used patterned paper printed with a rusty patina design to die cut the machine layers. I rubbed the edges of the top layer with a little black soon Distress Ink to age it a little more.

I cut a panel from brown cardstock just a little larger than the printed paper base to frame the card. The edges of the printed paper are inked with pumice stone Distress Ink. 

I hope you agree that this bubble gum machine is the perfect base for a vintage industrial steam gauge! 

Below you can find the products I used to create this project including some with compensated affiliate links to Scrapbook.com. These links are at absolutely no cost to you. When you shop through the links below, I receive a small commission from Scrapbook.com. These commissions help me cover the costs of my blog and other expenses, which allows me to continue to provide you with FREE inspiration along with Tips and Techniques provided for every project. Thank you so much for your love and support!

Supplies:

Amazing Paper Grace:

Paper:

Ink:

Mixed Media:

Embellishments:

Adhesives:

Tools:

The Amazing Paper Grace Die of the Month is available exclusively at Spellbinders Paper Arts during September 2022, Pop Up 3D Vignette Bubble Gum Machine along with other membership perks.

View this month’s Amazing Paper Grace Die of the Month!


Thanks for stopping by! I treasure your comments.

~ Blessings ~