Saturday, November 22, 2014

"Faith Shines Bright" Mixed Media Layout for Donna Salazar

Faith is an important part of our lives, and we are so happy that Elizabeth and Andrew are carrying that faith into their marriage and lives together. I love this photo from their wedding where their love for each other and for our Lord shines so brightly in their faces. I've featured lots of Donna Salazar products and have used Mistra's November Girlie Grunge Sketch-n-Color for inspiration.

"Faith Shines Bright"
Mixed Media Layout by Tracey Sabella for Donna Salazar - Love; Wedding; Faith; Handcrafted Flowers

November Girlie Grunge Sketch-n-Color

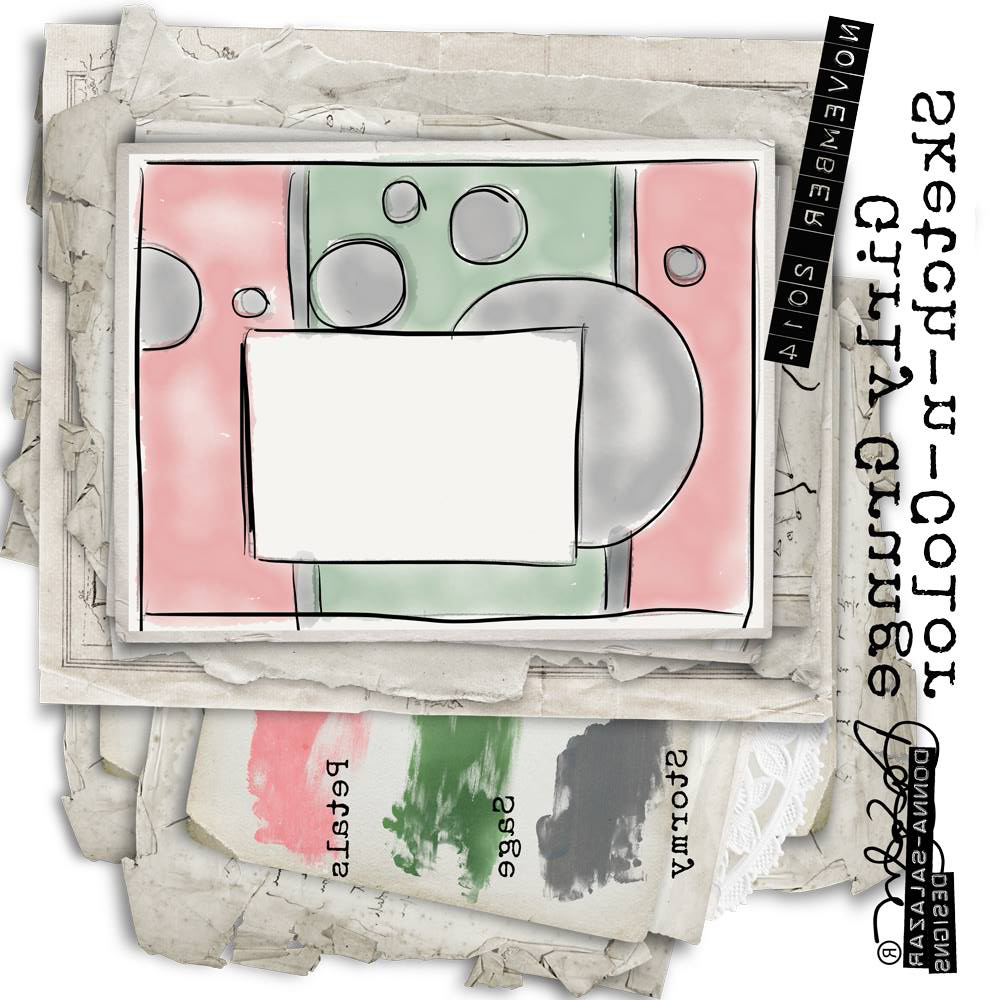
As you can see I flipped and turned the sketch, using lanterns for some of the circles.

Tips and Techniques
Mixed Media Layout by Tracey Sabella for Donna Salazar - Love; Wedding; Faith; Handcrafted Flowers
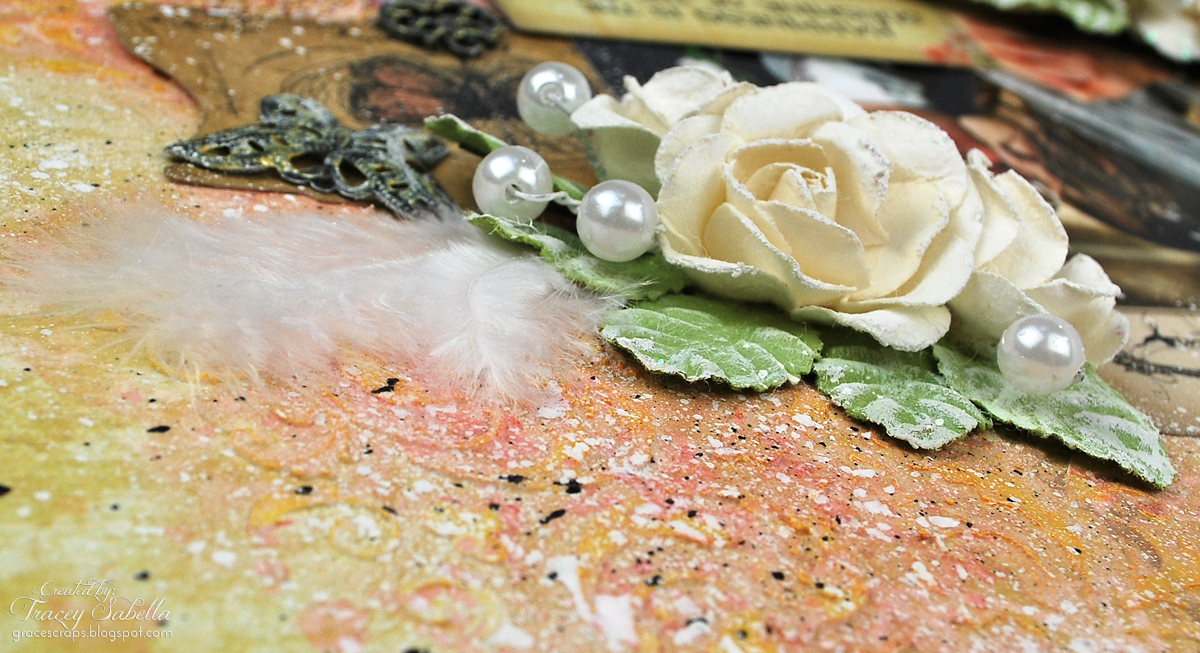
I've used Donna's Spellbinders Grand Peony and Rose Creation dies to create the larger Open Lace Rose flower. The tutorial for this flower can be found HERE.

The photo mat is distressed with Donna's Zutter Distrezz-it-All. I've inked the edges of the paper scraps edging the photo with her Clearsnap Mix'd Media Inx CHOX in Sage - one of the featured colors.

Mixed Media Layout by Tracey Sabella for Donna Salazar - Love; Wedding; Faith; Handcrafted Flowers
Here I've clustered some handcrafted little roses cut with Donna's Bitty Blossoms dies and dusted them with her Clearsnap Twinkle Dust Glitter in Sugar Shimmer. My Bitty Blossom flower tutorial can be found HERE.

Mixed Media Layout by Tracey Sabella for Donna Salazar - Love; Wedding; Faith; Handcrafted Flowers
I've embellished this beautiful chipboard piece from Um Wow Studio by painting and glittering. The top and "strings" are white. I wanted the hearts to be a pale pink, so I twisted my Petals Mix'd Media CHOX Inx onto my craft mat, then a dallop of white gesso. Mixing them tinted the gesso this lovely shade of pink. When dry, I brushed the hearts and upper flourish with glue and dusted with Sugar Shimmer Twinkle Dust Glitter.

I tried a new technique with Donna's embossing powder and glitter. I used Jasmine Mixed Media Inx to stamp out this fun grid circle. I sprinkled with Jasmine embossing powder, tapping off the excess then sprinkled with Twinkle Dust Glitter. I heated from the back of the page until the embossing powder had melted - capturing the sparkly glitter in the process. (If you heat set from the top, you will blow the glitter away before it gets set into the melting embossing power.) It does take a bit longer since the heat is not direct, but definitely worth the wait!!

Mixed Media Layout by Tracey Sabella for Donna Salazar - Love; Wedding; Faith; Handcrafted Flowers
Here's a shot showing some of my background textures. I did more of the glittered embossing for this other large circle stamp. 

I misted the background with water, then with some of Donna's Clearsnap Smooch Spritz in River Mossy, adding even more shimmer and shine. I then splattered with white ink and finished off by adhering a blend of microbeads and chunky glass glitter here and there across the page and around the clusters.

I don't have any close ups of the lanterns, but as you can see in the full photo at the top of the page. I stamped and embossed these images, then adhered Pralines and Cream Twinkle Dust Glitter so they look as if they are glowing and shining. The title is stamped in Stormy Mix'd Media Inx to bring in the final color from the sketch.

Donna Salazar Products
Grandma’s Garden – Garden Journal Cards
GCD Studio ~ Botanique 12” Paper Pad
GCD Studio ~ Natural Beauty 12” Paper Pad
GCD Studio ~ Family Jeans 12” Paper Pad
GCD Studio ~ Mix’d Media Stax 2
Clearsnap ~ Mix’d Media Inx – Jasmine; Stormy
Clearsnap ~ Mix’d Media Inx CHOX – Sage; Petals
Clearsnap ~ Mix’d Media Inx Embossing Powder – Jasmine
Clearsnap ~ Twinkle Dust Glitter – Pralines & Cream; Sugar Shimmer
Clearsnap ~ Smooch Spritz – River Mossy 
Spellbinders ~ Grand Peony
Spellbinders ~ Rose Creations
Spellbinders ~ Bitty Blossoms
Zutter ~ Distrezz-it-All 

Other Products
Um Wow Studio ~ Flair – From the Heart
Um Wow Studio ~ Heart Strings Chipboard
Lace – Stash
Tim Holtz ~ Idea-ology – Accoutrements – Fanciful Buttons
The Charm Shop ~ Heart Charms
David Tutera ~ Pearl Rhinestone Crown Picks
Darice Sequins ~ Crystal Iris
Michaels ~ Metal Embellishments - Keys
Liquitex ~ Gesso – White; Clear
Higgins ~ Drawing Ink – White 
Stampendous ~ Fran-tage – Glass Glitter, Silver
Martha Stewart ~ Micro Beads – Pink Sapphire
Stampendous ~ N*Studio Stamps –  Brush Strokes; Mish Mesh
Close to My Heart ~ Clear Stamps – Illuminate
Forever in Time ~ Clear Stamps – Hearts Medley
Helmar ~ 450 Quick Dry Adhesive; Zapdots, ½” Square, White
Art Glitter ~ Designer Dries Clear Adhesive
Tombow ~ Multi Mono Liquid Glue
Ranger ~ Glossy Accents
Spellbinders ~ Artisan X-plorer
Liquitex ~ Splatter Brush
Darice ~ Heat Tool

Thanks for stopping by! I treasure your comments.
~ Blessings ~

Saturday, November 15, 2014

Autumn Mixed Media Card for Leaky Shed Studio

I created this mixed media card for our daughter-in-law. As you can see, she adores purple which pairs beautifully with autumn oranges, golds, and yellows. I've featuring one of Leaky Shed Studio's gorgeous new release chipboard pieces, the Autumn Leaf Crown along with a classic Victorian Oval Frame

I had so much fun stamping, misting, and glittering the background created on a piece of mixed media water color paper. 


Tips and Techniques
To paint the Autumn Leaf Crown, I watered down some gold metallic paint and brushed it across the bare chipboard. I wanted just a gold shimmer, rather than a heavy metallic look. Once dry, I brushed orange Twinkling H20's randomly across the leaves, and heat set. These paints are no longer available in stores, but you could also mix up any watercolor paint and mix with mica for shimmer or even brush on a sparkling mist.

The Victorian Oval Frame is painted black, then lightly brushed with gold metallic paint. 

The mixed media background was applied to a piece of white mixed media paper brushed with clear gesso. I've stamped and misted using stencils to create the color and design. I randomly applied gel medium and sprinkled with microbeads and chunky glass glitter. 

The rose is edged with Prima's new Art Sugar super fine glitter, and I misted the natural dried phalaris grass with Prima's luscious Sorbet Color Bloom Spray to color it a golden yellow.

One final shot. You can really see here how the colors vary on the chipboard giving the feel of autumn leaves.


Autumn Leaf Crown (New Release)

Other Products
Petaloo ~ Botanica Collection – Minis Yellow #1101103
KaiserCraft ~ Paper Blooms – Aubergine
Natural Dried Phalaris Grass
Liquitex ~ Gesso – Clear; Black
Golden ~ Soft Gel - Matte
Ranger ~ Archival Ink – Jet Black
Prima ~ Color Bloom Spray Mist – Pressed Petal; Sorbet
Tattered Angels ~ Glimmer Mist – Sugar Plum Fairy
Tattered Angels ~ Glimmer Mist – Tiger Lily
Twinkling H20’s ~ Orange Pearl; Black Cherry
Jacquard ~ Lumiere – Sunset Gold
Stampendous ~ Fran-tage – Glass Glitter Bronze; Lavender
Martha Stewart ~ Microbeads – Fire Opal
Prima ~ Art Sugar - Charcoal
Prima ~ Clear Stamp #545055
Stampendous ~ Clear Stamps – Hope Verses
Inky Antics ~ Clear Stamp Set – Magnificent Men
Stampers Anonymous ~ Layering Stencil – Dot Fade
Americana Classic ~ Stencil – Jacobean Floral
Helmar ~ Crystal Kote Matte Varnish
Helmar ~ 450 Quick Dry Adhesive
Helmar ~ Liquid Scrap Dots 
Tombow ~ Multi Mono Liquid Glue
Tim Holtz ~ Grid Blocks

Thanks for stopping by today! I treasure your comments.
~ Blessings ~

Monday, November 10, 2014

Butterfly Trinket Box for Donna Salazar

Hi everyone!! Today I'm sharing a trinket box I've altered using lots of Donna Salazar's fabulous girlie grunge products combining textured mixed media and glittered handcrafted flowers and butterflies. I'm always excited to work with her products with the wide variety of looks I can achieve.

Butterfly Trinket Box

Tips and Techniques
I've created this sweet rose using the three smallest dies in Donna's Spellbinder Rose Creations die set. The mini roses are created from mulberry paper cut with Bitty Blossoms dies. I painted the corrugated flourishes then rubbed with Clearsnap Mix'd Media Inx. The flowers and flourishes were brushed with glue and sprinkled with Donna's Clearsnap Sugar Shimmer Twinkle Dust Glitter.

Box Front
The handcrafted butterflies are cut from cardstock with a Spellbinders Wonderful Wings die and glittered with Pralines and Cream Twinkle Dust Glitter. My Twinkling Butterfly Tutorial can be found HERE.

The hinges are brushed with a mixture of white and gold alcohol ink to distress.

Box Back
I started by removing the hinges and painting this unfinished wood box with a coat of white gesso. I recently received a box of goodies package with pearlized tissue paper. I brushed sections of the box with Mod Podge and applied crinkled pieces of tissue paper. I then applied a second coat of tissue paper in the same way for lots of texture. (I first covered the glass with painter's tape.)

Side One
I used Donna's Art Gone Wild Vine Stamp randomly around the entire box with her Mix'd Media Inx CHOX in Pomegranate. I was sure to stamp across the lid and around corners with the design for a cohesive look. Because I knew I would be applying mist over the stamping, I used CHOX ink because it does not react with water once dry, and I would be adding mist over the stamping.

Next I used several stencils with gold modeling cream. I heat set until the modeling cream bubbled and popped for added texture.

Side Two
My next step was to apply Donna's River Mossy Clearsnap Smooch Spritz. I spritzed a couple sprays of Smooch onto my craft mat along with a couple spritzes of water. I picked it up with an eyedropper to apply to the box. I squeezed on mist, spritzed on a little more water, then moved the box around to spread the mist. I heat set to dry then moved on to the next section. I wanted some of the gorgeous pearlized tissue paper to show through, so only covered about 2/3 of the box with mist. I just love how the mist settled into the crevices to highlight the peaks and valleys of the texture.

Finally, I randomly squeezed on glossy accents and sprinkled with pearlized seed beads, one section at a time.


DSD Products
GCD Studios ~ Natural Beauty Collection 12” Pad
GCD Studios ~ Mixed Media Stax2
Clearsnap ~ Mix’d Media Inx – Peridot, Patina
Clearsnap ~ Mix’d Media Inx CHOX – Pomegranate
Clearsnap ~ Smooch Spritz – River Mossy
Clearsnap ~ Twinkle Dust Glitter – Sugar Shimmer, Pralines & Cream
Spellbinders ~ Rose Creations
Spellbinders ~ Bitty Blossoms
Spellbinder ~ Wonderful Wings
Art Gone Wild ~ Vine

Stash
We R Memory Keepers ~ Cardstock – Happy Campers Marshmallow
Wood Box
Tissue Paper
Darice ~ TOHO Beads 11/0 Round Luster Creme
Self-Adhesive Pearls – Round, Teardrop
Crystals - Clear, Round
Liquitex ~ Gesso – White
Golden ~ Light Molding Paste – Gold
Viva ~ Modeling Cream
Ranger ~ Alcohol Ink Mixatives ~ Snow Cap; Gold
Martha Stewart Crafts ~ Adhesive Stencils – Scrolls; Fair Isle Dots
Martha Stewart Crafts ~ Stencils – Eyelet Lace
Helmar ~ 450 Quick Dry Adhesive
Helmar ~ Gemstone Glue
Tombow ~ Multi Mono Liquid Glue
Spellbinders ~ Artisan X-plorer
Heat Tool

Thanks for stopping by! I treasure your comments.

~ Blessings ~

Friday, November 7, 2014

"Celebrate" Mixed Media Card for C'est Magnifique

Hi everyone! I'm back to share the details of my second card and final project with the amazing C'est Magnifique November Kit

Our daughter, Grace, is a writer. She collects fountain pens, new and vintage, so when I saw this fountain pen and ink well in the Main Kit Prima Ephemera Pack, I knew I would use them to create a card for her. If you look closely, you will see that the background behind the flowers has more vintage pen related ephemera pieces. 

"Celebrate"

Tips and Techniques
When I was deconstructing the Mixed Media Kit beaded eyelash lace for one of my other kit projects, one of the beaded drops came apart. It was perfect to tuck the larger gem into the cluster and to scatter the beads nearby. If you are wondering how I adhere the beads, I simply put a dab of strong glue that dries clear like Helmar 450 on a craft mat, then use tweezers to dip the beads one at a time into the glue then place them randomly on the card.  

I used a mix of flowers from the Main Kit and Magnifique Mixed Media Kit. The black flower was brushed with glue and sprinkled with Prima Art Sugar in Charcoal while the others are dry brushed with black gesso. I've also tucked in one of the Main Kit Prima Stick Pins.

The Mixed Media Kit 3D sticker was not a color I wanted, so I spritzed it with mist to coordinate with the background. I like how the mist pooled, giving a vintage look to the sticker piece. You can see the texture on the background. I misted the paper with water, then two colors of mist (my stash) to get the mottled effect. When dry I stenciled the dot pattern with light molding paste (stash), then a bit more mist. I dry brushed the textured areas with the Mixed Media Kit Liquid Pearls to give a shimmery gold effect. Finally I splattered with black and white ink from my stash. 

I cut the ends off of the "Celebrate" sentiment from the Main Kit and colored with mists (stash). The card and sentiment are distressed with my Distrezz-it-All, then pulled the edges through the excess mist from my craft mat to color the edges and not waste the gorgeous, shimmery color sitting on my mat.

I hope you have enjoyed viewing my projects from the
C'est Magnifique November Kit and Add-ons.
They can be purchased in the store HERE.

Product List

Blue Fern Studio ~ Montage – Society
Prima ~ Ephemera - Epiphany #575885
American Crafts ~ Pebbles ~ Home-made, Phrase Tags
Prima ~ Vintage Trinkets – Metal Pins, Rosarian - #560065
Prima ~ Cigar Box Secrets - Humidor #578596

Prima ~ 3D Stickers – Epiphany #576257
Prima ~ Cigar Box Secrets - Londsdale #578626
Beaded Eyelash Lace, Black
Manorhouse ~ Black Tea Rose
Ranger ~ Liquid Pearls – Buttercup
Prima ~ Art Sugar – Charcoal 

Stash
Golden ~ Light Molding Past
Liquitex~  Gesso – Clear, Black
Ranger ~ Distress Ink – Pumice Stone
Heidi Swapp ~ Color Shine – Gold
Tattered Angels ~ Glimmer Mist – Sugar Plum Fairy
Higgins ~ Drawing Ink – White; Black
Tim Holtz ~ Layering Stencil – Dot Fade
Helmar 450 Quick Dry Adhesive
Art Glitter ~ Designer Dries Clear Glue
Distrezz-it-All

Thanks for stopping by! I treasure your comments.
~ Blessings ~

Wednesday, November 5, 2014

Happy Birthday Card for C'est Magnifique

Today I'm sharing the first of two cards I've created with the beautiful November C'est Magnifique "Time After Time" Kit


Tips and Techniques
The beautiful flowers are from the Main Kit and Flower Add-On. The smallest flower I created from mulberry paper using my Bitty Blossoms die. The flourishes are die cut from white cardstock. I dry brushed the flowers with white gesso, then Shimmerz Inklings from the Magnifique Mixed Media kit was brushed onto the flowers and flourishes. 

Here's a closer view. I softened the layered card edges by distressing and stitched around the card edge. I added dyed cheese cloth and flower stamen from my stash.

In this side view, you can see the layered cut outs from the Montage Calling Cards page and delicate die cuts from cardstock. I've used foam squares to pop up some of the center layers. I wrapped the center section with Baker's twine from the Main Kit

One final view. I've used Mixed Media Kit products with dots of Liquid Pearls in the bottom corner and the die cut layers are colored with more of the Shimmerz Inklings. The edge inking is done with Distress Ink from my stash. 

Product list

Blue Fern Studio ~ Montage – Society; Calling Cards
Prima ~ Epiphany – Ephemera Pack (Baker’s Twine)
Prima ~ Cigar Box Secrets – Humidor #578596

Flower Add-0n
Prima ~ Manhattan Collection – Times Square #577643

Shimmerz ~ Inklings – Me & Blue, Pearl
Ranger ~ Liquid Pearls - Buttercup

Stash
Cardstock ~ White
Mulberry Paper 
Flower Stamen ~ found in bridal department of craft stores 
Cheese Cloth
Clearsnap by Donna Salazar ~ Mix’d Media Inx – Peridot; Truffle
Ranger ~ Distress Ink – Pumice Stone
Zing ~ Embossing Powder, Clear
Spellbinders ~ Decorative Labels Twenty-Two; Opulent Ovals
Spellbinders by Donna Salazar ~ Bitty Blossoms
Memory Box ~ Norwich Corner
Inky Antics ~ Clear Stamp Sets – Magnificent Men
Helmar ~ 450 Quick Dry Adhesive; Premium Craft Glue; Liquid Scrap Dots
Zutter by Donna Salazar ~ Distrezz-it-All
Spellbinders ~ Artisan X-plorer
Darice ~ Heat Tool
Tim Holtz ~ Grid Blocks

Thanks for stopping by! I treasure your comments.
~ Blessings ~

Sunday, November 2, 2014

"Inspire" for Leaky Shed Studio & Once Upon A...Sketch

It's time for the Once Upon A...Sketch November reveal!! Our journaling theme this month is "Inspiration." Who or what are you inspired by?

I've always been inspired by the beauty of God's creation, particularly the vibrant colors and power of crashing waves during a sunset at the beach. This photo was taken on a family trip to Indian Rock Beach a few years back. I've featured the Leaky Shed Picket Fence and new release, Floral Pirouette (small), which are perfect for a beach layout.

"Inspire"


Journaling Theme: "Inspiration/I am inspired by etc..."

You are free to interpret our theme ANY WAY you like. It is for your inspiration and this theme word DOES NOT need to be part of your title or journaling. But please make sure your layout is based on the sketch below and includes journaling (hidden journaling is fine). Acceptable journaling is MORE than just a sentence, or generic writing such as date/place etc. It needs to be present and at least 3 lines long. Remember, hidden journaling (under a photo/tag or behind your page) is perfectly fine but please DO let us know in your post where your journaling is! 

November Sketch

For challenge details, more design team inspiration, and to link your project go HERE.

My journaling is just below the fence on the right side and says: I’m inspired by God’s creation. I love to walk along the beach at sunset. I’m reminded of God’s goodness and grace in the vibrant color and of His power in the crashing waves.

Tips and Techniques
I painted my chipboard to give a slightly weathered look, and highlighted and shadowed the edges to make it look like it was catching the final rays of light from the setting sun. I splattered the background for a sea foam effect, with some of the splatter touching the fence. 

I've clustered a variety of flowers (mostly Prima) around the layout along with natural seashells. Here I've added a bit of fishnet as well. I've scattered Prima pebbles and Dew Drops around the page like pieces of polished sea glass.

Here's a side view showing more of the fence, flowers, vines, and berries. I've softened the vibrant flowers by dry brushing with a little white gesso.

This Floral Pirouette chipboard is a new release which will soon be available on Scrapbook.com. I painted and shaded the flowers with acrylic paint. I love how the laser carved design shows on the petals through the paint. I wanted the stems to look like gnarly seaweed, so painted brown, then covered with transparent Viva Crackle paint for texture. I allowed a bit of the white splatter to splash across the piece and dry brushed with white gesso along with the flowers.

Here's a side view. To break up the more vibrant colors, I've included some lighter blue flowers along with some in burlap.

Here's one final shot of the top corner cluster. My wheat stencil made for some nice looking "seagrass" on the background.

You can stop by the OUAS blog to link your project HERE.


Other Products
13Arts ~ Timeless – Good Times
13Arts ~ Timeless – All the Time
Prima ~ Frost Gypsy Roses #565770
Prima ~ Bel Canto – Brown #562175
Prima ~ Lady Bird – Mini Rose Stems #565473
Prima ~ Banda – Golden Yellow #562021
Prima ~ Sherwood Rose – Sherwood #562021
Prima ~ Soubrette – Blue/Green #561611
Prima ~ Junkyard Findings – Typo Bulbs 2 #891534
Prima ~ Pebbles #57613
EK Success ~ Daisies 
Petaloo ~ Burlap Blossoms – Natural #1201000
Petaloo ~ Darjeeling – Hydrangeas, Blue
Dew Drops ~ Clear Drops – Large 
Sunflower – Stash
Darice ~ Seashells; Berry Sprigs
Ashland ~ Berries, Purple
Liquitex ~ Gesso –  White, Clear
Viva ~ Croco Crackling Colour – Transparent
Viva ~ Ferro Special Effect Paste – Graphite 
Clearsnap by Donna Salazar ~ Mix’d Media Inx CHOX - Butternut
Ranger ~ Archival Ink – Jet Black
Higgins ~ Drawing Ink - White
Pan Pastels ~ Copper; Rich Gold; Bronze
DecoArt ~ Crafter’s Acrylic – Burnt Umber; Black; Café Mocha; Yellow; Burnt Orange
Americana ~ Acrylic Paint – Driftwood
Pigma ~ Micron – 05 Blue
Prima ~ Clear Stamps – Threading #960797 
Kaisercraft ~ Template – Wheat
Helmar ~ Crystal Kote Fixative Spray
Helmar ~ Gloss Spray
Helmar ~ 450 Quick Dry Adhesive
Helmar ~ Liquid Scrap Dots
Helmar ~ Premium Craft Glue
Helmar ~ Zapdots ½” Square
Tombow ~ Multi Mono Liquid Glue
Zutter by Donna Salazar ~ Distrezz-it-All

Thanks for stopping by! I treasure your comments.
~ Blessings ~

Saturday, November 1, 2014

Happiness Is . . . November Sketch Challenge for C'est Magnifique

The first of the month is the reveal of our November C'est Magnifique Sketch Challenge. I have the layout I created based on this gorgeous sketch to share as well. 

First though, I'd like to share a sneak peek of my Once Upon A...Sketch layout featuring Leaky Shed Studio Chipboard. This project us up on the Leaky Shed blog today, so I hope you'll hop over there to take a look HERE.

Sneak Peek

Now for today's post.

The November "Time After Time" C'est Magnifique Kit is jam packed with gorgeous papers and coordinating elements. I've tried to created some different looks, and today's layout is soft and romantic. Elizabeth and Andrew waited to share their first kiss until they were husband and wife. Here's one of those first precious moments.

"Happiness Is . . ."

To view more amazing inspiration by our talented design team
and to link up your project,
please stop by the C'est Magnifique blog HERE.

Tips and Techniques
These lovely pearled rose clusters by Prima come in the Flower Add-On. The Prima clock charm is part of the Main Kit in the Ephemera Pack.

Here's another view. I've added mixed media products from my stash including mists, microbeads, molding paste and inks. I've used the Ranger Liquid Pearl in a different way. Instead of creating pearls with them, I rubbed this medium across the raised molding paste to achieve a beautiful golden sheen across the page. 

There are lots of ephemera pieces and tags in the Main Kit and Magnifique Mixed Media kit. The key and butterfly are part of the Ephemera Pack. I painted mist like watercolor across the bird cage and butterfly on the ephemera tags. Adding that bit of color pulls my eye right in to this sweet photo. I've also used some cards I cut from the gorgeous Blue Fern Montage papers. 

The smaller of the two rose clusters in this package did not include any pearls. I'm also a bead artist, so I happened to have several matching pearls in my stash. I painted thin wire with white gesso and twisted it through the pearls just like it was done in the larger cluster. Also I pulled the cluster apart and reworked it for this corner.

Here's a side view. The white feathers are from my stash.

Product List

Main Kit
Blue Fern ~ Montage – Invitation
Blue Fern ~ Montage – Bouquet
Prima ~ Ephemera ~ Epiphany #575885

Flower Add On Kit
Prima ~ Winthrop Collection, Pearl #577698

Magnifique Mixed Media Kit
Crate Paper ~ Notes & Things – Journaling Cards #683542
Ranger ~ Liquid Pearls – Buttercup

Stash
Feathers, White
Pearl Beads, White
Beadies Mini Marbles, Clear
Martha Stewart ~ Microbeads – White Gold
Golden ~ Light Molding Paste
Liquitex ~ Gesso – Clear, White
Heidi Swapp Color Shine – Blush
Tattered Angels ~ Glimmer Mist – Vintage Pink
Higgins ~ Drawing Ink – Black, White
Ranger ~ Distress Ink, Pumice Stone
Prima ~ 6” Stencil – Flourish #564278
Helmar ~ 450 Quick Dry Adhesive 
Tombow ~ Multi Mono Liqued Glue
Art Glitter ~ Designer Dries Clear

Thanks for stopping by! I treasure your comments.
~ Blessings ~