Monday, June 27, 2022

'Don’t Forget To Fly' 3D Art Panel for Amazing Paper Grace

Welcome to my creative space.

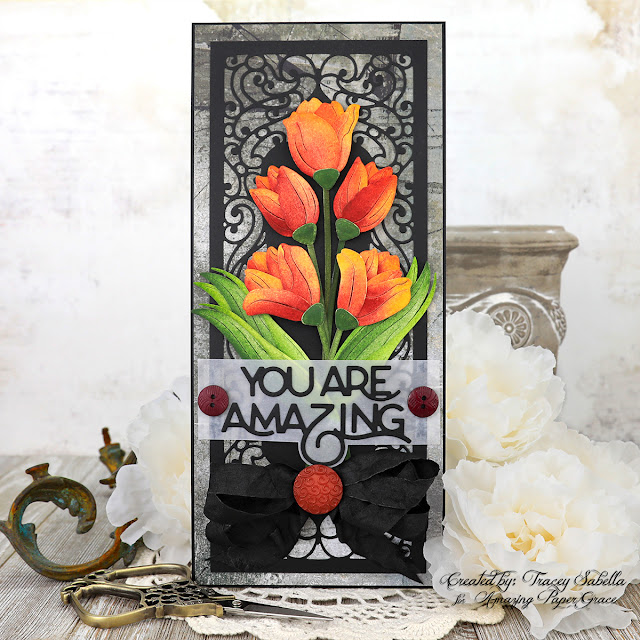
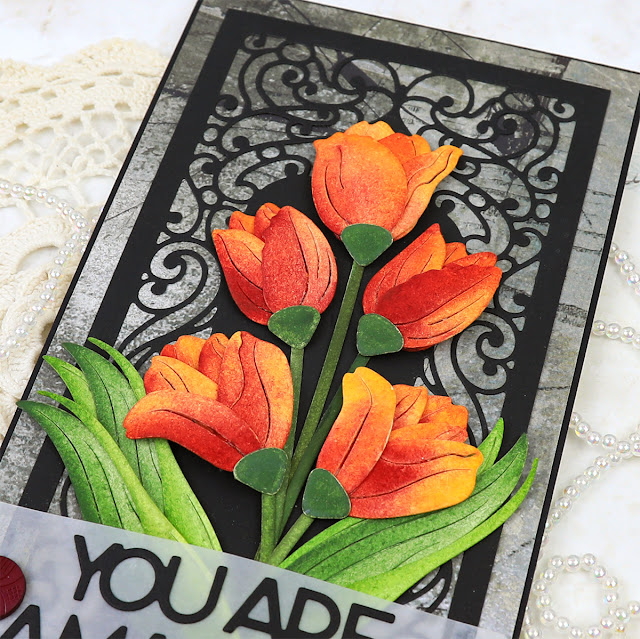
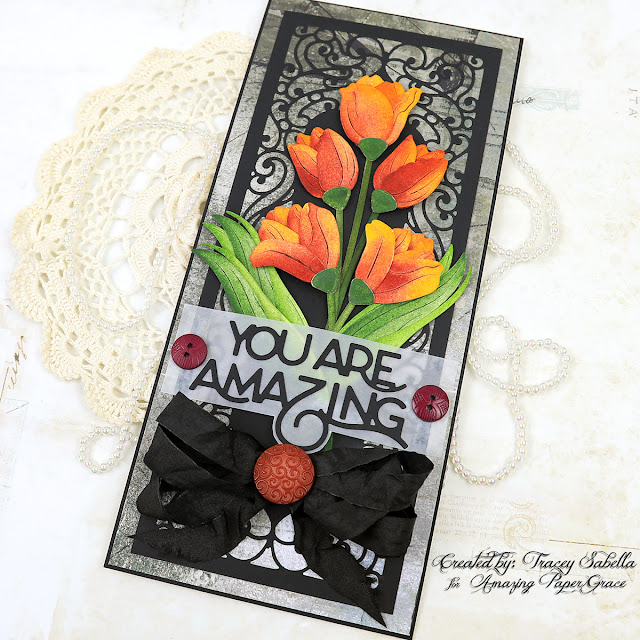
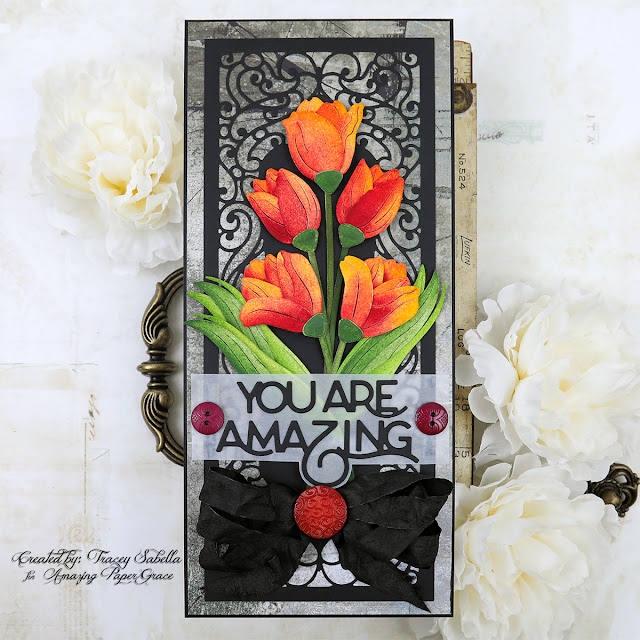
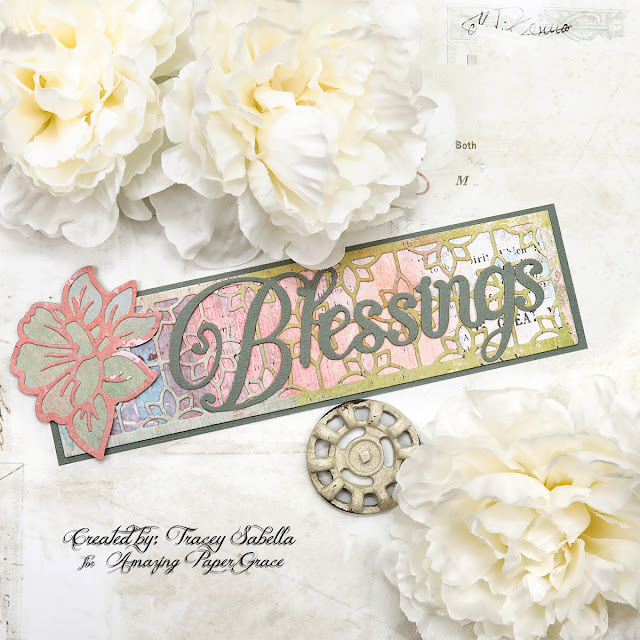
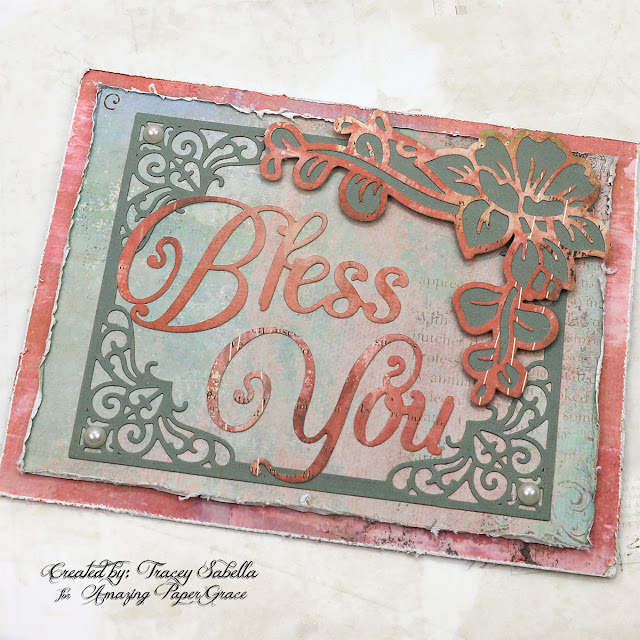
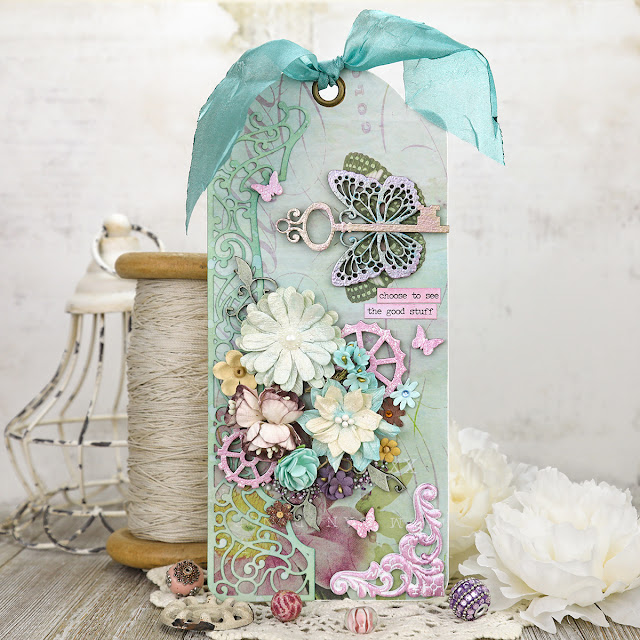
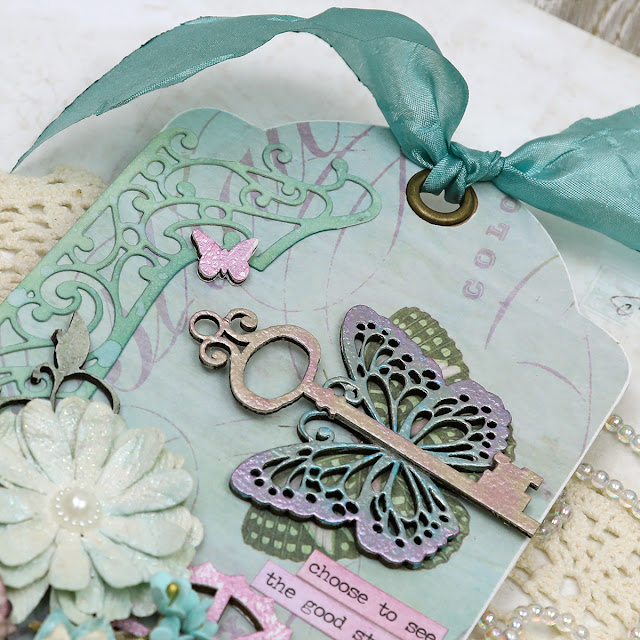
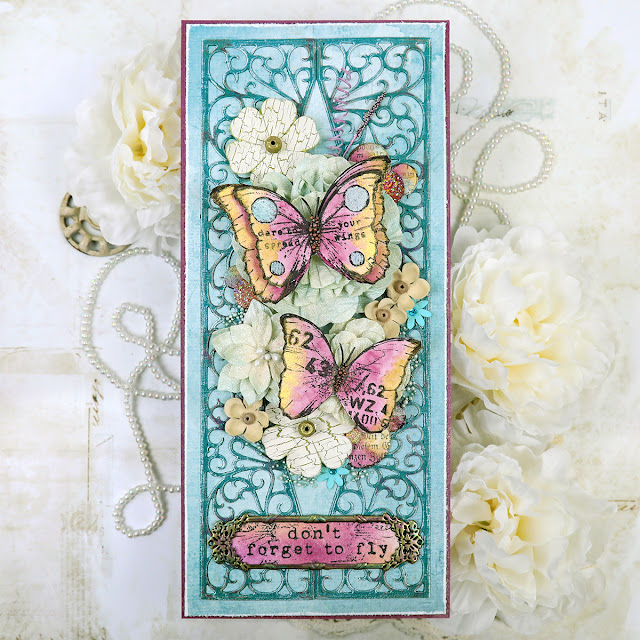
Summer has arrived here in Ohio bringing soaring temperatures and gorgeous fluttering butterflies. The scrolled design in this fabulous Amazing Paper Grace Half Slimline Diamond set (S4-1197) looks like iron scrollwork to me and I just couldn't resist this using amazing design as a backdrop to these watercolor butterflies layered over beautiful flowers. 

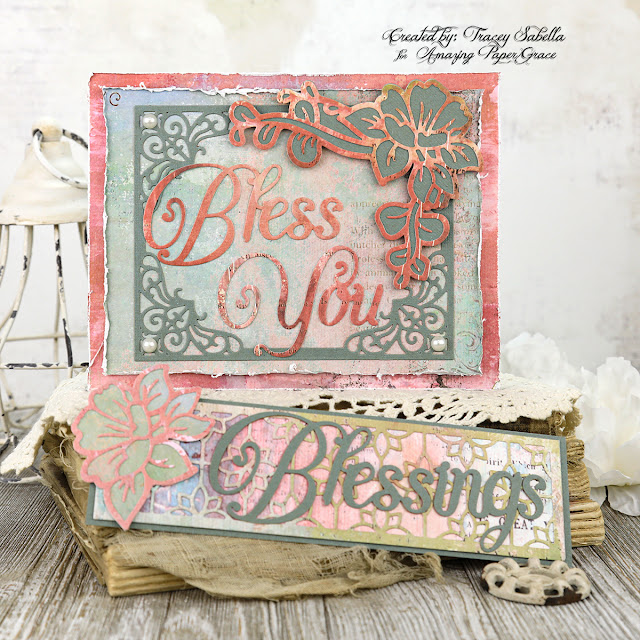
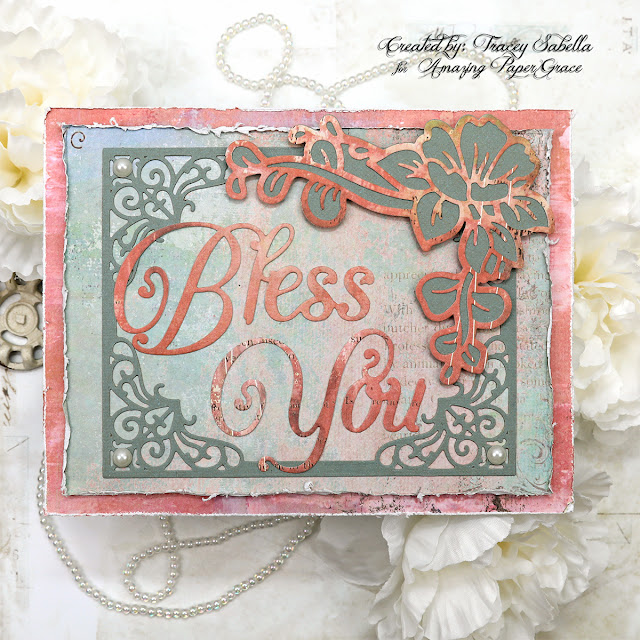
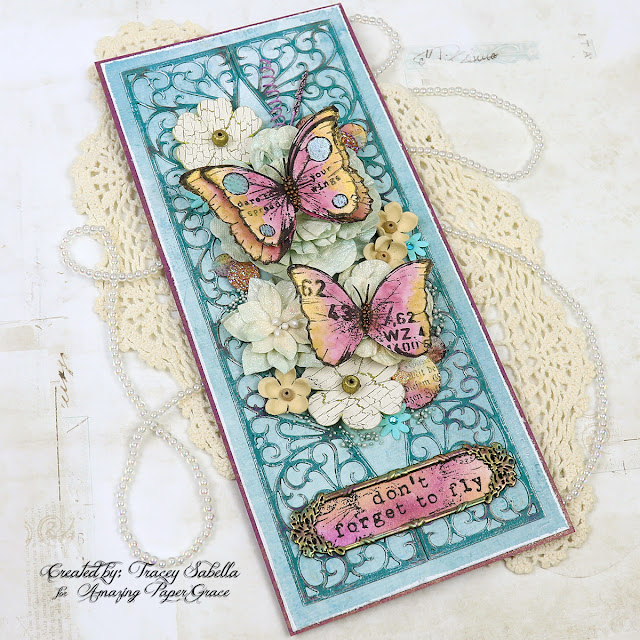
This stunning die cut is cut twice with one piece flipped and placed down in mirror image to create this amazing flourish with a diamond cut out in the center which is perfect for adding a simple sentiment or embellishing with a floral cluster as you see here. Originally I had planned this to be a delightful slimline card. However, by the time I put the finishing touches on this lovely creation, I decided to back it with chipboard to use as a home decor piece instead. 

Do you ever discover long forgotten items when organizing your creative space? While cleaning out a paper holder on my work table I rediscovered a sheet of images I had stamped out onto watercolor paper a while back including these beautiful butterflies and script filled circles. I decided it was time to use them on a project. 

Be sure to scroll down through the "Tips and Techniques" section below for close-ups and all the details on how to create this beautiful butterfly art panel with this gorgeous scrollwork background.

Thank you Amazing Paper Grace for providing the dies used in this project.

Tips and Techniques
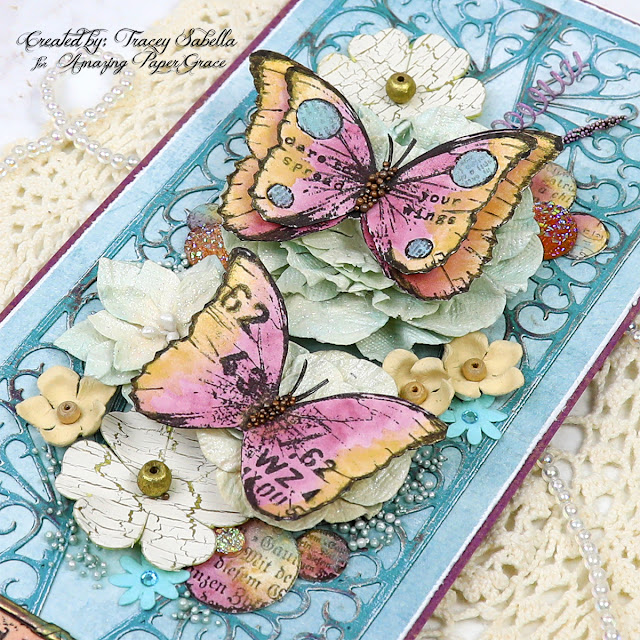
The butterflies and script circles are stamped onto smooth watercolor paper. I started by mixing some purple watercolors to get this lovely hue which I washed across the centers of the butterflies and about half of each circle. Once completely dry, the edges of the wings and about a fourth of the circles are brushed with metallic gold watercolor to add beautiful shimmer, which unfortunately doesn't photograph well. I also added some metallic teal to finish coloring each of the circles. The metallic gold watercolor paint lightened the black ink, so I colored over the gold areas with a black marker where needed. 

I placed a piece of washi tape across the top and bottom of the scrollwork pieces to hold them together and make it easier to keep them lined up properly as I adhered them onto the patterned teal background paper. 

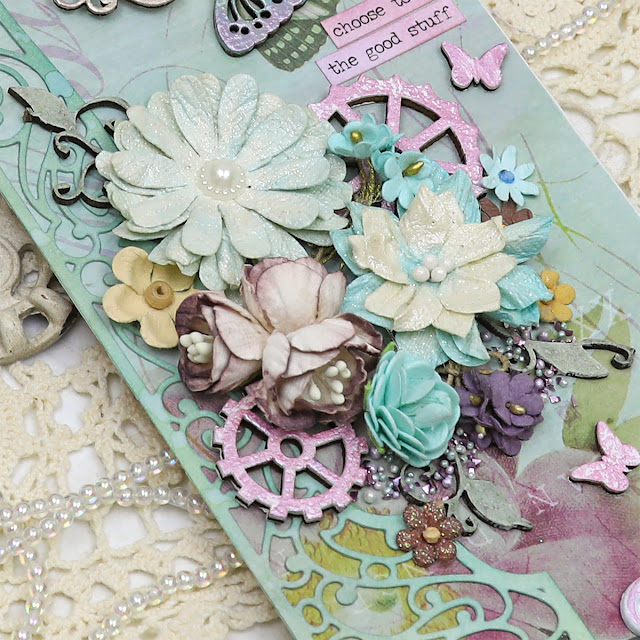
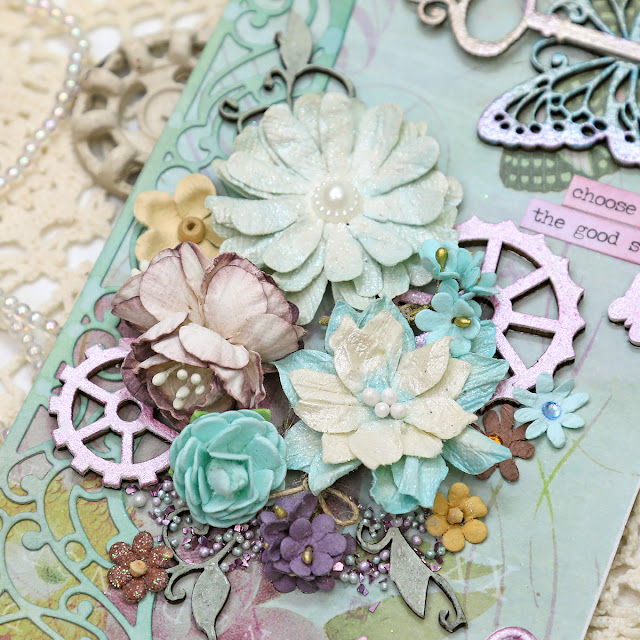
Little Birdie Crafts flowers are arranged down the center of the design with the butterflies layered atop the blossoms. The watercolor circles are tucked in around the cluster.

A fan brush was used  to dry brush gesso across the entire background for a shabby feel. Purple wax is randomly rubbed across the raised die cut as well to add a bit of shading. The teal paper is lightly distressed along the edges and backed with coordinating purple cardstock. A little metallic yellow PanPastel is rubbed around this purple border for a bit of shimmer. 

I just adore texture so added Mint To Be Prills around the cluster.

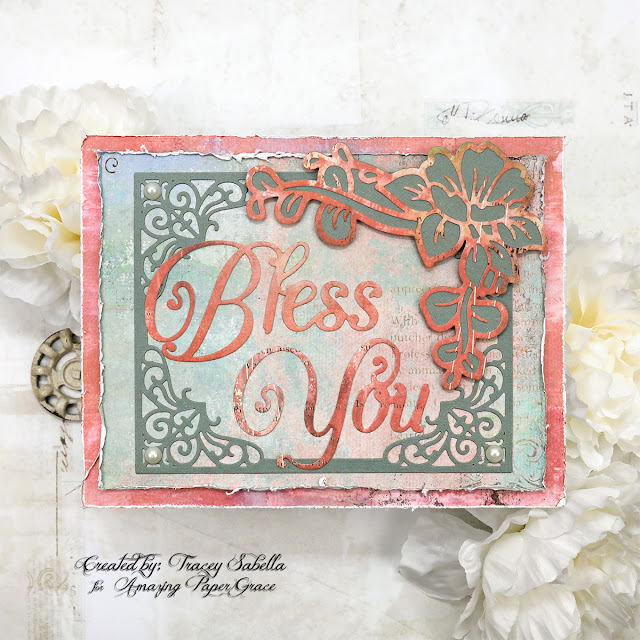
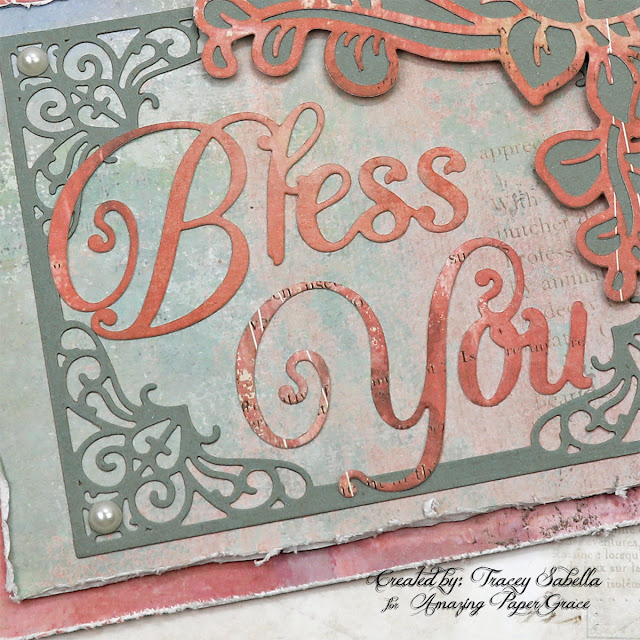
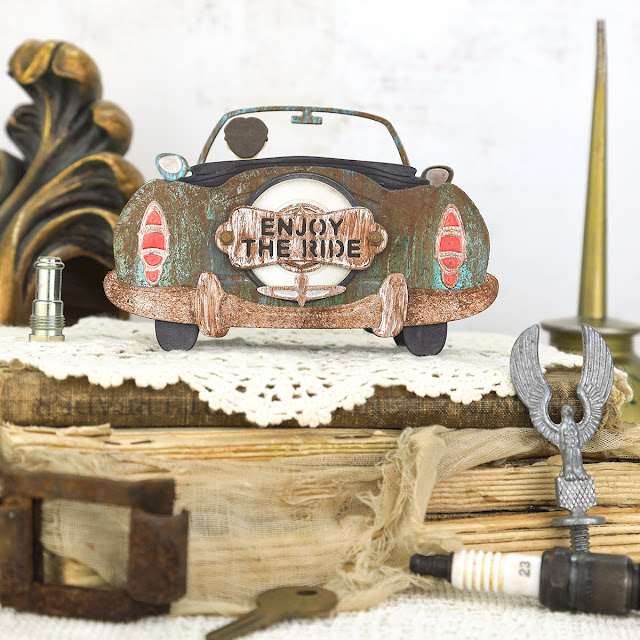
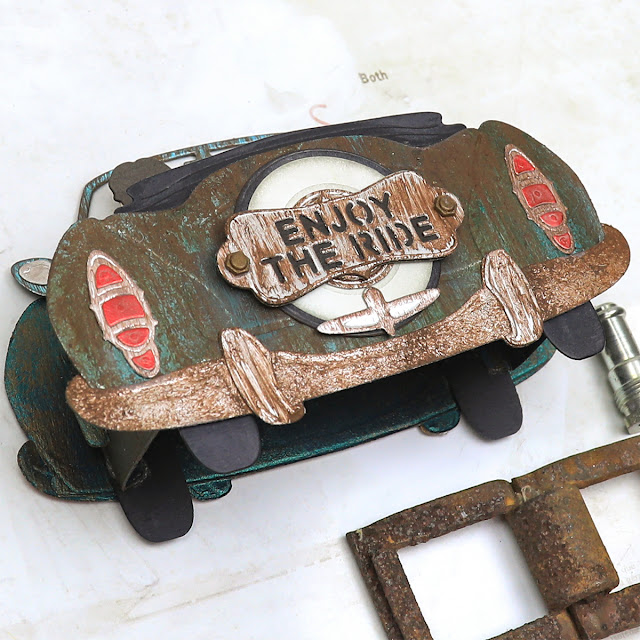
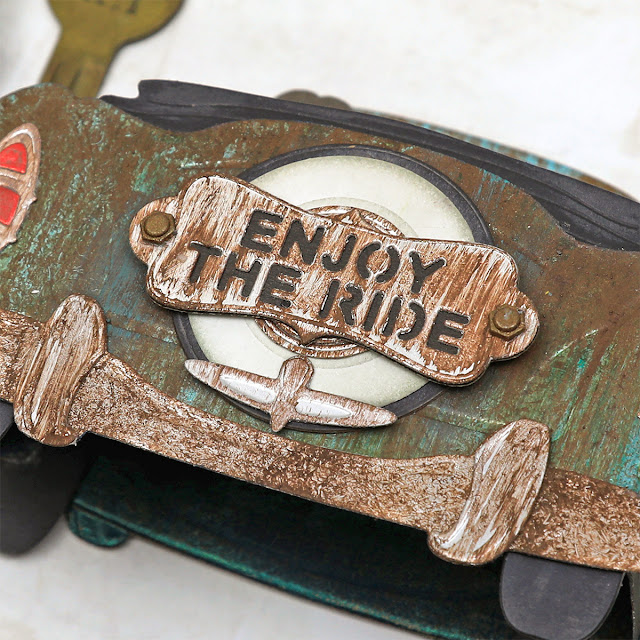
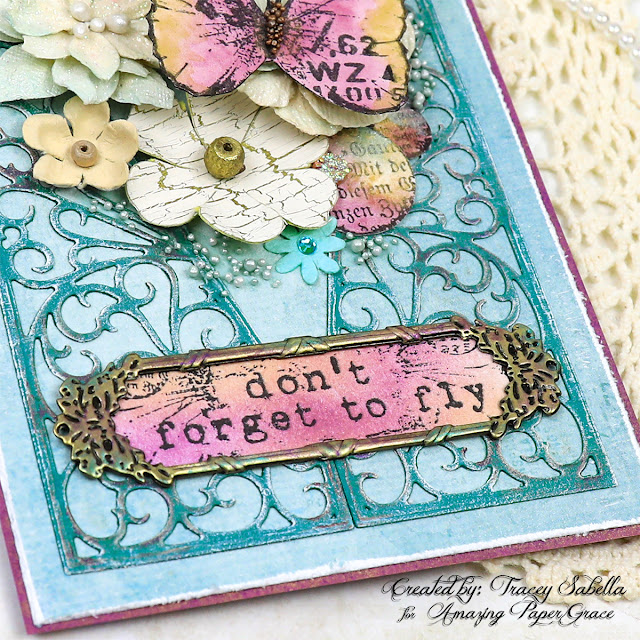
I've had this small metal frame in my stash for eons, and finally found the perfect use for it. The sentiment is part of a larger image with a beautiful woman that is part of the stamp set used for the butterflies. When I placed the frame over the sentiment, I found that it was a perfect paring. The grungy print around the sentiment is part of that stamp, and works well here. Teal and purple waxes are rubbed across the metal frame before adhering it to the sentiment.

For added shimmer, I've tucked in a few Finnabair Sugar Art Pebbles. 

Foam squares are used to pop up the butterflies and where I layered the two butterflies together. The watercolor butterflies and circles were fussy cut after coloring them. 

One final look.

Amazing Paper Grace Dies:

Paper:
  • 49 and Market ~ Spectrum Sherbet: Solids, Cotton Candy
  • Cardstock ~ Teal
  • Arches ~ Watercolor Paper - Hot Press 140 lb

Ink:
  • Versafine ~ Onyx Black 
  • Ranger ~ Distress Ink: Seedless Preserves; Scattered Straw

Stamps:
  • Finnabair with Prima Marketing ~ Cling Stamps: Don't Forget to Fly; Rust and Dust

Mixed Media:
  • Finnabair with Prima Marketing ~ Antique Brilliance Wax: Amethyst Magic
  • Finnabair with Prima Marketing ~ Metallique Wax: Peacock
  • M. Graham ~ Artists' Watercolors
  • Prima Marketing ~ Metallic Accents Semi-Watercolor Cake Set
  • Colorfin ~ PanPastel: Light Gold

Embellishments:

Adhesives:
Scrapbook.com ~ Clear Double Sided Adhesive Roll, 1/4"
Tombow ~ Mono MULTI Liquid Glue
Helmar ~ 450 Quick Dry Adhesive
Beacon ~ 3-IN-1 Advanced Craft Glue
Beacon ~ Fabri-Tac 
Scrapbook Adhesives by 3L ~ 3D Foam Squares - Small, White

Tools:
Spellbinders ~ Platinum 6
Tim Holtz with Tonic Studios ~ Haberdashery Scissor - 5 Inches
Ranger ~ Heat It Craft Tool

Thank you Little Birdie Crafts for providing flowers used in this project!

Little Birdie Crafts can be purchased at their online store.

Use code TRACEY05 for a 5% discount.

I receive a small commission at not cost to you.


Thanks for stopping by! I treasure your comments.

~ Blessings ~

Monday, June 20, 2022

Watercolor Tulip Card for Amazing Paper Grace

Welcome to my creative space.

As soon as I saw this gorgeous Amazing Paper Grace Layered Tulips dies (S4-1195) I thought of the vibrant red and orange/yellow blossoms I grew up adoring. I've used a wet on wet watercolor technique for these tulips cut from watercolor paper.

I was inspired by this lovely photo.

The scrollwork layer is cut using the fabulous Half Slimline Bracket (S4-1199) with this fabulous sentiment cut from the newly released You're Amazing (S4-1203) set from The Right Words collection. I kept with darker grungy colors for my background to keep with my shabby aesthetic and to  help the colors in these vibrant beauties to pop.

Be sure to scroll down through the "Tips and Techniques" section below for close-ups and all the details on how to create this beautiful card and gorgeous tulips.

Thank you Amazing Paper Grace for providing the dies used in this project.

Tips and Techniques
I used watercolor paper to cut these blossoms and foliage. I pulled out all the die cuts for one tulip blossom and used a wash brush to apply a generous layer of water across each petal and while wet brushed first with the yellow/orange color, then while wet came back in with the red and brushed down the left side of each petal and towards the bottom across the entire petal. At this point, I used a dry paper towel to pat off any of the red where I wanted more yellow to show through where needed. 

I just adore how the colors bloomed into each other to create such an organic flow of color that looks so much like the real tulip flowers in the photo above. I repeated this process for each of the five blossoms.

I used the same watercolor technique on the beautiful leaves using greens. The green bases and stems are washed in a solid green color. 

This fabulous sentiment is cut from black cardstock with the You're Amazing die set (S4-1203). I backed it with vellum that has a cloudy design in it. I trimmed around the bottom of the vellum to let more of the background show through and to add a lovely design element to the card.

I used black wrinkled ribbon to tie a three loop bow for a lovely embellishment and to help fill in this bottom area. I had laid everything out before gluing the blossoms down, but still ended up with more space on the bottom than I really wanted, so this bow was a perfect solution and really adds a gorgeous touch to this card. 

I pulled in the colors of the tulips by adding a lovely swirled button to the center of the bow and a couple smaller buttons to each side of the sentiment. 


If the scrollwork design looks familiar, it's cut from the Half Slimline Bracket die set (S4-1199) which I used on my tag with Distress Oxide blending earlier this month. Wow, two strikingly different looks using the same die set. This time I cut the design directly into the paper without using the edge die, then flipped the die and matched up the design to die cut it a second time for the mirror image. The outside edge was then cut to allow a 1/4 inch border.

Once the black scrolled piece was cut, I laid the tulips on top and tried several patterned papers underneath to decide which one worked best. I like this grey grungy design which gave a nice contrast to the black die cut layer and helped the colors in the blossoms to pop so beautifully. 

Amazing Paper Grace Dies:

Paper:
  • Prima - Art Philosophy ~ 12 x 12 Watercolor Paper Pad
  • Dress My Craft ~ A4 Cardstock - Black - 10 Pack
  • Blue Fern Studios ~ Chesterville Collection

Mixed Media:
  • M. Graham  ~ Artists' Watercolors

Embellishments: 

Adhesives:
  • Scrapbook.com ~ Clear Double Sided Adhesive Roll, 1/4"
  • Tombow ~ Mono MULTI Liquid Glue
  • Helmar ~ 450 Quick Dry Adhesive
  • Beacon ~ 3-IN-1 Advanced Craft Glue
  • Beacon ~ Fabri-Tac 

Tools:
  • Spellbinders ~ Platinum 6


Thanks for stopping by! I treasure your comments.

~ Blessings ~

Tuesday, June 14, 2022

Introducing Amazing Paper Grace The Right Words Collection with Bless You Card and Bookmark and Blog Hop

 
Welcome to my creative space.

It's time to reveal the fabulous new collection of Amazing Grace Dies, The Right Words. Imaging my delight when I saw this sweet You Are a Blessing (S5-514) die set. This set just couldn't be any more perfect for me to create a card sending God's blessings to a someone special. What better way to uplift someone than to send blessings their way in the form of a beautiful cardI've paired this sweet card with a bookmark to be a reminder of those blessings. The words and floral image are included in this lovely set. 

I wanted this cheerful sentiment to shine, so didn't use my normal mixed media supplies on this creation. Instead, I selected papers with summery colors and a shabby distressed design.

The die from the beautiful A2 Filigree Marquis set (S4-1164) is a perfect fit both in size and design to frame this sweet sentiment. The bookmark is backed with a lovely die cut from the new Thank You for Your Kindness die set (S5-513) that is a part of The Right Words collection. With a few quick snips, I trimmed the floral image to fit the space on the bookmark. 

Today's projects were created with dies provided by Amazing Paper Grace.

My Projects for Today


What I Made
Yes, you can achieve a shabby chic feel for your project without dimensional flowers or mixed media products by selecting patterned papers that have a distressed, shabby feel.  For balance, the ornate frame die cut with the fabulous A2 Filigree Marquis die set (S4-1164) is cut from solid green cardstock. The base layer is larger than the die cut so that this beautiful frame is perfectly integrated into the design. I've also added more of the coral paper behind the focal paper to frame the card. The edges of these two papers are heavily distressed to accentuate the shabby feel I'm going for. I used foam tape between these two layers to add dimension.

I just adore the variation in the depth of color from this paper on the sentiment. Because the paper behind it is lighter, the sentiment still pops. A pearl is added to each of the visible corners to just a hint of bling.

The gorgeous floral image is also cut in the same coral paper as the sentiment and is backed in more of the solid green cardstock. The grungy patterned paper really works to give a shabby chic feel to this card. Foam tape is used to pop this image up for a little dimension.

If you are a regular follower, you know that I enjoy sending blessings with each of my posts and comments, so I just couldn't resist altering this sentiment. I cut the word bless twice, and trimmed off the second "s" to add to the end of the word. 

To create the bookmark, I used papers from the same collection to die cut this delightful strip using the Thank You for Your Kindness die set (S5-513) in the new The Right Words collection.

The floral corner was a bit large to fit the bookmark, so with a few snips I trimmed it down by cutting off the leafy sections leaving this beautiful blossom image which is a perfect fit. Instead of using the solid green cardstock to back it, I used some green patterned paper instead.
 
One final view of this sweet and encouraging card.

These dies and plates are available from Spellbinders right now! Click here: The Right Words Collection.

Amazing Paper Grace Dies:

Paper:
  • Prima ~ Royal Menagerie Collection
  • Cardstock ~ Green; White

Embellishments:
  • Queen and Company ~ Pearls

Adhesives:
  • Scrapbook.com ~ Clear Double Sided Adhesive Roll 1/4" - Permanent
  • Tombow ~ Mono MULTI Liquid Glue
  • Beacon ~ 3-IN-1 Advanced Craft Glue
  • Beacon ~ Fabri-Tac

Tools:
  • Spellbinders ~ Platinum 6
For more Layered Fleur Bouquet Slimlines Collection Inspiration

Visit each Creative Team blog linked below for their take on creative paper crafting ideas using The Right Words Collection Collection.


I would adore hearing from you! Please leave a comment below letting me know how you will use these gorgeous dies!


Thanks for stopping by! I treasure your comments.

~ Blessings ~

Monday, June 13, 2022

Shabby Mixed Media Tag For Amazing Paper Grace with Tutorial Link for Distress Oxide Ink Blending on Die Cuts

Welcome to my creative space!

A tag is a perfect way to share a small piece of art. With this encouraging sentiment and gorgeous embellishments, this tag is meant to be on display, rather than being a simple gift tag. This tag features the fabulous Amazing Paper Grace Half Slimline Bracket die set (S4-1199) from the Layered Fleur Bouquet Slimlines collection. I've framed half of this tag with this gorgeous die cut. I've created a video tutorial showing how to use Distress Oxide Ink blending on die cuts to create flowing organic color that coordinates perfectly with your patterned background paper.

You can find a full video tutorial explaining this technique exclusively in the Amazing Paper Grace Creative - Creative Encouragement Community Facebook Group.

This lovely group includes exclusive tutorial content. I share a mixed media tutorial there on the 13th of each month. If you're not a part of this fabulous and encouraging group you can join HERE.

Thank you Amazing Paper Grace for providing the dies used in this project.

Tips and Techniques
This gorgeous die cut on the left is cut using the Amazing Paper Grace Half Slimline Bracket die set (S4-1199) and is colored with Distress Oxide ink blending. A full video tutorial is available in the Amazing Paper Grace Creative - Creative Encouragement Community Facebook Group.

This lovely floral cluster is created with Little Birdie Crafts flowers, wood veneer gears and leafy chipboard vines. I've used metallic paints to color the gears.

The top edge of this beautiful die cut is fussy cut to fit the tag and becomes such a beautiful design element!

I wanted to accent the sweet butterfly on the background paper, so layered this chipboard butterfly and key over the printed one. They're colored with a blend of metallic paints. The sweet and encouraging sentiment is inked to coordinate with the colors on the tag.

A piece of beautiful May Arts Silky Crush ribbon is tied on the top.

The bottom edge of the die cut is trimmed to curve with the edge of the tag. 

I've added texture around the bottom of the cluster using prills and glass glitter. The ornate corner on the right side is a metal piece from my stash. It's painted with white gesso then dry brushed with metallic paints to add a bit of color. 

One final look. Doesn't this gorgeous die cut add such amazing texture to this tag?

Amazing Paper Grace Dies:

Paper:
  • Scrap of patterned paper 
  • Scalloped Kraft Tag
  • Tim Holtz with Idea-ology ~ Small Talk

Ink:
  • Ranger ~ Distress Oxide Ink: Iced Spruce; Pine Needles; Forest Moss
  • Ranger ~ Distress Ink: Victorian Velvet; Seedless Preserves; Dusty Concord

Mixed Media:

Embellishments:

Adhesives:
  • Scrapbook.com ~ Clear Double Sided Adhesive Roll - Permanent
  • Helmar ~ 450 Quick Dry Adhesive
  • Beacon ~ 3-IN-1 Advanced Craft Glue
  • Beacon ~ Fabri-Tac 
  • Tombow ~ Mono MULTI Liquid Glue

Tools:
  • Spellbinders ~ Platinum 6


Thanks for stopping by! I treasure your comments.

~ Blessings ~

Sunday, June 12, 2022

“Tell the Story” Floral Camera Card for Little Birdie Crafts

 
Welcome to my Creative Space.

Do you have someone special in your life who exudes creativity? This is just the card to celebrate that artistry. I just adore the camera images included in the fabulous Little Birdie Celebrate Life collection and feature one in this beautiful card.

I’ve layered Celebrate Life ephemera and gorgeous Little Birdie Crafts flowers over the chipboard feather to build dimension as well as adding mixed media touches with stenciling and gesso.

Be sure to hop on over to the Little Birdie blog where I have a full photo tutorial with all the details on how I created this sweet card HERE. Thanks for stopping over there to leave a comment.

Thank you Little Birdie, for providing supplies used in this project!

If you would like to see a full supply list, please scroll down.
Little Birdie Crafts can be purchased at their online store.

Be sure to check out the current sales HERE.

Use code TRACEY05 for a 5% discount.

I receive a small commission at not cost to you.

A couple close-ups for you:


Little Birdie Crafts Supplies:


Other Supplies:
Tim Holtz ~ Small Talk
Wood Shapes ~ Camera; Feather
Scrapbook.com ~ Clear Double Sided Adhesive Roll - Permanent
Helmar ~ 450 Quick Dry Adhesive
Beacon ~ 3-IN-1 Advanced Craft Glue
Beacon ~ Fabri-Tac 
Tombow ~ Mono MULTI Liquid Glue
Foam Tape ~ 1"


Thanks for stopping by! I treasure your comments.

~ Blessings ~

Monday, June 6, 2022

Amazing Paper Grace June 2022 Die of the Month: Pop-Up 3D Vignette Road Trip

 
Welcome to my creative space!

When I saw this fabulous Amazing Paper Grace June Die of the Month I thought what an adorable card it would make for my husband who's a car guy. He likes his cars shiny and clean, so that was the direction I planned to go with this 3D car die set. Then . . . . . . . the more I looked at the shape of this car, I started thinking of old barn find roadsters covered in rust and patina. I searched for images and there was no turning back. I had to transform this adorable car into a grungy "American Pickers" rusty classic. I'd adore hearing from you in the comments to let me know what you think! (Oh and by the way, that's my husband in the driver's seat. He adores taking his cars out for drives around the countryside.)

While it took some time and effort to achieve the rusty patina effect on this car, it was well worth it! I also wanted to show you something that still has that rusty patina effect, but is quick and easy to put together. On the flat card, the car is die cut from paper with a rusty patina print. It still has that grungy patina feel, but in a fraction of the time. With Father's Day just around the corner, these cards would be perfect for that special dad or father figure in your life. 

Be sure to scroll down through the Tips and Techniques section below for all the details on how I created these barn find roadster cards.

Many thanks to Amazing Paper Grace for providing the dies used in this project!

There are 26 cutting dies included in the Pop Up 3D Vignette Road Trip.

3D Roadster Card


"Enjoy the Ride" Flat Roadster Card

Tips and Techniques
I used a combination of Rust Paste, which is basically rust and patina colored acrylic paints with grit added for rusty texture, metallic acrylic paint, liquid acrylic paint, and Artisan Powder to create this patina effect. You could really use whatever rusty paint colors you have in your stash to create a similar effect. 

I mixed the mediums on a palette, but left streaks of the various colors just like you would find in natural rust and patina. I used a dabbing motion to apply the paints, then lightly brushed over it while still wet in a downward motion to give the feel of rust that has happened over time dripping down over the car. The yellow headlights are rubbed with Rusty Brown Matte Wax to make them look a bit dirty.

The dash board is lightly rubbed with distress inks to add to the grungy feel.

***Tip*** When using paints containing any kind of grit, be sure to use an old or inexpensive brush, as the grit will fray the bristles and damage the brush. I have a couple brushes set aside just for this use.

The back of this card is just as fun as the front with with the spare tire and fun sentiments to pick from. I used the same paint technique here on the back. I applied a little grungy ink to the white wall on the tire. The shiny red lights are toned down by rubbing with Rusty Brown Matte Wax, but no rust since glass doesn't rust.

Don't you just adore how these 3D Vignette cards slide to lie flat for posting? I added the rusty patina effect to the hinges and slot pieces that make up the center of the card as well. 

Because this card has a front and a back, I needed to do something to the back of each piece. The metallic paper that I used has a kraft back, and would not have looked right if left as is. The solution was quite simple. I mixed up some emerald and deep blue metallic paints to brush over the back of each piece. Once dry, I lightly dry brushed the pieces with Hazelnut metallic paint in a downward motion to give a bit of that rusty feel. I didn't go all out with the patina mixture on the backs but this quick paint on the backs helps give a cohesive look to the card. 

***Tip*** The paint caused the pieces to curl, so once they were dry to the touch, I layered them in paper towels between two glass mats with a few heavy books on top and let them sit overnight. By the next day they were perfectly flat again. 

A close-up of this fun sentiment on the back. You can see that the mix of pouncing on the rusty color along with brushing over it gives a natural rusty feel. The shiny black tires and back seat are rubbed with a bit more of that rusty brown matte wax to grunge them up just a little. 

Here you get a perfectly grungy car just by die cutting it from paper with a rusty patina design. This car image fits perfectly into the largest Fluted Classics Rectangle. This fluted frame is cut from a different section of the same paper that has more of the rust color in it and is placed over a grungy printed paper in a lighter color so the car image will pop. The sentiment is cut from the lighter paper as well.

The metal accent pieces like the bumper and grille are cut from metallic silver cardstock. To keep it simple, I didn't add any inking or grungy mixed media affects to this card, but just adore the way it turned out. 

My husband wears a lot of red and blue, so I gave him a red shirt in the 3D car and blue here on the flat card.

A few final shots


Supplies:

Amazing Paper Grace Dies:

Paper:
  • Scrapbook.com ~ Christmas - Smooth Cardstock Paper Pad - Slimline
  • Tim Holtz with Idea-ology ~ 8 x 8 Kraft Stock - Metallic - Confections
  • Tim Holtz with Idea-ology ~ 8 x 8 Kraft Stock - Metallic - Jewels
  • Tim Holtz with Idea-ology ~ 8 x 8 Kraft Stock - Metallic
  • Craft Consortium ~ Patina, 12x12" Paper Pad
  • Prima ~ Timeless Memories, 12x12" Paper Pad
  • Concord & 9th ~ Dove 
  • Cardstock ~ Black, Red, Blue, White, Skin Tone

Ink:
  • Distress Ink ~ Frayed Burlap; Pumice Stone

Mixed Media:
  • Finnabair with Prima Marketing ~ Rust Effect Paste: Gold Rust; Red Rust; Turquoise
  • Finnabair with Prima Marketing ~ Liquid Acrylic: Burnt Sienna; Emerald
  • Finnabair with Prima Marketing ~ Matte Wax: Rusty Brown
  • Finnabair with Prima Marketing ~ Metallique Acrylic Paint: Hazelnut; Emerald Green; Deep Waters
  • Frank Garcia with Prima Marketing ~ Artisan Powder: Clay

Embellishments:
  • Tim Holtz with Idea-ology ~ Hardware Heads

Adhesives:
  • Scrapbook.com ~ Clear Double Sided Adhesive Roll - Permanent
  • Helmar ~ 450 Quick Dry Adhesive
  • Beacon ~ 3-IN-1 Advanced Craft Glue
  • Beacon ~ Fabri-Tac 
  • Tombow ~ Mono MULTI Liquid Glue
  • Foam Tape ~ 1"

Tools:
  • Spellbinders ~ Platinum 6
The Amazing Paper Grace Die of the Month is available exclusively at Spellbinders Paper Arts during June 2022, Pop Up 3D Vignette Road Trip along with other membership perks.

View this month’s Amazing Paper Grace Die of the Month! 

I would adore hearing from you! Please leave a comment below letting me know how you will use these fabulous dies!


Thanks for stopping by! I treasure your comments.

~ Blessings ~