Friday, December 23, 2011

All Dressed with Time to Play ~ The Stamping Scrapper December Sketch Reveal


I enjoyed using Shannon’s fabulous sketch to create this layout of Joseph and his groomsmen having some fun after getting dressed and ready for the wedding.


Here is The Stamping Scrapper Sketch for December:


Be sure to head on over the The Stamping Scrapper to see what Shannon’s talented Design Team did with her sketch. I hope you’ll be inspired to try out her sketch as well.

Techniques:

I stuck with the basics on this one.

Inking – I inked the edges of each paper to give a little more  dimension. If you are using chalk ink, you can apply the ink directly from the ink pad to the paper. I’ve been using mostly distress inks these days and have found for a lighter touch I like using a foam applicator in the form of a make-up wedge to apply the ink. While other inks can be applied with a variety of applicator materials, distress inks work best with some type of foam.

The outer B/W floral paper was from a different collection and the white portions were too white so I just used the Ranger foam applicator to apply some pumice stone Distress Ink over the portion that would be showing. Often a paper that is a little off in color can be corrected by rubbing some distress ink over the paper. If in doubt try it out on a piece of scrap paper.

Die Cut Border Strips ~ These come in such large quantities that I rarely buy them. These came from a scrapping buddy who had more than they needed. Don’t you love to trade extras with scrappy friends?? Instead of using the entire strip, I cut two of them into pieces to use around the layout. I can be a little OCD when it comes to scrapping and didn’t like the white edge which would be obvious between the black/grey borders and the red backgrounds, so I used a brush marker to ink the edges of the border strips before applying to the page. 


I've entered this layout in Bird is the Word ~ Time challenge.

Thanks for stopping by! I treasure your comments.

~ Blessings ~

Thursday, December 15, 2011

Wedding Box ~ ScrapFIT Workout #58 ~ Mini Pics Reveal

It's time for a fabulous new Workout at ScrapFIT!!


It seems when something is smaller than normal size it makes it better or cuter! For this Workout you will need to work with Mini Pictures! Then need to be wallet size or smaller - you can have as many or as few as you would like. 

Rachel and Joseph had a beautiful wedding on December 10. I decided instead of a layout like I usually do, I would create a card box for the reception. I placed tiny black and white photos individually matted in a red glitter paper, from their engagement photos and one of Rachel's favorites from Thanksgiving on the edge of the box lid. I so appreciate the wonderful Workouts at ScrapFIT. I'm sure I would have never thought of this idea without this fabulous prompt. So I hope you will join me in embracing this Workout challenge. I can't wait to see what you post on Mister Linky at ScrapFIT!!


We are blessed again to have
as our sponsor for Workout #58

The winner for Workout #58 will receive this WONDERFUL "Old School" kit featuring Pink Paislee!!!


Be sure to stop by the store and check out their monthly kits for only $15 each!!

Now, hop on over to ScrapFIT to see the Design Team inspiration. 

Don't forget, Sara is looking for the next ScrapFIT Design Team and submissions are due by January 1.

Techniques:
Box ~ I used a plain cardboard box that had the shape I was looking for. I cut the top flaps off and used another large piece of cardboard to create the lid with a two inch edge. I cut the card slot, then covered the lid in black moleskin fabric. I used my Scotch ATG to adhere the fabric. I then sprayed the box one side at a time starting with the smaller sides as well as the back of the paper to adhere to the box. I went back and used the red backed tape to secure the edges of the paper as they were a little loose with just the spray adhesive. Then around the bottom, I used a band of black grosgrain ribbon.


Flowers ~ I created these flowers with the Spellbinders Rose Creations die. First I created and glued together the center "bud." Then I used 3 more of the small size petals, and 4 each of 3 larger size petals - your petal size selection will determine the final size of your roses. I inked the petal edges then spritzed them with water and scrunched around the center (I re-spritzed every few petal layers to make sure all the petals were damp. When dry, I arranged the petals so they were in different positions to give nice fullness and then painted translucent medium on the edges with a fine paint brush. I further embellished with wired Christmas berries and rose leaves rescued form the floral department trash at my favorite craft store, Pat Catan's. These roses were quite time consuming, but worth the effort. 


Photos ~ I converted the photos to black and white and sized them at 1 3/4 inches in height - not worrying about the width. I matted each with about 1/8 inch red sparkle paper then evenly spaced them across the front of the lid. 

Thanks for dropping by. I treasure your comments!

~ Blessings ~

Thursday, December 1, 2011

Family ~ ScrapFIT Workout #57 Reveal

It's time for another fabulous ScrapFIT reveal. The first Workout for December is Word of the Year.


It's almost a new year!!! What single word best describes how you want to embrace the new year? Here's your chance to think about how you want to change, improve, create, define or challenge the new year! Share with us a layout or altered project that showcases your Word of the Year!

The word I selected is Family. There are so many changes going on in our family, and I want to embrace the new directions our family is taking. Our son, Joseph, is getting married on December 10 and giving us a lovely new daughter, Rachel (bottom right photo). These photos were taken last week during our Thanksgiving celebration with extended family. We weren't all there at the same time, so I created a collage of photos to include everyone. 


We have a gorgeous Echo Park kit to give to the winner of Workout #57 donated by Paper Lovelies. Be sure to stop by their store and check out their monthly kits for only $15 each!!


I hope you'll join us in creating a project to embrace the new year. Be sure to hop on over to ScrapFIT to see the inspiration by our fabulous design team and to link up your creation. 

Techniques:


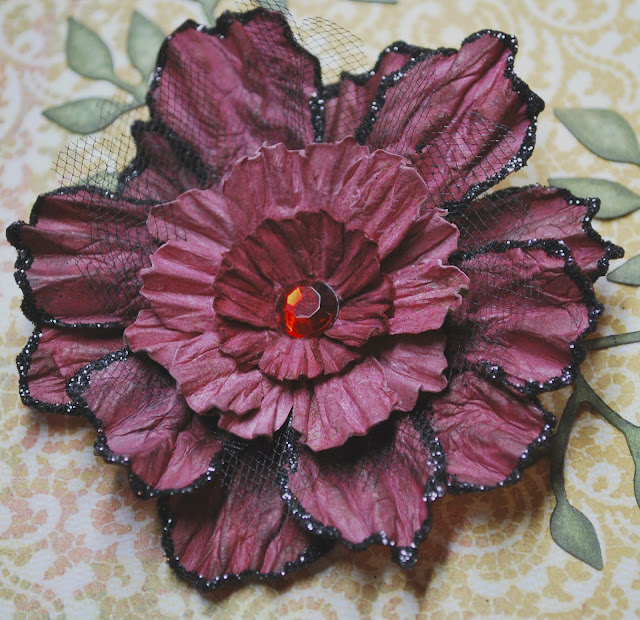
Hand Crafted Flowers ~ I used the Spellbinders Rose Creations Die to cut both the petals and rose leaves for these flowers. I just love all the different sizes and that the petals are not all exactly the same shape. This makes for more realistic flowers. 

For each blossom, I cut 3 sizes of the petals and 4 sizes for the largest flower. I wanted to use the two papers from the background, so I alternated the papers for each size. I cut two petal shapes for the largest size used for that particular flower and one of each of the other sizes. I tried two of each size initially, but found the finished flower to be more thick and fluffy than I wanted for this page. 

To get the texture, I wet the cut petals by dipping them in water. You want them damp but not sopping wet. With my fingers, I pleated each petal, then lightly twisted them together to form a bud-like shape. You can set them aside to dry over night, or if you're like me, hold them with tweezers and dry them with your heat tool. If you use the heat tool, they may not be all the way dry in spots - so be very careful in opening them, because the damp spots will tear very easily. (The completely air dried ones can rip too, but not quite as readily.) 

At this point I inked the petal edges and on the yellow petals inked lightly over the entire petal to give more visual dimension. I wanted the pattern on the black/tan paper to be prominent, so I only inked the edges of those petals. 

I put the blossoms together with a decorative brad, and arranged the petals before closing up the back of the brad. You could also use glue or glue dots to hold them together and use a stick-on decorative center as well. 

For the leaves, I fold them in half to get a center vein, then use my fingers to pinch along each side to get the smaller veins you would find in a real leaf. Then I ink the edges and lightly across the entire leaf. 

Fabric Ruffle ~ This is so easy peasy!! I just tore a strip of fabric (make little snips on the edge of the fabric the width you desire and simply rip the fabric). I machine basted down the center and then lightly gathered it up to make the ruffle. (If you don't have a sewing machine, a quick run of hand basted stitches down the center will work just as well.) I pulled some of the threads off the edges to give a rustic look. I used 3 rows of my Scotch Tape Runner to adhere it to the page.

Fussy Cutting ~ I fussy cut the bracket mat under the flower cluster and hid the bird (that I didn't think went with this layout) under the flowers and leaves. 

I want to say thanks to Amy Gaskins for the fabulous inspiration. The wonderful November Scrap-Friendzy challenges were focused on scraplifting pages from our gallery, and I selected one of Amy's gorgeous pages to lift. If you're looking for a fun forum based scrappy place to hang out with 3 challenges each week, run don't walk to ScrapFriendzy and join our uplifting group of girlz for loads of scrappy fun. December's theme is Scrap Your Stash

Paper:
My Mind's Eye ~ Lost & Found Two Sunshine Collection - 
"Memories" Blossoms, "Lovely" Plaid, "Sunshine" Music
Authentique ~ Foundations
Basic Grey ~ Fruitcake - Pine

Embellishments:
Tan Loose Weave Fabric - Stash
The Paper Studio ~ Spare-Parts - Brad Assortment Browns
Zva Creative - Adhesive Pearl Swirls

Technique Products:
Spellbinders ~ Donna Salazar - Rose Creations Dies
Ranger Distress Inks ~ Pumice Stone, Walnut Stain, Forest Moss
TPC Studio ~  Clearly Better - Chocolate
Hot Off the Press ~ Artful Collection acrylic stamps
7gypsies ~ Clear Stamp Ink - Family

Tools:
Tonic Studios ~ Paper Distresser
Sizzix ~ Big Shot
Visual Artestry ~ Stamp Gird Blocks
Fiskars ~ Kraft Knife
Fiskars ~ Self Healing Craft Mat
EK Success ~ Honey Bee Scissors (My favorite for fussy cutting)

Thanks for stopping by! I treasure your comments.

~ Blessings ~

Adore

I created this layout for "The Scrapping Stamper's" Fabulous November Sketch.

This is our son Joseph and his bride to be. I was fortunate enough to be asked to take a fall engagement photo shoot for them, and this is one of the photos taken that day. The wedding is a week from Saturday - December 10.


Here's Shannon's wonderful November sketch:
Be sure to head on over to Shannon's blog to see the fabulous inspiration by her design team.

Techniques:


Hand Stitching ~ I drew a heart template using a double wavy crisscrossing line around the edges to look like ribbon. I cut the pink paper around the outside edge and penciled in the inner line. I applied the heart to the background paper being sure not to put the adhesive where I would be stitching. I pierced holes on both lines, then used a red Copic marker to color between the two lines. Then I stitched around the heart creating the look of a wavy ribbon. 


Tattered Florals Flower ~  I'm not sure why this flower was so difficult to photograph in the context of the whole layout, but here is a much better shot. I cut two of each size Tattered Florals petals except the large daisy, which I cut from black tulle. I water distressed and inked the edges. On the largest petals, I applied Art Glitter Dries Clear Adhesive and sprinkled with ultra fine glitter. In the past when I tried to use glitter, it didn't stay put very well and made a big mess all over my page. This glue really holds onto the glitter and now I don't mind using glitter.


"Frosted" Chipboard ~ This technique is actually quite easy if you have the right supplies. I used my Crop-A-Dile Big Bite to punch holes in the chipboard hearts so that I would be able lace them together, and sanded the edges. I put a good size dab of modeling paste on my craft mat and mixed in a few drops of acrylic paint to get the pink color. I used a small paint brush (not foam) to apply a thick coat on each heart, swirling the paste to look like frosting on a sugar cookie - that was the goal anyway!! Since this is on chipboard which is a fairly stable surface - you can use either regular modeling paste or flexible modeling paste. If you apply it to cardstock, you would need to use the flexible type. (Yes, I learned this the hard way!!) No need to have both types in your stash, so if you're going out to buy some, I would recommend the flexible kind, which can be found at an art supply store. 

"Sugared Chipboard" ~ I had these grunge board letters in my stash that were the perfect size and shape for my title. I painted them a creamy white and when dry, brushed them with Mod Podge and while wet sprinkled with Diamond Dust (chunky glass glitter). Another easy technique. 

Tulle Flowers ~ I was cutting some tulle to put in my flower and decided the red didn't provide enough contrast, and set it aside - right on top of the pink heart. Wouldn't you know that I was looking for a way to add dimension/texture to the heart and this was just perfect, so I cut some more tulle using my Tattered Florals Die. I sprayed adhesive on the back to adhere them to the page. 

Paper
Basic Grey ~ Hello Lucious - Honeyed, Simply Grand
Red scrap of Basic Grey ~ Scrap Stash
Basic Grey ~ Fruit Cake - Pine
Embellishments
Pelaloo ~ Flora Doodles Brads - Retro Rage Round Gems
Martha Stewart ~ Gemstone Glitter - Onyx
Black and Dark Red Tulle ~ Stash
Cotton Twine
Zva Crystal Swirl
Technique
DMC ~ Floss - #761
Copic Ciao ~ #R59
Deco Art Crafter's Acrlic Paint ~ Redbird, Fun Fuchsia
Liquitex ~ Modeling Pase
Ranger ~ Distress Ink- Aged Mahogany, Victorian Velvet, Forest Moss
Y&C Gel Xtreme 0.7 gold
Art Glitter Dries Clear Adhesive
Tools
Sizzix Die ~ Alterations - Tattered Florals
Sizzix ~ Big Shot
EK Success ~ Honey Bee Scissors
Sizzix ~ Branch w/Leaves die


I've entered this in:
BasicGrey Challenges ~ #58 Lost and Found - My found object is the twine tying the heart banner together, and my Basic Grey project is the paper.

Thanks for stopping by!! I treasure your comments
~ Blessings ~

Tuesday, November 15, 2011

Mama-Razzi ~ ScrapFIT Workout #56 Reveal

Scrapbooking is my passion and it all starts with the photos, so when I saw this ScrapFIT Workout to create a layout about my favorite gadget, I knew it needed to be about my camera. Here is the challenge and I hope you'll hop on over to ScrapFIT and create a layout to join us.

Oh, how we all love our technical gadgets! Computer, iPods, iPads, Wii, DS, Smart Phone, Digital SLR Camera, and soooo many more! What technical gadget do you hold deer to your heart? Show us and tell us why you can't live without it!

Here's the layout I created for this fun challenge:


Now, if the challenge itself isn't enough motivation to join the Workout, look at this fabulous prize donated by:


Burlap & Buttercups is back again for this workout to offer you another AMAZING kit as a prize fo the winner of Workout #56. They are a monthly kit club delivering beautifully coordinating scrapbooking supplies. 

Every month we provide our subscribers with a generous assortment of patterned paper, cardstock, stickers, ribbon and many other fun embellishments - enough to create a number of layouts and projects. Each of our scrapbook kits puts inspiration at the fingertips of those seeking to preserve treasured memories. We continuously browse the manufacturers' latest offerings, selecting some of the hottest new products to hit the market . . .  so our members can simply open their boxes when they arrive and begin creating!


Techniques:


Decorative Scissors ~ You know those deco scissors that went out of vogue for scrapping a while back? Well, I've been inspired by the talented Gabrielle Pollacco to use them on my layered blocks. I used two different styles - a postage stamp look and medium size wave. I added dimension on the postage stamp block by inking with Walnut Stain Distress Ink, for the waved block, I cut the block with the deco scissors, then pierced and hand stitched around the block. I then water distressed the edges by applying water with a wet cotton ball and then scrunched in with my fingers. When dry I added a light touch of Walnut Stain Ink. 

Burlap ~ I wanted a layer of open weave rustic fiber, so I took a block of burlap and removed two strands of fiber for every one strand I left. To adhere, I sprayed the back of the burlap with Krylon spray adhesive.


Flower Centers ~ I really liked these flowers - the color, size and design were perfect to go on this page, but the centers felt lacking to me. The smaller flowers had glitter centers and the pretty pewter center on the blue flower had an empty hole in the center. I remedied this by adding large pearls to the smaller flowers and a clear rhinestone to the larger. Don't be afraid to modify your flowers. Just a simple modification can make a big difference. 


Transparent Layering ~ Sometimes I like the look of layering, but don't want to completely cover my background paper. Using an open weave fiber and open crystal leaves allowed this cluster to give balance without overwhelming this corner. If you want to get more milage out of your crystal designs, don't be afraid to cut them apart and use the pieces around your page like I did with this crystal leaf swirl by Zva. 

If you see a technique on my page that you would like more information about, don't hesitate to ask. I'll be glad to give you more information.

Paper
Bo Bunny ~ Mama-Razzi Line:
Mama-Razzi, Shutter, Word, Stripe, Film
Bo Bunny ~ Mama-Razzi Combo Stickers

Embellishments
Bo Bunny Trinets ~ Garden Girl
Zva ~ Self Adhesive Crystal - Leaves
Jolee's Boutique ~ Parisian Flowers
Floral Embellishments by Petaloo:
Canterbury Rose x 6 Vanilla
Darjeeling Collection Deep Blue
Brighton Tan/Brown
Darice ~ Rhinestones
Heidi Grace ~ Clear Epoxy Sentiments 1 - One Sunny Day
Pebbles Chips ~ Chocolate Brown
Prima Say it in Pearls ~ SIIS and Crystal Center
Queen and Co. ~ Pearls - Sunflower Yellow
Burlap ~ Stash
Lace ~ Stash
Lace Mesh ~ a gift from my Scrappy Friend, Robyn

Technique Products
Tim Holtz Stamp
TPC Studie ~ Clearly Better Ink Pad - Chocolate
Tombow APT ~ N15
Zig Writer ~ Pure Brown
Tim Holtz Stamp - Fabulous Flourishes
Ranger Distress Ink ~ Walnut Stain, Gathered Twigs
Decorative Scissors ~ Borrowed from Pat Catan's
DMC Embroidery Floss ~ #433

Tools
Tim Holtz ~ Acrylic Grid Stamp Blocks
Fiskars ~ Craft Knife
Fiskars ~ Self-Healing Mat
Tonic Studios ~ Paper Distresser
Tonic Studios ~ Scissors
Idea-ology ~ Ruler

I've entered this at:
Bird is the Word ~ "Wish" Challenge - Journaling "I WISH they enjoyed being photographed.

Thanks for stopping by. I treasure your comments!

~ Blessings ~


Tuesday, November 1, 2011

Christmas Wedding Card ~ ScrapFIT Reveal ~ Workout #55 Tis' the Season

ScrapFIT Workout #55 is to create a Christmas card or tag. As you can tell from my blog postings, I usually create scrapbook pages and haven't done much in the way of making cards, so this was quite a challenge for me. Of course I don't mind being stretched!!

Our son is getting married in December to his beautiful fiance, Rachel, so rather than make a traditional Christmas card or tag, I created this Christmas wedding card. Here are the results of my efforts with front and open views:

Our sponsor for this Challenge is Burlap and Buttercups. They 
have donated this wonderful kit for our winner:


I hope you have been inspired to join ScrapFIT Challenge #55 to create a Christmas Card or tag ~ 

We know Christmas will be here before we know it so let's start spreading ideas for Christmas Cards and Tags! Show us what you're putting in the mail or attaching to a gift this year!

I can't wait to see what you create!!

I've only created single fold cards before and found Bonnie Szwalkiewicz's tutorial on how to create tri-fold cards to be very helpful. She has a picture tutorial with dimensions in addition to her easy to follow video.

Techniques:

Poinsettia
I used the McGill Lily punch, Punch Bunch ~ 3D Punch Craft Tool Kit, and In Stitch'z foam mat to punch and shape the leaves for the poinsettia. I also crocheted the cream doily behind my flower and tucked in a bit of black netting as well. The center was created with some shimmery gold glass beads from my stash.


Glitter Snowflakes:
I used the Martha Stewart Double Sided Snowflake Stickers and ultra fine glitter to create these sparkly snowflakes. I'll really like the way they turned out, but will warn you that getting the sticker from the paper backing to the card was quite some challenge. I used my piercing tool to poke down each little piece of the sticker, then placed a scrap of the non-stick backing over top, and rubbed it with a bone folder to make sure it was completely adhered before sprinkling the glitter on. A good tap and a light rub with my finger removed the excess glitter. 

Brad Attachment:
The love piece is a brad. I didn't want to pierce my paper in this tri-fold card or have the extra bulk of the brad prongs, so I used my wire cutters to remove the prongs. I put several layers of red backed tape until it was even with the depth of the brad. I tried to use foam tape, but it was too thick.

Fussy Cutting:
An inexpensive way to get a nice embellishment is to fussy cut from scraps. The rejoice image was cut from a scrap left over from a previous project.

Paper:
Bo Bunny ~ Decaf Dot, Noel Stripe, Noel Cheer
Bazzil Cardstock 
Green Cardstock ~ Scrap from my stash

Embellishments:
Brown Lace ~ stash
Music Ribbon ~ stash
Black Tulle ~ stash
Flower ~ Crocheted from scraps
Rhinestone strip ~ Stash
Love brad
Prima ~ Pearl Swirl

Technique Products:
Zig Textile Marker #40 Green
Zig Textire Marker #93 Green Grey                         
Gold Beads ~ Stash
DMC Embroidery Floss
Crystal Gliter Ritz ~ Cool Highlights
Martha Steward ~ Double Sided Snowflake Stickers
Ranger ~ Matte Accents

Tools:
McGill ~ Lily Punch
Punch Bunch ~ Tool Kit
In Stitch'z Piercing tool
In Stitch's Foam Mat
Idea-ology Ruler
This card is entered in:
Anything Goes Challenge Blog: Challenge #53 ~ Stitches real or faux - Hand stitching on borders of card front. (Nov 14)**
Crafty Sentiments: More than one fold ~ Trifold card (Nov 7)**
Catered Crop: FTR24 Recipe ~ I used burgundy/green colors, Christmas theme, glitter and lace (Nov 10)**
Come and Get it Challenges: Anything Goes **
The Hybrid Chick: Card Caravan Challenge #5 THCCC5 ~ Homemade flowers - Poinsettia (Nov 11)**
Ribbon Girls: Jingle all the way to Christmas ~ Use ribbon on a Christmas themed project - Used music ribbon on Christmas wedding card**

Thanks for stopping by my blog! I treasure your comments!

~ Blessings ~

Tuesday, October 25, 2011

Swinging Together ~ Scrapping Stamper Reveal

Shannon gave us two sketches to choose from this month. I created a layout with a flowering dogwood tree earlier this year, so decided to go a different direction from the tree. I've been wanting to extend an element on out of a photo for a while, and this photo worked perfectly. Grace is pushing Maria on our wooden swing set back in North Carolina. The set is not in the photo, so I extended the swing chains and recreated the wooden structure. I told my wonderful engineer husband that I felt like I was doing an engineering project creating the swing set - LOL!

My title was inspired by the Bird is the Word "Together" Challenge.
 

Here is the fabulous October Scrapping Stamper Sketch that I chose to work with:


Be sure to head over to The Scrapping Stamper to see Shannon's other great sketch for October and to see the inspiring layouts created by her DT!!

Techniques:

Chain: I purchased some chain from the jewelry department at JoAnn's and applied the blue alcohol ink with a fine paintbrush. I mixed a couple colors of alcohol ink on my craft mat to get a color that would match the blue chain in the photo. I cut small pieces of glue dots to adhere the chain to the page. The chain eyelets were formed with craft wire wrapped once around a round tip plier and then twisted. I made the two pieces and then cut part of the twisted section off with wire cutters so they would be the same length.

Swing set: This was a fairly simple project. I located a photo of a swing set similar to the one this swing had hung from and recreated it in a wood-like paper. I cut strips of the paper and inked the edges before assembling my swing set. I alcohol inked the screw brads before adding to strategic spots.

Butterflies: These little butterflies started out as simple punched cut-outs. I brushed coordinating stickles across the wings, and Black Diamond Stickles over the bodies. When dry, I curled the wings over a round bar to add dimension. Such sweet little butterflies for pennies.

Title Letters: These letters were plain white. First I took the letters for my title and stuck them down on my non-stick craft mat. I rubbed distress ink over them then painted a thin later of stickles.  When dry the adhesive backed letters peel right off of the mat, and are ready to apply  to my project. This is a great way to get sparkly letters that coordinate perfectly without the cost of expensive glitter letters or attempting to cut glitter paper, which can be a challenge and may not be just the right color.

Paper:
Bo Bunny Fusion ~ Tangerine, Free Spirit, Mesmerize, Love Me Tender
Pixie Press Memories ~ Crackle Mustard
Letters

Embellishments:
Chain ~ Stash
Screw Brads ~ Stash

Technique Products:
Ranger Alcohol ink
Tombo ~ ABT N15
Zig Textile Marker ~ Brown
Stickles
Distress Ink

Tools:
Martha Steward Circle Cutter
Martha Stewart ~ Ruler
Fiskars Softgrip Craft Knife
Fiskars 14 in Self-Healing Rotating Mat

I'm participating with this LO in the Cuttin' Up with class Show and Tell

Thanks for stopping by. I treasure your comments! 

~ Blessings ~

Wednesday, October 19, 2011

You and Me

For the past several years we've made our annual trek to Knoebels Phall Phun Phest. Last year, our daughter, Elizabeth, came with us. My sister, Terry, likes to ride the Fandango, but it's a bit much for the rest of us. (I can't do spinning rides - bummer) It was so much fun for Terry to have a flying companion!!

I like the challenge of designing layouts around several challenges. This page incorporates the Layout Friday Challenge over at Bo Bunny ~ dimension, Bird is the Word ~ "You and Me," along with the sketch from Punky Scraps.

Here is my layout:


I've been wanting to touch base with my distressed/funky style and complete a
challenge over at Punky Scraps, and am finally joining in on their fun by
using this fabulous challenge sketch by their talented Marie:

Techniques:

Dimensional Ribbon: The Pink Punch ribbon was a little brighter than the pink in the photo, so I toned it down by using a sponge applicator to rub Pumice Stone Distress Ink onto the ribbon. When dry I randomly twisted and scrunched the ribbon across the page and used mini staples to secure it to the page.

Dimensional Border: I went to my stash to find beads and wire jewelry findings. I used alcohol ink to color the wire pieces and alter the color on the flower eyelet blending the inks to get pink and dark teal. I adhered the pieces by stitching through them into a variety of patterns that I randomly created with my piercing tool. I also used my handy dandy Big Bite to set the snaps.

Chipboard: One of the things I enjoy about the Naked Chipboard, is that I can alter it to go with any layout. Here I painted it pink, then sprayed the back of the punchinella with temporary adhesive and stuck it to the chipboard, which I then painted with brown metallic paint. In removing the punchinella from the larger chipboard it peeled off some of the paint down to the raw chipboard. (I had made a mistake and put a couple extra coats of pink paint on the larger chipboard, making it softer and easier to "damage.") This was a happy mistake that I liked since I was going for a distressed look. I took my piercing tool to the arrow pieces and exposed portions of raw chipboard on these pieces as well.

Punchinella Texture: I cut a 12 inch length of the round punchinella and adhered it across my page with temporary adhesive and used a creamy yellow paint to add this distressed texture to my LO. I did not paint all the way to the edge so the dots would fade out in a distressed kind of way.

Funky Title: To go with the distressed look, I wanted a bold and funky title. I simply used a pencil to sketch out the title on my layout. I used two shades of copics markers to color the letters. Since I only have 6 copics, the color wasn't quite right, so I went over the letters with a teal Prismacolor pencil and blending pencil giving them just the right color. One of our daughter's enjoys art and discovered the Moo Eraser. It erases pencil marks without any damage to the paper. If you like to sketch things out on your layouts, and have trouble removing the tell tale signs, this is a product you will want to try. They are available in art supply stores.

Misting: I had fun misting and ink dropping on this page. For the larger drops I removed the sprayer from the bottle and flicked ink from the bottom of the sprayer onto the layout. Thanks Amanda for sharing the ink flicking technique with me!

Paper
Bo Bunny Et Cetera ~ Geography
Bo Bunny Time Piece Collection ~ Note Worthy Journal Card

Embellishments
Bo Bunny ~ Double Dot Ribbon ~ Pink Punch
Bo Bunny ~ Double Dot Chipboard ~ Bare Naked
Beads and Ribbon Slide ~ stash

Technique Products
Copic Sketch markers ~ B34 Manganese Blue, B 37 Antwerp Blue
Prismacolor Pencils and Blending Pencil
Punchinella ~ Squares - a gift from my scrappy friend, Mandy
Punchinella ~ Round - a gift from my scrappy friend, Robin
Zig Millennium 05 ~ Pure Blue
Zig Writer ~ Pure Blue
DMC Embroidery Floss #3808
Glimmer Mist ~ Turquoise Blue
Smooch Spritz ~ Log Cabin
DecoArt Acrylic Paint ~ Buttercream
DecoArt Dazzling Metallics ~ Renaissance Brown
Making Memories Scrapbook Colors ~ Fresh Anthology Deep Coral
Ranger Alcohol Ink ~ Snow Cap, Pink Sherbet, Denim, Pool
Ranger Distress Ink ~ Pumice Stone

Tools
Idea-ology ~ Mini Stapler and Staples
Crop-A-Dile II ~ Big Bite
In Stitch'z Piercing tool and mat
Tonic Studios Scissors
Fiskars ~ Softgrip Craft Knife
Fiskars ~ Self Healing Rotating Mat
Moo Eraser

I've also entered this layout in the following:
Scrapbook Sisters Challenge#6 - Shapes - Using circles ~ Photo, Journal spot, paint strip, snaps (November 6)

Thanks for stopping by! I treasure your comments.

~ Blessings ~

Saturday, October 15, 2011

18 Years Later ~ ScrapFIT Reveal for Workout #54

I just knew when I came across this old photo of the girls with their cousin, Connie, I had to take a current shot and scrap them together. ScrapFIT Workout #54 was a perfect fit for these photos.

Numbers, numbers, and more numbers! Let's see a layout or card with lots and lots of numbers. Can you use them in your title? Can you add them as an embellishment? Can you stamp them? YES you can do all of those and more! Show us how your numbers add up!

Here is my example for you. I even used the numbers zero and one along with the negatives from the zeros to create my flowers:

I hope you are inspired to join us for this fun Workout!!

The winner of this Workout will receive this fabulous prize from The Paper Bakery Kit Club:

Be sure to head on over to ScrapFIT to be inspired by the work of our fabulous DT!

Techniques:

Masking
This paper came with a sticker sheet that had flowers in two sizes that coordinate with the flowers on the paper. I stuck them on the paper and spritzed glimmer mist over them as a mask. I used a few drops of Un-Du adhesive remover to get them off without damaging the page or the stickers. The funny think is that I blotted with a paper towel and since the stickers were shiny, the glimmer mist wiped right off, so I'll be able to use the stickers on another page.

Flowers
I looked through my fonts to find 0's and 1's that looked similar to flower petals, and cut out bunches of them on my Gazelle. The o's were placed on a larger circle of kraft and once adhered, I trimmed around the petals. The ones and negatives from the zeros where inked then adhered to a small circle of kraft then shaped and curled, then a rhinestone placed in the center of each.

Stitching
Because the girls were so young in the older photo, and down the road it might be hard to remember who each one is in the photo, I drew lines connecting the girls between the photos and hand stitched the lines to write the girls' names on.

Supplies:

Paper:
Simple Stories - 100 Days of Summer ~ 100% Summer Fun
Simple Stories - 100 Days of Summer ~ Flash Cards
Simple Stories - 100 Days of Summer ~ Sweet Memories
Simple Stories - 100 Days of Summer ~ Cardstock Stickers Fundamentals
Simple Stories - 100 Days of Summer ~ Cardstock Stickers Expressions
Kraft Paper ~ Stash

Embellishments:
Scrap-Friendzy Kit ~ Pom Pom Lace
Darice ~ Jute
Rhinestones ~ Stash
Stickers ~ Stash

Technique Items:
Tattered Angels Glimmer Mist ~ Simply Khaki
Tombo ABT #993
Zig Millennium 05 ~ Pure Black
Ranger Distress Ink ~ Pine Needles, Rusty Hinge, Spiced Marmalade
Ranger Alcohol Ink ~ Terra Cotta
DMC Thread ~ Stash
Black Thread ~ Stash

Tools:
Fiskars ~ Softgrip Craft Knife
Fiskars ~ Self-healing Mat
Gazelle
EK Success Punch
Sewing Machine

Thanks for stopping by. I treasure your comments!

~ Blessings ~