Showing posts with label Distrezz-It-All. Show all posts

Wednesday, September 10, 2014

Anniversary Card with Feathered Rose Tutorial for Donna Salazar

Today I'm sharing an anniversary card created for my parents who are celebrating 55 years of marriage. I've used Donna Salazar's Spellbinder flower dies and inks to create my flowers and have shared a tutorial for the Feathered Rose below. 

Anniversary Card

Tips and Techniques
My Feathered Rose is created with Donna's Spellbinders Rose Creations and Carnation Creations dies and colored with her Mix'd Media Inx and Smooch Spritz by Clearsnap. Please scroll down for my tutorial. 

The remaining flowers are created from Donna's Spellbinder's Bitty Blossoms dies using her Mix'd Media Stax2 Mulberry paper, patterned paper, and cardstock. The edges are distressed with Donna's Zutter Distrezz-it-All.

The background is stenciled, dry brushed with gesso, and splattered, then dripped with Donna's Pralines and Cream Smooch Spritz. I've also used Smooch to color the printed canvas and cheese cloth tucked into my cluster. The leaves are cut with Carnation Creations dies. 

For the inside I've used Mix'd Media Inx to stamp and emboss the sentiment. I've distressed the background with Donna's Art Gone Wild stamps. I then spritzed with Pralines & Cream Smooch Spritz to add a little color and lots of shimmer. 

One final shot.

Feathered Rose Tutorial
**I photographed this tutorial as I was creating a flower for another project,
so you will see variations in the color and center.

Supply List
White Cardstock
Feathers
Spellbinders ~ Donna Salazar - Carnation Creations
Spellbinders ~ Donna Salazar - Rose Creations
Clearsnap ~ Donna Salazar - Mix'd Media Inx
Foam Pad
Stylus
Round Nose Pliers or other tool to curl petals
Spellbinders ~ Artisan X-plorer

Step 1.
I've numbered my dies from each set from the smallest to the largest. 
Cut two each of the following from white cardstock:
Rose Creations #3
Rose Creations #6
Carnation Creations #5

Step 2.
Use a stylus to cup the back of each of the rose petals. (Large & small)

Step 3.
Turn the rose sections over and use the stylus to cup the center. This will also raise the petals.

Step 4.
Cup each of the carnation petals by rolling the stylus from the center to the tip of each petal.

Step 5. 
Use round nose pliers to curl each of the petals to the right on one section and in the opposite direction on the other. If you don't have round nose pliers, you can curl the petals around something slender like a bamboo skewer or thin knitting needle.

Step 6.
Color flowers.
I twisted a Mix'd Media Inx pad onto a craft mat and spritzed with water. I used this like water color paint and brushed it onto the flowers with a paint brush. The centers will be covered, so don't need colored. The petal tips are left white.

Step 7.
Glue the largest petals together, offsetting the petals as shown.

Step 8.
Select 5 or 10 similar sized feathers.
For this flower I used 5.
The flower on my card uses 10.
If using 5 feathers - adhere between each petal.
If using 10, adhere between each petal, and also in the center of each petal.
Place so the feathers extend over the edges about the same distance. They may not line up in the center equally, but that's just fine, since it will be covered up with the next layer.

Step 9.
Adhere the carnation petals together, offsetting the petals as shown.
The petals will curl into each other since they are curled in opposite directions.
Glue these petals over the feathers.

Step 10.
Use the round nose pliers to curl back the edges of the smaller rose petals.
Offset and adhere as shown.
Step 11.
Add center.
A variety of centers can be used. Here I've used a medium bitty blossom and for the flower on my card, I used stamen. You could also use a brad, button, or large rhinestone.
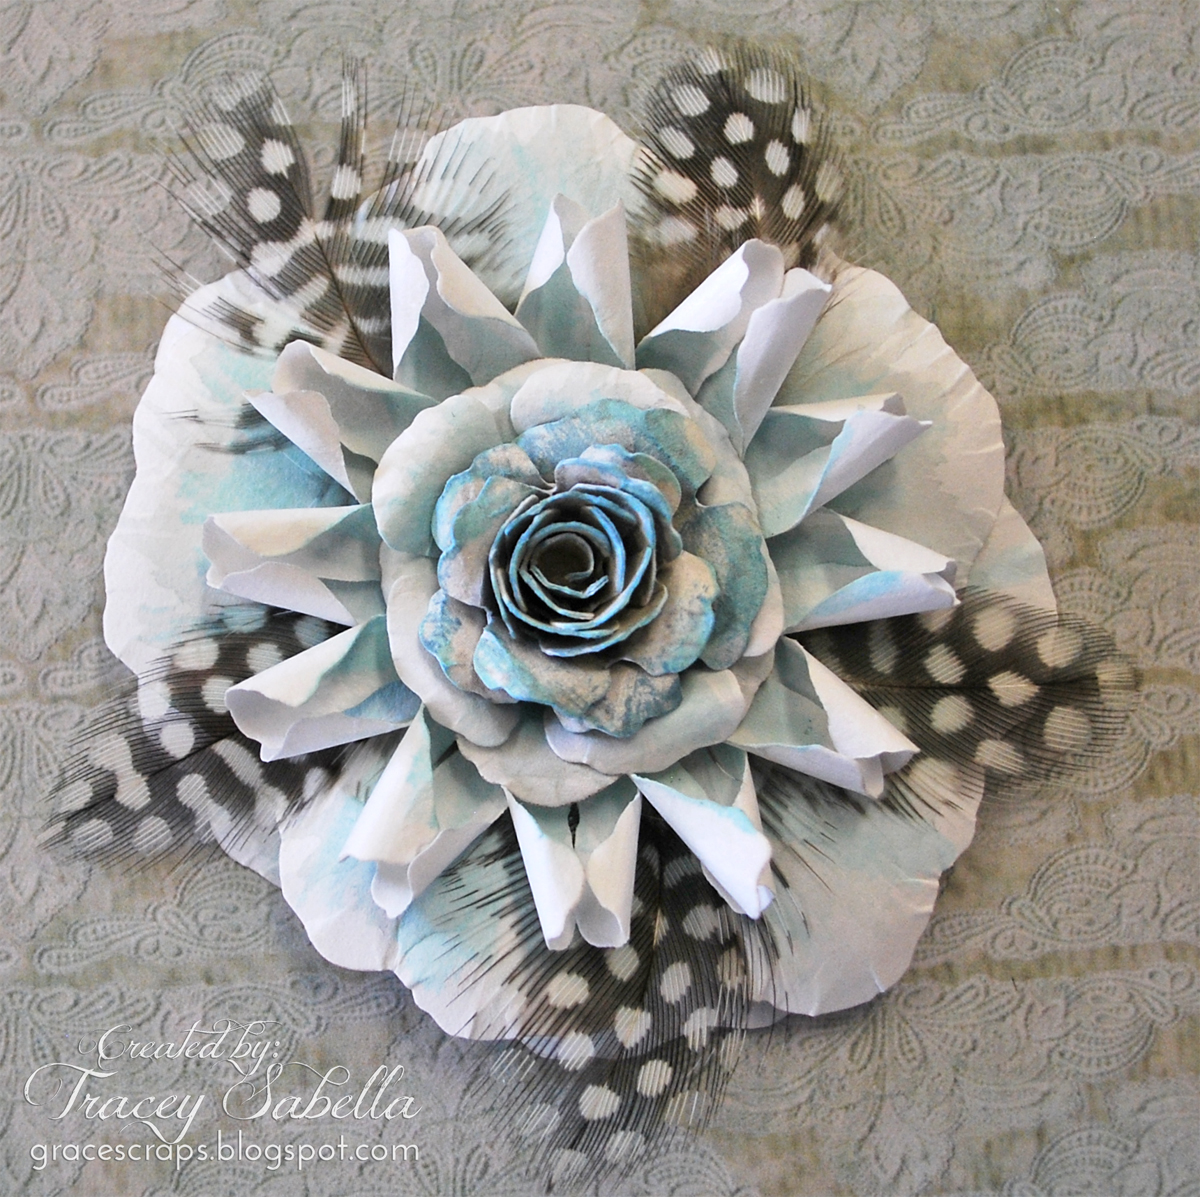

Here's a side view.

And a close-up from my card.


Donna Salazar Products
GCD Studios ~ Natural Beauty; Family Jeans
GCD Studios ~ Mix'd Media Stax 2
Clearsnap ~ Mix'd Media Inx - Vintage; Truffle; Pewter; Mossy
Clearsnap ~ Mix'd Media Inx CHOX - Butternut
Clearsnap ~ Mix'd Media Inx Embossing Powder - Truffle
Clearsnap ~ Smooch Spritz - Pralines & Cream; Woodstain
Spellbinders ~ Rose Creations
Spellbinders ~ Carnation Creations
Spellbinders ~ Bitty Blossoms
Art Gone Wild Stamps ~ Crackle; Heart Applique; Family Portraits
Zutter ~ Distrezz-it-All

Other Products
Cardstock ~ Kraft; White; Butterscotch
Little Yellow Bicycle ~ Canvas Stickers - Frames
Darice ~ Feathers
Cheesecloth
Stamen
White Thread
Golden ~ Light Molding Paste
Liquitex ~ Gesso, white, clear
Spellbinders ~ Radient Rectangles
TCW ~ Mini Art Is 6" Stencil
DCWV ~ Stencil - heart
Cloud 9 Design ~ Love Phrase Stamp Set
Helmar ~ 450 Quick Dry Adhesive; Premium Craft Glue
Spellbinders ~ Artisan X-plorer
Ranger ~ Heat It
Sewing Machine

Thanks for stopping by today! I treasure your comments.

~ Blessings ~

Saturday, May 10, 2014

Mother's Day card for Donna Salazar

It's a special weekend to celebrate the mother's in our lives. I'd like to wish each of you who are mom's a special day on Sunday. To celebrate, I've created this card for my mom. Donna's designs and products are so great to work with for shabby mixed media projects like this.

Mother's Day Card

Tips and Techniques
These sweet roses are created with the mulberry paper from Donna's Mix'd Media Stax 2 cut with her Spellbinder's Bitty Blossoms Dies, then brushed with gesso. 


Underneath the flowers, I've layered Donna's Mix'd Media Stax 2 Dictionary Paper and Want2Scrap Corrugated Board along with other delicate elements. 

Inside and out I dry brushed the background with gesso, then mixed Donna's Clearsnap Mix'd Media Inx Reinker into gesso and dry brushed that over top.

The edges are distressed with Donna's Distrezz-it-All by Zutter, then machine stitched.

I hope you've been inspired to grab your Donna Salazar products and created a card for a special mother in your life. 


Donna Salazar Products
GCD Studios ~ Natural Beauty Collection
GCD Studios ~ Family Jeans
GDC Studios ~ Mix'd Media Stax 2
Want2Scrap ~ Corrugated Board
Clearsnap ~ Mix'd Media Inx - Stormy
Clearsnap ~ Mix'd Media Inx - Reinker - Petals
Spellbinders ~ Bitty Blossoms Dies
Zutter ~ Distrezz-it-All

Other Products
Darice ~ Card Base
Want2Scrap ~ Rhinestones - Mother of Pearl
Queen & Co. ~ Twinkle Goosebumps, Clear
Darice ~ Self-Stick Gems - Cross
Plaid ~  Gem Drops
Cheese Cloth; Open Weave Fabric; Lace; Fibers; White Thread; Pine Sprig - Stash
Liquitex ~ Gesso
Spellbinders ~ Opulent Ovals
Cloud 9 Design - Stamp
Helmar ~ 450 Quick Dry Adhesive
Helmar ~ Zapdots 1/2" Square, white
Helmar ~ Quickfix Adhesive Runner
Viking Sewing Machine

Thanks for stopping by! I treasure your comments.

~ Blessings ~

Tuesday, December 10, 2013

"A Snowy Day" for Leaky Shed Studio with Enameled Chipboard

I'm back today to share the details of my layout featuring Leaky Shed Studio chipboard. It's been snowy in this part of the world - a perfect time to share this wintry page. This is an older photo of our daughter Grace enjoying an afternoon of sledding. 

"A Snowy Day"

Tips and Techniques
Here you can see the French Curve Scroll which I cut in half to use as a flourish. Don't be afraid to cut your chipboard to get different looks. Flowers and other elements were dry brushed with gesso to lighten and give a snowy feel. 

I thought the Clear Scraps Cracked Glass stencil had a wintry, icy feel and added some nice texture using molding paste. Paper strips were distressed and inked then dry brushed with gesso. I used BoBunny Cardstock Stickers for the title, adding rhinestones to the sticker strip below the title. 

These snowflakes are a brand new design at Leaky Shed. They'll be showing up in the LSS Store soon. To give them a shabby look, I sprinkled the embossing enamel with a light hand so some of the natural chipboard would show through. These snowflakes were absolutely perfect to fit the design of the flakes on this BoBunny Winter Wonderland paper. 

I distressed the photo edge and brushed with gesso. Texture is added with corrugated board, burlap and my handy Distrezz-it-All on the paper edges. The smallest LSS snowflake is perfect for the corner of my photo. The tiny snowflake on the tag and around the page are wood veneer pieces I picked up at Michaels. 

One of my favorite LSS chipboard pieces is this ornate corner with it's intricate design. Stampendous Fran-tage embossing enamel is a great product that makes dressing up chipboard so very easy. I simply pressed the chipboard into a Perfect Medium pad (Any clear embossing pad will work.), then sprinkled on Shabby White embossing enamel and heat set. This embossing enamel has several different colors and sizes of enamel and even some fine gold glitter, perfect for this wintry page. 

One final snowflake. Look at the wonderful cut detail on this piece! 

Leaky Shed Studio Chipboard
Snowflakes (Set of 6 different flakes)
Ornate Corner
French Curve Scroll

Other Products
Bo Bunny Woodland Winter~ Woodland Winter, Snowfall, Blizzard
Bo Bunny Woodland Winter ~ Cardstock Stickers
Zutter ~ Donna Salazar Designs - Corrugated Board
BoBunny ~ Buttons
BoBunny ~ Blossoms - Natural Earth Daisy
BoBunny ~ Chocolate Jewels
BoBunny ~ Lace - Denim Blue
Petaloo ~ Darjeeling - Medium Mix, Petites
Petaloo ~ Penny Lane Garden Collection - Ruffled Roses, Vanilla
White Thread
Ranger ~ Distress Ink - Frayed Burlap
Liquitex Gesso
Golden ~ Light Molding Paste
Stampendous ~ Fran-tage Embossing Enamel - Shabby White
Clear Scraps ~ Shattered Glass Stencil
Helmar 450 Quick Dry Adhesive
Helmar ~ Premium Craft Glue
Tombo Multi Mono Liquid Glue
Zutter ~ Donna Salazar Designs - Distrezz-it-All
Tim Holtz ~ Paper Distresser
Sewing Machine

Thanks for stopping by! I treasure your comments. 

~ Blessings ~

Friday, November 22, 2013

"Live the Life" Grungy Birthday Card for Donna Salazar

The trees are now bare and the cooler temperatures are settling in. We've not started a fire in our wood burner yet, but the wood is stacked next to the house ready to go. I know some of my dear followers in the Southern hemisphere are entering the hot days of summer-like weather as it cools off here.

I have created a grungy, masculine card with a steampunk edge featuring The Zutter Distrezz-it-All by Donna Salazar Designs and her Spellbinders Sprightly Sprockets dies.

"Live the Life"

Tips and Techniques
I cut these gears from thin chipboard using Donna's Spellbinders Sprightly Sprockets dies with the Spellbinders Artisan X-plorer. This machine has more pressure and cut the chipboard in just a couple passes. I swirled together some metallic copper and metallic back acrylic paint and brushed thickly across the gears. While wet, I used my heat tool to bubble and dry the paint to get this grungy, weathered texture. Then I randomly applied more metallic black paint and heated again. You could use any colors to get the effect needed for your particular project. 

Here's another view of the small gears. You can also see the grungy corrugated board in this shot. 

First, I cut a piece of Donna's Want2Scrap Corrugated Board just a little larger than the finished size I wanted. I then spritzed with water and pressed on the corrugated ridges pushing them down in different directions to get a wavy, grungy look and dried. Once dry, I deeply distressed the edges in my Distrezz-it-All which distressed cardboard with ease.  

Then I spritzed again with water, then very lightly with Donna's Wood Stain Smooch Spritz by Clearsnap and splattered with her Caramel Latte Smooch. I added a couple more sprays of Wood Stain to the overspray on my craft mat along with a couple spritzes of water, then dragged the edges of the corrugated board through the watery mist to color and darken the edges. When there was just a small bit of mist left on the sheet, I put the corrugated board face down and rubbed across the rest of the mist to highlight the ridges. 

Here you can see the larger gear and all the grungy layers including: Donna's Want2Scrap Canvas fringed and inked, then layers of dark brown cardstock and Donna's Natural Beauty papers - all distrezzed with my Distrezz-it-All. As you can see I have distressed some of the papers lightly and some deeply to get a variety of textures. I've covered most of my stamping up, but have used some of Donna's Art Gone Wild stamps on the background. 

One final shot of the grungy texture and layers. 

Donna has now released her Distrezz-it-All V3.0.
For all the details and a demonstration of this handy machine, 
check out her Youtube video here.

Donna will be giving away a new Distrezz-it-All V3.0 when
her Distrezz-it-All Facebook page gets 2,000 likes.
For other ways to enter this drawing go here


Donna Salazar Designs Products
GCD Studios ~ Natural Beauty 6 x 6 pad and 12 x 12 collection
Clearsnap ~ Mix'd Media Inx: Black, Leather, Pewter, Honey, Stormy
Clearsnap ~ Mix'd Media Inx CHOX: Midnight, Sparrow
Clearsnap ~ Smooch Spritz: Caramel Latte, Wood Stain
Want2Scrap ~ 7" x 7" Canvas
Art Gone Wild Stamps ~ Binoculars
Art Gone Wild Stamps ~ Brass Corner
Art Gone Wild Stamps ~ Ruler
Spellbinders ~ Sprightly Sprockets
Zutter ~ Distrezz-it-All

Other Products
Thin Chipboard
Black Webbing ~ May Arts - Really Reasonable Ribbon
Jute Ribbon ~ Really Reasonable Ribbon
Visual Artistry ~ Tim Holtz - Life's Possibilities
Folk Art Acrylic ~ Metallic Sequin Black
DecoArt ~ Dazzling Metallics - Worn Penny
Helmar ~ 450 Quick Dry Adhesive
Helmar ~ Premium Craft Glue
Helmar ~ Fabric Glue
Spellbinders ~ Artisan X-plorer
Martha Stewart ~ Mini Score Board
Darice ~ Heat Tool

Thanks for stopping by! I treasure your comments.

~ Blessings ~

Wednesday, November 13, 2013

"Here Comes the Bride" for Helmar

Today I'm sharing a layout of our lovely daughter-in-law, Rachel, as she takes in her first glimpse of our son, Joseph on their wedding day featuring Helmar Scrapdots. I adore using mixed media and lots of layers. For that to work, I find that I need to raise certain elements on my pages, particularly the photo mat. You'll see why and how in my tips and techniques.

"Here Comes the Bride"

Tips and Techniques
When I layer on my pages, one of the things I like to do is to raise the photo and mats, so that I can tuck a variety of elements and flowers underneath. Helmar Zapdots are the perfect solution for this task! I simply glue the photo and mat layers together with Helmar Premium Craft Glue, then place three or four Zapdots down the back as shown. This will leave all the edges free. Once I'm done embellishing, if there are any areas that need more support, I add more Zapdots.

This chipboard clock was heat embossed and embellished with small pearls, then adhered with Helmar 450 Quick Dry Adhesive 

These lovely flowers and the window charm are all adhered with Helmar 450 Quick Dry Adhesive - my favorite adhesive when adhering to a mixed media background like I have here. The transparency corner piece is also adhered with a small dab as well.

The window shape was stenciled using molding paste. I inked the background paper first to help make this textured image pop.

Here's another view of the same flowers. You can see that I also tucked in a gold metal rose. Helmar 450 Quick Dry Adhesive is a fabulous adhesive for a variety of materials including metal.

You can also see how I tucked parts of this cluster in under the raised photo mats. This is why Helmar Zapdots work so well for this application!

This wooden heart flourish was heat embossed with embossing powder. I used lots of layers, from distressed papers to shiny gold doilies - all adhered with Helmar Premium Craft Glue.

Another of my flower clusters - again you can see how Helmar Zapdots raised the photo mat so that some of my elements can easily be tucked right underneath. 

A close-up of these lovely flowers.

Finally, my embellished title. I inked around the background area where I planed to place my title sticker. The paper ornaments were fussy cut from coordinating paper and adhered with Helmar Premium Craft Glue, while the berry cluster is adhered with Helmar 450 Quick Dry Adhesive.

I hope you'll try some Helmar Zapdots on your projects to give added height and dimension to your next scrapbook layout or card.

Helmar Product List:

Other Products used:
Leaky Shed Studio ~ Clock #3
 BoBunny ~ Enchanted Collection
Kaisercraft ~ Turtle Dove Collection, Wood Heart Flourish
Prima ~ Stencils
Petaloo ~ Flowers
Ranger ~ Distress Ink
Wild Orchid Crafts ~ Flowers
Want2Scrap ~ Pearls
Imaginisce ~ Jewels
Momenta ~ Metal Rose
Zutter ~ Donna Salazar Designs - Distrezz-it-All

Thanks for stopping by! I treasure your comments.

~ Blessings ~

Sunday, September 15, 2013

Unforgettable Memories in the Making for Really Reasonable Ribbon

Our children grow up all too quickly. This photo was taken about 16 years ago and our children are now all grown. Where does the time go? When we lived in North Carolina, we often vacationed at Morrow Mountain Park. We would rent a cabin for the week. Joseph and Gary would often spend the day fishing while the girls and I would hike around the trails. Here Joseph, Elizabeth, and Maria are climbing on some fallen trees. 

I've created this page featuring Really Reasonable Ribbon and a sketch from the September Dusty Attic Challenge. Bonnie at RRR has a wonderful selection of natural fiber ribbons, lace, and is now carrying Wild Orchid Craft Mulberry Flowers


"Unforgettable Memories in the Making"

Here's the lovely DA Sketch:

To enter this challenge, create a card, layout, or any handcrafted project. Just be sure to follow the theme and use ribbon, lace, or trim somewhere on your project.

Really Reasonable Ribbon Products

Tips and Techniques
A mixed cluster of flowers. I often purchase white or cream colors so that I can ink them to coordinate with my layout as I did here. From the Really Reasonable Ribbon Store, I've included the Open Rose, Cosmos Daisy, and Cottage Rose - all in white. These flowers are so perfect to nestle in among other flowers in my stash. I hand crocheted the layer under the open rose. 

Another view of this cluster. Here you can also see the gorgeous Burlap Woven Ribbon. Rather than using a length of this ribbon, I cut sections of it and pulled it apart at one end to tuck into my clusters for added dimension and interest. Here you can also see some of my stamping, border punching, and machine stitched border. 

I stamped and embossed my title, then inked the background paper. The embossing acts as a resist. The cluster to the right includes a Sweetheart Rose, Cosmos Daisy, and more of the Burlap Woven Ribbon

This butterfly die-cut was included in the paper collection I used. I painted Distress Stickles across the wings. 

A close-up of the top flower cluster with some of the Natural Jute Ribbon peeking out from under the photo mat. 

I painted up this Dusty Attic Vine Frame with metallic paints, then shaded with distress markers. Distress stickles were brushed on the outer frame to add texture. 

This DA wicker fence was embellished with Sweetheart Blossoms. I painted it and added the woodgrain with a marker. 

This DA Grass Cluster was painted with golds and greens, then I added microbeads to the seed head. 

I hope you've been inspired to create a project for


Be sure to stop by the RRR Blog for all the details and prize information.

Thanks for stopping by! I treasure your comments.

~ Blessings ~