Monday, May 30, 2022

"Adoring You" Fathers Day Card for Amazing Paper Grace

Welcome to my creative space!

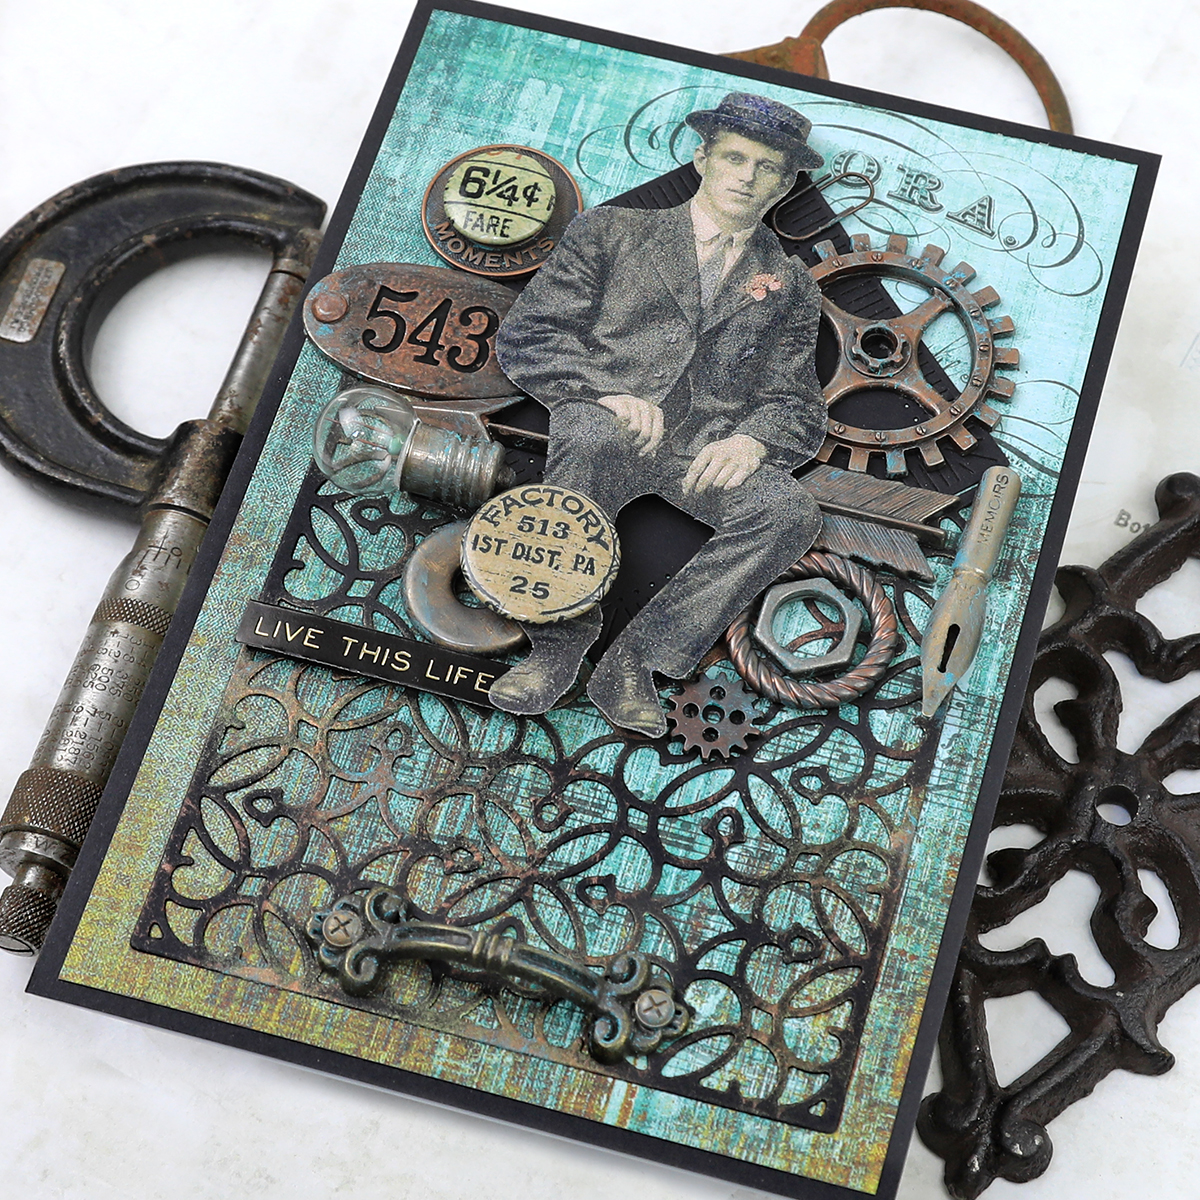
Father's Day is just around the corner, and I thought I'd share how to transform delicate and feminine Amazing Grace Die sets into a masculine card for that special father in your life. I know that some makers are challenged to create guy cards, so I hope this helps inspire you to try out a masculine card with Amazing Paper Grace dies if you haven't already. 

I've featured the Adoring Fleurette Card Builder set (S5-493) to create this Father's Day card for my sweet husband. By using neutral colors and arranging some industrial steampunk elements around the center you can get a nice masculine feel. I cut the black border frame with the Scalloped Symphony Notecard set (S6-177). The metal embellishments were mostly silver so I rubbed them with art waxes to give them that aged industrial feel. 

Be sure to scroll down through the "Tips and Techniques" section below for close-ups and all the details on how to create this masculine Father's Day card.

Thank you Amazing Paper Grace for providing the dies used in this project.

Tips and Techniques
Here's a close-up of the center of the card. The scrolled background is die cut in two pieces which gives it a lot of versatility and allows you to vary the width of the card. I wanted to use this black border piece from the Scalloped Symphony Notecard set, but the two background pieces did not fit snugly together to fit the dimension of the black border piece. No problem at all. The emblem piece behind the sentiment covers the gap between the two pieces. Easy peasy fix! Both the scrolled background and the emblem are cut from a beautiful leather print paper for a masculine feel. The edges of the emblem are inked lightly with Black Soot Distress Ink. 

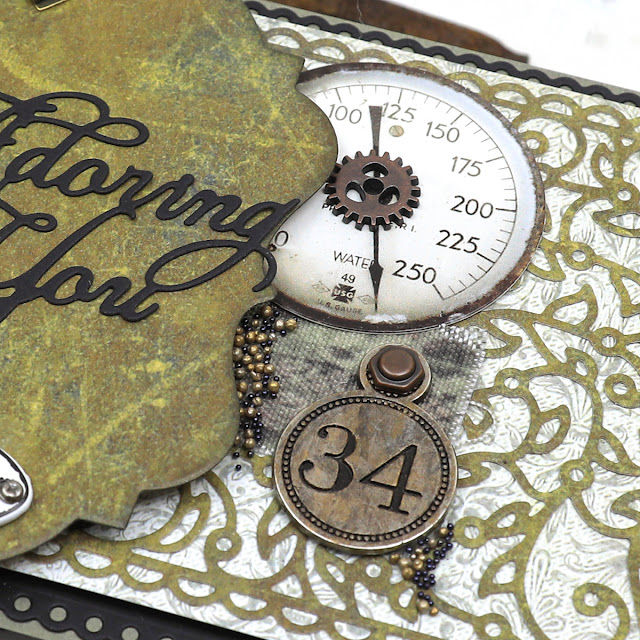
The emblem is popped up using foam tape, so that you can tuck some of the other elements underneath. This layering gives beautiful dimension. I rubbed several grungy colors of art wax in both metallic and matte finishes to add an aged industrial metal feel to the metal pieces. The edges of the fabric tape are frayed to add to the vintage look. 

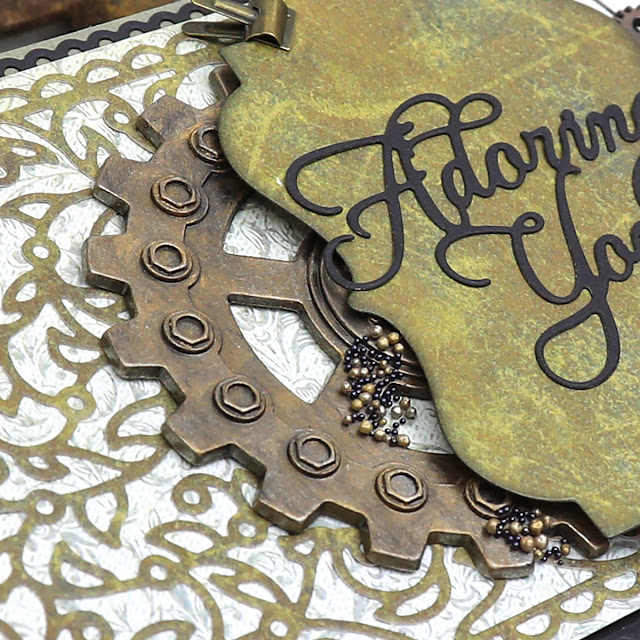
This half gear has more of the wax finish on it. For a list of colors used, scroll down to my supply list below. I adore texture, so added some microbeads and prills in black and metallic colors.

The number piece below the sentiment is simply glued in place and adds such a nice touch to balance everything out.

I used foam tape to adhere the light base behind the scrollwork to the black frame piece to pop it up and add more depth and dimension.

One final view. I bet you can tell from my staging pieces that I enjoy designing masculine creations and hope that this excitement is contagious! 

Amazing Paper Grace Dies:

Paper:
  • Tim Holtz with Idea-ology ~ Backdrops Vol 1
  • Tim Holtz Core'dinations Cardstock, Neutral

Ink:
  • Ranger ~ Distress Ink: Black Soot

Mixed Media:
  • Finnabair with Prima ~ Metallique Wax: Bronze Age; Aged Brass
  • Finnabair with Prima ~ Matte Wax: Rusty Brown; Charcoal Black
  • Finnabair with Prima ~ Microbeads, Black
  • Finnabair with Prima ~ Soft Matte Gel
  • US ArtQuest ~ Prills: Gilt Trip

Embellishments:
  • Tim Holtz with Idea-ology ~ Gauge Dials
  • Tim Holtz with Idea-ology ~ Linen Tape: Patchwork
  • Tim Holtz with Idea-ology ~ Industrial Gears
  • Tim Holtz with Idea-ology ~ Mini Plaquetttes
  • Tim Holtz with Idea-ology ~ Adornments: Foundry
  • Tim Holtz with Idea-ology ~ Tiny Clips
  • Tim Holtz with Idea-ology ~ Hex Fasteners
  • Tim Holtz with Idea-ology ~ Mini Gears

Adhesives:
  • Beacon ~ 3-IN-1 Advanced Craft Glue
  • Beacon ~ Fabri-Tac 
  • Tombow ~ Mono MULTI Liquid Glue
  • Double Sided Tape ~ 1/4" 
  • Helmar ~ 450 Quick Dry Adhesive
  • Scrapbook Adhesives by 3L ~ 3D Foam Squares, Black
  • Scrapbook Adhesives by 3L ~ Thin 3D Foam Squares, Black
  • Scrapbook Adhesives by 3L ~ Crafty Foam Tape, Black

Tools:
  • Spellbinders ~ Platinum 6


Thanks for stopping by! I treasure your comments.

~ Blessings ~

Monday, May 23, 2022

Cherry Blossom Wedding Card for Amazing Paper Grace

Welcome to my creative space.

It's the season for weddings, and I thought these Amazing Paper Grace cherry blossoms would be perfect for a spring wedding card. I just adore that this fabulous Layered Cherry Blossoms set (S4-1194) has four distinctively different blossoms and includes leaf dies as well as three stem dies so that you can vary the design depending on the size and shape of your card. 

I've created a shaped card using the elegant Eyelet Lace Frame die set (S6-184), The frame is a lovely music printed paper and the center is a delicate and elegant damask, a perfect backdrop for these beautiful cherry blossoms. 

Be sure to scroll down through the "Tips and Techniques" section below for close-ups and all the details on how to create this beautiful card and sweet handcrafted flowers.

Thank you Amazing Paper Grace for providing the dies used in this project.

Tips and Techniques:
Aren't these blossoms so sweet and beautiful? Each of the four different blossoms has an individual die that cuts all the pieces to form that flower, making these so easy to put together. I used a finger dabber to apply light pink ink into the centers and bases of the petals and just lightly around the edges. I cupped the petals with a stylus on a foam pad, but they could easily be shaped with your fingers if you don't have a stylus in the right size. I inked white cardstock with green ink to die cut the bases for the buds and partially opened blossoms.

I inked a small piece of cardstock with light yellow ink to die cut the stamen which are added to the centers of the fully opened blossoms and adhered a few prills into the middle of these stamen.

I used more of the green inked paper to die cut the leaves. There are four leaf dies in two sizes which allows for a more natural, organic look. I've used a shaped base cut with the Eyelet Lace Frame die set (S6-184) and backed it with a light brown paper to show through the eyelets. 

The sentiment is stamped in a coordinating brown ink. I didn't have quite the right color of ink, so stamped it using a stamp platform with a lighter brown first, that was just a little too green, then lightly stamped over that with a darker brown that was a bit too dark on its own to get the perfect color. Once it was good and dry, I fussy cut it out and popped it up using foam tape, then arranged the floral branches around it. 

There are three branch dies making it easy to give a lot of versatility to this set. You can cut as many branches as desired, but I've just cut each one once for this branch of blossoms. I cut them from the same brown paper that's peeking through the eyelets, then inked it to highlight the embossing.

I also went in and added a bit of extra green ink around the leave edges to add some natural shading. 

Here's one final look.

Amazing Paper Grace Dies:

Paper:
  • Studio75 ~ Forever in Love Collection 12x12"
  • Cardstock ~ White 110lb
  • Tim Holtz ~ Kraft-Core Nostalgic Collection

Ink:
  • Ranger ~ Spun Sugar; Bundled Sage; Gathered Twigs; Scattered Straw
  • Ranger ~ Archival: Coffee
  • Concord & 9th ~ Dye Ink: Wheat

Stamps:
  • Waffle Flower: Essential Sentiments

Embellishments:
  • US ArtQuest ~ Prills: Lemon Chiffon

Adhesives:
  • Ranger ~ Distress Collage Medium
  • Beacon ~ 3-IN-1 Advanced Craft Glue
  • Beacon ~ Fabri-Tac 
  • Double Sided Tape ~ 1/4" 

Tools: 
  • Spellbinders ~ Platinum 6
  • Tim Holtz with Tonic Studios ~ Haberdashery Scissor - 5 Inches


Thanks for stopping by! I treasure your comments.

~ Blessings ~

Monday, May 16, 2022

Mini Slimline Floral Birthday Card for Amazing Paper Grace


Welcome to my creative space!

Hello dear friends, I'm so happy to share my first mini slimline card with you featuring the beautiful Amazing Paper Grace Sweet Leaf Mini Slimline (S5-508) die set. This fabulous leafy background die is perfect to layer under shabby chic florals and stamped images. 

I've used papers from 49 and Market for the background and to die cut the leafy layer. This die set includes a set of three tiny blossoms that are so sweet. I mostly used Little Birdie Crafts flowers for my cluster, but created three of the die cut flowers to tuck in around the edges. I fussy cut the lovely butterfly and tag from a sweet image page included with the 49 and Market Sherbet Collection then stamped and hand cut images using the Tim Holtz Field Notes rubber stamp set.

Be sure to scroll down through the "Tips and Techniques" section below for close-ups and all the details on how to create this shabby mini slimline card.

Thank you Amazing Paper Grace for providing the dies used in this project.

Tips and Techniques
Here you can see how beautiful this leafy die cut is layered behind the cluster. I adore the subtle grungy pattern on this peachy paper along with the gradation of color giving a subtle ombre effect. The coordinating paper below is so lovely with these teals, greens and yellows. I've pulled the greens and teals into my embellishments. I cut this piece 1/4 inch larger than the die cut to leave a 1/8" border. I cut a piece of white cardstock another 1/4" larger to create a framed border around the card and inked the edges lightly with Rusty Hinge Distress Oxide Ink.

The sherbet paper pack included some beautiful coordinating images to fussy cut including this butterfly and ticket. The ticket had a nice open space, so I stamped the birthday sentiment and inked it in coordinating colors to place on the ticket. The beautiful flowers and dimensional butterfly are from Little Birdie Crafts. 

To fill in around the cluster I stamped several images from the Tim Holtz Field Notes stamp set onto a scrap of the background paper using Ground Espresso Archival Ink. The section I stamped on was a little light, so I added a bit more color by rubbing on Bundled Sage, Peeled Paint, and Evergreen Bough Distress Inks, then fussy cut the images to add to the cluster. The number image is edged with more of the Ground Espresso Archival Ink.

I just adore texture, so used Matte Gel Medium to add a few Mint To Be Prills around the edges of the cluster.

I die cut three of the small blossoms from the Sweet Leaf Mini Slimline set from the same paper used for the leafy background. I inked the edges with more of the Rusty Hinge Oxide Ink, and inked up some paper using Bundled Sage blended with Peeled Paint Distress Ink to use for die cutting the centers. I shaped the flowers and added a prill to the center of each blossom. They would have gotten lost placed against the background, so I was sure to place them on the green stamped and fussy cut images to be more visible. 

One final look.

Amazing Paper Grace Dies:

Paper:
  • 49 and Market ~ Spectrum Sherbet Collection - 6 x 8 Collection Pack
  • Core'dinations ~ Cardstock 110lb, White - 8.5 x 11"

Ink:
  • Ranger ~ Distress Ink: Bundled Sage; Peeled Paint; Evergreen Bough
  • Ranger ~ Distress Oxide Ink: Rusty Hinge
  • Ranger ~ Distress Archival Ink: Ground Espresso

Stamps: 
  • Tim Holtz with Stampers Anonymous ~ Field Notes 
  • Close to my Heart ~ Short & Sweet Sentiments

Mixed Media:
  • Finnabair with Prima ~ Soft Matte Gel

Embellishments:
  • Little Birdie Crafts ~ Woodland Stories - Wendy
  • Little Birdie Crafts ~ Woodland Stories - Marina
  • Brad ~ From my stash

Adhesives:
  • Tim Holtz with Ranger ~ Distress Collage Medium
  • Tombow ~ Mono MULTI Liquid Glue
  • Helmar ~ 450 Quick Dry Adhesive
  • Beacon ~ 3-IN-1 Advanced Craft Glue
  • Beacon ~ Fabri-Tac 
  • Helmar ~ ZapDots: 1/4" Black

Tools: 
  • Spellbinders ~ Platinum 6
  • Tim Holtz with Tonic Studios ~ Haberdashery Scissor - 5 Inches
Thank you Little Birdie Crafts for supplying products used to create this card.

Little Birdie Crafts can be purchased at their online store.

Use code TRACEY05 for a 5% discount.

I receive a small commission at not cost to you.


Thanks for stopping by! I treasure your comments.

~ Blessings ~

Saturday, May 14, 2022

Hello Card for Amazing Paper Grace with Tutorial Link for Water Blended Backgrounds with Distress Oxide Inks

 
Welcome to my creative space!

It's nice to have cards on hand to send a cheery note, so I created this sweet "Hello" card featuring Amazing Paper Grace dies with this gorgeous Distress Oxide Ink background. I thought that black would be a perfect accent to this lovely inky paper, and the lacy border is cut with the Romantic Slimline Borders die set (S4-1165) from the Classically Becca collection. I've also used Sweet Sayings Notecard Sentiments (S4-1148) to cut "Hello" and Perfect Harmony Notecard Embellishments (S4-1149) to cut the medallion below the sweet butterfly. Isn't it the perfect shape to layer with the butterfly?

You can find a full video tutorial explaining this technique exclusively in the Amazing Paper Grace Creative - Creative Encouragement Community Facebook Group.

This lovely group includes exclusive tutorial content. I share a mixed media tutorial there on the 13th of each month. The tutorial for this project includes a video tutorial teaching you how to create this beautiful paper to die cut or use as a background for your die cut projects. If you're not a part of this fabulous and encouraging group you can join HERE.

Thank you Amazing Paper Grace for providing the dies used in this project.

Tips and Techniques
This beautiful background paper is created using a water blended Distress Oxide Ink. A video tutorial for this technique can be found in the Amazing Paper Grace Creative - Creative Encouragement Community Facebook Group.

I really wanted this paper to shine so kept the embellishments simple. This sweet butterfly is painted using Distress Paints in coordinating colors. It's layered over a gorgeous medallion die cut from the Perfect Harmony Notecard Embellishments set. A teardrop shaped gem is placed in the center to add sparkle to the butterfly body.

This beautiful lacy border is cut with the Romantic Slimline Borders die set pairing the intricate scalloped die with the dots. The sentiment is cut from the Distress Oxide blended paper, using the sample piece I had created to make sure the colors I had selected played well together. You could also die cut the sentiment into the black paper to allow the focal paper to show through underneath.

One final look.

Amazing Paper Grace Dies:

Paper:
  • Tim Holtz with Ranger ~ Distress Watercolor Cardstock 
  • Cardstock: Black; White

Ink:
  • Tim Holtz with Ranger ~ Distress Oxide Ink: Salvaged Patina; Bundled Sage; Speckled Egg; Villainous Potion

Mixed Media:
  • Tim Holtz with Ranger ~ Distress Paint: Villainous Potion; Salvaged Patina; Speckled Egg
  • Liquitex ~ Gesso, White

Embellishments:
  • Recollections ~ Mixed Media Chipboard - Butterflies
  • Prima Marketing ~ Vintage Trinkets - Gems

Adhesives:
  • Helmar ~ 450 Quick Dry Adhesive 
  • Tombow ~ Mono MULTI Liquid Glue
  • Beacon ~ 3-IN-1 Advanced Craft Glue
  • Double Sided Tape ~ 1/4" 

Tools:
  • Spellbinders ~ Platinum 6
  • Wagner ~ HT 400 Heat Gun


Thanks for stopping by! I treasure your comments.

~ Blessings ~

Monday, May 9, 2022

"Live this Life" Industrial Steampunk Card for Amazing Paper Grace

Welcome to my creative space!

I just adore creating in the industrial steampunk style, and as soon as I laid eyes on the fabulous Amazing Paper Grace With Love Regalia Card Builder (S5-492) die set, I thought it looked like old wrought iron fencing that would be perfect to create a card in this style. As I looked through my stash of embellishments, I found this dapper gentleman from the Tim Holtz Paper Dolls set to perch perfectly atop the fence. Yes, this is another "who knew" Amazing Paper Grace could be fabulous for a masculine creation!

Since this die has a V shape at the top, I cut a square of black cardstock using the smallest dies in the Fluted Classics Squares set to provide a backdrop for my gentleman and industrial elements. This square fits the opening perfectly and those fluted edges add wonderful texture here.

The fence has been given a coppery patina finish in places using the new Tim Holtz Foundry Waxes along with classic Finnabair art waxes. These mediums are also used to add a grungy finish to the metal elements.

Be sure to scroll down through the "Tips and Techniques" section below for close-ups and all the details on how to create this industrial steampunk card.

Thank you Amazing Paper Grace for providing the dies used in this project.

Tips and Techniques
Here you can see just how gorgeous this die cut is as a wrought iron fence. It's cut from 120lb black cardstock. I randomly applied Mined Foundry Wax across the piece where you might see corrosion naturally appearing on an old weathered iron fence, then heat set the wax to bring out it's shiny luster. Green Patina Matte Wax is rubbed on around the copper for a grungy patina finish. I wanted a little something on the bottom of the card to help balance the detailed top, so found this ornate handle in my stash that's the perfect size to use here. 

The small square from the Fluted Classics Squares set fits into the "fence" opening perfectly and helps the man and embellishments stand out. I felt that he would have gotten a little "lost" against the colorful patterned paper.

This vintage gentleman is sitting atop the fence on a whimsical arrow. I applied and heated Mined and Statue Foundry Wax across many of these industrial elements to age them. I also applied Matte Patina Green, Bronze Age, and Rich Copper waxes around those areas to accentuate the aged patina look I wanted to achieve. Nearly all of these embellishments are from the Tim Holtz Idea-ology collection.

***Tip*** The engraved numbers on the 543 piece were colored with the waxes and no longer very visible. My solution to fix that problem was to rub black acrylic paint into the numbers, then gently use a soft cloth to remove most of the paint from the patina surface. Not all of the black paint came off, but that just adds to the grungy look and the numerals now pop!

One final look so you can see how all the grungy, aged elements come together so beautifully to create a wonderful masculine card. Don't you agree that this die is perfect to create a weathered wrought iron fence?

Amazing Paper Grace Dies:

Paper:
  • Tim Holtz with Idea-ology ~ Paper Stash: Abandoned
  • Cardstock ~ Black 120lb; White 120lb

Ink:
  • Tim Holtz with Ranger ~ Distress Ink: Chipped Sapphire
  • Tim Holtz with Ranger ~ Distress Ink: Saltwater Taffy

Mixed Media
  • Tim Holtz with Ranger ~ Foundry Wax: Mined
  • Tim Holtz with Ranger ~ Foundry Wax: Statue
  • Tim Holtz with Ranger ~ Distress Frosted Crystal 
  • Tim Holtz with Ranger ~ Distress Embossing Dabber
  • Tim Holtz with Ranger ~ Distress Paint: Black Soot
  • Finnabair with Prima ~ Metallique Wax: Bronze Age; Rich Copper
  • Finnabair with Prima ~ Matte Wax: Patina Green

Embellishments:
  • Tim Holtz with Idea-ology ~ Paper Dolls
  • Tim Holtz with Idea-ology ~ Industrial Gears
  • Tim Holtz with Idea-ology ~ Adornments: Arrows
  • Tim Holtz with Idea-ology ~ Adornments: Foundry
  • Tim Holtz with Idea-ology ~ Pen Nibs
  • Tim Holtz with Idea-ology ~ Muse Tokens
  • Tim Holtz with Idea-ology ~ Mini Paper Clips
  • Tim Holtz with Idea-ology ~ Mini Gears
  • Tim Holtz with Idea-ology ~ Hardware Heads
  • Tim Holtz with Idea-ology ~ Mini Flair
  • Spare Parts ~ Mini Light Bulbs
  • Spare Parts ~ Small Metal Handles
  • Washers ~ From my stash

Adhesives:
  • Tombow ~ Mono MULTI Liquid Glue
  • Helmar ~ 450 Quick Dry Adhesive
  • Beacon ~ 3-IN-1 Advanced Craft Glue
  • Scrapbook Adhesives by 3L ~ Thin 3D Foam Squares, Black
  • Scrapbook Adhesives by 3L ~ Crafty Foam Tape, Black
  • Helmar ~ ZapDots: 1/4" Black; 1/2" Black
  • Double Sided Tape ~ 1/4" 

Tools:
  • Spellbinders ~ Platinum 6


Thanks for stopping by! I treasure your comments.

~ Blessings ~

Wednesday, May 4, 2022

Amazing Paper Grace May Die of the Month: Pop Up 3D Vignette What's Bakin' Oven with Blog Hop

Welcome to my creative space!

What could be more special than this fabulous retro stove to create a card for someone who loves to cook with the Amazing Paper Grace May Die of the Month: What's Baking' Oven die set (DOMAPG-MAY22)? I really wanted to embrace the retro feel of this die set, so used this fabulous mint green metallic paper to die cut the vignette card and used similar colors from cardstock surrounded by sweet spring flowers for the flat card.  

Be sure to scroll down through the Tips and Techniques section below for all the details on how I created these sweet cards.

Many thanks to Amazing Paper Grace for providing the dies used in this project!

There are 14 dies included in the Pop Up 3D Vignette What's Bakin' Oven.

3D Vignette Retro Stove Card

Flat Hey Cookie, What's Bakin' Card

Tips and Techniques
When I think of retro kitchen appliance, I think of fun colors like this cool mint green. I used metallic papers to get that enameled feel and accented with metallic silver. I found this fabulous image to use for inspiration, but went with the green instead of yellow:


Of course this vignette card is designed to fold up to fit into a flat envelope. The top of the stove opens like a box lid flap, then the card slides right over to lie flat. 

The oven door is backed with acetate for a glassy finish and the oven grates are also cut from silver metallic paper. I inked up some white cardstock in a coordinating green color to back the words in the oven. 

The grates for the stove top are cut from thing black chipboard to give a cast iron feel, while the knobs, utensils and oven are cut from black gloss paper for an enameled look. I found a snippet of fun patterned paper to cut the pot holder from that also had a bit of a retro feel to it. 

Each of the cookies is cut three times from yellow cardstock and adhered together to give them a bit more dimension. When baking, my cookies are not lined up perfectly, so I used a more random placement here on my cookie sheet which is also cut from metallic card stock. 

Here's a view of both cards with their oven doors open to see the fun and fabulous sentiments inside. 

For this flat card, I wanted to show you something quick and easy that you could create with this die set. The stove is cut from regular cardstock and accented with metallic silver. The dials are simplified by using just the two center pieces for the burner dials. 

I found this delightful spring paper in my stash which complements the stove colors. It's cut with the Fluted Classics Rectangles Die Set (S5-475) to add a lovely border around the paper. I also cut a larger piece from the lighter green paper used on the stove to frame the card and tie everything together. 

To keep this easy, I used Little Birdie Crafts flowers and a butterfly to embellish the card. I also found a snippet of chipboard left from a previous project that fit perfectly here and heat embossed it in pale gold. 

The doors fold open to see the sweet sentiments below.

Supplies:

Accessories:

Paper:
  • Tim Holtz with Idea-Ology ~ Metallic Kraft Stock Confections (mint green)
  • Tim Holtz with Idea-Ology ~ Metallic Kraft Stock Gold/Silver
  • Tim Holtz with Idea-Ology ~ Metallic Kraft Stock 3 Champagne/Onyx 
  • Tim Holtz with Core'dinations Kraft-core, Assorted Colors
  • Craft and You ~ Spring Garden 03
  • Studio Calico ~ Memoir, 6x6" Paper Pack
  • Cardstock: Black Gloss; Yellow

Ink:
  • Ranger ~ Distress Ink: Evergreen Bough; Bundled Sage

Mixed Media:
  • Ranger ~ Embossing Pearl: Pale Gold

Embellishments:

Adhesives:
  • Tombow ~ Mono MULTI Liquid Glue
  • Beacon ~ 3-IN-1 Advanced Craft Glue
  • Beacon ~ Fabri-Tac
  • Double Sided Tape ~ 1/4" 
  • Red Line Tape ~ 1/4"; 1/8"

Tools:
  • Spellbinders ~ Platinum 6
Thank you Little Birdie Crafts for supplying products used to create this card.

Little Birdie Crafts can be purchased at their online store.

Use code TRACEY05 for a 5% discount.

I receive a small commission at not cost to you.

For more Pop Up 3D Vignette What's Bakin' Oven Inspiration from the Creative Team:

Visit each Creative Team blog linked below for their take on creative paper crafting ideas with  Pop Up 3D Vignette What's Bakin' Oven, the Amazing Paper Grace May 2022 Die of the Month!


The Amazing Paper Grace Die of the Month is available exclusively at Spellbinders Paper Arts during May 2022, Pop Up 3D Vignette What's Bakin' Oven along with other membership perks.

View this month’s Amazing Paper Grace Die of the Month:

I would adore hearing from you! Please leave a comment below letting me know how you will use these gorgeous dies!


Thanks for stopping by! I treasure your comments.

~ Blessings ~