Showing posts with label Off the Page Project. Show all posts

Monday, January 5, 2015

Mixed Media Blessings Box for Leaky Shed Studio

I hope that each of you had a wonderful Christmas
and would like to wish you many blessings in the coming year.

I have so many blessings day by day. However, as the year goes by, it's all to easy to overlook them, especially when those challenging days happen. I've created this Blessings Box, so I can write down those sweet blessings and collect them in my box. I've featured the gorgeous Leaky Shed Studio Moroccan BorderOrnate Banner, and Fancy Keyhole.

Blessings Box
Mixed Media Blessings Box, Tracey Sabella, Leaky Shed Studio, Lindy's Stamp Gang, Prima, Helmar, Petaloo

Tips and Techniques
Mixed Media Blessings Box, Tracey Sabella, Leaky Shed Studio, Lindy's Stamp Gang, Prima, Helmar, Petaloo
The base of my Blessings Box is a 6" square paper mache box. I painted the box and all chipboard pieces with two coats of white gesso. This Ornate Banner was misted with two colors of Lindy's Stamp Gang mist, then decorated with rhinestones. 

I've edged the box with a mix of mica flakes, German glass glitter and microbeads.

The dangling cross is attached by looping cording through the cross and bead then knotted. The cording was then pulled through a gear, then through two holes in the box lid and knotted on the other side.

Mixed Media Blessings Box, Tracey Sabella, Leaky Shed Studio, Lindy's Stamp Gang, Prima, Helmar, Petaloo
The box base was layered with strips of sheetrock mesh and stenciled molding paste. I spritzed the textured surface with several colors of Lindy's Stamp Gang mist - allowing to dry between colors. The raised areas and box edges are rubbed with Viva Gold Modeling Cream.

Mixed Media Blessings Box, Tracey Sabella, Leaky Shed Studio, Lindy's Stamp Gang, Prima, Helmar, Petaloo
The metal flower was painted with white gesso, except for the rhinestones and dark center. Then when dry, I spritzed with several colors of mist. 

The remaining flowers were misted in the same colors as the box base, then brushed with gesso. I dabbed them with Glossy Accents to adhere chunky glass glitter.

Mixed Media Blessings Box, Tracey Sabella, Leaky Shed Studio, Lindy's Stamp Gang, Prima, Helmar, Petaloo
Front view - I cut each of the Moroccan Borders into two pieces, cutting and sanding the cut ends to look like the laser cut ends. I repeated the border on all four sides. The Fancy Keyhole and border are colored the same as the Ornate Banner on the top of the lid.

The cross is a metal charm I painted with gesso and misted.

Mixed Media Blessings Box, Tracey Sabella, Leaky Shed Studio, Lindy's Stamp Gang, Prima, Helmar, Petaloo
Here you can see more of the texture and how I added chunky glass glitter around the Moroccan Border

Leaky Shed Studio Products

Other Products
6 x 6” Paper Mache Box
Petaloo ~ Botanica Collection Faux Dried Blooms, Ivory
Petaloo ~ Canterbury Collection – Magnolia Blossoms, Cream
Wild Orchid Crafts ~ Mulberry Flowers – 25mm Cottage Rose, Mixed White
Cross Charm ~ Stash
Blue Twine ~ Stash
Smoky Crystal Bead ~ Stash
Amber Rhinestones ~ Stash
Bead Landing ~ Bezels, Frames & Filigree – Mini Gears
Metal Flower Jewelry Finding ~ Stash
Michaels ~ Metal Embellishments – A Place in Time
Liquitex Gesso, White
Viva ~ Modeling Cream – Gold
Lindy’s Stamp Gang Mist ~ Starburst – Incandescent Copper, Bayou Boogie Gold, Afternoon Delight Denim, Black Orchid Silver
Lindy’s Stamp Gang Mist ~ Moon Shadow – Silhouette Silver
Iced Enamels ~ German Glass Glitter – Sky Blue
Stampendous ~ Fran-tage – Mica Fragments, Gilded; Blue
Stampendous ~ Fran-tage – Glass Glitter, Bronze
Provo Craft ~ Art Accentz – Micro Beedz, Blue
Prima ~ Stencil – 6x6” Stone Wall 3 #575953
Helmar ~ Crystal Kote – Matte
Helmar ~ 450 Quick Dry Adhesive
Ranger ~ Glossy Accents, Matte Accents
Tombow ~ Multi Mono Liquid Glue
Ranger ~ Heat It Craft tool 

Thanks for stopping by today! I treasure your comments

~ Blessings ~

Sunday, August 31, 2014

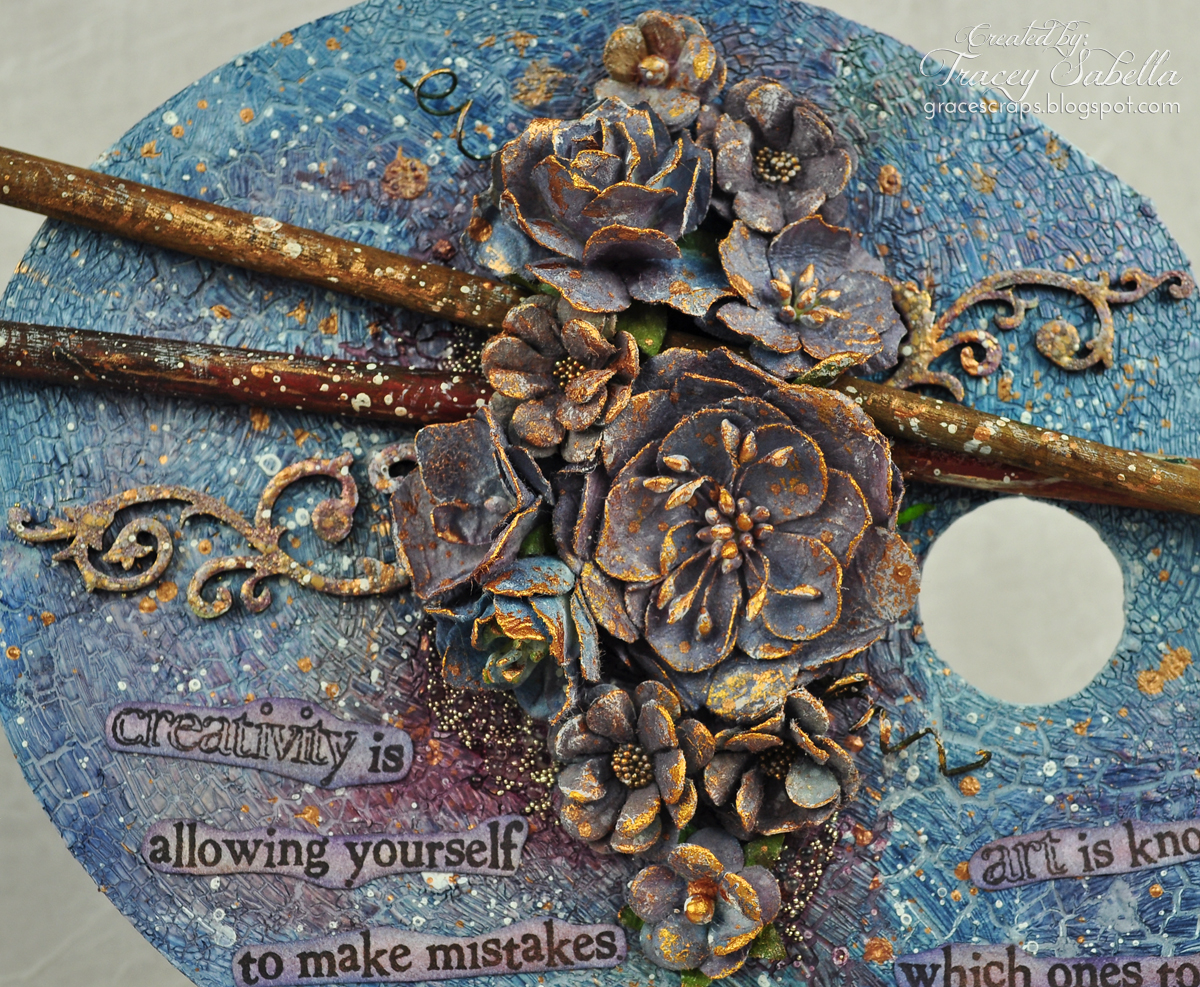
Art Is . . . Paint Palette for Leaky Shed Studio

Today I'm sharing an art piece I created using a page from the Leaky Shed Studio Artist's Palette Album. Last summer I purchased a basket of worthless old paintbrushes at an auction for a dollar with a vision of using them in some of my projects. So when I saw this Artist's Palette, I knew it would be perfect for a couple of the brushes. If you follow my work, you know that I enjoy thinking outside the box, using items differently than they were originally intended.

"Art Is . . ."

Tips and Techniques
The first thing I did was to adhere a piece of cardstock over the binder ring hole. I then painted the entire palette with a couple coats of white gesso. I was inspired by vintage wooden paint palettes. One of my favorites was so full of old paint, that it was crackled and worn. To achieve that effect, I have used a thick coat of white Viva Crackle Paint. Once dry, I used a variety of mists to color. 

I also used the Leaky Shed Small Flower Corner. I cut it in half for each side of the flower cluster. I painted it with metallic paint. I misted the flowers to color and then adhered the flowers, paint brushes, and chipboard in place. Then I splattered with white gesso and gold paint.

Once the splatters were dry, I dry brushed gold paint over the flowers and chipboard pieces. I also added microbeads and mini marbles at the edges of the flowers. 

The final step was to stamp the sentiment, cut it apart and color with Pan Pastels before adhering to the palette. 


Leaky Shed Studio Products

Other Products
Cardstock ~ White
Flowers ~ Petaloo and Wild Orchid Crafts
Beadies ~ Mini Marbles; Microbeads
Tattered Angels ~ Glimmer Mist - Dreamsicle; Garden Fairy; Hydrangea; Huckleberry; Cinnamon; Wild Current; Dragonfly; Blackberry Cordial; Sapphire; Moonlight
Lindy's Stamp Gang ~ Flat Fabio - Aloha Avacado
Liquitex ~ Super Heavy Gesso
Liquitex ~ Gesso, white
Viva ~ Crackle Paint, white
Lumiere Paint ~ True Gold
Pan Pastels
Ranger ~ Glossy Accents
Helmar ~ Crystal Kote Fixative Spray
Helmar ~ 450 Quick Dry Adhesive
Helmar ~ Liquid Scrap Dots
Darice ~ Heat Tool

Thanks for stopping by today! I treasure your comments.
~ Blessings ~

Tuesday, December 31, 2013

Mixed Media Scripture Card Holder for Helmar

Wishing each of you a happy and blessed New Year!

Helmar asked me to create a New Years resolution project to share with you. I'm not big on resolutions; however, one of my goals this year is to commit more Scripture to memory. I created this lovely card holder for the window ledge above my kitchen sink. I'll place special verses there to think about and learn as I work. This would make a great recipe holder as well. I've used Helmar Decoupage & Craft Paste to adhere and seal my background papers.

Scripture Card Holder

Tips and Techniques
I found this giant clothes pin on clearance after Easter last year. It was decorated with some "lovely" cartoon Easter bunny paper. I peeled off the paper and sanded to get a smooth finish and also sanded all the painted edges to distress, revealing the wood below at all the edges. 

Once all my sanding was complete, I cut sections of cardstock weight patterned paper by Prima just a little larger than the flat panels on the clothes pin base. I brushed just the wood panels with Decoupage  Paste then laid the paper pieces onto the decoupaged wood. I rolled over the paper with a brayer to make sure it would be completely adhered without any air bubbles below. Here's a hint when using a brayer. I laid a sheet of computer paper over the patterned paper before using the brayer to make sure I wouldn't leave markings or transfer stray bits from the brayer. 

When this was completely dry, I trimmed close and sanded the edges to distress so the paper blended right into the wood edge. Then I brushed more Decoupage & Craft Paste over the top to seal the paper beneath. Since I plan to use this in the kitchen I want a nice sealed surface to protect the paper from splashes. Set aside and allow to dry completely.

When dry, I applied molding paste with a dot fade stencil, then used tinsel and gold Color Shine mists to add shimmer and drips. When this was dry, I sprayed with Helmar Crystal Kote Gloss Varnish

I stamped and heat embossed my sentiment and lantern, then colored with inks and watercolor pencils. I wanted to seal these to protect against those kitchen splashes, but didn't wanted to keep a natural finish to contrast against the glossy background, so sprayed with Helmar Crystal Kote Matte Varnish.

Finally, I selected some gorgeous flowers and arranged my elements onto the clothes pin. Everything is adhered into place with Helmar 450 Quick Dry Adhesive, which is my favorite go to adhesive when adhering to a mixed media surface. 

Helmar Products

Other Products
Prima ~ Ledger Pad 12 x 12
Petaloo ~ Botanica Faux Dried Blooms - Ivory; Canterbury Magnolia Blossoms - Burgundy; Color Me Crazy Mini Pearl Daisies - All Whites
Wild Orchid Crafts ~ 25mm Cottage rose - Mixed White/Cream
Clearsnap ~ Donna Salazar Designs - Mix'd Media Inx and MMI Embossing Powder, Leather
Ranger ~ Distress Ink - Gathered Twigs, Scattered Straw
Heidi Swapp ~ Color Shine - Gold, Tinsel
Prismacolor ~ Watercolor Pencils - Spanish Orange Crimson Red, Sienna, Goldenrod
Stampers Anonymous ~ Dot Fade Stencil
Inky Antics Clear Set Stamps ~ Shining Lantern
Giant Clothespin - craft store
Darice ~ Heat Tool, Brayer
Stampers Anonymous ~ Grid Blocks
Ranger ~ Water Brush
EK Success ~ Honey Bee Scissors
Monteverde Fountain Pen

Thanks for stopping by! I treasure your comments.
~ Blessings ~

Sunday, December 22, 2013

"Bless the Lord" Ironwork Cross for Donna Salazar Designs Featuring Bitty Blossoms

Christmas is nearly upon us. I hope that you are having a wonderful holiday season. I have a project to share with you today featuring Donna Salazar Designs products.

One of the things I enjoy about the holidays is creating one of a kind, handcrafted gifts. Today I have a trash to treasure gift to share with you. I found this ironwork cross for a dollar at a local thrift shop and decorated it with handcrafted flowers created with Donna's Spellbinders Bitty Blossoms dies.

Donna has a gorgeous gift bag project on this week's Wednesday Webisodes and an amazing prize package including a Zutter Bow-it-All. You can check out the details and enter for a chance for the prize here

"Bless the Lord" Ironwork Cross

Tips and Techniques
I have a stash of bitty blossom flowers created with project scraps, so this was a quick holiday project to pull together. A tutorial for my Bitty Blossoms Flowers can be found here. I used all three sizes of Bitty Blossoms. I adhered the blossoms to the ironwork cross with Helmar 450 Quick Dry Adhesive.

I printed out this verse from Word Art Wednesday onto white cardstock, tore it out, and rubbed several colors of Mix'd Media Inx on to coordinate with the flowers. I backed it with a strip of chipboard to hold it's shape and backed with foam tabs to raise before gluing onto the cross. 

Once I had the flowers and Word Art arranged and adhered to the cross, I applied Clearsnap Glue Gloss and sprinkled with Donna's Fairy Dust Glitter which adds so much gorgeous sparkle! 

Once final close-up.

Thanks for stopping by today!
I hope you've been inspired to pull out your Bitty Blossoms dies
and create a handcrafted gift this holiday season. 


Donna Salazar Products
GCD Studios ~  Natural Beauty, Family Jeans
Clearsnap ~ Mix'd Media Inx - Truffle, Honey, Leather
Clearsnap ~ Fairy Dust Glitter - Sugar Shimmer

Other Products
Ironwork Cross - Thrift Store
Clearsnap ~ Glue Gloss
Helmar ~ 450 Quick Dry Adhesive, Zapdots 
Verse from Word Art Wednesday

Thanks for stopping by! I treasure your comments

~ Blessings ~

Wednesday, September 11, 2013

Memories Box ~ for Donna Salazar Designs

Before sharing my project with you today, I'd like to take a moment to reflect. Twelve years ago, so many innocent lives were taken. My prayers continue to go out to many families who lost loved ones that day.

Today I get to share my latest project featuring Donna Salazar Designs GCD Studios Mix'd Media Stax 2 and a variety of her Clearsnap products. Donna's products not only create lovely scrapbook pages, but can be used in so many different ways on mixed media projects. (Can you tell how much I enjoy sitting in my studio creating with Donna Salazar Designs products??)

I'm always looking for items with trash to treasure potential. I found this little box while going to yard sales with my sister this summer. It was white with not very pretty flowers carved into the lid. I enjoyed altering it into a wedding keepsake box for our daughter, Elizabeth, who was married last October. It will make a nice anniversary gift.

"Memories" Box

Tips and Techniques:
To get this depth of texture on the box. I crinkled and scrunched (a lot) - strips of Donna's GCD Studios Mix'd Media Stax 2 crepe paper and adhered with Matte Mod Podge. When dry, I misted with her Clearsnap Smooch Spritz in Mixed Berries and Pralines and Cream, drying between colors. I also added glass bead gel and finished by adhering Donna's Clearsnap Fairy Dust Glitter into some of the crevices. 

I contemplated adding a design on the box with Donna's stencils, but couldn't bring myself to cover this gorgeous texture. Instead, I embellished with pearl and crystal flourishes from Want2Scrap.

Here I used the mulberry paper from Donna's GCD Studios Mix'd Media Stax 2 to create flowers and leaves with Donna's Spellbinders Bitty Blossoms dies and flourishes with her Pockets and Swirls Dies. I brushed some Smooch Spritz on the leaves and Mix'd Media Inx on the flourishes, then added Fairy Dust Glitter to them all!

Every girlie grunge project needs at least a little grunge. I applied modeling paste to Donna's Want2Scrap Hand Drawn Swirls card size chipboard flourishes. I mixed several different colors of Mix'd Media Inx to achieve a color to coordinate and brushed it on. While the ink was still wet, I lightly sprinkled with Clearsnap Mix'd Media Inx Jasmine embossing powder and heat set. 

In this view of the top, you can see I added Want2Scrap pearl flourishes and the memories word charm. The box had a cut out with glass - a perfect spot for this wedding photo of Elizabeth and Andrew.

One final view of the front of the box. 


Product List
Paper
GCD Studios ~ Donna Salazar Designs - Mix'd Media Stax 2 (crepe paper and mulberry paper)
Color/Inks
Clearsnap ~ Donna Salazar Designs - Smooch Spritz - Mixed Berries, Pralines & Cream
Clearsnap ~ Donna Salazar Designs - Fairy Dust Glitter - Mixed Berries
Dies
Spellbinders ~ Donna Salazar Designs - Bitty Blossoms
Spellbinders ~ Donna Salazar Designs - Pockets and Swirls
Embellishments
Want2Scrap ~ Say It with Bling - Rhinestones, mother of pearl
Want2Scrap ~ Say It with Pearls - Frilly Flourish Swirls, white pearls
Want2Scrap ~ Beautiful Bling Borders
Studio g - metal charms
Mixed Media
Matte Mod Podge
Liquitex - Flexible Modeling Paste
Liquitex - Gesso
Liquitex - Glass Bead Gel
Adhesives
Art Glitter - Designer Dries Clear
Tombow Multi Liquid Glue
Helmar 450 Quick Dry Adhesive
Tools
Ranger Craft Mat
Tonic Scissors

If  you have a few moments, I'd be happy if you could stop by the Donna Salazar Designs blog to leave your comments there. Thanks!! 

Thanks for stopping by! I treasure your comments.

~ Blessings ~

Saturday, March 9, 2013

Girlie Grunge Altered Box

I thought I'd change things up a little and create an altered wood box. I had a lot of fun combining mixed media with girlie grunge Donna Salazar products.


Tips and Techniques:


Flowers ~ Everyone knows I enjoy using my DSD flower dies. For these roses and leaves, I peeled the top off of some DSD corrugated board and used this lining to cut the flowers and leaves. After cutting, I randomly misted the petals with DSD Smooch Spritz in Caramel Latte and Sea Breeze. For the leaves it was just a very light mist with Sea Breeze for some speckles and plenty of Caramel Latte. I used all three of Donna's flower die sets - Bitty Blossoms, Grand Peony, and Rose Creations. I have a tutorial for the largest flower, which I call my Full Open Rose. It can be found here. You can get so many looks with this one flower by changing up the materials and colors!! The medium flower is basically the same only using Rose Creations petals and the medium Bitty Bossoms die. The small rose is a sweet Bitty Blossom. 

Butterfly ~ I cut DSD Corrugated Board with one of Donna's Wonderful Wings dies. I ran it through my Big Shot about 10 times along with a little scissor trimming. I peeled the top liner paper off and used it to create another butterfly for the inside of my box. I colored this butterfly with more Smooch Spritz and when dry, applied Ranger Crackle Accents. The antennae were created with brown fiber wrapped wire.

Flourish ~ I squeezed out some Viva Pearl Pen medium onto my craft mat, mixed it with Donna's Sea Breeze Smooch Spritz, and applied to a Want2Scrap chipboard flourish. Once dry, I covered it with Crackle Accents. 

Embellishments ~ I included some metal and glass pieces from my stash and attached with a piece of chain. 

Chicken Wire ~ Yes this is real chicken wire with real patina. My friend Mandy and her mom, Barb, had a roll of formerly used chicken wire in their barn and cut a generous piece for me. It even had dried vines still attached. Thanks girls!! 


Mixed Media ~ I love to layer and play with mixed media. I started by applying DSD Botanique Imagine paper to the sides and top of the box with Mod Podge. (Not that it can be seen now - LOL) The next layer is crinkled tissue paper applied with gel medium. I stamped with my DSD Crackle stamp with DSD Patina Mix'd Media Inx across the top of the box. I did not used a grid block and just touched portions of the stamp to the box randomly. While the ink was still wet I sprinkled on clear embossing powder and heat set. I repeated this on each side. On the top, front and back, I applied texture paste through a stencil. I was going for a grungy look so left swirls and lumps in the texture paste. Finally, I got out the DSD Smooch - again in Sea Breeze and Caramel Latte and covered the box with mist. The embossed crackle stamping acted as a resist - leaving great texture and contrast. 

Lace Edging ~ To add a girlie touch - I adhered some Prima lace around the edge of the box. 


I also decorated the inside of the box.
The raised center portion is the same as the box exterior. 

Tissue Carnation ~ The outer layers are cut from corrugated board liner using Grand Peony, and the inside is tissue paper colored with Pralines and Cream and Sea Breeze DSD Smooch cut from Carnation Creations. 

Grungy Carnations ~ The small Carnations are cut with DSD Artistic Papers. First I wet and crinkled the petals. Then, I applied just a little Mix'd Media Inx and sprinkled on Frontage embossing powders, then heat set to give the grungy look. I did not cover the entire petal with embossing since I wanted color to show through. I then spritzed with Caramel Latte and Sea Breeze Smooch. 

Butterfly ~ This is the liner I peeled off of the corrugated board for the butterfly on the top of the box. Exact same techniques applied but with different results since this piece is smooth. 

Paint ~ Any place where I did not apply the paper and mixed media, I dry brushed with Lumiere paints. 

I hope you have enjoyed my "Girlie Grunge" altered box!! 

DSD Products Used:
Botanique ~ Imagine
Artistic Papers ~ Antiquites 6x6 Squares
Zutter Corrugated Board - 12 x 12
Spellbinders Wonderful Wings
Spellbinders Grand Peony
Spellbinders Bitty Blossoms
Spellbinders Rose Creations
Crackle Stamp
Mix'd Media Inx ~ Patina
Mixed Media Inx ~ Vintage  
Smooch Spritz ~ Sea Breeze
Smooch Spritz ~ Caramel Latte
Smooch Spritz ~ Pralines and Cream

Other Products:
Tissue Paper ~ Stash
Want2Scrap ~ Martha Flourish Style C
Want2Scrap ~ Baby Bling Pearls
Chain ~ Cousin
Key ~ Michael's
Charm ~ Art-i-cake by Amy Labbe #AL29280
Chicken Wire ~ Stash
Cover Spool Wire, Brown ~ Darice
Prima Lace - Alencon Collection
Ranger Crackle Accents
Ranger Clear Embossing Powder
Lumiere Paint - Pearlescent Blue, Halo Blue Gold, Copper
Martha Stewart ~ Stencils Flourish
Martha Stewart ~ Stencils Scrolls
DecoArt Americana Classic Stencil ~ Royal Tiles

I have entered this at:
Word Art Wednesday Challenge #70 Anything goes

Thanks for stopping by! I treasure your comments.

~ Blessings ~