Friday, April 22, 2022

Introducing Amazing Paper Grace Layered Fleur Bouquet Slimline Collection with "Beautiful Friend Card and Tag and Blog Hop

 Welcome to my creative space!

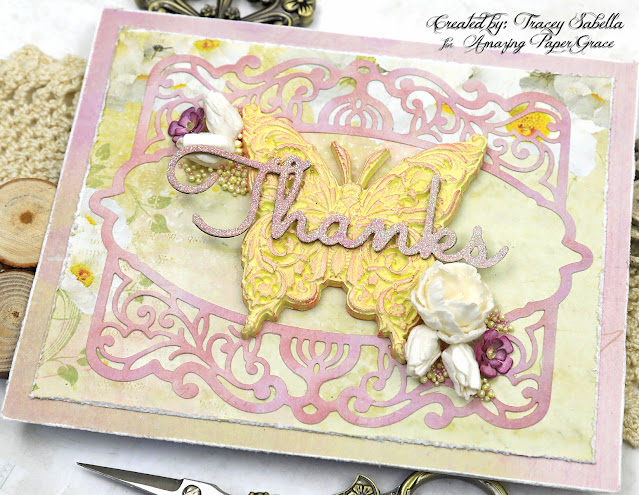
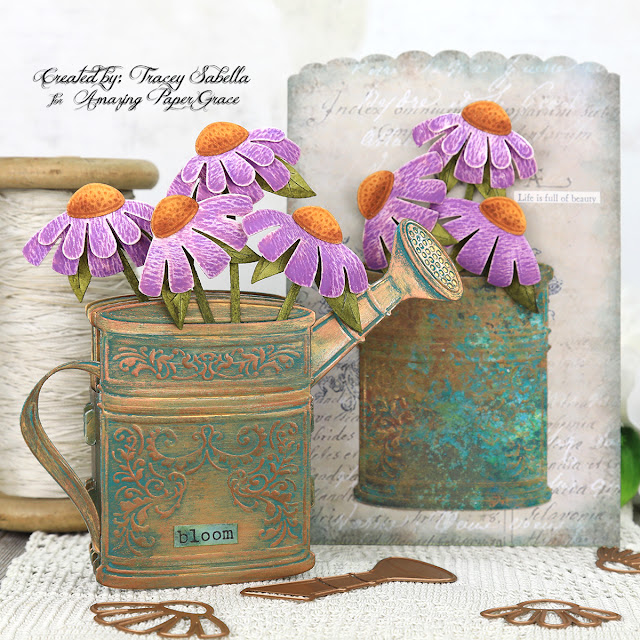
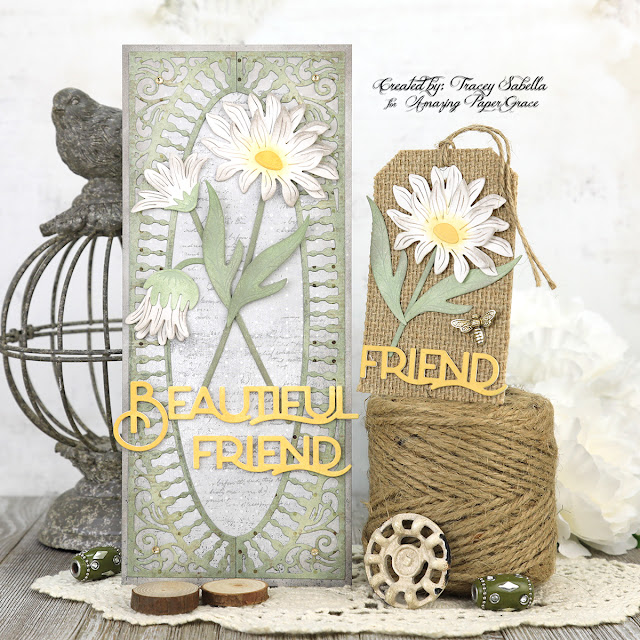
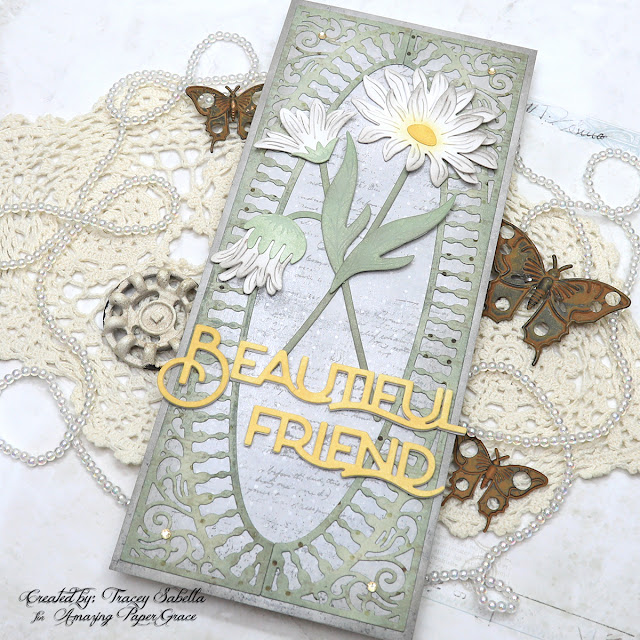
Today I've paired the gorgeous Amazing Paper Grace Half Slimline Oval (S4-1198) and Layered Daisies (S4-1193) from the Layered Fleur Bouquet Slimline Collection to create this beautiful card and coordinating gift tag set. These beautiful daisies remind me of a warm summer day, so I was inspired to create using grugy, muted colors with pops of warm sunshine yellow. 

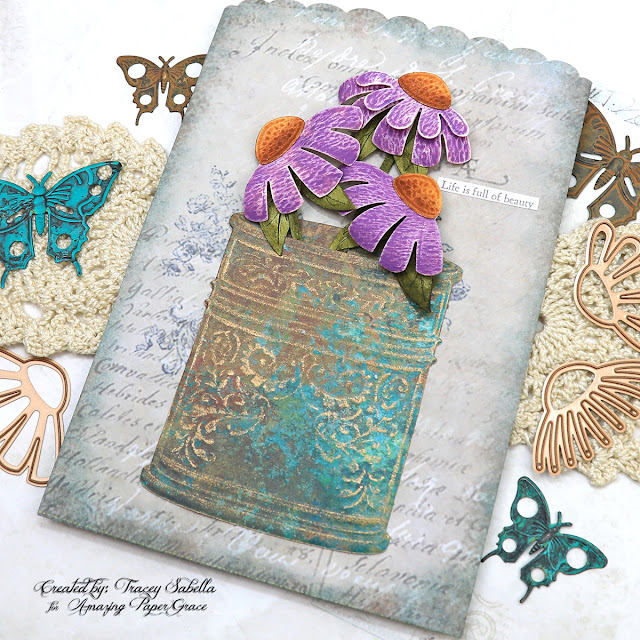
This sentiment from the Half Slimline Oval set cut from vibrant sunshine yellow, makes this a sweet ensemble that would be perfect to celebrate a birthday or special life event for a treasured friend.

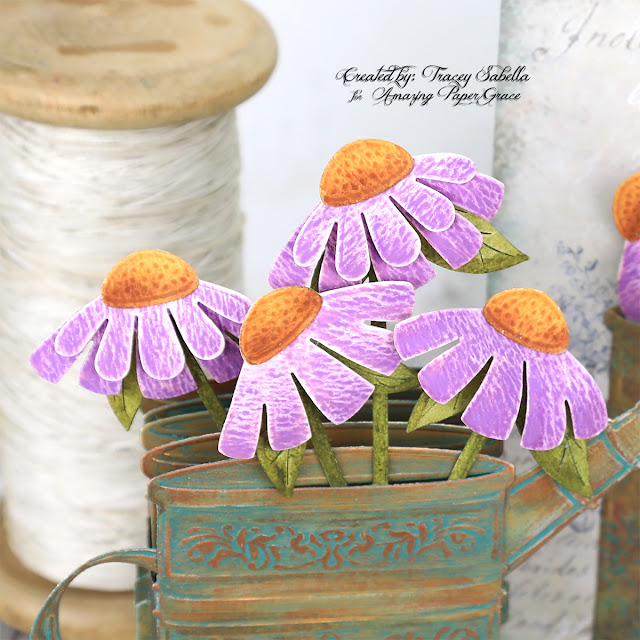
These gorgeous open flowers have just a little dimension that I added with a ball stylus and lay quite flat so that these would be easy to post in the mail. Be sure to scroll down to check out my "What I Made" section with all the details on how I created this summery ensemble. There are also links for creations from the entire Amazing Paper Grace Creative Team for more inspiration with this amazing collection.

Today's projects were created with dies provided by Amazing Paper Grace.

My Projects for Today


What I Made
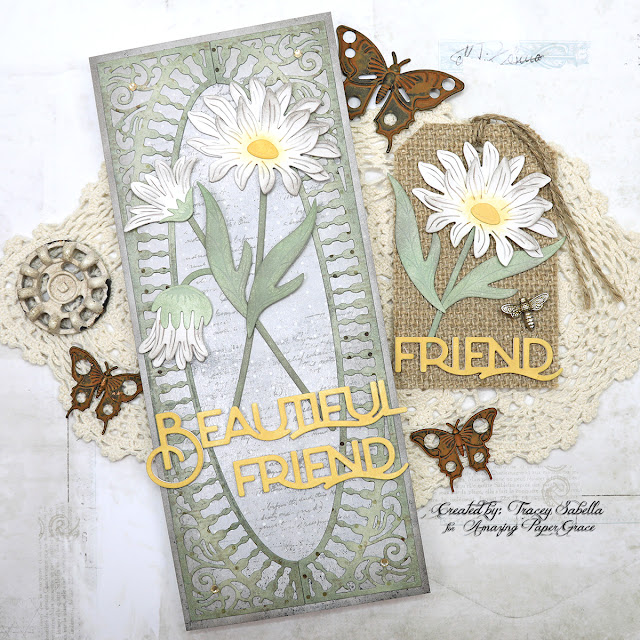
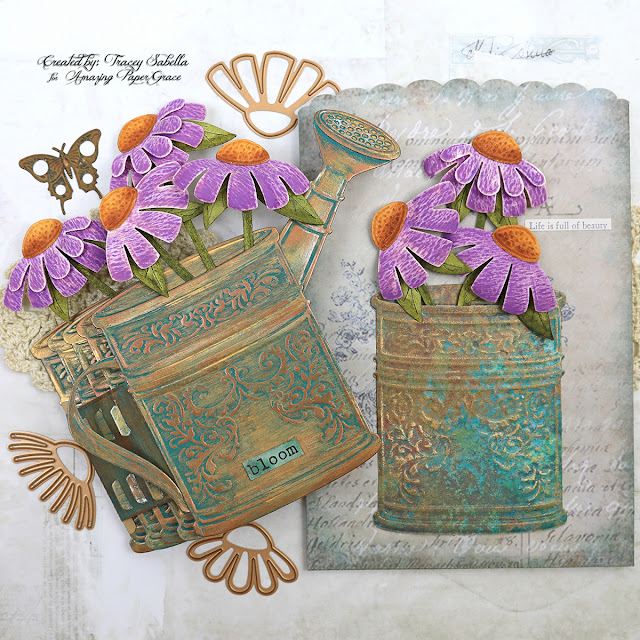
I paired the Half Slimline Oval Die Set with the Layered Daisies Set to create this grungy slimline card and gift tag with pops of sunshine. Keep on scrolling for more photos and details.

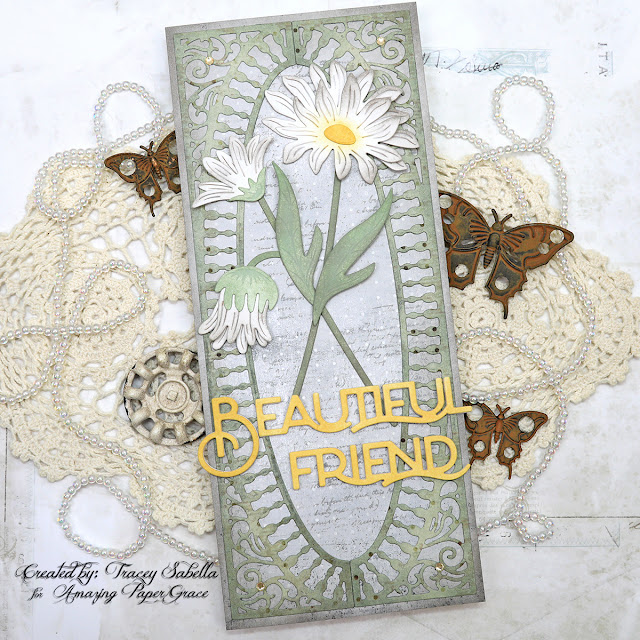
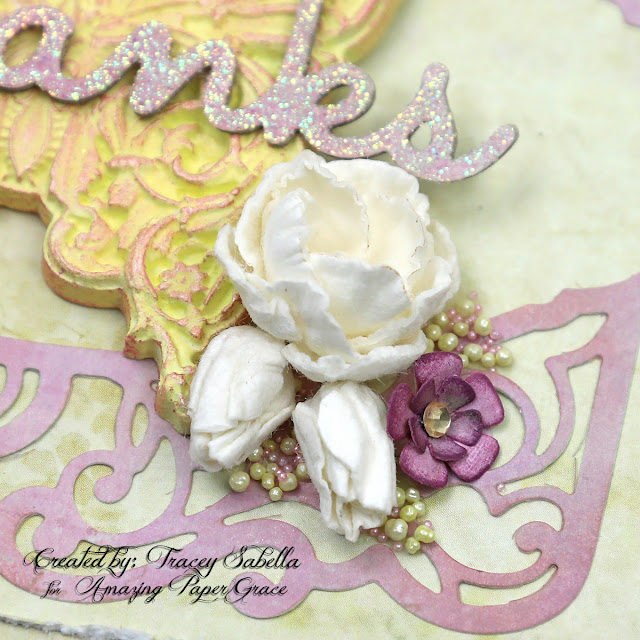
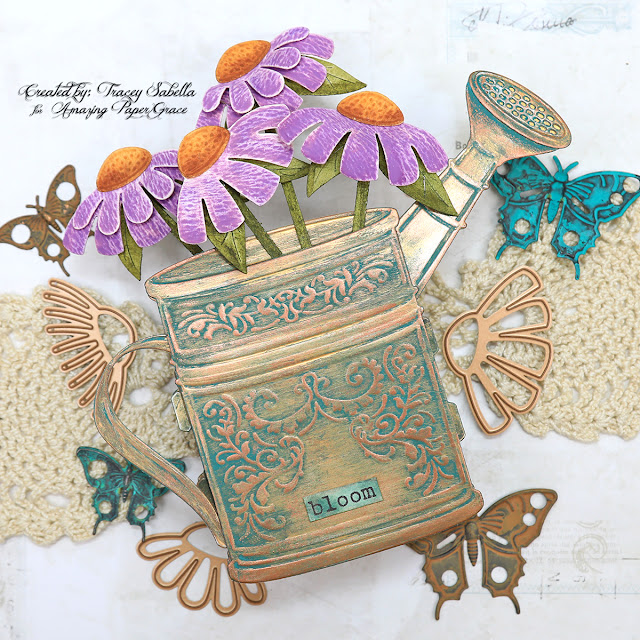
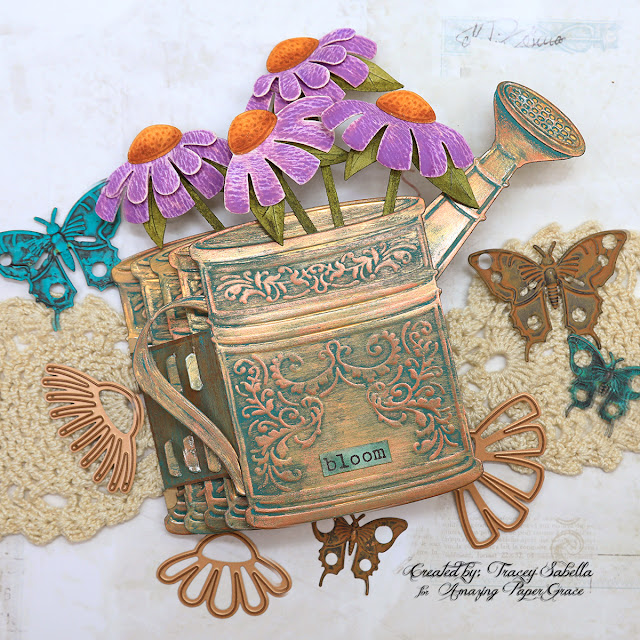
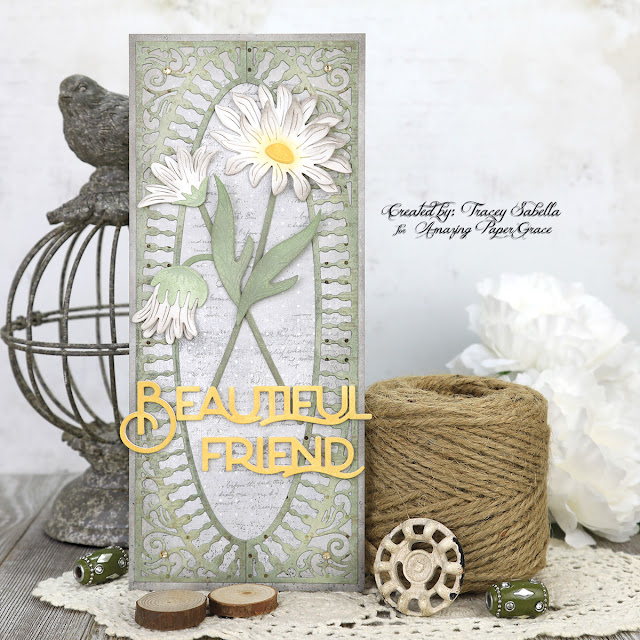
The scrolled iron work oval is created by cutting the half oval twice and placing them together to form this gorgeous design. The beautiful flowers are layered over the oval, then the sweet sentiment is layered over both.

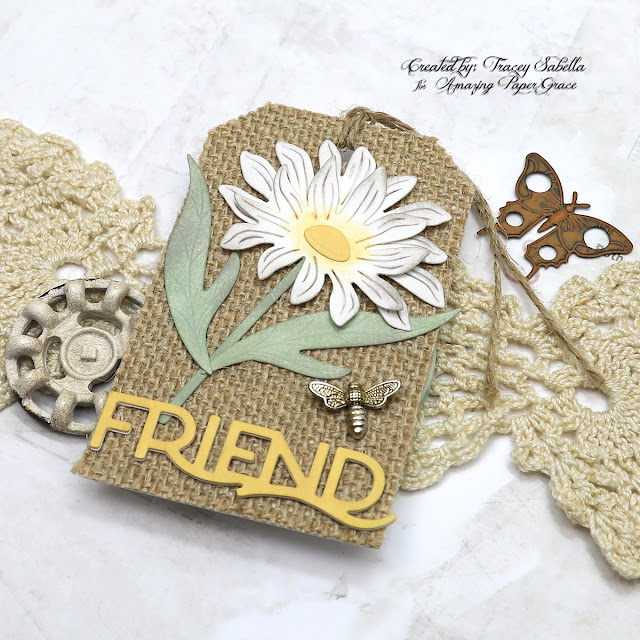
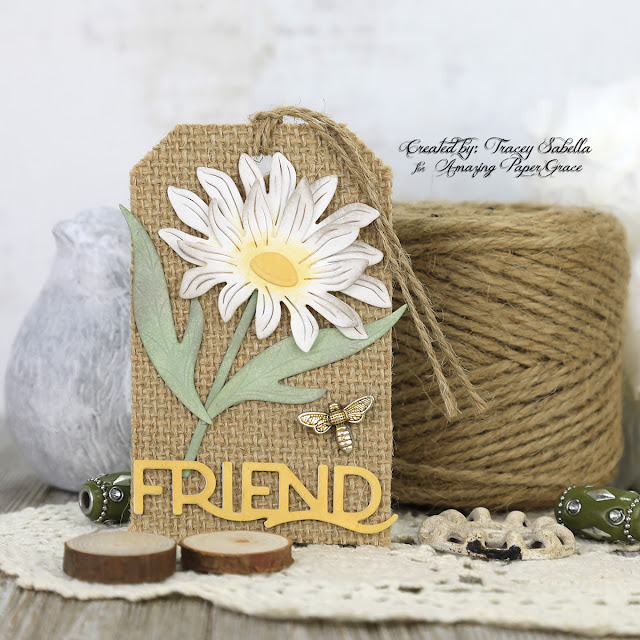
My accessory with these fabulous dies is a sweet burlap tag. I wanted to show you that these sets can be combined for a quick and easy gift tag by using a precut tag with one of the gorgeous daisies paired with the friend portion of the sentiment.

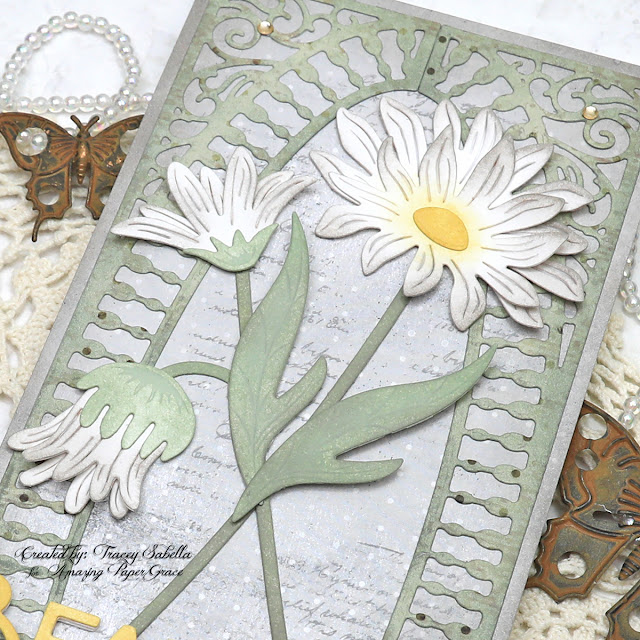
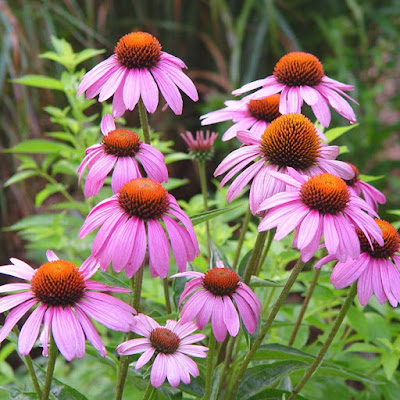
When I think of summer daisies, I picture sweet feathery white blossoms with bright yellow centers. For the petal layers to be more visible, I added a bit of grungy grey inking. The leaves and buds are beautifully embossed with these fabulous dies, so I also inked them with green to highlight the gorgeous designs and add some natural shading.

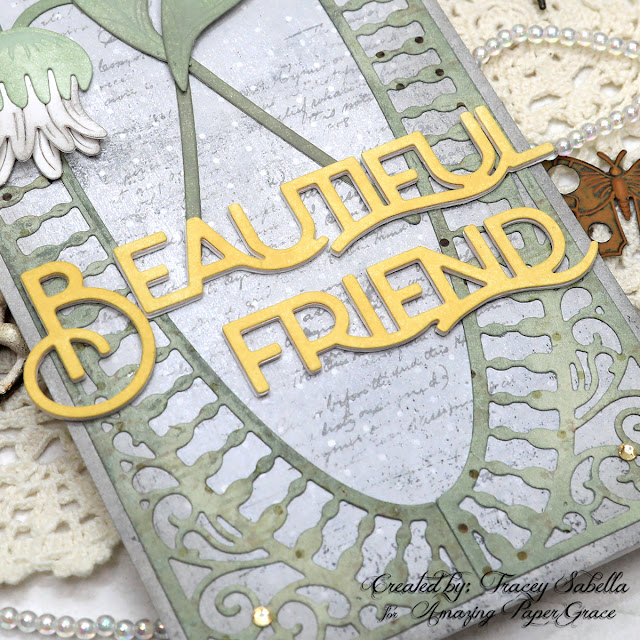
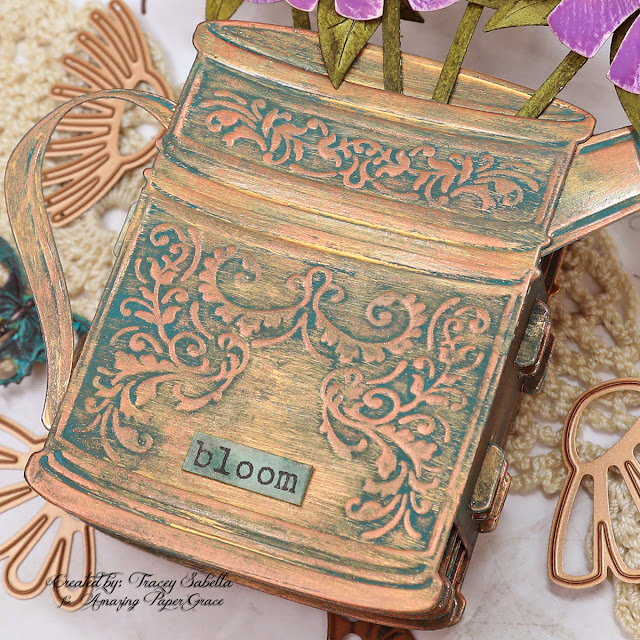
This sentiment is die cut 5 times from 120lb cover weight white cardstock. The top layer is inked to give it a bright pop of yellow and all of the layers are adhered together to give the sentiment some beautiful dimension and more stability.

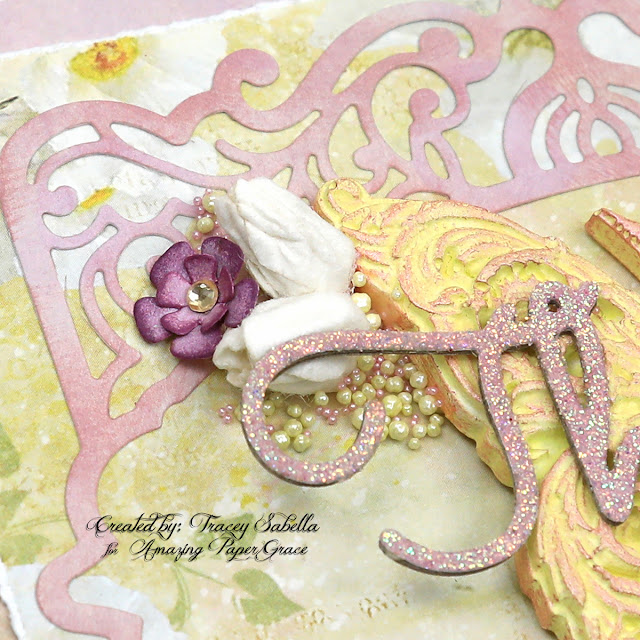
The edges of the iron scrolled oval are inked to add shading and visual dimension. I've popped on a few sparking rhinestones to add just a little bling.

The background paper behind the scrollwork is randomly stamped with a script stamp and inked around the edges. I rolled the stamp around my fingers so that the edges of the stamping are more organic. 

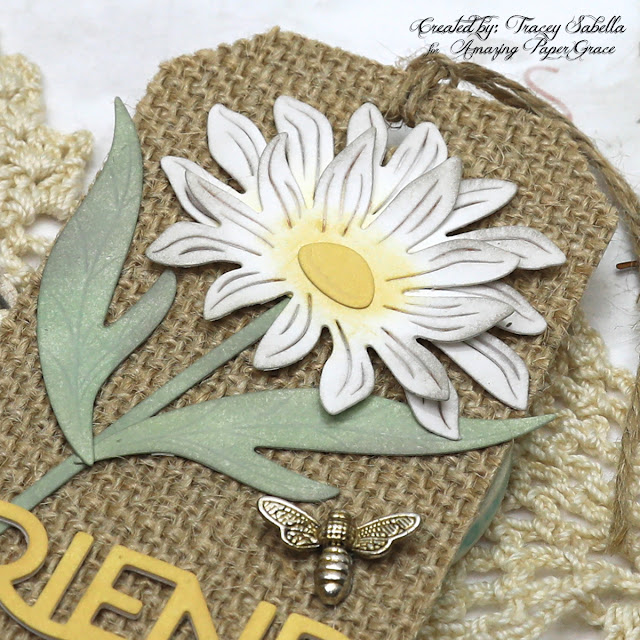
I created this sweet daisy while I was creating the ones I used on the card making this quick and easy to put together. The Friend sentiment here is also layered and inked like the one on the card. This little bee is from a set of bee charms I picked up on Amazon, but any little insect would be adorable here. 

One more view of the sweet card.

Designer Tip: Layering die cut sentiments gives them more stability and dimension.

These dies are available from Spellbinders right now! Click here: Layered Fleur Bouquet Slimlines Collection.

Supplies:
Accessories:
Paper:
  • Basic Grey ~ Basics Manilla
  • FabScraps ~ Vintage Bearings
  • Cardstock ~ White, 120lb
  • Jilibean Soup ~ Burlap Tags
Ink:
  • Ranger ~ Distress Ink: Iced Spruce; Pumice Stone; Scattered Strap; Bundled Sage
  • Ranger ~ Distress Oxide Ink: Hickory Smoke
Stamps: 
  • Tim Holtz with Stampers Anonymous ~ Entomology
Embellishments: 
  • Rhinestones ~ Yellow
Adhesives:
  • Tombow ~ Mono MULTI Liquid Glue
  • Beacon ~ 3-IN-1 Advanced Craft Glue
  • Beacon ~ Fabri-Tac
  • Double Sided Tape ~ 1/4" 
Tools:
  • Spellbinders ~ Platinum 6
For more Layered Fleur Bouquet Slimlines Collection Inspiration
Visit each Creative Team blog linked below for their take on creative paper crafting ideas using the Layered Fleur Bouquet Slimlines Collection!


I would adore hearing from you! Please leave a comment below letting me know how you will use these gorgeous dies!


Thanks for stopping by! I treasure your comments.

~ Blessings ~

Tuesday, April 19, 2022

Springtime Interactive Flip Card for Amazing Paper Grace

 
Welcome to my creative space!

I just couldn't resist using beautiful spring colors on this interactive birthday flip card featuring the gorgeous Amazing Paper Grace Primrose Heart Façade (S5-484) die set. The yellow primrose flowers and delicate hearts along the the primrose leaves are cut with this fabulous set. I've also used the Daisy Delight Garden Shutters A2 Card Base (S5-479) for the interactive flip base; S6-183 Butterfly Bliss Garden Shutters 5 x 7" Card Base for the sweet glittering butterfly, and Petite Floral Potpourri (S3-420) for the leaf sprig foliage.

I encourage you not to give up when things go wrong. I cut this card base for a previous project, but had a mishap when I attempted to add stenciling with colored pearlized texture paste. Unfortunately the paste created more of a blob than the delicate design I was going for. At that point, I set my mistake aside and started over again. 

I wanted to feature the primrose flowers and remembered this flawed base. As I examined it, I realized that I used small dabs of glue to hold it in place until it set so I could remove the tape backing around the edges to hold it securely, so it wasn't difficult to carefully remove the top layer. I didn't have more of the original paper, but found this lovely patterned teal paper that worked with the other colors I had used for the base nicely. I recut the top layer, glued it down and it was ready to decorate and a perfect backdrop for the gorgeous primroses. 

Here's a view of the card with the shutters open:
Don't you just adore this interactive feature? This birthday sentiment is part of the Daisy Delight Garden Shutters A2 Card Base set. I cut it once from the same yellow patterned paper used for the primroses, then inked it to deepen the color for more contrast against the background paper. I cut it three more times from white 120 lb cardstock and adhered the layers to give more depth.

Thank you Amazing Paper Grace for providing the dies used in this project.

Tips and Techniques
I've use a combination of handcrafted primrose flowers with die cut foliage along with purple and pink blossoms from my stash. The lattice pieces are cut with dies included in the Daisy Delight Garden Shutters set. 

The lovely primrose flowers are cut from yellow patterned paper. On the open blossoms, I used a Distress Marker to add teal color to the flower centers. The die cut centers are cut from teal and the color is also deepened with Distress Markers. A clear rhinestone is placed in the center for a little sparkle. 

In this bottom corner, I've used one of the primrose buds with leaves also die cut from the Primrose Heart Façade set. the leafy sprigs are cut from Petite Floral Potpourri. 

Pull tabs are added to the card to help flip it open to reveal the birthday sentiment. Each pull tab is cut twice and the bottom piece is inked so the die cut word pops. The edges are inked with the same color.

This sweet butterfly is cut using dies from the Butterfly Bliss set. It is cut from the same paper used for the card front, then inked to deepen the colors. The wing pieces are brushed with Crystal Stickers to add gorgeous sparkles.
 
One final view.

Amazing Paper Grace Dies:

Paper:
  • Blue Fern Studios: Heartland; Blush
  • Cardstock: White, 120lb

Ink:
  • Ranger ~ Distress Ink: Bundled Sage; Victorian Velvet; Aged Mahogany; Scattered Straw; Peacock Feathers
  • Ranger ~ Distress Markers: Tumbled Glass; Broken China

Mixed Media:
  • Ranger ~ Stickles: Crystal

Embellishments:
  • Scrapberry's ~ Blessings Flowers
  • Rhinestones ~ Clear (flower centers)

Adhesives:
  • Tombo ~ Mono MULTI Liquid Glue
  • Beacon ~ 3-IN-1 Advanced Craft Glue
  • Beacon ~ Fabri-Tac
  • Double Sided Tape ~ 1/4" 
  • Red Line Tape ~ 1/8"

Tools:
  • Spellbinders ~ Platinum 6


Thanks for stopping by! I treasure your comments.

~ Blessings ~

Sunday, April 17, 2022

Layered Shabby Chic Card for Little Birdie Crafts

 
Welcome to my creative space!

Spring has finally arrived after a cold, snowy winter here in northeast Ohio. I’ve created this shabby layered card loaded with spring flowers and embellishments featuring the gorgeous Little Birdie Crafts Shabby Chic Bouquet collection including papers, ephemera, and of course fabulous handcrafted flowers created by beautiful women in India!

I have a full photo tutorial with all the details on how I created this card up on the Little Birdie Crafts blog HERE. Thanks for stopping over there to leave a comment.

Thank you Little Birdie, for providing supplies used in this project!

If you would like to see a full supply list, please scroll down.
Little Birdie Crafts can be purchased at their online store.

Be sure to check out the current sales HERE.

Use code TRACEY05 for a 5% discount.

I receive a small commission at not cost to you.

A couple close-ups for you:


Little Birdie Crafts Supplies

Other Supplies
Thin Chipboard
Tim Holtz with Ranger ~ Distress Ink - Old Paper; Brushed Corduroy
Tim Holtz with Ranger ~ Distress Archival Ink: Ground Espresso; Peeled Paint
Tim Holtz with Stampers Anonymous ~ Ledger Script
Tim Holtz with Stampers Anonymous ~ Flower Shop
Beaded Lace
Bee Charm (from Amazon)
Repositionable Tape
Silicone Glue


Thanks for stopping by! I treasure your comments.

~ Blessings ~

Saturday, April 16, 2022

 
Welcome to my creative space!

I've used a special technique to add a glittery finish to the beautiful die cut sentiment from the Amazing Paper Grace Sweet Sayings Notecard Sentiments (S4-1148) die set from the Sweet Serenade Collection. This gorgeous sentiment adds a beautiful touch to this spring thank you card.

You can find a full video tutorial explaining this technique exclusively in the Amazing Paper Grace Creative - Creative Encouragement Community Facebook Group.

This lovely group includes exclusive tutorial content. I share a mixed media tutorial there on the 13th of each month. The tutorial for this project includes a video tutorial teaching you how to create this beautiful sparkling finish that coordinates perfectly with your project. If you're not a part of this fabulous and encouraging group you can join HERE.

The lovely resin butterfly is molded with the Zuri Designs Beauty and the Beast silicone mold. I painted the butterfly with impasto paints and highlighted the texture with metallique waxes. 

Thank you Amazing Paper Grace for providing the dies used in this project.

Tips and Techniques
Here's a close-up of the beautiful glittery sentiment. If you would like to learn how I created this sparking finish, be sure to stop by the Amazing Paper Grace Creative - Creative Encouragement Community Facebook Group. for the video tutorial.

To coordinate this sweet butterfly with the papers, I mixed white with Lemon Peel impasto paints by Finnabair to color the butterfly and accented the texture with Sweet Rose metallique wax.

The beautiful white rose and buds are die cut from mulberry paper with the Candlewick Rosebud Dies set with the purple flower being cut with A2 Filigree Marquis set. I tucked in a few prills and microbeads to add texture.

More of the beautiful flowers. 

The background die cut is also cut with the A2 Filigree Marquis die set using the same paper found on the glittering sentiment. Don't you adore how the colors coordinate so beautifully?

Amazing Paper Grace Dies:

Paper:
  • Patterned Paper ~ Scraps from my stash
  • Cardstock ~ 120lb, White
  • Thin Chipboard

Ink:
  • Ranger ~ Distress Ink: Scattered Straw
  • Ranger ~ Distress Oxide Ink: Victorian Velvet

Mixed Media:
  • Ranger ~ Embossing Dabber
  • Ranger ~ Embossing Powder: Holographic
  • Finnabair with Prima ~ Soft Matte Gel
  • Finnabair with Prima ~ Metallique Wax: Sweet Rose
  • Finnabair with Prima ~ Impasto Paint: Snow White; Lemon Peel
  • Amazing Casting Resin ~ White
  • Zuri Designs ~ Wings of Beauty Silicone Mold (Butterfly)

Embellishments:
  • US Artquest ~ Prills: Lemon Chiffon
  • Martha Stewart Crafts ~ Microbeads - Kunzite
  • Rhinestones (Flower Centers)

Adhesives:
  • Beacon ~ 3-IN-1 Advanced Craft Glue
  • Helmar ~ 450 Quick Dry Adhesive
  • Double Sided Tape ~ 1/4" 
  • Tombo ~ Mono MULTI Liquid Glue

Tools:
  • Spellbinders ~ Platinum 6
  • Wagner ~ HT 400 Heat Gun

I am an affiliate with Zuri Designs and receive a small commission at no
cost to you if you purchase from them using a link from this post. 

You can find their online store HERE
and the Beauty and the Beast mold can be found HERE.

Thanks so much for your support!


Thanks for stopping by! I treasure your comments.

~ Blessings ~

Monday, April 4, 2022

Amazing Paper Grace April Die of the Month: Pop Up 3D Vignette Watering Can Bouquet with Blog Hop

 
Welcome to my creative space!

As soon as I saw this gorgeous Amazing Paper Grace Pop Up 3D Vignette Watering Can Bouquet Die of the Month set (DOMAPG-APR22), I just new it would look gorgeous in copper and patina. I looked up some photos of vintage copper watering cans to get a feel for real patina goodness before starting. 

One of my favorite summer flowers is the purple coneflower also known as echinacea. They have the beautiful purple petals with a golden brown cone in the center. I used them for inspiration for the sweet flowers on my card and gift bag.


Be sure to scroll down through the Tips and Techniques section below for all the details on how I created the coppery patina finish and these lovely purple cone flowers.

Many thanks to Amazing Paper Grace for providing the dies used in this project!

There are 15 dies included in the Pop Up 3D Vignette Watering Can Bouquet.

Watering Can Vignette Card

Gift Bag

Tips and Techniques
Here's a view of the gorgeous watering can. It's embossed and cut into copper metallic paper. These embossed designs are just so gorgeous! I rubbed Finnabair Patina and Rust pastes across the watering can and focused on applying it around the embossed areas to create this realistic vintage patina. If you don't have these pastes, acrylic craft paint in patina colors would work well too.

You can see how the paint settles into the crevices. Of course some of the paint also adhered to the raised embossed areas, so I applied brass and copper metallique waxes to the raised areas to highlight the gorgeous design.

This fabulous vignette card slides over so that it's flat to fit nicely into an envelope for mailing.


My accessory is this sweet gift bag. I wanted to show you a different technique that's quick and easy. I used the dies without the spout and handle to create this vintage vase. It's embossed and cut from patina print paper. The raised embossed design is rubbed with brass and copper metallique waxes. If you don't have waxes, you could use a very light touch with metallic copper craft paint to get a similar effect. I had extra flowers from creating the watering can that I used here. It's adhered to a pre-printed gift bag I had in my stash along with a sweet sentiment.

The flowers are cut from watercolor paper and colored with watercolor paints using purples for the petals and dark orange with brown shadows for the cones. The stems and leaves are also cut from watercolor paper and painted with a couple shades of green. I curled the petals and leaves a little with my fingers for added dimension.

Here's one final look at this sweet duo.

Supplies:
Accessories:


Paper:
  • Tim Holtz with Idea-ology ~ Kraft-Stock Metallic-2: Copper
  • Craft Consortium ~ Patins, 12x12" Paper Pad
  • Bienfang ~ Watercolor Paper, 140lb Cold Pressed
  • Decorative Gift Bag 

Ink:
  • Ranger ~ Distress Ink: Peeled Paint; Pine Needles

Mixed Media:
  • Finnabair with Prima Marketing ~ Metallique Wax: Bronze Age; Copper
  • Finnabair with Prima Marketing ~ Rust Effect Paste: Fantasy
  • Finnabair with Prima Marketing ~ Patina Effect Paste: Blue
  • M. Graham Watercolor Paint
  • Colorful ~ PanPaster: Copper; Permanent Green Shade; Turquoise Shade

Embellishments:
  • Tim Holtz with Idea-ology ~ Clippings Sticker Book
  • Finnabair with Prima Marketing ~ Sentiments

Adhesives:
  • Art Glitter ~ Designer Dries Clear Adhesive
  • Beacon ~ 3-IN-1 Advanced Craft Glue
  • Beacon ~ Fabri-Tac
  • Helmar ~ 450 Quick Dry Adhesive
  • Redline Tape ~ 1/8"
  • Double Sided Tape ~ 1/4" 

Tools:
  • Spellbinders ~ Platinum 6
For more Marvelous Medallion Inspiration from the Creative Team:

Visit each blog linked below for their take on creative paper crafting ideas with Marvelous Medallion, the Amazing Paper Grace April 2022 Die of the Month!


The Amazing Paper Grace Die of the Month is available exclusively at Spellbinders Paper Arts during April 2022, Pop Up 3D Vignette Watering Can Bouquet along with other membership perks.

View this month’s Amazing Paper Grace Die of the Month!

I would adore hearing from you! Please leave a comment below letting me know how you will use these gorgeous dies!


Thanks for stopping by! I treasure your comments.

~ Blessings ~