Showing posts with label Inking. Show all posts

Tuesday, December 24, 2013

Love Notes For Leaky Shed Studio featuring Heat Embossed Chipboard


I would like to wish each of you a blessed Christmas. I hope you'll take time to reflect on Christ's love this holiday season. 

Today I'd like to share some details from my Leaky Shed Studio project. It's always fun to send little notes to our loved ones to let them know how much we care, or to congratulate them on a special accomplishment. I've created a set of note card holders just for that purpose. I've cut the holders and coordinating note cards from the Prima Romance collection and decorated them with gorgeous Leaky Shed Studio chipboard.

Love Notes Set

Tips and Techniques
This first note card holder has a steampunk image, so I added one of the LSS crosses from the cross set. I heat embossed with with the wonderfully textured Fran-tage Aged Black Embossing Enamel. Each of these holders was fussy cut from design sheets from this gorgeous Prima paper, then scored and folded. Edges are inked in Walnut Stain Distress Ink. 

For each of these holders I cut out and inked additional sentiments like the Beautiful and Notes sentiments on this one. The Leaky Shed Studio Butterfly was heat embossed with Fran-tage Shabby Pink Embossing Enamel. Inking for this holder is done with Black Soot Distress Ink. 

This chipboard piece is the new Damask design that is an upcoming release. Don't you just adore the intricate detail? It's also heat embossed with Fran-tage Embossing Enamel in Aged Silver. The top part of the chipboard is not glued down so the envelope tab can be tucked underneath. I went back to the Walnut Stain Distress ink for this note holder. 

You may have noticed that I have not included much dimension with flowers and other embellishments so that they will be easy to slip into an envelope and send on their way, but still have so much elegant and gorgeous dimension with the lovely dressed up chipboard. 

Spring Butterfly Small (Set of 3)
Cross Set (Set of 5)
Damask - small

Other Products
Prima ~ Romance Novel - Messenger, Ime Travel, Bookplate
Ranger ~ Distress Ink - Walnut Stain, Black Soot
Ranger ~ Perfect Medium
Stampendous ~ Fran-tage Embossing Enamel - Aged Black, Shabby Pink, Aged Silver
Tombow Multi Mono Liquid Glue
Scotch ~ ATG
Darice ~ Heat Tool

I hope you've been inspired to add some Leaky Shed Studio chipboard to your next project!

Thanks for stopping by! I treasure your comments.

~ Blessings ~

Wednesday, November 27, 2013

Thanksgiving Wishes Card for Helmar

For those of us in the US, tomorrow is Thanksgiving. I'll be spending the day at the home of one of my husband's cousins where everyone, about 50 in all, will be gathered together for a special day of family fellowship and food. All of our children will be able to make it, and it's always so wonderful to spend time with them!! 

Today I'm sharing a card I created for Thanksgiving featuring Helmar products. As you've probably figured out, my go to adhesives these days are the Helmar liquid adhesives that work so well with my mixed media style. However, when putting a card together, the Helmar Quickfix Adhesive Runner works great to make quick work of putting all the paper layers together.

"A Day of Thanks"

Tips and Techniques
I prepared my layers by trimming to size, inking the edges, and stitching. Then to adhere, I simply ran the Helmar Quickfix Adhesive Runner around the edges. There are two things I appreciate about the Helmar Quickfix Adhesive Runner. First, it is very tacky, so I don't have to worry about my project coming apart. Second, it is just adhesive - no stiff tape component, so it's easy to apply to curvy shapes as well as straight lines. 


I also used the Helmar Quickfix Adhesive Runner to adhere my strip of ribbon.

I selected flowers, a berry sprig and jewelry pendant from my stash. These heavier items were adhered with Helmar 450 Quick Dry Adhesive

I stamped and heat embossed my sentiment on white cardstock, then centered and die cut it before rubbing with several shades of ink to color. 

I also stamped and embossed the inside sentiment. Here is where I really love using the adhesive runner - to build layered frames. I cut out my sentiment, then applied the adhesive runner to adhere to the darker cardstock and used a transparent ruler and craft knife to trim the mat for perfectly even edges. 

Before adhering my layers, I created the swirling leaf design on the top layer by dry embossing the grungy fall color paper. I then sanded the raised edges to expose the white paper core. 

Thanks for dropping by today to check out my project.
I hope you've been inspired to create!! 

Helmar Products:

Other Products:
BoBunny Vintage Double Dot - Buttercup (Thank you Juliana!)
We R Memory Keepers - Black Widow Collection
Brown Cardstock
BoBunny Blossoms - Wildberry Daisy (Thank you, Juliana!)
Petaloo Darjeeling Mini Mix
Cappuccino Satin with Grosgrain Edges ~ Really Reasonable Ribbon
Tonal Duets - Pendant
Creative Imaginations Clear Stamps - Thankful
Darice Embossing Folder - Fall Leaf
Ranger Distress Ink - Vintage Photo, Wild Honey
Clearsnap ~ Donna Salazar - Mixed Media Inx: Leather
Clearsnap ~ Donna Salazar - Mixed Media Inx Embossing Powder: Leather
Clearsnap ~ Donna Salazar - Mixed Media Inx CHOX: Sparrow
Spellbinders ~ Decorative Labels Twenty-Two
Sizzix - Big Shot
Core-dinations - Sanding Block
Tim Holtz - Grid Blocks
Sewing Machine

I'd like to give special thanks to Juliana Michaels for her gift of BoBunny goodies!!
If you'd like to see some of her amazing work stop by her blog:

Thanks for stopping by! I treasure your comments.
~ Blessings ~

Monday, April 1, 2013

"Adventure" SEM April Main Challenge #27 ~ All God's Creatures

I hope you had a wonderful Easter! We went to church then had all the family over for some homemade lasagne and a time of sweet family fellowship.

It's the first Monday of the month and that means it's time to share the Scrapping Everyday Miracles Main Challenge. Nicole is hosting a wonderful challenge for you this month. Here are the details:
For this month's main challenge we would like you to create a project inspired by your pets.  Even if you arent animal person or don't have any pets you can still be inspired by this challenge.  You can create a project inspired by any animal in God's creation. Your projects can even be about an animal related experience like a day at the zoo or a farm. What is important is that we see that God is blessing us with everyday miracles using both the animals within our families and those outside our homes.  

SCRAP TWIST: USE AN ANIMAL RELATED QUOTE SAYING OR EVEN BIBLE VERSE ON YOUR PROJECT.   You can use it for your title, journaling or just addition to your project! Just to help you get started here's a link to a bunch of animal quotes :

Here is my project based on this challenge:

"Adventure"

My husband and I never had a dog. or even discussed the possibility of getting one. Then we moved back to Ohio in 2000 to be closer to our families. My brother taught dog obedience classes including a dog 4-H club. He also did a little breeding. He decided to keep one of the pups as an experiment. He often had clients bring in 2 or 3 year old dogs with no former obedience training, and these dogs were more of a challenge. So he decided to keep Ellie. While he didn't allow her to jump on people, she had no obedience training and had only been on a leash a couple times to go to the vet. You may have guessed it. He offered Grace the opportunity to have 15 month old Ellie so she could be in his 4-H club, and Grace became part of the experiment. Now dogs became a "big" part of our lives. Grace wanted to make Uncle Paul proud and put a lot of time and effort into training her new pal. She defied the odds and with Ellie became one of the top obedience teams in the UKC. They attained every possible obedience title and in their final year of competition placed 3rd in the country in Utility - the most advanced obedience class. 

Now, you do see three dogs in the photo. It didn't take long for our two other daughters to get dogs and join in the fun. From the left you see Tori, Ellie then Bounder. The girls have always been in charge of their dogs including training, feeding, grooming, vet appointments ~ everything. They learned so much responsibility, and the Lord has opened up many doors for us to share our faith along the way. There are people from many walks of life in the dog world, and I pray that the Lord has been able to touch some of them through us. While Elizabeth and Maria did not train for the advanced classes, they were recognized as top Junior handlers by qualifying for an invitation to the National UKC Dog Show each year they showed. 

This sweet photo was taken a year ago ~ one of the last photos before Ellie left us. Grace has just picked a new border collie puppy and is excited to have a dog in her life again. 

Tips and Techniques:
Inking ~ The larger jeweled flower started out as layers of creamy Prima flowers - the kind you used to buy in the pillars - I simply rubbed on some distress ink. The wooden leaves were also lightly inked. The background paper was somewhat teal, so more rubbing with distress ink brought it to the right color to coordinate with this photo. The white doilies were inked up as well. 

Lace Trim ~ Such an easy addition to any border strip to add a pretty touch.

Title and Trinkets ~ I was so thrilled the other day to find these fabulous vintage lightbulb word trinkets by Prima and thought the word "Adventure" would be the perfect title for this page since our daughters have had quite an adventure with their dogs!! I also enjoy adding little trinkets, buttons, wooden pieces into my clusters.


Stamping ~ I repeated this charming background stamp before adding my embellishments. To get a soft edge, I just tear a piece of paper towel and place where I want the stamped edges to be and stamp right over it.

Flourishes ~ I cut this gorgeous flourish into two pieces and used in each corner for balance.


Twine Flower ~ My tutorial for the handcrafted twine flower can be found here.

Distressing ~ So quick and easy with my Donna Salazar Distrezz-It-All by Zutter to get these nice "thick" edges. 

Canvas Tape ~ I simply folded and laid some this canvas tape at the edge of the clusters. A little talc powder on the adhesive edge that is up takes care of the stickiness. 

Fussy Cutting ~ I tucked a few fussy cut pieces in as well. 


Journaling ~ I wanted my "required element" to blend seamlessly into my layout, so hand wrote it at the bottom under the green paper strip. It says "Dogs are not our whole lives, but they make our lives whole." Roger Caras

Our Sponsor this month is:

Hello there! I'm Leena and I live in the tiny island of Singapore. I've been scrapbooking for 6 years now and the recent one year, I've turned from a traditional scrapbooker to Project Lifer. It's been an amazing year just dedicating my time and days documenting week after week worth of stories about me, my family and friends, my full time job, the places I've travelled to for work and holidays, celebrations and many more interesting journey of my life. I've also set up a very small online shop just a year ago, just to share handmade items that was originally created for my own use. Then I realized, I had a lot of request from scrapbookers all over the world asking for my handmade items to be made available for sale. That's how it got started. The response has been overwhelming and I'm so thankful to all my buyers for their support. My shop sells mainly core handmade items such as flair buttons or also known as badges which can be used for any kind of craft projects. They're a very popular scrapbook product amongst scrapbookers! Once again thank you to Scrapping Everyday Miracles for this opportunity to sponsor my shop products for their challenge this April! 

Instagram - username is "findingnana"

Leena has sponsored it us with a wonderful prize that you could win by linking up a project to our April Challenges!  Wanna see it? That is $40 worth of flair buttons!  WOW!

Guess what everyone? Leena has prepared a discount code for all of you!!!! You can save  20% off total purchase of any products in her shop, valid from now until April 30thThe code is SEM20You just need to enter this during check out. This discount does not apply on the shipping fee. She ships from Singapore to all over the world. 

**NOTE: You may submit the project you create for Scrapping Everyday Miracles to other challenge blogs but your project must be mainly created for the Scrapping Everyday Miracles challenge in order to win the sponsor prize and/or be one of Top 3**

 All entries must be linked HERE by April 30th, 11:59pm PST.

*Important: Make sure your link is to the blog post with your project & not just your blog in general...and be sure to remember the SCRAP TWIST!

Thanks for stopping by! I treasure your comments.

~ Blessings ~

Monday, February 11, 2013

"A New Life" Scrapping Everyday Miracles February Guest Designer

I'm so excited to be the February Guest Designer for Scrapping Everyday Miracles. SEM is such a special place to share our scrappy work and what the Lord is doing in our lives! Thank you Nicole for offering me this chance to be a part of SEM this month."

I would like to share my take on the SEM February Main Challenge ~ Home is Where the Heart Is, to scrap about where we feel most at home. The Scrap Twist is to use a tag or journal block to include the details. 

Our daughter, Elizabeth, married her soul mate, Andrew, in October. From the time our children were conceived we have prayed for their future homes. We pray both that our Lord will reveal the marriage and life partner He has for them and that He would be working in that individual's life to prepare them to be the Godly man or woman He has called them to be.

We raise our children in our home for the very purpose of them one day leaving us to establish their own Godly home. Deuteronomy 6 talks of us loving our Lord with all our heart, soul, and might and to obey His commandments. Then we are to teach God's ways to our children as we live out our lives before them. Why? To pass on the rich heritage and relationship with our Lord, so that in time they will have a home that serves our Lord as well. Deuteronomy 7:9 tells us that God is faithful to keep His covenant and His lovingkindness to a thousandth generation with those who love Him and keep His commandments. What an amazing promise to claim for our children, their spouses (future and current) and homes. Oh, and those Grandchildren, yet to come into our lives. 

The wedding photo I selected for this challenge is of the candle ceremony, a symbol of their two lives becoming one. Elizabeth is leaving our home to be one with Andrew to start their new home and lives together.

"A New Life"

The twist is to include a tag or journal block with details.


The details are included in hidden journaling on the back of my tag. "A new life and a new home begin today. May our Lord always be the center of both. Deuteronomy 6" 


The tag was cut with a Tim Holtz die, inked with Distress ink and the stamp is also from Tim Holtz. Last week I picked up a selection of steam punk jewelry findings at Michael's clearenced to 70% off the marked down price and this sweet charm is part of that lot. The glittered heart was a bit too pink, so some espresso alcohol ink toned the pink down quite nicely. I attached a blue bead from my stash. 

My background was created by inking the edges of this Ruby Rock-It paper with several colors of Distress Ink. I then sprayed glimmer mist across the page and used a dropper to create drips where I would be placing my cluster under the photo. 

The large focal flower is from Manor House and the smaller blue flowers are handcrafted using Bitty Blossoms dies. The flourish is another Michael's find.

I used clocks in several ways to help convey the idea of a new home and life together. First I inked a clock image behind this cluster using a stencil. I spritzed my chipboard grass with a green chalk mist and pulled some fiber from a fabric scrap to lay across the bottom of the cluster. The sweet flowers are Prima.

Here's my tip for Top Tip Tuesday ~ Fibers can be pulled from a fabric scrap. To adhere, lay on a scrap of paper and spritz with spray adhesive. Carefully place on page or card.

And next to the photo I used a patina finish on this KaiserCraft wood clock piece. I discovered Sophisticated Finishes products a few months ago and painted the wood piece with their gold paint, then applied the patina. The patina wasn't quite as green as I wanted, so I added a few touches of distress ink as well. 

The shutters are from a resin pack I purchased from Michael's a while back. 

I hope you are inspired to create a page about where you feel most at home to join the SEM February Challenge. Details can be found here.


I have entered this at:
Crafty Cardmakers Challenge 84 - Vintage Love ~ I used a winged heart charm to represent love. (Feb 18) **
Anything But a Card Challenge 12 - Share the Love (Feb 18) **
Come and Get it Challenges - Show us your Heart - Love Is in the Air ~ Winged heart charm (Feb. 16) **
2 Sisters Challenge Blog Challenge #130 - Hearts ~ Winged heart charm (Feb 16) **
One Stop Craft Challenge 215 - Love Is in the Air (Feb 16) **
Top Tip Tuesday Challenge - Let Me Call You Sweetheart (TIP) (Feb 20) **

Thanks for stopping by! I treasure your comments. 

~ Blessings ~

Friday, December 21, 2012

"Sweet Angel" ScrapThat! Dec. Kit

Only 4 more sleeps til Christmas! I wish each of you and your families a blessed and wondrous Christmas. I have several Christmas and winter layouts I will be sharing with you between now and Christmas. I hope you enjoy our celebrations of seasons past. 

Today I would like to share the details of a layout using the

"Sweet Angel"
Main, FAO, and EAO Kits

I have such wonderful memories of our children participating in a home school Christmas play so many years ago. I just adore this sweet photo of Elizabeth with her crooked little angel wings, so innocent and precious. I used several sheets of the gorgeous Kaisercraft Turtle Dove Collection. When I saw the angel paper and chipboard angels in the Embellishment Add-On Kit, I knew I would have to scrap this photo. 

Tips and Techniques: 

Chipboard Angel ~ My tutorial for these crackled and glittered chipboard angels can be found here

Snowy Mist ~ I have a couple Mister Huey Color Mists. These mists are chalky rather than glimmery and the white gives the snowy effect I used here on my background. 

Music Background ~ The center portion of the paper from the torn angel corner was a beautiful cream color. I stamped it in brown with a music stamp to peak through the die cut section. 

Painted "Photo Mat" ~ One of the sentiment blocks from the paper had the lovely green and red floral border which would be a perfect backdrop for this photo, that is if the sentiment wasn't in the center of it. I painted over the words in a sunburst pattern using a couple shades of cream to give a halo effect behind the photo. 

Wire ~ I curled the May Arts silver ball wire to add to my clusters. I snipped some of the wires off of the Prima kit flowers and coiled them to create the green vine tendrils. 

Berries ~ The red kit pearls were just a little bright for this page, so I painted some cranberry alcohol ink on them and when dry applied across my leaf stems as berries. 

Bridal Lace ~ My photo cut off the bottom of Elizabeth's beautiful dress, so I fussy cut the beaded lace flowers from a piece of bridal lace to trim out the bottom of the photo.


Flowers ~ The gorgeous jeweled flowers in the Flower Kit are by Prima, and I added some smaller white roses to the cluster that I cut from white cardstock, a staple in my stash, using my Donna Salazar Bitty Blossoms dies by Spellbinders. 

Leaves ~ I used a scrap of my kit paper to cut these beautiful leaf stems using the Spellbinder Foliage die. I used distress ink on the edges and a black marker to doodle the leaves and stems. 

Thanks for dropping by! I treasure your comments. 
~ Blessings ~

Friday, June 1, 2012

Cherry Trees ~ ScrapFIT Reveal for Workout #69

Each spring I anticipate the blooming of the cherry trees at the edge of our woods. This year I took some photos, and now I'll get to see them all year long in my scrapbook! I looked at close-up photos and created the cherry blossoms on the branch from coffee filters. The Cherry Blossom Tutorial can be found below.

Diana, our Creative Trainer, is back with another one of her training sessions! This session is sure to give you a boost in your FITness level! What she has laid out for you may seem hard but give it your best to stay ScrapFIT!


Here is Diana's amazing sketch:


is this month's amazing sponsor! Fabric embellishments are always a great addition to any layout and Holly Craft Originals has a ton to choose from! The winner of this Workout will receive a $20 Gift Certificate! 


Holly is a stay at home mom who loves to craft. she makes fabric embellishments or appliques mostly from upcycled fabrics along with fabric leftover from larger projects .  .  .   All of her embellishments are her designs, hand cut, then sewn by hand with their own unique personalities! 

Be sure to hop on over to ScrapFIT to see the amazing inspiration by our talented DT. I hope you are inspired to join us for this sketch Workout. You have until June 30 to link up your paper craft project. 

Here are some close-ups:

Butterflies

Masked Modeling Paste and Inked Cherry Blossom Branch

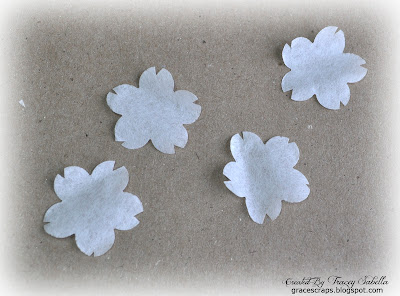
Coffee Filter Cherry Blossoms

Coffee Filter Cherry Blossom Tutorial

Supplies:

Coffee Filter
5 Petal Punch
Scrap of Cardstock
Tiny Stamins from floral department
Scissors (EK Success Honey Bees are my personal favorite!!)
Distress Ink ~ Worn Lipstick
Piercing Tool (toothpick would work if you don't have one)
Glossy Accents

Not Pictured
Heat Tool - optional
Spray Bottle with water

Step 1. You might be wondering how I punched a coffee filter. I experimented and tried layering the coffee filter over top of a piece of card stock and it punched perfectly. Don't worry that the coffee filter is wavy. We will be misting and scrunching, so that doesn't matter. If you don't have this particular punch, most any little round tipped 5 petal flower punch should work.

Step 2. I use two punched flowers per blossom. Once you get all of your blossoms punched, stack them in groups of 6 or 8. With your scissors, take a small v shaped snip out of each petal. Don't worry if they are exactly centered or exactly the same on each petal. In nature, they are varied and different, besides we are going to scrunch these up. 

Here they are with the snips cut out:

Step 3. Lightly spritz with water. Place the piercing tool in the center of a blossom and crinkle the blossom around the tool as shown. I don't pierce a hole at this point, but if it does pierce, that's OK since we're going to pierce a hole later for the stamins. Do this to each of your blossoms. 

Step 4. Take each bunched and crinkled blossom and swipe the cut edges against the top of the Worn Lipstick (or color of your choice) ink pad. Be sure to get some ink on all of the petal edges, but just a little. It doesn't matter if your petals are dry or still damp. 

Step 5. Lightly spritz each blossom. This will lighten and spread the ink. The misting may kind of flatten your blossom out, so crinkle it back up like before. You probably don't need to use the piercing tool this time. Set aside to dry or if you are impatient like me, place back on the piercing tool and use your heat tool to dry, being careful not to singe or burn. Here is what the petals will look like after misting, drying and carefully opening. See how the color softens and spreads!

Step 6. Add Stamins. Place two blossoms on top of each other and adjust so you can see both sets of petals. (not stacked directly on top of each other). Use a piercing tool or other sharp pointed object to pierce a small hole in the center of each blossom. Stamins generally come with a ball on each end of a cord. Snip these in half. You will need 6 pieces for each flower (or whatever looks good to you). Put the stem ends through the center of the flower like this. 

Now turn the flower over and put a dot of glossy accents or other quick drying glue in the center on the back side. Once dry you can clip off the excess stems. 

Step 7. Curl your petals. I used a piercing tool and curled the center petals a little tighter than the back ones.

Here is one all finished:

If you have any questions, please leave a comment and I will be glad to answer them.

I have entered this layout at:
Word Art Wednesday ~ Use Scripture - I hand journaled Isaiah 35:2 around the flourish and photo mat, then highlighted with aged mahogany Distress ink. It will blossom profusely . . .  They will see the glory of the LORD, The majesty of our God. **
Crafty Cardmakers ~ Challenge 69 - Distress it: I distressed the cardboard and mats. I also used Distress embossing powder on the chipboard pieces. **

Thanks for dropping by! I treasure your comments.

~ Blessings ~ 

Saturday, May 26, 2012

12 Tags of 2012 ~ May

I've been trying out a technique from each of the Tim Holtz 12 Tags of 2012. This month, I actually created a tag!! 


I have done most of the techniques on this tag before, but it was the first time I dipped flowers into UTEE. Didn't they turn out cute!! Instead of a dress image in the upper right side, I selected a portion of the pattern with printing to use instead and attached a needle and thread trinket to the hanger. 

Thanks for stopping by. I treasure you comments!

~ Blessings ~

Tuesday, May 1, 2012

Our Future Forever Linked ~ DT Reveal for ScrapFIT Workout #67 - Doilies

Our son was married to his beautiful bride, Rachel, in December. One of my favorite photos was this wonderful shot of their wedding rings placed on the open pages of Scripture. 

The gorgeous Prima paper and embellishments were a perfect backdrop for my photos.


My mother used to have a doily under every plant, picture frame and nicknack in our house! Doilies are back and being put to good use on our scrapbook layouts and paper crafts! Show us fun and unique ways to use a doily! It can be a pre-made or home made doily. 


Our Sponsor this Month is:


Vicky's Etsy shop has an amazing selection of gorgeous Dusty Attic Chipboard. She is also a very talented scrap artist and you can see her gorgeous work at her personal blog, Simply Paper and Creativity.

I hope you have been inspired to create a layout using those doilies you've had stashed away for that special project. So head on over to ScrapFIT to see the doily inspired layouts by our talented design team and to link up your project. 

Techniques:


Doily Flower ~ I created this flower using vintage dictionary pages, a vintage map page, kraft tissue paper, a doily and layers of tulle. Because these materials would not cut well on my Cricut, I cut a 6 inch scalloped circle from my Art Philosophy cartridge to use as a template to hand cut each layer. I misted the papers with water and scrunched them, then dried them with my heat tool to give the lovely distressed wrinkled look. I then misted all of the layers except the white tulle with brown and green Tattered Angels glimmer mists. I used a small brad to hold the layers together so that I could scrunch and arrange my layers and then added the gorgeous Prima pebble to the center. I surrounded my flower with a Prima Say it with Pearls flourish that I cut into two pieces to use on either side of the flower. I also fussy cut some white lace pieces for the corner. 

I used a tutorial by our oh so talented sponsor, Vicki Alberto, along with a video tutorial at this link from the Donna Salazar blog by Leah's Scrapbook Room as my inspiration for this flower. If you have access to a 6 inch scalloped circle die for the Accucut machine, like in the video, that would make these flowers a breeze to put together. 


Masking with Flexible Modeling Paste ~ I was so excited to find the Crafter's Workshop chicken wire mask on a recent trip to Archivers that I had to use it on my next layout. I sprayed the back of the mask with Krylon Easy-Tack and let it dry, then placed it on my paper where I wanted the mask. I spread a thin layer of flexible modeling paste over a portion of the mask where the design fit nicely with my patterned paper. My paper looked kind of warped, but as it dried, it flattened back out again. It did take a long time to dry - over night. Once dry, I rubbed some coordinating Distress Ink over top and used the Prima Screen stamp behind where I planned to place my larger flower. Oh, and I also used the Prima  Moulin Rouge stamp behind the locket. 

Photo Mat ~ I found a box that had this tiny corrugation and quickly nabbed it for my scrapbook stash. I peeled the top layer off to expose the corrugation - leaving some bits and pieces behind for texture. I used a foam brush to paint the edges with antique white (I wanted the natural color to show in the grooves and a regular paint brush got paint down in those grooves while the foam brush did a nice job of applying paint just to the top edges.), then highlighted with some pink and brown distress ink. The lovely Prima Resin corners were painted and then I rubbed off some of the paint for a distressed look. The locket and gorgeous gems on my banner flowers are also by Prima. I had a tiny ball chain in my stash that I rubbed some black paint into, ran through the locket and wound across the flower banner.

Flower Banner ~ this was so easy peasy. I simply took Prima flowers, folded them in half and ran a Martha Stewart satin cord across the page along the branch in the paper and used jump rings to hang the gems in the center of each flower. 


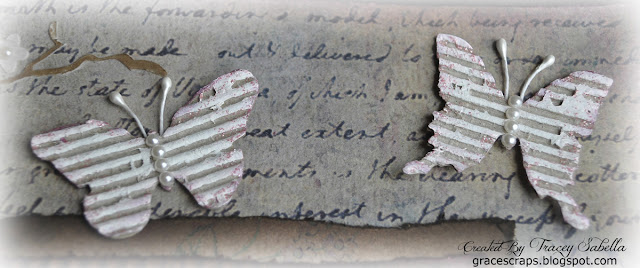
Butterflies ~ I cut these butterflies with the Alterations Butterflies Movers die, then used the same techniques described for my photo mat. I fashioned the antennae using wrapped wire from the floral department and added adhesive pearls for the body. 

Title ~ I painted and inked a Want2Scrap Nestaboard Fancy Tag, cut letters from grungepaper and painted them with metallic paint before adhering to the tag. 

I have entered this at:
Bird is the Word ~ Future Challenge
City Crafter Challenge Blog ~ Week 107 Text and Tulle: Text - dictionary page in flower, text on focal paper, and in the photo itself; Tulle - in large layered flower. **
Timeless Tuesday ~ #167 Use Butterflies **
Use it Tuesday ~ Challenge #30 April Showers: I used spring flowers, The pink flowers and adhesive pearls are at least 2 years in my stash, the dictionary pages come from a dictionary I've had for 18 years and the map pages 10 years, the cardboard isn't new, but rescued from the recycling bin. **
Scrapbook Sisters ~ Stamped Background: I stamped the backgrounds behind the flower with a screen mesh stamp, and behind the locket with a lace stamp. **
Scrap It Girl ~ April Showers Bring the "May Flowers" Challenge: I created the layered flower using a template from my Art Philosophy cartridge, and Prima flowers for my banner/trinket flowers. **

Thanks for dropping by. I treasure your comments!

~ Blessings ~