Showing posts with label Stampendous. Show all posts

Monday, December 19, 2022

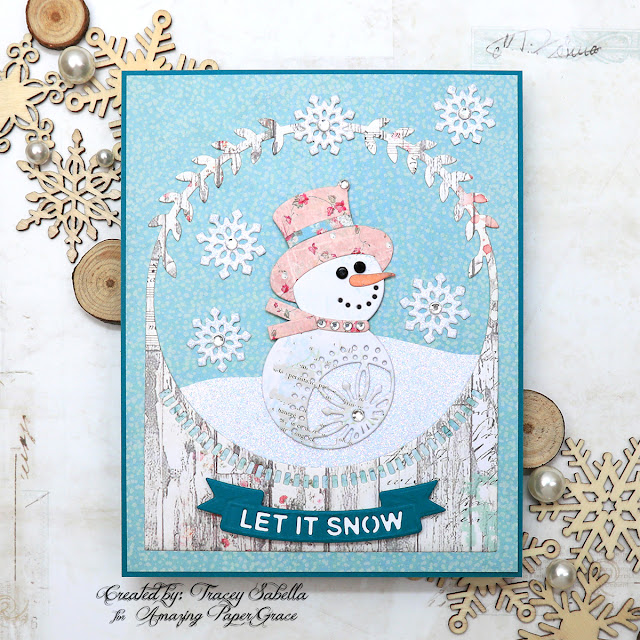
Let It Snowgirl Christmas Card for Amazing Paper Grace

Welcome to my creative space!

There's just something so sweet about a winter snowman or in this case snowgirl. This wintry Christmas card features the fabulous Amazing Paper Grace S5-533 Let It Snowman A2 Card Front die set.

When our children were young, we lived in North Carolina and didn't get those heavy wet snows that are perfect for building a snowman very often, but when we did we bundled up to build a huge snowman in our front yard and just like this die set, he had a wintry scarf, fun hat, rock eyes, and a carrot nose. We lived on a quaint but busy street and got lots of shout-outs by passersby. This sweet die set reminds me of those lovely wintry days in the snow with our children.

I just couldn't resist decorating her in a pink floral hat and scarf which is so beautiful against the snowy blue background. The snowbank is hand cut from the same white glitter paper used to die cut the fluttering snowflakes. 

For more close-ups and all the details on how to create this card, be sure to scroll down through the Tips and Techniques section below. 

Thank you Amazing Paper Grace for providing the dies used in this project.

11 Dies are included in the Let It Snowman A2 Card Front set.

Tips and Techniques
The body of the snowgirl is cut from the 49 and Market Holiday Wishes collection. I just adore the sweet blues and text that gives so much dimension to our wintry girl and it lightened up to nearly white for her darling face.

The other patterned papers used for the background pieces, hat, and scarf come from the Sweet Winter Backgrounds Paper Collection from Stamperia and work so beautifully with this darling die set. The snowy blue is so perfect behind the snowgirl and the wood grain pattern creates a lovely frame for the image.
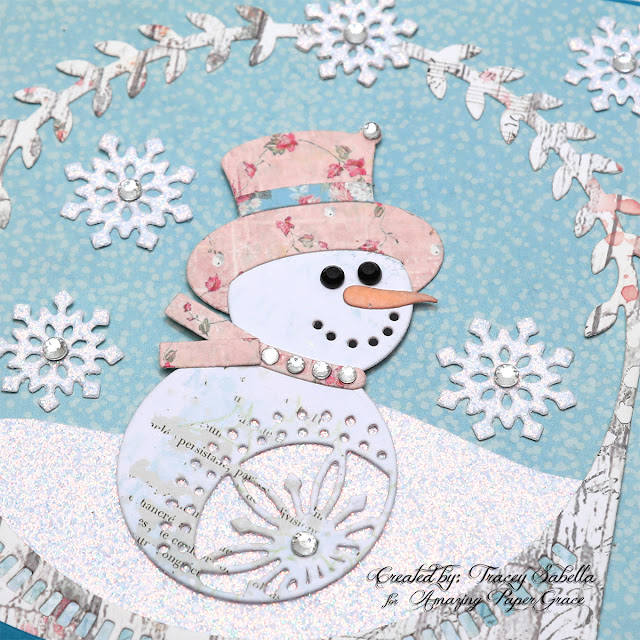
Our snowgirl is embellished with a pink floral scarf and hat. The carrot nose is cut from pale pink cardstock and inked with Dried Marigold and Hickory Smoke Distress inks to give it the carrot orange color. I didn't have pale orange cardstock, so used what I have on hand to create the right color. 

Her eyes are embellished with black rhinestones to look like lumps of coal, and a piece of black cardstock is place behind the circles forming her smile. For some added bling, a few clear rhinestones in different sizes are added to the scarf, tip of her hat and her snowflake belly.

The snowflakes are cut from white glitter paper and centered with a clear rhinestone for extra sparkle. The snowdrift is hand-cut from more of the white glitter paper.
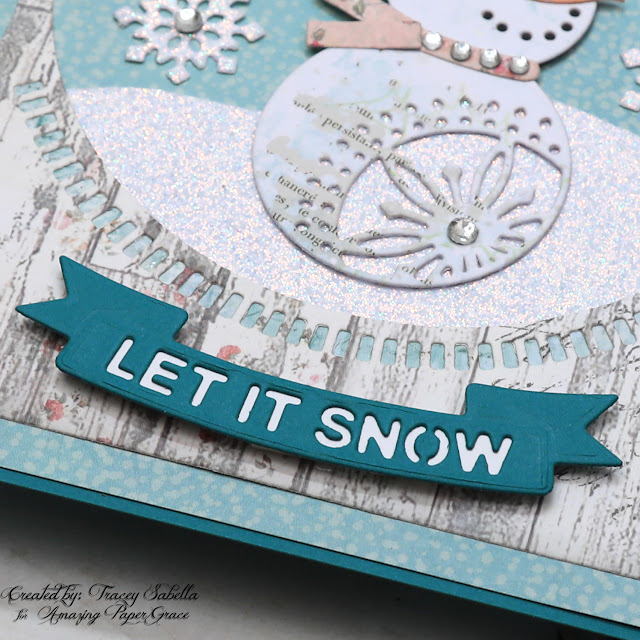
The banner for the sentiment is cut from a darker teal cardstock and the die-cut sentiment is backed in white. 

I just adore the die cut detail in the frame above the banner and wanted to make sure it was visible, so backed it with a piece of coordinating blue patterned paper. The fabulous design would have gotten lost had it been up against the white glitter paper. 
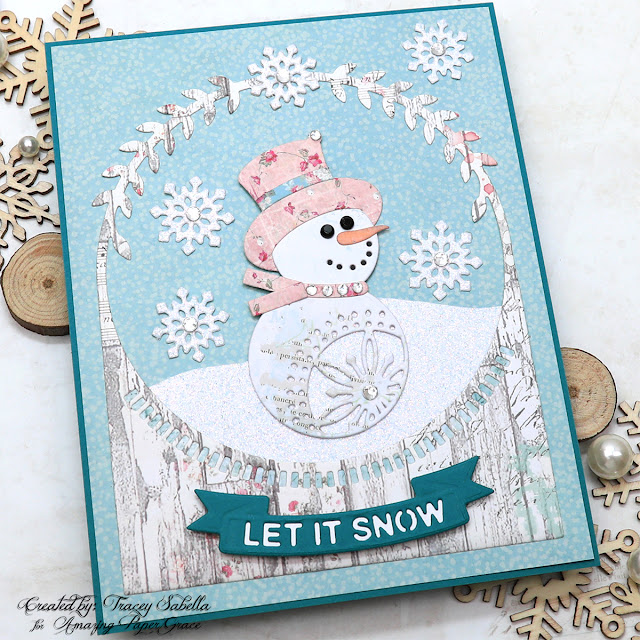
The gorgeous frame die is designed to fit an A2 card, but I cut a larger card base to allow more of the snowy blue paper to accent the card then framed it with a sliver of the dark teal cardstock used for the banner to tie everything together. 

Below you can find the products I used to create this project including some with compensated affiliate links to Scrapbook.com and Spellbinders. These links are at absolutely no cost to you. When you shop through the links below, I receive a small commission from the companies.  These commissions help me cover the costs of my blog and other expenses, which allows me to continue to provide you with FREE inspiration along with detailed Tips and Techniques provided for every project. Thank you so much for your love and support!

Amazing Paper Grace Sets:

Paper:

Ink:

Mixed Media:

Embellishments:
  • Stash - Rhinestones - Clear; Black

Adhesives:

Tools:

Saturday, December 4, 2021

Amazing Paper Grace December Die of the Month - Enchanting Pocket Card Tag and Envelope


Welcome to my creative space!

The Enchanting Pocket Card, Tag and Envelope set has many different options to make your creations stand out! It is a sweet gift card-sized envelope that doubles as a card front pocket. The bonus is that there is a tag too that doubles as a label. The inspiration for this set comes from Becca’s love of giving gift cards! It can be used year-round, dressed up or dressed down, and themed for any occasion. Using the different inlay and insert designs, you can cut and make unique variations to keep the design fresh!
 
Dies for my creations today were supplied by Amazing Paper Grace.

Card with Gift Card Holder Feature

Gift Card Envelope

There are 14 dies included in the Enchanting Pocket Card, Tag and Envelope.

My Project Today: 

I use this fabulous Enchanting Pocked Card Tag and Envelope Die of the Month set to create a mixed media card that features a gorgeous die cut pocket on the front that includes a card with a filigree top tucked into the pocket to write a heartfelt note. The pocket is perfectly sized to tuck in a gift card behind the note. 

I was inspired by a magazine that delivered to our home a few weeks ago with a cover filled with a bevy of beautiful blue and purple flowers. This color combination was so fabulous that I decided to use it on my next project along with gold accents. The card base is stenciled with white gold icing paste for texture, then spritzed with metallic gold color spray. I used the sweet flower dies in the set to created the blossoms and foliage for the clusters around the pocket. The edges of the petals are inked before shaping to add visual dimension and the centers are filled with prills in coordinating colors. I added chipboard and metal pieces from my stash. The metal bits were silver, bronze, and gold, so I brushed them all with gold art wax for uniformity. The butterfly and dragonfly are colored with art wax and dimension and sparkle are added to the dragonfly by brushing the wings with stickles and gold wax and adhering prills to the body. And of course the butterfly is adorned with one of the handcrafted flowers. Chunky glass glitter and prills fill in around the edges of the floral clusters. 

One of our daughters is an author and adores writing with fountain pens, so I had her in mind when adding the pen nib. One of the joys of creating a handcrafted card is being able to personalize it for the special person it's intended for.

The paper I used was a heavy 110lb patterned cardstock and cracked just a little on the folds, so I went with it and distressed all the edges and inked them for the shabby effect I was going for with this card. (When I created a sample with a lighter weight paper, there was no cracking.)

Designer Tip: If something goes awry in the creative process, think outside of the box to fix it. Rather than starting over again when my edges cracked just a little, I just pulled out my distressing tool, and roughed up all the edges and added a little ink. Distressing and inking can fix a myriad of blunders. 

Here are some project close-ups:
The filigree designs in this die set are absolutely stunning!!

This printed sentiment is colored with Distress Ink to coordinate with the background paper.

These sweet blossoms are so delicate and beautiful!

I enjoy adding simmer and bling to projects with glitter, prills, and metallics. You may have noticed just a hint of a steampunk feel with a couple gears tucked into the flowers.

A closeup of this sweet butterfly and a view of the distressed paper edges adding such a nice shabby chic touch.

Here's the lovely duo one more time.

Supplies:
Accessories:
Paper:
  • 49 and Market ~ Scents of Nature Paper Collection
Ink:
  • Ranger ~ Distress Ink: Dusty Concord; Stormy Sky
Embellishments:
  • Tim Holtz with Idea-ology ~ Small Talk
  • Tim Holtz with Idea-ology ~ Heirloom Roses; Sprocket Gears; Story Sticks; Pen Nibs
  • Tim Holtz with Idea-ology ~ Adornments, Halloween Accents 
  • Ornate Metal Corner from my stash
  • Chipboard Butterfly and Dragonfly from my stash
  • US ArtQuest ~ Prills: Ice Queen; Gilt Trip; Lavender & Lace
  • Stampendous ~ Glass Glitter - Lavender

Mixed Media Supplies:
  • Finnabair with Prima Marketing ~ Soft Matte Gel, Transparent
  • Finnabair with Prima Marketing ~ Clear Gesso
  • Finnabair with Prima Marketing ~ Icing Paste: White Gold
  • Finnabair with Prima ~ Metallique Wax: Vintage Gold
  • Finnabair with Prima ~ Antique Brilliance Wax: Amethyst Magic
  • Finnabair with Prima ~ Matte Wax: Patina Blue
  • Ranger ~ Stickles - Crystal
  • Heidi Swapp ~ Color Shine: Gold
  • Shimmerz ~ Coloringz - Punked Up Purple
  • AAll & Create ~ Stencil - Circle of Life by Olga Heldwein

Adhesives:
  • Helmar ~ 450 Quick Dry Adhesive
  • Tombo ~ Mono MULTI Liquid Glue
  • Redline Tape ~ 1/2"
  • Imagine ~ Tear It! Double-sided Adhesive Tape
For more Enchanting Pocket Card, Tag and Envelope Inspiration:

Visit each Creative Team blog linked below for their take on creative paper crafting ideas with Enchanting Pocket Card, Tag and Envelope, the Amazing Paper Grace December 2021 Die of the Month!


The Amazing Paper Grace Die of the Month is available exclusively at Spellbinders Paper Arts during December 2021. Enchanting Pocket Card, Tag and Envelope at the special kit club price, along with other membership perks.

View this month's Amazing Paper Grace Die of the Month! 


I would adore hearing from you! Please leave a comment below letting me know how you will use these gorgeous dies!


Thanks for stopping by! I treasure your comments.

~ Blessings ~

Monday, November 8, 2021

"A Savior Has Been Born" Christmas Card for Amazing Paper Grace


Welcome to my creative space!

Christmas is a special time to celebrate the birth of our Lord Jesus Christ. I've created a special Christmas card featuring the gorgeous Amazing Paper Grace Celebrate Scrollwork Card Builder die set from the Holiday Medley Collection. The lovely poinsettia is handcrafted using the Cinch and Go Poinsettia die set. 

The Celebrate Scrollwork set includes a die with the Celebrate the Season sentiment surrounded by gorgeous scrollwork, which would also look wonderful and is quick and easy to die cut for the center. I wanted to show a little different way to use this set by stamping a sentiment on the square background piece. A stamp platform and scrap paper are a great way to line up the sentiment before stamping on your good paper. 

Amazing Paper Grace provided the dies used in this project.

Tips and Techniques
This gorgeous Poinsettia is die cut from patterned paper. The edges of the petals are inked, then shaped. The petals are adhered together then stamen are inserted into the die cut center hole and glued in place. Poinsettia's come in many different colors and this pale yellow/cream color worked perfectly against the reds and greens on the card.

The handcrafted poinsettia is paired with gorgeous red roses and a white rose bud from Little Birdie Crafts. The Tim Holtz metal snowflakes are rubbed with white gold metallique wax and then a little Old White Matte Wax to highlight the textures and give a wintry feel. To add a little sparkle, I've tucked shaved ice flakes into the cluster edges.

The scrollwork design is cut from red cardstock. I colored the center piece with distress ink to coordinate with the green background paper before stamping. I wanted to frame the card with red cardstock, so trimmed the center of the scrollwork pieces to use a slightly smaller square for the center so this slimline card would fit nicely into a standard #10 envelope.

The sweet snowflake overlapping the sentiment piece is cut from white glitter paper using a die included in the Celebrate Scrollwork set.

One final shot.

Amazing Paper Grace Dies

Other Supplies
Tim Holtz Idea-ology ~ Snowflakes 
Stamen from my stash
Tim Holtz ~ Kraft Core 
Fab Scraps ~ Gentleness 
Patterned paper from my stash
Glitter Paper ~ White
Ranger ~ Distress Ink: Sage Green; Gathered Twig
Ranger ~ Distress Glaze
Versafine ~ Onyx Black
Finnabair with Prima ~ Metallique Wax: White Gold
Finnabair with Prima ~ Matte Wax: Old White
Finnabair with Prima ~ Soft Matte Gel, Transparent
Stampendous ~ Shaved Ice
Our Daily Bread ~ Luke 2:11 Stamp Set
Scrapbook Adhesives by 3L ~ Crafty Power Tape
Helmar ~ 450 Quick Dry Adhesive
Tombo ~ Mono MULTI Liquid Glue

When purchasing from Little Birdie Crafts HERE
Use code TRACEY05 for a 5% discount.
I receive a small commission at no cost to you.


Thanks for stopping by! I treasure your comments.

~ Blessings ~

Monday, November 1, 2021

"All is Calm" Shabby Christmas Card for Amazing Paper Grace

Welcome to my creative space!

The Amazing Paper Grace Holiday Medley Collection is such a blessing to work with to create gorgeous Christmas cards. Today I'm featuring the All is Calm Word Frame die set (S5-1146) to create this sweet A2 Shabby Chic Christmas card with touches of mixed media.

Amazing Paper Grace provided the dies used in this project.

Tips and Techniques:
The sentiment is heat embossed with Stampendous Aged Green Embossing powder to add a textured shabby finish and set on an oval piece with inked edges to help the sentiment pop.

I've added a few metal pieces and resin roses from the Tim Holtz Idea-Ology collection. The metal pieces are rubbed with wax for a gold color. Prills are scattered around the sentiment for added texture. 

The square die cut from the All is Calm set is also heat embossed, this time in Aged Scarlet for a pop of Christmas Red. The clusters are accented with holly leaves cut using the Merry Filigree Card Builder set (S5-464) from the Holiday Medley Collection and the filigree texture on the background is cut with the Celebrate Scrollwork Card Builder set (S5-465).

The paper edges are distressed and inked for definition and to add to the shabby feel of this card. Flowers are from 49 and Market.

One final look!

Amazing Paper Grace Dies:

Other Supplies:
Blue Fern Studios ~ Spring Parade
49 and Market Flowers: Botanical Potpourri - Buttermilk
Prima Marketing ~ Soft Matte Gel Medium
Prima Marketing ~ White Gold Microbeads
Prima Marketing ~ Metallique Wax - Vintage Gold
Stampendous ~ Embossing Enamel: Aged Scarlet; Aged Green
Ranger ~  Emboss It Dabber
USArtquest ~ Prills: Guilt Trip
Helmar ~ 450 Quick Dry Adhesive
Tombo ~ Mono MULTI Liquid Glue


Thanks for stopping by! I treasure your comments.

~ Blessings ~

Friday, October 22, 2021

Amazing Paper Grace New Release: Sweet Serenade Blog Hop ~ Shabby Boxed Notecard Set

Welcome to my creative space!!

The Sweet Serenade Notecard Collection is simply to extend a sweet thought or warm greeting to let them know you’re thinking of them through a heartwarming notecard. The inspiration behind this collection is the ability to create beautiful notecards. Everything in this collection coordinates together from the card base to the embellishments to the stamps to make wonderful notecard creations! Notecards also make a wonderful gift as a boxed set! Swoon your family and friends with a special handmade gift! Make it seasonal for fall or for the holidays. Maybe a specific style such as soft vintage, clean and simple, or even a mixed media twist!

Today's projects were created with dies provided by Becca Feeken of Amazing Paper Grace.

The focal die set I'm using for my notecard set is: 


I've also used these stamp sets from the collection:


These gorgeous die sets are also part of the Sweet Serenade Collection:


All flowers are created with the fabulous:


Here are some close-ups of my notecart set
A handmade notecard set is such a wonderful and thoughtful gift. The Scalloped Symphony Notecard Die Set includes all the amazing dies needed to create a beautiful set for someone special in your life, or to create a batch of gorgeous cards to send out for any occasion.

This handcrafted kraft cardstock box is embellished with a medallion cut from 110lb white cardstock using the Scalloped Symphony Notecard Die Set. I added a touch of mixed media by heat embossing the medallion with embossing enamel. This is an easy way to add texture and a bit of shine to any die cut project. The edges of the patterned paper block are inked to add contrast and a shabby/grungy feel.

The flowers and foliage are created with the Petite Floral Potpourri Die Set. The flowers are cut from coordinating patterned paper and the tips of each petal are inked for contrast. A stylus is used to shape the petals and prills are added to the center of each blossom. The foliage is cut from a neutral patterned paper and colored with distress ink.  

Card Close-ups:
The card bases are cut with the border die from the Scalloped Symphony Die set which includes a piece to place in the center to score the card so it's easy to fold in just the right place!

The card medallions on each card are heat embossed like the lid of the box. The envelopes are hand crafted from coordinating papers. Each of the sentiments is stamped onto coordinating paper using the stamp sets included in this collection.

I thought you might enjoy seeing a close-up of each card.


One final photo showing the boxed set:

Designer Tip: 
When folding the cards, match up the holes
on the bottom for perfect alignment.

Sweet Serenade Notecards Availability:
These dies and plates are available from Spellbinders right now! Click here: Sweet Serenade Notecards Collection.

Supplies:
Accessories:
Stamps:
Paper:
Blue Fern Studios ~ Serendipity Collection
49 and Market ~ Vintage Artistry 6x6" Pad
Kraft Cardstock
White Cardstock
Ink:
Ranger ~ Distress Ink: Vintage Photo; Bundled Sage
Versafine ~ Onyx Black
Mixed Media Supplies:
Stampendous ~ Aged Spice Embossing Enamel
Prills ~ Express-O-Yourself
Tools:
Scoring Board
Wagner ~ HT 400 Heat Gun

For more Sweet Serenade Notecards Collection Inspiration
Visit each Creative Team blog linked below for their take on creative paper crafting ideas using the Sweet Serenade Notecards Collection!

Visit Tracey Sabella <<You are here>>

Please comment: Which Sweet Serenade Notecards set speaks to you?

Follow me on Facebook!

Follow me on Instagram!

Follow me on YouTube!


Thanks for stopping by! I treasure your comments.

~ Blessings ~