Saturday, December 31, 2022

Big Adventure Postage Edge Circle Card for Amazing Paper Grace

 
Welcome to my creative space!

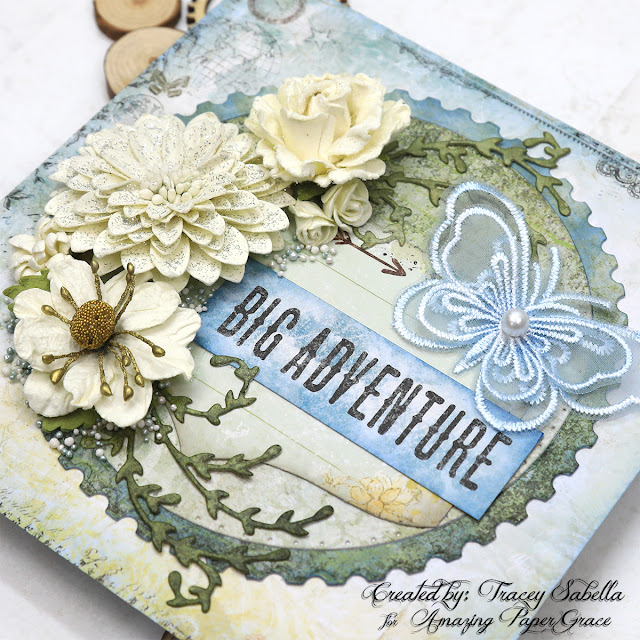
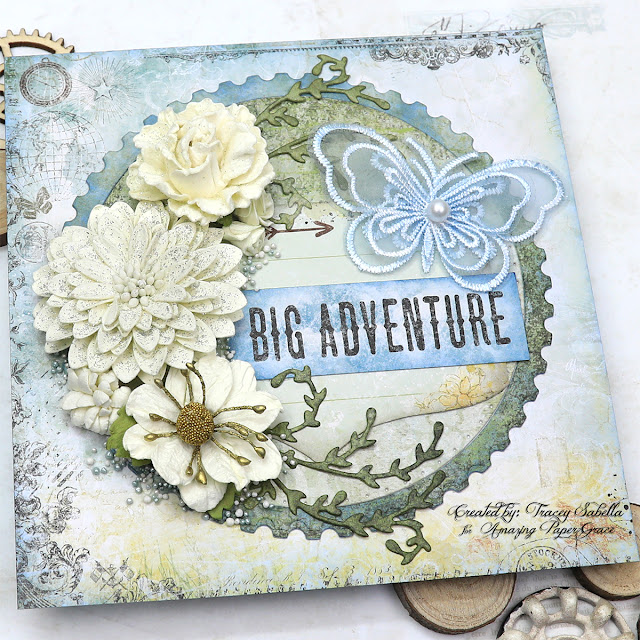
I thought it would be nice to bring a hint of summer warmth after the recent wintry weather we have experienced recently. This beautiful card features the Amazing Paper Grace Postage Edge Circles die set (S5-539). I just adore the versatility of this fabulous postage edge collection.

The postage edge and pierced inner circle were cut in one pass with the same section of patterned paper.  The outer postage ring is inked and turned to highlight and give definition. Premade flowers from Little Birdie Crafts are paired with gorgeous foliage die cut with fabulous leaf dies from the My Sweet Friend set (S5-512)

I enjoy creating versatile cards that can be used for a variety of occasions. This card could be a send off for someone taking an adventurous trip, a new job, graduation, or milestone birthday. 

For more close-ups and all the details on how to create this card, be sure to scroll down through the Tips and Techniques section below. 

Thank you Amazing Paper Grace for providing the dies used in this project.


Tips and Techniques
As mentioned earlier, I die cut the postage edge ring and inner pierced circle from the same patterned paper in one pass. I wanted the ring to have definition while coordinating with the inner circle so rubbed it randomly with Faded Jeans Distress Ink. The edges of the inner circle are inked with Pumice Stone Distress Ink to make the pierced design more visible and to add to the contrast between the two pieces. 

The white lace butterfly is also rubbed with the Faded Jeans ink to give it a soft blue hue.

This circle design is perfect for arranging a flowing floral cluster along one side as I did here. I arranged pre-made Little Birdie flowers from the Shabby Chic collection, then to extend the design around the circle I die cut foliage with a soft curve from the My Sweet Friend die set (S5-512) from a darker green section of the same patterned paper. The leafy section is cut into two pieces to use on each end of the cluster and inked with Forest Moss Distress Ink to add contrast.

This close-up also shows how gorgeous this postage edge design is. You may notice that I also rotated the outer ring so that the darker part of the ring is against the lighter part of the circle. This adds more contrast to the design. By rotating and inking the postal edged ring, it looks like two different patterned paper were used. 

To add texture and fill in areas around the cluster I brushed matte gel medium around the edges and sprinkled with two colors of Prills. This is an easy way to add a bit of sparkling texture to your project.

The Wanderlust paper collection included a page with 6x6" designs that could be cut for card bases. The background paper is one of those pieces and coordinates perfectly with the round postage designs. The edges look stamped, but this is part of the patterned paper. I did add a bit of light inking with Faded Jeans around the edges of the background and sentiment.

Below you can find the products I used to create this project including some with compensated affiliate links to Scrapbook.com and Spellbinders. These links are at absolutely no cost to you. When you shop through the links below, I receive a small commission from the companies.  These commissions help me cover the costs of my blog and other expenses, which allows me to continue to provide you with FREE inspiration along with detailed Tips and Techniques provided for every project. Thank you so much for your love and support!

Amazing Paper Grace Sets:

Paper:

Ink:

Mixed Media:
  • Prima - Finnabair - Soft Matte Gel

Embellishments:
  • Little Birdie Crafts - Shabby Chic Flowers: Wendy; Nancy; Bonita; Julita: Micro Roses
  • Prima - My Sweet Butterfly Lace
  • US ArtQuest - Mini Prills: Mint To Be; Minnie Pearls

Adhesives:

Tools:

Thank so much for stopping by to view this warm summery card.
I hope you've been inspired.

Monday, December 19, 2022

Let It Snowgirl Christmas Card for Amazing Paper Grace

Welcome to my creative space!

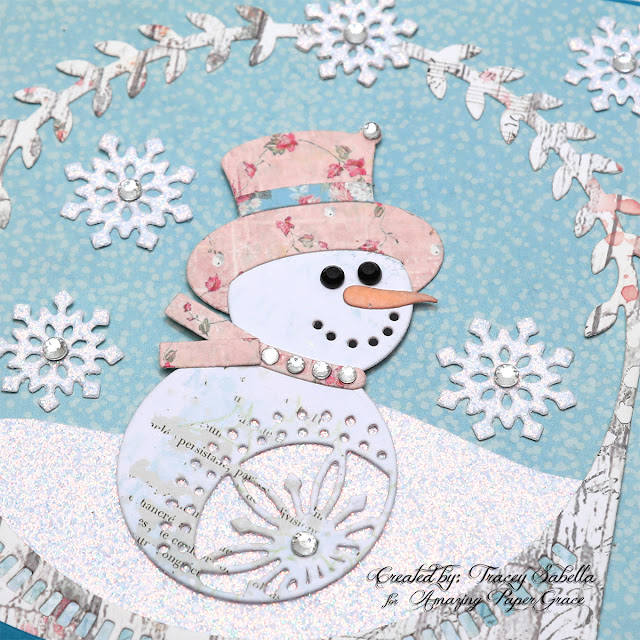
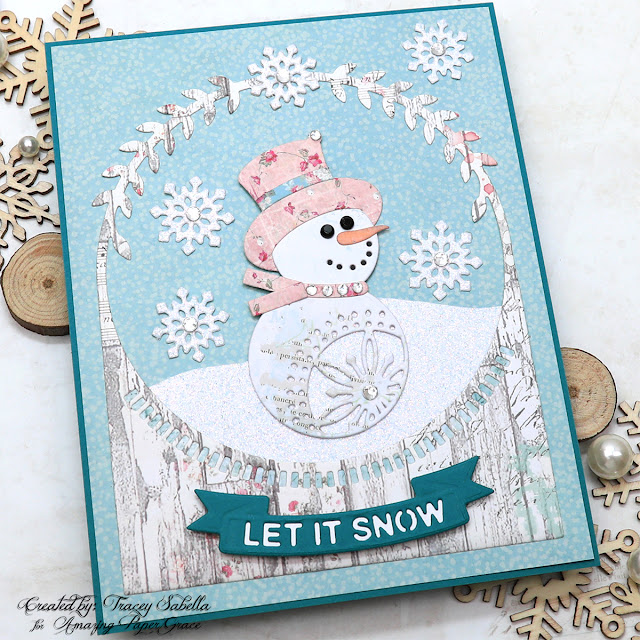
There's just something so sweet about a winter snowman or in this case snowgirl. This wintry Christmas card features the fabulous Amazing Paper Grace S5-533 Let It Snowman A2 Card Front die set.

When our children were young, we lived in North Carolina and didn't get those heavy wet snows that are perfect for building a snowman very often, but when we did we bundled up to build a huge snowman in our front yard and just like this die set, he had a wintry scarf, fun hat, rock eyes, and a carrot nose. We lived on a quaint but busy street and got lots of shout-outs by passersby. This sweet die set reminds me of those lovely wintry days in the snow with our children.

I just couldn't resist decorating her in a pink floral hat and scarf which is so beautiful against the snowy blue background. The snowbank is hand cut from the same white glitter paper used to die cut the fluttering snowflakes. 

For more close-ups and all the details on how to create this card, be sure to scroll down through the Tips and Techniques section below. 

Thank you Amazing Paper Grace for providing the dies used in this project.

11 Dies are included in the Let It Snowman A2 Card Front set.

Tips and Techniques
The body of the snowgirl is cut from the 49 and Market Holiday Wishes collection. I just adore the sweet blues and text that gives so much dimension to our wintry girl and it lightened up to nearly white for her darling face.

The other patterned papers used for the background pieces, hat, and scarf come from the Sweet Winter Backgrounds Paper Collection from Stamperia and work so beautifully with this darling die set. The snowy blue is so perfect behind the snowgirl and the wood grain pattern creates a lovely frame for the image.

Our snowgirl is embellished with a pink floral scarf and hat. The carrot nose is cut from pale pink cardstock and inked with Dried Marigold and Hickory Smoke Distress inks to give it the carrot orange color. I didn't have pale orange cardstock, so used what I have on hand to create the right color. 

Her eyes are embellished with black rhinestones to look like lumps of coal, and a piece of black cardstock is place behind the circles forming her smile. For some added bling, a few clear rhinestones in different sizes are added to the scarf, tip of her hat and her snowflake belly.

The snowflakes are cut from white glitter paper and centered with a clear rhinestone for extra sparkle. The snowdrift is hand-cut from more of the white glitter paper.

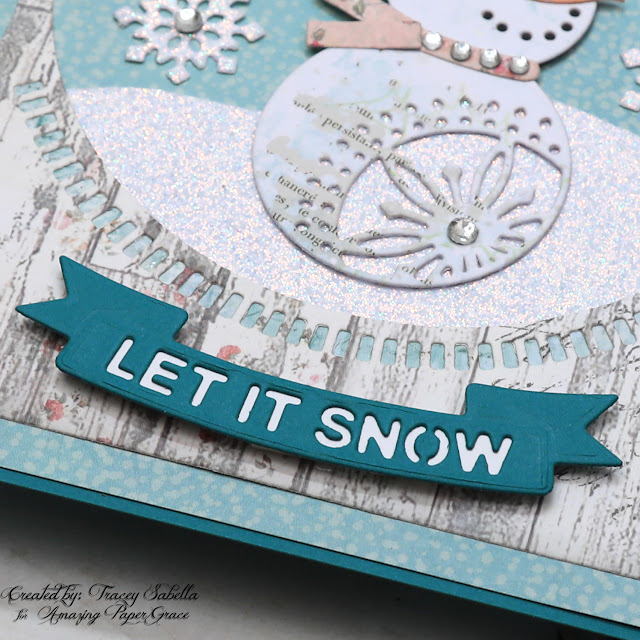
The banner for the sentiment is cut from a darker teal cardstock and the die-cut sentiment is backed in white. 

I just adore the die cut detail in the frame above the banner and wanted to make sure it was visible, so backed it with a piece of coordinating blue patterned paper. The fabulous design would have gotten lost had it been up against the white glitter paper. 

The gorgeous frame die is designed to fit an A2 card, but I cut a larger card base to allow more of the snowy blue paper to accent the card then framed it with a sliver of the dark teal cardstock used for the banner to tie everything together. 

Below you can find the products I used to create this project including some with compensated affiliate links to Scrapbook.com and Spellbinders. These links are at absolutely no cost to you. When you shop through the links below, I receive a small commission from the companies.  These commissions help me cover the costs of my blog and other expenses, which allows me to continue to provide you with FREE inspiration along with detailed Tips and Techniques provided for every project. Thank you so much for your love and support!

Amazing Paper Grace Sets:

Paper:

Ink:

Mixed Media:

Embellishments:
  • Stash - Rhinestones - Clear; Black

Adhesives:

Tools:

Wednesday, December 14, 2022

Introducing the Amazing Paper Grace Home Sweet Quilt Collection with Quilted Card Two Ways

 
Welcome to my creative space!

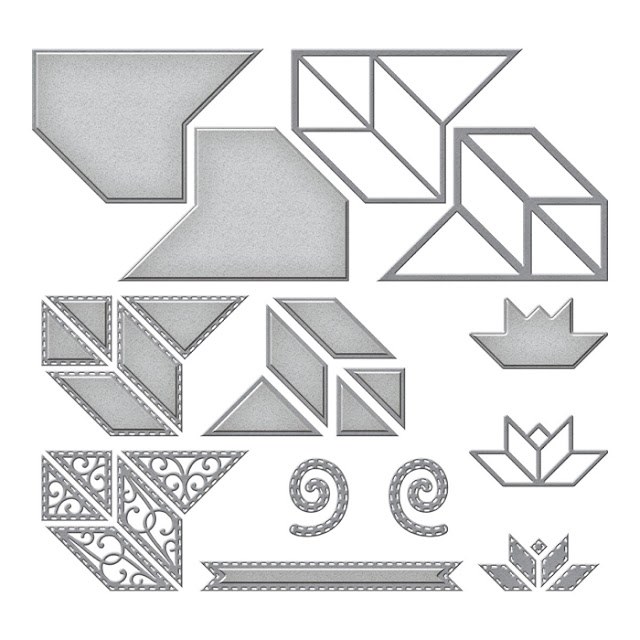
My grandmother created gorgeous quits from lovely scraps of fabric. I remember visiting my grandparents as a child and seeing the quilt rack pulled up to the ceiling amazed at the beautiful designs peeking through. My grandfather crafted a special quilt rack for her that hung from chains where she spent many creative hours hand quilting her beautiful designs. This has made it a special joy to create beautiful shabby chic quilted cards with the fabulous Amazing Paper Grace Filigree Eight Point Star set (S4-1251) from the newly released Home Sweet Quilt Collection! 

As I child my grandmother's creative spirit inspired me. I often thought I would become a quilter, but that creative inspiration turned into mixed media paper crafting instead. I'm so thankful for her beautiful inspiration and how much it means in my life.

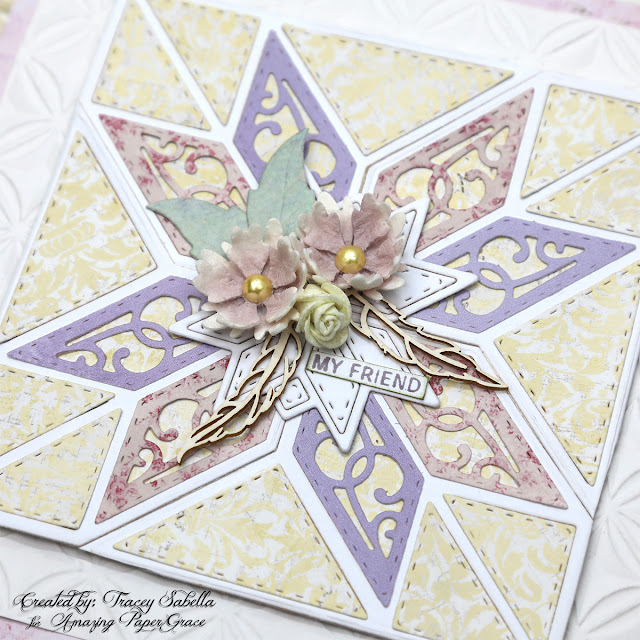
I started out by die cutting the filigree points and wanted to alternate colors as you so often see on fabric quilts. The points are directional, so I needed to cut out eight points in each color, but could only use four of each for this card. I set aside the extras to get a head start on a second card. 

Yellow is a complementary color to purple and this pairing of colors is just gorgeous. With the filigree points already die cut for the second card, I wanted to show a different direction with the colors and used blue with just a hint of lavender to keep it in the same cool color family. 

The embossed design that frames both quilt squares uses the Orange Peel Quilt 3D Embossing Folder (E3D-046), and the sentiments are from the Quilty Hugs Sentiments Clear Stamp Set (STP-156). These sweet sets are from the new Home Sweet Quilt Collection.

Because I went with a masculine design last week, I didn't end up using the floral and foliage dies from the Sweetheart Envelope & Notecard Die of the Month Set (DOMAPG-DEC22) so used them here to create the mulberry purple centered flowers and green leaves used on both cards. The scale of these gorgeous flowers is just perfect with this quilted design.

For lots of close-ups and all the details on how to create these beautiful quilted cards, be sure to scroll down through my Tips and Techniques section below.

Today's projects were created with dies provided by Amazing Paper Grace.

Purple and Yellow Quilted Card

Purple and Blue Quilted Card

Tips and Techniques
What a gorgeous die set to work with. The details are just so gorgeous from the filigree points to the stitched triangles and inlay frames that bring this design together so effortlessly. 

This card pairs the beautiful golden yellow with the purples.

The floral filigree points were a little on the light side so I didn't get a good contrast with the yellow background. It was an easy fix. I inked them lightly with Milled Lavender Distress Ink to darken them just a little to get the nice contrast I was looking for. 

***Designer Tip*** If you love a patterned paper die cut, but the color isn't quite working just right, it can be altered with inks.

These sweet flowers are die cut from ivory mulberry paper using the December Sweetheart Envelope & Notecard Set (DOMAPG-DEC22) and the leaves are cut from soft green patterned paper. I added a small ivory rosebud and chipboard leaves from my stash.

The white quilted points in the center make a gorgeous base for this simple cluster. I die cut two sets of white points then added washi tape to the back to hold all the pieces in place.

The sentiment is stamped with Hickory Smoke Distress Archival ink onto white cardstock with the coordinating Quilty Hugs Sentiments Clear Stamp Set (STP-156). I wanted to keep it small so more of the quilted design would be visible, so cut it out closely with scissors and inked the edges lightly with Hickory Smoke Distress Ink.

In this close-up you can see how lovely the stitched details are in these die cut pieces.

The embossed design is just so gorgeous to frame this beautiful quilt square. By using white cardstock with the Orange Peel Quilt 3D Embossing Folder (E3D-046), it adds lovely texture, but keeps the focus on the beautiful quilted pattern. The entire card is framed with a piece of coordinating purple patterned paper.
    
Now let's take a look at how these same filigree points paired with blue patterned paper. The quilts my grandmother created had lovely designs in the fabric, so when looking through my stash of papers I looked for patterns with a small scale that would look like fabrics quilted together. 

Since the filigree points were already cut, and I had put this card together once, this second one came together more quickly, yet each has a distinctive look with the different color palettes. 

I used another sweet sentiment from the Quilty Hugs Sentiments Clear Stamp Set (STP-156) using the same Hickory Smoke color that is used on the yellow card.

This time the floral filigree points contrasted nicely with the blue paper beneath, so no need to ink them.

Here is the third mulberry paper flower I created using the December Sweetheart Envelope & Notecard Set (DOMAPG-DEC22) along with another pair of lovely green leaves. 

It's paired with two pink rosebuds and more delicate chipboard.

I framed this card with more of the embossed design and framed it using the same lavender blue paper used for the quilt square. I normally use 1/4 inch double sided adhesive on the edges to adhere layers, but for this embossed layer, I knew there would be less contact with the adhesive because of the raised design, so used 1/2 inch double sided adhesive to be on the safe side.

These dies and plates are available from Spellbinders right now! Click here: The Home Sweet Quilt Collection.

Below you can find the products I used to create this project including some with compensated affiliate links to Scrapbook.com and Spellbinders. These links are at absolutely no cost to you. When you shop through the links below, I receive a small commission from the companies.  These commissions help me cover the costs of my blog and other expenses, which allows me to continue to provide you with FREE inspiration along with detailed Tips and Techniques provided for every project. Thank you so much for your love and support!

Amazing Paper Grace Sets:

Paper:
Stash - Maja Designs; Scrapberry's Patterned Paper (Retired)
Mulberry Paper - Thick, Ivory

Ink:
Ranger Ink - Tim Holtz - Distress Archival Ink - 4 Pack (Hickory Smoke)

Embellishments:
Scrapiniec - Boho Love Chipboard - Small Garlands 02 - 5144
Stash - Half Pearls - Gold

Adhesive:
Clear Double Sided Adhesive Roll - 1/4 Inch - Permanent
Scotch - Quick Dry Adhesive
Beacon - 3-IN-1: Fabri-Tac

Tools:

Visit each Creative Team blog linked below for their take on creative paper crafting ideas using  The Home Sweet Quilt Collection.


I would adore hearing from you! Please leave a comment below letting me know how you will use these gorgeous dies!


Thanks for stopping by! I treasure your comments.

~ Blessings ~

Monday, December 5, 2022

Amazing Paper Grace December Die of the Month: Sweetheart Envelope & Notecard Set - Steampunk Valentine's Day Card and Gift Card Holder

 
Welcome to my creative space.

I try to keep to a more masculine style when creating Valentine's cards for my husband so decided to go steampunk with this fabulous Amazing Paper Grace December Die of the Month Set: Sweetheart Envelope & Notecard Set. This set also included some amazing flowers which I did not use, but would be fabulous on a more elegant and feminine creation.

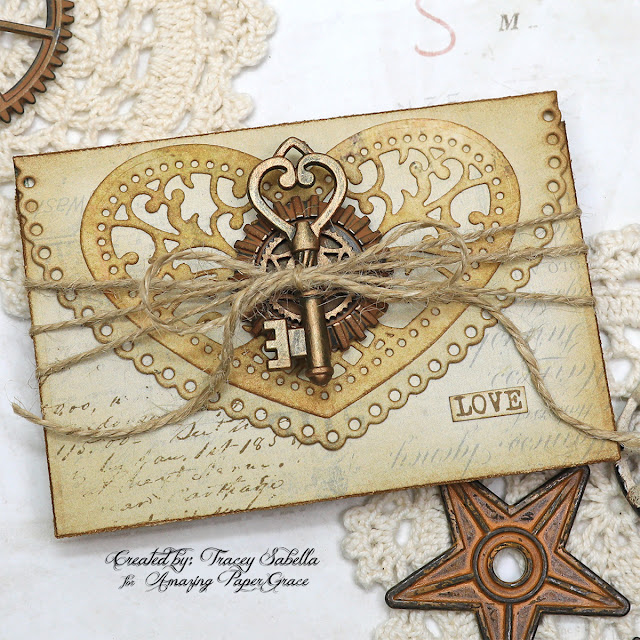
The intricate details in this gorgeous die set have a definite steampunk vibe with the fabulous scrollwork design, so I enhanced this genre by adding rusty gears, star, and metal key, along with masculine twine. The papers I selected have subtle patterns, so I added some stamping to add more visual texture. Inking is added to help the heart designs and edges pop.

Please scroll down through the Tips and Techniques section to find close-ups and all the details on how to create this steampunk Valentine card and gift card holder.

Many thanks to Amazing Paper Grace for providing the dies used in this project!


Steampunk Valentine Card

Steampunk Valentine Gift Card Holder

Tips and Techniques
I selected patterned papers in neutral colors with a touch of peach to give a Valentine feel without being too feminine, since this card is for my husband. 

***Designer Tip*** When selecting patterned papers for this die set, keep in mind that both sides will be showing and need to make sense for the design. The peach color is the back of the more neutral cream paper used to die cut the envelope feature.

To enhance the masculine steampunk feel of this card, stamping is added with a grungy script and dotted squares. 

The heart is cut from the same paper that is behind it, so it is rubbed with Distress Inks in Tea Dye and Vintage Photo to give it some contrast. 

The envelope feature is popped up with foam tape for added dimension and to leave room to tuck gears underneath as well as the twine wrap.

This sentiment is stamped with Vintage Photo Archival Ink on the same paper as the envelope piece and edged with Vintage photo Distress Ink.

Rusty steampunk gears are tucked under the envelope flap. 

As you can see in the top right corner, the inside background layer is distressed and both background layers are rubbed at the edges with Vingtage Photo Distress Ink.

Here's a side view of the heart so you can see how dimension is built. The heart is adhered to the envelope, then the envelope is wrapped with twine over the heart. The rusty star is added and a small copper gear is centered onto the star. These wonderful layers give beautiful dimension to the card.

One final photo. You can see there's even a rusty faucet handle added to the card insert. This insert is a great place to add a special private note!

Now let's take a look at the gift card holder. It's created with the larger envelope die that's left open on the card. I just folded the flap over to create this envelope gift card holder. 

This particular paper was a little thicker and cracked just a little on the fold lines. I went with that and lightly distressed the folded edges, then inked with Vintage Photo Distress Ink. Just make sure you don't distress the edges too much or you might go all the way through the paper. 

This beautiful heart is rubbed with more of the Vintage photo ink to highlight the gorgeous intricate design. The card is wrapped and tied with twine for a closure. 

Here's a side view to see the dimension. The heart die cut is centered onto the envelope flap, then a rusty gear is added. This gear has a large flat center, so I found a chipboard gear that fit perfectly. The chipboard is painted with a mix of Brass Hardware and Hazelnut Metallique paints to coordinate. A brass key is added to the top of the gears. It is dry brushed with the same paint mixture used for the chipboard gear to add highlights. Then the entire card is wrapped with twine to act as a closure. 
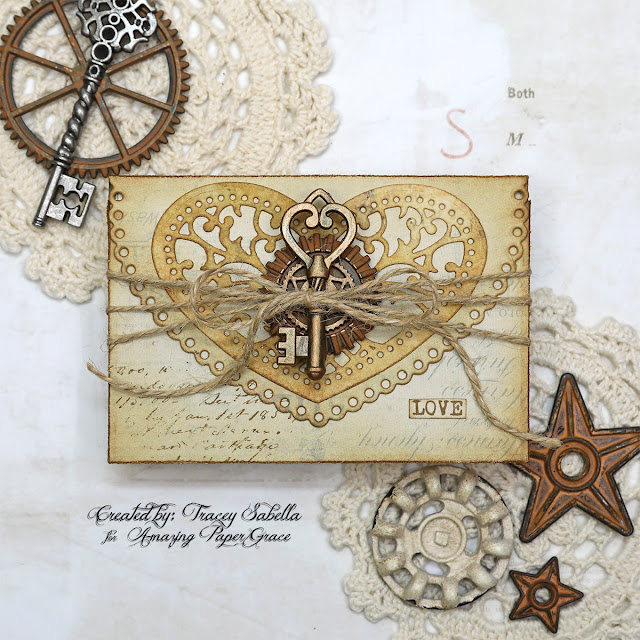
One final view. The sentiment is also stamped and edged in Vintage Photo Ink. 

Below you can find the products I used to create this project including some with compensated affiliate links to Scrapbook.com and Spellbinders. These links are at absolutely no cost to you. When you shop through the links below, I receive a small commission from the companies.  These commissions help me cover the costs of my blog and other expenses, which allows me to continue to provide you with FREE inspiration along with detailed Tips and Techniques provided for every project. Thank you so much for your love and support!

Amazing Paper Grace Sets:

Paper:

Ink: 

Mixed Media:

Stamps:

Embellishments:
  • Prima - Finnabair Collection - Mechanicals - Steampunk Gears
  • Prima - Finnabair Collection - Mechanicals - Rustic Knobs
  • Prima - Finnabair Collection - Mechanicals - Barn Stars
  • Prima - Tiny Junkyard Findings - Vintage Trinkets
  • Creative Embellishments - Gears - Steampunk - Industrial
  • Hobby Lobby - Sunny Side Up - Bakery Twine (thin)
  • Michaels - Metal Embellishments - A Place in Time - Keys

Adhesives:

Tools:

The Amazing Paper Grace Die of the Month is available exclusively at Spellbinders Paper Arts during December 2022, Sweetheart Envelope and Notecard Set along with other membership perks.

View this month’s Amazing Paper Grace Die of the Month: 

Thanks so much for stopping by to view this steampunk Valentine ensemble.
I hope you've been inspired!