Wednesday, December 29, 2021

"What If You Fly" Interactive Flip Card for Amazing Paper Grace

 
Welcome to my creative space!

Don’t you love interactive cards? Amazing Paper Grace has added the Garden Shutters Collection for another fun element of motion. It creates a beautiful card and with one pull of a tab, the shutters open to reveal a delightful surprise sentiment on the other side! There are two card base sizes, A2 and 5 x 7-inch, to choose from. Each card base set has all the elements you need to assemble and embellish a card! Which catches your eye? 

Today's projects were created with dies provided by Amazing Paper Grace.

My Project for Today

Please click on full screen button below for a better view of the video.

There are 19 dies included in the Butterfly Bliss Garden Shutters 5x7 Card Base Set

13 Dies Are Included in the Beautiful 
Primrose Heart Facade Set

What I made
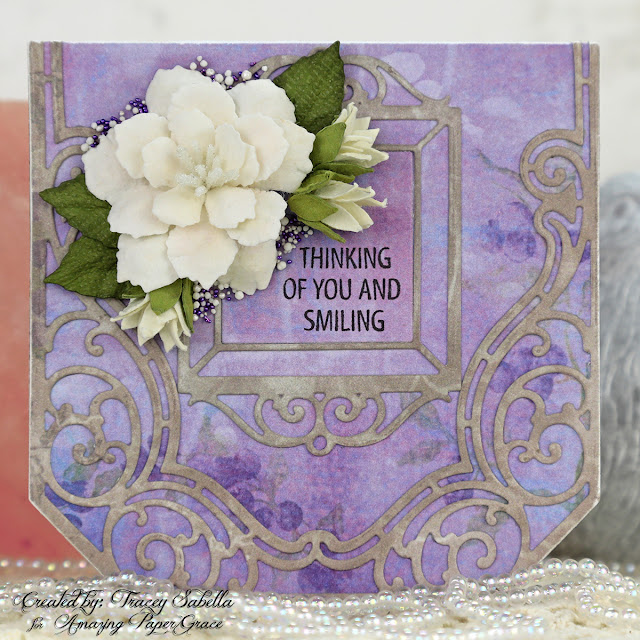
This sweet interactive card was such a joy to create. It's my first time creating a flip card, and I look forward to making more of these fun cards. This interactive design is so clever and easy to use!! The butterflies, sentiment, and base are all included in the S6-183 Butterfly Bliss Garden Shutters 5x7 Card Base set and the flowers are from S5-484 Primrose Heart Facade. Of course both of these gorgeous die sets are in the new Garden Shutters collection

The butterflies and flowers are a great way to use up those paper scraps we all have on hand and had me thinking spring, so I went to my paper stash to find delicately patterned papers in spring colors. Purples, yellows, and greens are so beautiful together. 

These little butterflies include multiple die cut pieces so that they can be layered for dimension and to vary the colors on the fluttering wings. I inked to soften the edges and give a shabby feel to the design. I bent the wings upward for even more dimension. I also added a couple rhinestones to each butterfly for a bit of sparkle.

There are three different blossoms with stems and leaves included in the Primrose Heart Facade die set along with a scrolled heart and the fabulous decorative piece you see here below the butterfly panels, along with another sentiment and pull tabs. I die cut the petals, then inked them before shaping and putting these gorgeous blossoms together. The stems extend from the flip panel to the card base, so I snipped each stem where the panel meets the base, so that this interactive card can turn smoothly. I added more inking to the leaves, stems, and decorative piece.

Designer Tip: My flip panel ended up not being perfectly centered. It looks great visually, but cutting the top panel turned out to be a little tricky since it was slightly off center. I came up with a quick and easy solution. Cut the front panel to 5 1/2 by 7 1/2 inches (instead of 5x7"), cutting out the center panel right in the middle of this larger sized piece. Once cut, center the opening over the flip panels and hold it in place with repositionable tape runner. Turn it over and use a pencil to mark the edges of the card. One it's marked, remove the piece and use a craft knife and ruler to trim the edges. Now the flip panel is perfectly aligned with the front panel and it can be permanently adhered to the card.

More Close-Ups
Top panel: The scrolled pieces are inked around the edges as well as the edges of the card base. 

Flipped Sentiment: You may have noticed some of the other Creative Team members used one more word on the top panel to say "But What If You Fly?" When I added a border to the panels, both words didn't quite fit, so I took out the word "But" and think it works nicely. If you like the full sentiment, just eliminate the border and it fits perfectly.

These dies and plates are available from Spellbinders right now! Click here: Garden Shutters Collection.

Supplies:
Accessories:
Paper:
  • Blue Fern Studios: Déjà Vu; Autumn Anthology; Courtship Lane
Ink:
  • Ranger ~ Distress Ink: Dusty Concord; Brushed Corduroy; Fossilized Amber; Peeled Paint
Embellishments:
    • Want2Scrap ~ Say It With Bling - Purple Rhinestones
    Adhesives:
      • Red Line Tape
      • Helmar ~ 450 Quick Dry Adhesive
      Tools:
      • Spellbinders ~ Platinum 6 Die Cut Machine
      For more Garden Shutters Collection Inspiration:

      Visit each Creative Team blog linked below for their take on creative paper crafting ideas using the Garden Shutters Collection!

      Visit Katarzyna Bobrowska
      Visit Tracey Sabella <<You Are Here>>
      Visit Robin Clendenning
      Visit Joanna Wisniewska
      Visit Patricia Manhire
      Visit Agnieszka Posluszny
      Visit Elena Olinevich
      Visit Anita Kejriwal
      Visit Becca Feeken at Amazing Paper Grace

      But wait, there's more!  Are you curious how it goes together?  Be sure to drop by amazingpapergrace.com/blog on 12/30/21 for a detailed video on how it goes together as Becca makes a card.

      I would adore hearing from you! Please leave a comment below letting me know how you will use these gorgeous dies!


      Thanks for stopping by! I treasure your comments.

      ~ Blessings ~

      Thursday, December 23, 2021

      Festive Burlap Gift Bags for Little Birdie Crafts


      Welcome to my creative space!

      Today I'm sharing these quick and easy gift bags featuring fabulous Little Birdie Crafts Christmas embellishments and burlap bags. These are perfectly sized for a small gift or gift card. If you're looking for a last minute gift bag, these are so quick and easy. I selected coordinating embellishments and adhered them to the burlap bags with silicone glue. 

      This is my final share for the trio of Christmas projects I created featuring Little Birdie's amazing Christmas supplies. I hope you've been inspired to create some Christmas holiday projects of your own. 

      I don't have any special tips and techniques for you today, but have included a close-up shot of each bag below.

      Thank you Little Birdie Crafts for providing the supplies used to create this card!

      You can visit the Little Birdie Crafts store HERE for all your holiday crafting supplies.

      Use code TRACEY05 for a 5% discount.

      I receive a small commission at not cost to you.

      Close-Ups


      Little Birdie Crafts Supplies


      Thanks for stopping by! I treasure your comments.

      ~ Blessings ~

      Wednesday, December 22, 2021

      Wintry Christmas Star for Little Birdie Crafts

       a
      Welcome to my creative space!

      Today I'm sharing this wintry Christmas Star featuring gorgeous Little Birdie Crafts seasonal Christmas supplies. I've created three Christmas projects for Little Birdie including this beautiful star. I wanted to show three very different ways to showcase their fabulous Christmas products. Yesterday you saw a Christmas card in traditional red and green colors. Be sure to come back tomorrow to see how I created some quick and easy gift bags that are perfect for a last minute project.

      This star uses wintry blues, silver and white. The sparkling silver poinsettia is gorgeous as a focal point for the cluster surrounded by glittering snowflakes and printed cardstock foliage with glittered accents. I've also tucked in some creamy flowers from the Shabby Chic collection to add to the snowy feel. I share all the details on how I created the amazing background texture in the tips and techniques section below.

      Thank you Little Birdie Crafts for providing the supplies used to create this card!

      You can visit the Little Birdie Crafts store HERE for all your holiday crafting supplies.

      Use code TRACEY05 for a 5% discount.

      I receive a small commission at not cost to you.

      Tips and Techniques
      This wood star was brushed with white gesso, then stenciled using Crackle Paste with this lovely Christmas Bauble Stencil.  I stenciled one or two points of the star at a time and allowed the crackle paste to dry before moving on to stencil the next point(s).

      I mixed Golden glaze with a small amount of Tawny Glint Tinted Metallic paints to create this brass base to look like metal. Blue Waltz is thinned down with water to create a wash to paint over the star. I misted the paint while wet to help it move and flow into the cracks and crevices. Once the paint was dry, I lightly dry brushed over the blue star with white gesso for a snowy feel and to highlight the beautiful crackled texture.

      Once dry, I arranged and adhered this gorgeous silver glittered poinsettia along with snowflakes and embellishments from the Little Birdie Crafts store. 

      A few small flowers from the Shabby Chic collection are tucked in as well.

      I've added pebble rhinestones to the center of the glittered snowflakes for extra bling and filled in around the cluster with Iced Slate Metal Microbeads and prills for even more texture. 

      Tuesday, December 21, 2021

      "Joy to the World" Christmas Card for Little Birdie Crafts


      Welcome to my creative space!

      Christmas is a special time of the year to create heartfelt cards for the special people in my life with images and sentiments that share the love of Christ. I've created this festive Christmas card featuring holiday supplies available in the Little Birdie Crafts store including gorgeous flowers, ribbon, and embellishments along with their fabulous mixed media supplies available all year long. 

      Thank you Little Birdie Crafts for providing the supplies used to create this card!

      You can visit the Little Birdie Crafts store HERE for all your holiday crafting supplies.

      Use code TRACEY05 for a 5% discount.

      I receive a small commission at not cost to you.

      Tips and Techniques
      The background paper is from the Shabby Chic Bouquet collection. I brushed clear gesso across the paper before stenciling with mixed media paste for a snowy effect. The edges of the paper are distressed. 

      I wrapped the card base with beautiful Tartan Ribbon, then arranged all the elements onto the card.

      A quick and easy mixed media card to create for someone special in your life!

      Shabby Chic Bouquet Collection - Printed Cardstock Pack 12"X12"
      https://littlebirdiecrafts.com/products/paper-pack-12in-x-12in-shabby-chic-bouquet-12-sheet

      Little Birdie Crafts Supplies

      Other Supplies
      Cardstock ~ Green from my stash
      Scrapbook Adhesives by 3L ~ 3D Foam Squares
      Helmar ~ 450 Quick Dry Adhesive
      Imagine ~ Tear It! Double-sided Adhesive Tape


      Thanks for stopping by! I treasure your comments.

      ~ Blessings ~

      Monday, December 20, 2021

      "Thinking of You" Notecard for Amazing Paper Grace

      Welcome to my creative space!

      It is so wonderful to have some sweet notecards in my stash. This encouraging card features the fabulous Amazing Paper Grace Flourished Sonata Notecard Die Set from the Sweet Serenade Notecard Collection. I've also created the focal flower with the Grand Cinch and Go Flowers Set and foliage with the Candlewick Rosebud Dies and tucked in several tiny flowers from Little Birdie Crafts.

      To be honest, I have mostly created birthday, holiday, and wedding cards, but not much in the way of general notecards. This die set has encouraged me to include small notecards for my stash that can be used to send a note of encouragement or thanks. Many thanks to Becca for creating this fabulous die set. 

      Thank you Amazing Paper Grace for providing the dies used in this project.

      Tips and Techniques
      A great way to extend your stash of purchased flowers is to create a gorgeous handcrafted focal flower and foliage like I've used here, then add in a few small bought flowers.

      This beautiful focal flower is die cut with the Grand Cinch and Go Flowers dies from mulberry paper. I shaped the petals and added beaded stamen to the center. The foliage uses the rose leafs from the Candlewick Rosebud Die set. They are cut from green cardstock, shaped, then inked with a darker green to highlight the texture. I also tucked in a few small Queenie flowers from Little Birdie Crafts. I also adhered white prills and purple microbeads to add texture and to fill in around the cluster.

      Normally we think of centering a sentiment when stamping on a square shape, but I knew I wanted to add a cluster of flowers, so stamped in the corner of the square instead.

      The scrollwork in this die set is simply amazing. I die cut the scroll pieces, then inked them randomly to add visual texture. When folding the card, this scrolled piece cracked a little on the folded edge. An easy solution was to distress all the outside edges as you can see here.

      This versatile die set can be used to create a slimline card. There is also a scoring die included in the set that creates a scoreline to fold the card in half to create this notecard size. 

      Amazing Paper Grace Dies

      Other Supplies
      Studio75 ~ The Berry Copse Collection
      Mulberry Paper ~ Cream
      Core-dinations ~ Tim Holtz - Cardstock, Green
      **Thank you Little Birdie for providing these flowers **
      Finnabair with Prima Marketing ~ Art Basics: Soft Matte Gel
      Prills ~ Minnie Pearls
      Microbeads ~ Amethyst
      Helmar ~ 450 Quick Dry Adhesive
      When purchasing from Little Birdie Crafts HERE
      Use code TRACEY05 for a 5% discount.
      I receive a small commission at no cost to you.

      In this supply list you can find the products I used to create this project along with compensated affiliate links to Scrapbook.com These links are at absolutely no cost to you. When you shop through these links I receive a small commission from Scrapbook.com. These commissions help me cover the costs of my blog and other expenses, which allows me to continue to provide you with FREE inspiration along with Tips and Techniques. Thank you so much for your love and support!


      Thanks for stopping by! I treasure your comments.

      ~ Blessings ~

      Monday, December 13, 2021

      Merry Christmas Card for Amazing Paper Grace with Tutorial Link

      Welcome to my creative space!

      I have one final Christmas card to share using the gorgeous Amazing Paper Grace Holiday Medley Collection. It has been so wonderful having the opportunity to work with these fabulous dies to create my Christmas cards this year! 

      This card features a fun and fabulous technique using the Pinstripe Bracket Card Builder set (GLP-280) that includes a pinstripe Glimmer Foil Hot Plate. Rather than foiling, I've used ink to create the striped patterned paper for my card. You can find the full tutorial exclusively in the Amazing Paper Grace Creative - Creative Encouragement Community Facebook Group.

      This lovely group includes exclusive tutorial content. I share a mixed media tutorial there on the 13th of each month. The tutorial for this project includes a detailed step by step photo tutorial teaching you how to create this one of a kind patterned paper for your projects. If you're not a part of this fabulous and encouraging group you can join HERE.

      Thank you Amazing Paper Grace for providing the dies used in this project.

      Close-ups
      Don't you just adore this handmade pinstripe paper with the organic, grungy feel? The gorgeous handcrafted poinsettias are cut with the Cinch and Go Poinsettia Dies. They are cut from the same cream patterned paper used as the base for the pinstripe design, then inked with Distress Ink before shaping. I just adore the veined texture embossed into the petals as they are die cut.

      The Christmas sentiment and shimmering snowflakes are from the Silent Night Make a Scene Die Set. The green bracket shape is cut with the Mosaic Bracket Card Builder Dies that coordinate beautifully with the Pinstripe Bracket Card Builder.

      Another gorgeous poinsettia. The gold stamen are a perfect touch to finish off these blossoms.


      One final shot. Be sure to check out the tutorial to learn how to use a glimmer place to create beautiful and unique patterned paper to complement your projects in the Amazing Paper Grace - Creative Encouragement Community Facebook HERE.

      AmazingPaper Grace Dies

      Other Supplies
      Patterned Paper - from my stash
      Glitter Paper - White
      Stamen ~ Gold
      Tim Holtz with Idea-Ology ~ Antiqued Gems; Snowflakes
      Bead Landing ~ Keys
      Rhinestones ~ Round AB
      Ranger ~ Distress Ink: Bundled Sage; Aged Mahogany
      Finnabair with Prima ~ Metallique Wax: Vintage Gold
      Helmar ~ 450 Quick Dry Adhesive
      Tombo ~ Mono MULTI Liquid Glue
      Imagine Crafts ~ Tear It! Double Sided Tape


      Thanks for stopping by! I treasure your comments.

      ~ Blessings ~