Monday, November 22, 2021

Amazing Paper Grace Fluted Classics Intro Blog Hop ~ Fall Art Panel with Artist Trading Card

 
Welcome to my creative space!

Within the various collection introductions, Amazing Paper Grace has included sets that were inspired by classic sewing motifs. The Fluted Classics Collection is another wonderful layering shape set with ticking designs reminiscent of the blanket stitch on its edges! Nest the outer and inner rims with the insert to cut a tailored frame or for a beautiful background edge to any layering design. Keep it simple and you can cut a solid shape with just an outer rim. The Fluted Classics come in circle, square, oval, and rectangle shapes. We’ve also added a slimline version for those card makers who want to create an elegant and trendy silhouette.

Today's projects were created with dies provided by Becca Feeken of Amazing Paper Grace.

My Projects for Today:

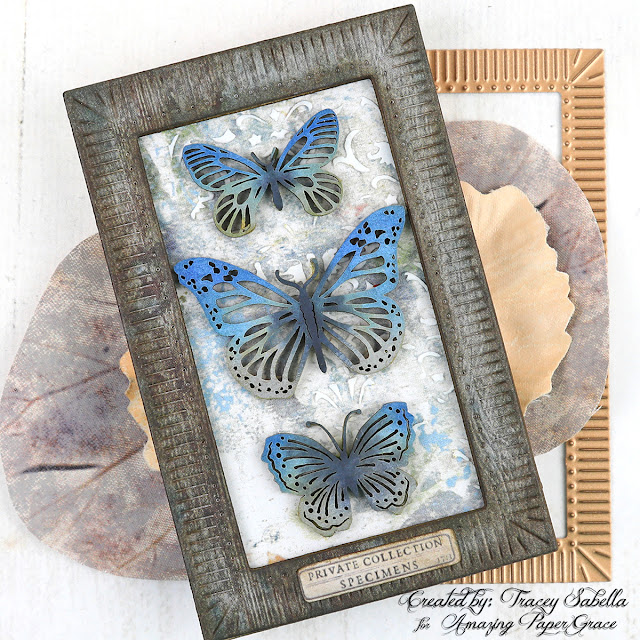
I'm featuring the Amazing Paper Grace Fluted Classics Rectangle Die Set by Becca Feeken to create a fall themed art panel and an artist trading card with chipboard butterflies in a shadowbox frame.


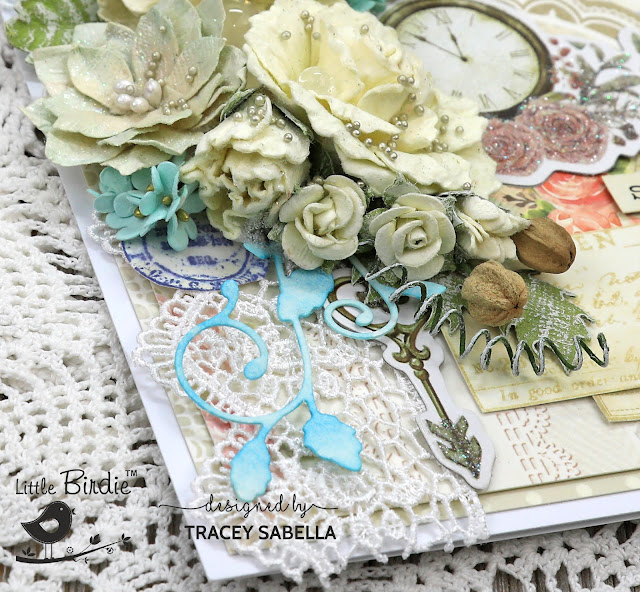
These gorgeous Fluted Classics Rectangles are a perfect way to frame a beautiful decor piece. I've used the two larger dies to double frame an arrangement of mushrooms and flowers. The butterfly ATC has a shadowbox frame cut with this fabulous die set. The background on both pieces is accented with delicate stenciling. Because the frames are cut from a darker patterned paper, the gorgeous design was not as visible as I wanted, so I rubbed them with Distress Ink to help highlight the gorgeous stitch inspired design. 

Designer Tip: 

To create a shadowbox frame, simply cut several frames and glue them together for beautiful depth and dimension. I used this technique for the butterfly artist trading card.

More Close-Ups with Tips and Techniques:

Gorgeous mushrooms and flowers in fall colors are arranged and overlap the frame in places to create a gorgeous home decor art panel which is backed with chipboard to make a sturdy piece to display. The specimen label is adhered to the bottom right over the frame.

Here you can see how fabulous the double frame looks. The stenciled texture paste design adds lots of wonderful texture. The inking highlights the gorgeous texture in the frame so beautifully.

This shadow box frame looks like it was cut from thick chipboard, but that wouldn't be possible with these detailed etched dies. Instead I cut 5 layers of cardstock weight patterned paper, then glued them together to created the deep frame. 

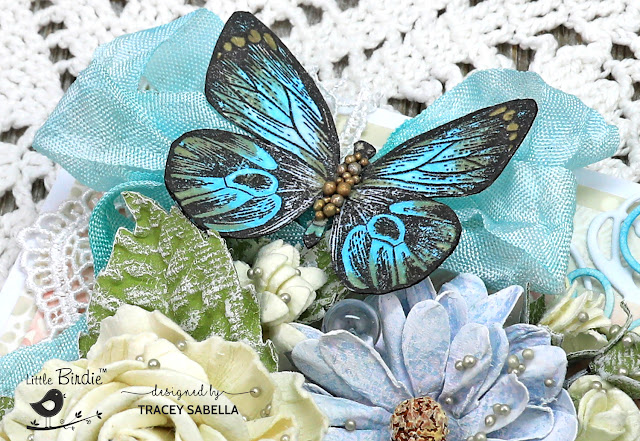
These lovely chipboard butterflies are colored with Distress and Distress Oxide Sprays. A paintbrush was used to apply the spray for more control.


Fluted Classics Availability:

These dies are available from Spellbinders right now! Click here: Fluted Classics Collection.

Supplies:
Accessories:
Paper:
Patterned paper from my stash
Tim Holtz with Idea-ology ~ Ephemera Pack - Field Notes
Ink:
Ranger ~ Distress Ink - Ground Espresso
Ranger ~ Distress Oxide Spray: Black Soot; Frayed Burlap
Mixed Media Supplies:
Ranger ~ Distress Spray: Faded Jeans; Prize Ribbon
SnipArt ~ Stencil, Up in the Air
Adhesives:
Helmar ~ 450 Quick Dry Adhesive
Tombo ~ Mono MULTI Liquid Glue

For more Fluted Classics Collection Inspiration
Visit each Creative Team blog linked below for their take on creative paper crafting ideas using the Fluted Classics Collection!

Visit Tracey Sabella <<You are here!>>

Please leave a comment letting me know which Fluted Classics set you would use first.

Follow me on Facebook!

Follow me on Instagram!

Follow me on YouTube!


Thanks for stopping by! I treasure your comments.

~ Blessings ~

Monday, November 15, 2021

"Merry Christmas Bells" Card for Amazing Paper Grace

 Welcome to my creative space!

We had our first snow yesterday blanketing the ground with a layer of white sparkling snow, so it's beginning to feel like a little like Christmas here in Ohio. Although I have to admit, it's a little odd seeing the snow against a touch of fall color in the trees.

Have you started creating your Christmas cards yet? I've created another one featuring the fabulous Amazing Paper Grace Silver Bells Dimensional Doily die set (S4-1130) from the Holiday Medley Collection. I've included a gorgeous handcrafted Poinsettia using the Cinch and Go Poinsettia set (S4-960), snowflakes from Silent Night Make a Scene (S5-462), and the sentiment is from the Mosaic Bracket Card Builder set (S5-461).

I simply adore dimension and this bell die has such amazing depth when it's all put together. One die cuts out 3 beautiful bells that interconnect with raised edges. More pieces can be cut and connected to create a 3D bell that can be used as an ornament or embellishment for a decor project. 

Thank you Amazing Paper Grace for providing the dies used in this project.

Tips and Techniques
Isn't this dimensional bell simply gorgeous? I die cut three bells from red patterned paper and inked the edges. Next the bells are folded on the score lines created when die cutting. A little glue is applied, then attached together. They fit perfectly across this 5x7" card.

I created this poinsettia using the Cinch and Go Poinsettia die set. The edges are inked before shaping and then gold stamen are added to the center. I've also added small flowers from Little Birdie Crafts, a metal bell, and a hand tied jute bow to embellish the top of the bell.

This sentiment from the Mosaic Bracket Card Builder die set was a perfect pairing with the bell. I cut the snowflakes from glitter paper using dies from the Silent Night Make a Scene set.

Texture is added to the background patterned paper by stenciling with texture paste, then spritzing with gold Color Shine. The edges of the paper are inked for definition and to add to the shabby mixed media feel.


Here's one final look.

Amazing Paper Grace Dies

Other Supplies
Glitter Paper ~ White
Patterned Paper from my stash
Tim Holtz with Idea-ology ~ Tiny Bells
Jute
Stamen ~ Gold
Ranger ~ Distress Ink: Ground Espresso; Gathered Twigs
Ranger ~ Texture Paste, White
Finnabair with Prima Marketing ~ Clear Gesso
Heidi Swapp ~ Color Shine - Gold
Art Anthology ~ Stencil - Diamond Grunge
Helmar ~ 450 Quick Dry Adhesive
Tombo ~ Mono MULTI Liquid Glue

When purchasing from Little Birdie Crafts HERE
Use code TRACEY05 for a 5% discount.
I receive a small commission at no cost to you.


Thanks for stopping by! I treasure your comments.

~ Blessings ~

Saturday, November 13, 2021

"O Holy Night" Christmas Card for Amazing Paper Grace with Tutorial Link

Welcome to my creative space!

Today I'm sharing this festive Christmas card featuring the Amazing Paper Grace Jingle Word Frame die set from the Holiday Medley Collection. The stenciling is added by die cutting the design to use as a stencil.

The Amazing Paper Grace - Creative Encouragement Community Facebook group includes exclusive tutorial content. I'll be creating a mixed media tutorial there on the 13th of each month. My tutorial today includes a detailed step by step photo tutorial teaching you how to create this fabulous textured design. If you're not a part of this fabulous and encouraging group you can join HERE.

Amazing Paper Grace provided the dies used in this project.

Close-ups
Here you can see the beautiful stenciling behind the bottom floral cluster. The poinsettia is handcrafted from the Cinch and Go Poinsettia die set. The edges are inked, then I shaped the petals before adhering them together and added gold stamen to the centers. The fabulous dies not only cut the design, but emboss the veins into the paper as well.

The paper die cut is inked for a shabby feel and is a gorgeous background for this festive and sweet sentiment. I cut a circle of patterned paper matching the base to glue behind the die cut, so the background stenciling isn't visible through the paper die cut.

Texture is added around the clusters by adding pearls, prills, and microbeads.

More of the gorgeous poinsettias. I've also added in a few smaller flowers from Little Birdie Crafts to fill in the clusters.

One final shot. Be sure to check out the tutorial to learn how to use die cuts to add stenciled details to your projects in the Amazing Paper Grace - Creative Encouragement Community Facebook HERE.

Other Supplies
Patterned Paper from my stash
Tim Holtz Idea-Ology ~ Christmas Quote Chips
US ArtQuest: Prills: Gilt Trip; Stop Whinning 
Finnabair with Prima Marketing ~ Micro Beads - White Gold
Pearls from my stash
Stamen ~ Gold
Ranger ~ Distress Ink: Ground Espresso; Bundled Sage
Ranger ~ Texture Paste, White
Finnabair with Prima Marketing ~ Clear Gesso
Finnabair with Prima Marketing ~ Soft Matte Gel, Transparent
Liquitex ~ Gesso, White
Scrapbook Adhesives by 3L ~ Crafty Power Tape
Helmar ~ 450 Quick Dry Adhesive
Tombo ~ Mono MULTI Liquid Glue

When purchasing from Little Birdie Crafts HERE
Use code TRACEY05 for a 5% discount.
I receive a small commission at no cost to you.


Thanks for stopping by! I treasure your comments.

~ Blessings ~

Monday, November 8, 2021

"A Savior Has Been Born" Christmas Card for Amazing Paper Grace


Welcome to my creative space!

Christmas is a special time to celebrate the birth of our Lord Jesus Christ. I've created a special Christmas card featuring the gorgeous Amazing Paper Grace Celebrate Scrollwork Card Builder die set from the Holiday Medley Collection. The lovely poinsettia is handcrafted using the Cinch and Go Poinsettia die set

The Celebrate Scrollwork set includes a die with the Celebrate the Season sentiment surrounded by gorgeous scrollwork, which would also look wonderful and is quick and easy to die cut for the center. I wanted to show a little different way to use this set by stamping a sentiment on the square background piece. A stamp platform and scrap paper are a great way to line up the sentiment before stamping on your good paper. 

Amazing Paper Grace provided the dies used in this project.

Tips and Techniques
This gorgeous Poinsettia is die cut from patterned paper. The edges of the petals are inked, then shaped. The petals are adhered together then stamen are inserted into the die cut center hole and glued in place. Poinsettia's come in many different colors and this pale yellow/cream color worked perfectly against the reds and greens on the card.

The handcrafted poinsettia is paired with gorgeous red roses and a white rose bud from Little Birdie Crafts. The Tim Holtz metal snowflakes are rubbed with white gold metallique wax and then a little Old White Matte Wax to highlight the textures and give a wintry feel. To add a little sparkle, I've tucked shaved ice flakes into the cluster edges.

The scrollwork design is cut from red cardstock. I colored the center piece with distress ink to coordinate with the green background paper before stamping. I wanted to frame the card with red cardstock, so trimmed the center of the scrollwork pieces to use a slightly smaller square for the center so this slimline card would fit nicely into a standard #10 envelope.

The sweet snowflake overlapping the sentiment piece is cut from white glitter paper using a die included in the Celebrate Scrollwork set.

One final shot.

Amazing Paper Grace Dies

Other Supplies
Tim Holtz Idea-ology ~ Snowflakes 
Stamen from my stash
Tim Holtz ~ Kraft Core 
Fab Scraps ~ Gentleness 
Patterned paper from my stash
Glitter Paper ~ White
Ranger ~ Distress Ink: Sage Green; Gathered Twig
Ranger ~ Distress Glaze
Versafine ~ Onyx Black
Finnabair with Prima ~ Metallique Wax: White Gold
Finnabair with Prima ~ Matte Wax: Old White
Finnabair with Prima ~ Soft Matte Gel, Transparent
Stampendous ~ Shaved Ice
Our Daily Bread ~ Luke 2:11 Stamp Set
Scrapbook Adhesives by 3L ~ Crafty Power Tape
Helmar ~ 450 Quick Dry Adhesive
Tombo ~ Mono MULTI Liquid Glue

When purchasing from Little Birdie Crafts HERE
Use code TRACEY05 for a 5% discount.
I receive a small commission at no cost to you.


Thanks for stopping by! I treasure your comments.

~ Blessings ~

Friday, November 5, 2021

"Shine" Layered Shabby Card for Little Birdie Crafts


Welcome to my creative space!

I've created this beautiful layered card featuring gorgeous Little Birdie Crafts Flowers and Ephemera. I've added in some stamped images and lace from my stash as well. I have a full photo tutorial with all the details on how I created this card up on the Little Birdie Crafts blog HERE. Thanks for stopping over there to leave a comment.

Be sure to check out the current sales HERE.

Use code TRACEY05 for a 5% discount.

I receive a small commission at not cost to you.

Some close-up shots:


Little Birdie Crafts Supplies

Other Supplies
Tim Holtz with Idea-ology ~ Big Chat ***
Tim Holtz with Idea-ology ~ Bubbles ***
Tim Holtz with Stampers Anonymous ~ Flutter Stamp Set ***
Tim Holtz with Stampers Anonymous ~ Field Notes Stamp Set ***
Tim Holtz with Ranger ~ Distress Ink - Antique Linen ***
Tim Holtz with Ranger ~ Distress Oxide Ink - Chipped Sapphire ***
Memory Box ~ Quinn Flourish Die
Memory Box ~ Norwich Corner Die
Versafine Pigment Ink ~ Vintage Sepia
Prills ~ Gilt Trip
White Lace
White Rayon Seam Binding
Zig ~ Clean Color Real Brush Markers - Light Blue; Haze Blue; Brick Beige
Lindy's Gang ~ Starburst - Tibetian Poppy Teal
Heidi Swapp ~ Color Shine - Ocean; Tropicana Teal
1/4" Double Sided Tape
Helmar ~ 450 Quick Dry Adhesive


Thanks for stopping by! I treasure your comments.

~ Blessings ~

Thursday, November 4, 2021

Amazing Paper Grace November Die of the Month - Pop Up 3D Vignette Christmas Tree Card and Ornament

Welcome to my creative space!

What a magical sight to see a beautifully decorated Christmas tree with gifts piled high around its trunk! The Pop Up 3D Vignette Christmas Tree includes a set of graduated trees for a full dimensional design, along with details of presents, bows, and ornaments to complete this set. Change up the colors for an elegant or casual look. Best of all, it folds for easy mailing. Use just the elements to work with a flat card format from A2 to A7. Detailed die cuts make it easy to personalize for the holidays. The choice is yours!

Dies for my creations today were supplied by Amazing Paper Grace.

3D Christmas Tree Card

Christmas Ornament

There are 21 dies included in the Pop Up 3D Vignette Christmas Tree.

My Project Today uses the Pop Up 3D Vignette Christmas Tree die set. What a gorgeous set to create a spectacular Christmas card. This beautiful Christmas tree folds up perfectly to fit into an envelope. 

For a shabby look, I decided to use up some grungy distressed patterned papers from my scrap pile. For the base structure, I used heavy weight kraft card stock (about 130#), then die cut those patterned paper scraps for the gifts and ornaments. It took one full 12x12" sheet of green patterned paper to cut the trees for the card and ornament and a little more than one sheet of the kraft cardstock.

For definition and more of a grungy effect, all the edges of the patterned papers are inked, the tree with green, and the gifts and sentiment with brown. For a snowy effect, I applied texture paste to the edges of the limbs and while still wet, sprinkled with clear sparkling glitter. Because the paper edges are inked the snow turned green in places which was exactly the effect I wanted. If you like this effect, but would like pristine white snow, you could skip inking the edges or seal the ink with Distress Glaze or some other type of fixative. Try a sample on a paper scrap to make sure you're getting the desired effect. 

I adore making handcrafted ornaments each year for our family and thought the small tree die would make a perfect keepsake ornament for this year. To keep it simple and to make for easier storage, I did not apply the texture paste snow to the ornament.

My Designer Tip for this project is to be sure to ink the edges of the paper before assembling the pieces together.

Close-Ups
The sentiment is popped up with foam tape.


Supplies:
Accessories:
Paper:
    Kraft Cardstock - 130#
    Grungy scraps from my stash
Ink:
    Distress Ink: Ground Espresso; Forest Moss
Mixed Media Supplies:
    Tim Holtz: Distress Texture Paste, Matte
    Tim Holtz: Distress Glitter, Clear Rock Candy

For more Pop Up 3D Vignette Christmas Tree Inspiration:

Visit each Creative Team blog linked below for their take on creative paper crafting ideas with Pop Up 3D Vignette Christmas Tree, the Amazing Paper Grace November 2021 Die of the Month!

 
The Amazing Paper Grace Die of the Month is available exclusively at Spellbinders Paper Arts during November 2021. Pop Up 3D Vignette Christmas Tree at the special kit club price, along with other membership perks.

View this month's Amazing Paper Grace Die of the Month! 


I would adore hearing from you! Please leave a comment below letting me know how you will use these gorgeous dies!


Thanks for stopping by! I treasure your comments.

~ Blessings ~

Monday, November 1, 2021

"All is Calm" Shabby Christmas Card for Amazing Paper Grace

Welcome to my creative space!

The Amazing Paper Grace Holiday Medley Collection is such a blessing to work with to create gorgeous Christmas cards. Today I'm featuring the All is Calm Word Frame die set (S5-1146) to create this sweet A2 Shabby Chic Christmas card with touches of mixed media.

Amazing Paper Grace provided the dies used in this project.

Tips and Techniques:
The sentiment is heat embossed with Stampendous Aged Green Embossing powder to add a textured shabby finish and set on an oval piece with inked edges to help the sentiment pop.

I've added a few metal pieces and resin roses from the Tim Holtz Idea-Ology collection. The metal pieces are rubbed with wax for a gold color. Prills are scattered around the sentiment for added texture. 

The square die cut from the All is Calm set is also heat embossed, this time in Aged Scarlet for a pop of Christmas Red. The clusters are accented with holly leaves cut using the Merry Filigree Card Builder set (S5-464) from the Holiday Medley Collection and the filigree texture on the background is cut with the Celebrate Scrollwork Card Builder set (S5-465).

The paper edges are distressed and inked for definition and to add to the shabby feel of this card. Flowers are from 49 and Market.

One final look!

Amazing Paper Grace Dies:

Other Supplies:
Blue Fern Studios ~ Spring Parade
49 and Market Flowers: Botanical Potpourri - Buttermilk
Prima Marketing ~ Soft Matte Gel Medium
Prima Marketing ~ White Gold Microbeads
Prima Marketing ~ Metallique Wax - Vintage Gold
Stampendous ~ Embossing Enamel: Aged Scarlet; Aged Green
Ranger ~  Emboss It Dabber
USArtquest ~ Prills: Guilt Trip
Helmar ~ 450 Quick Dry Adhesive
Tombo ~ Mono MULTI Liquid Glue


Thanks for stopping by! I treasure your comments.

~ Blessings ~