Thursday, July 28, 2022

Summer Thank You Card for Amazing Paper Grace

 
Welcome to my creative space!

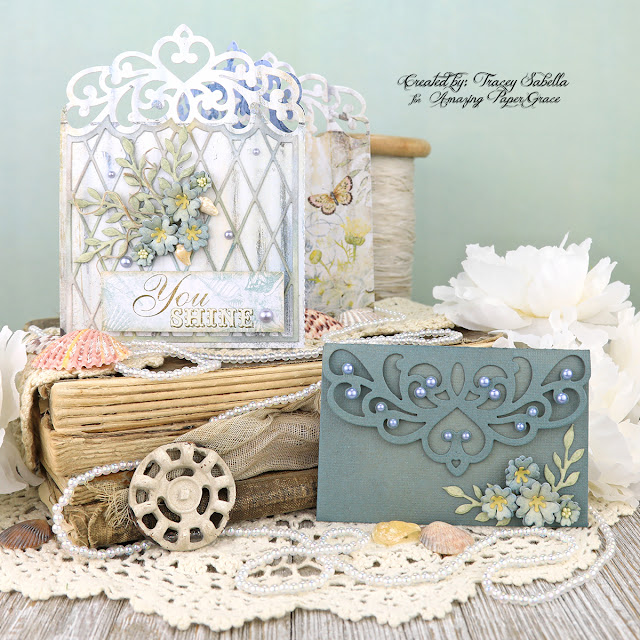
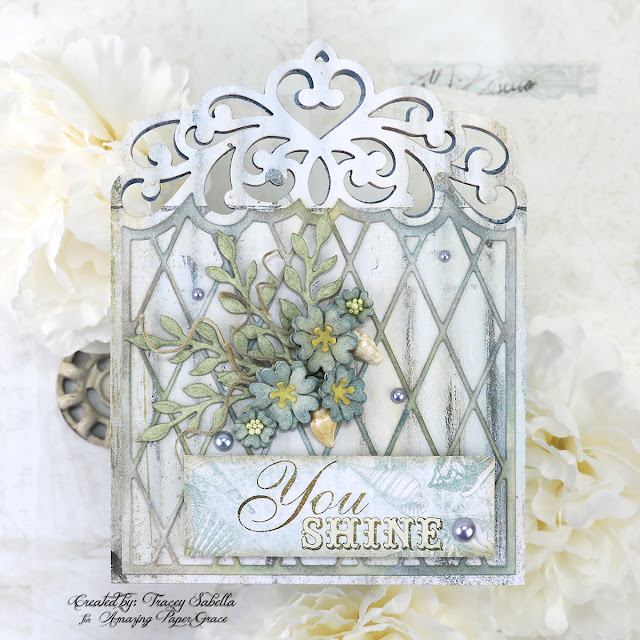
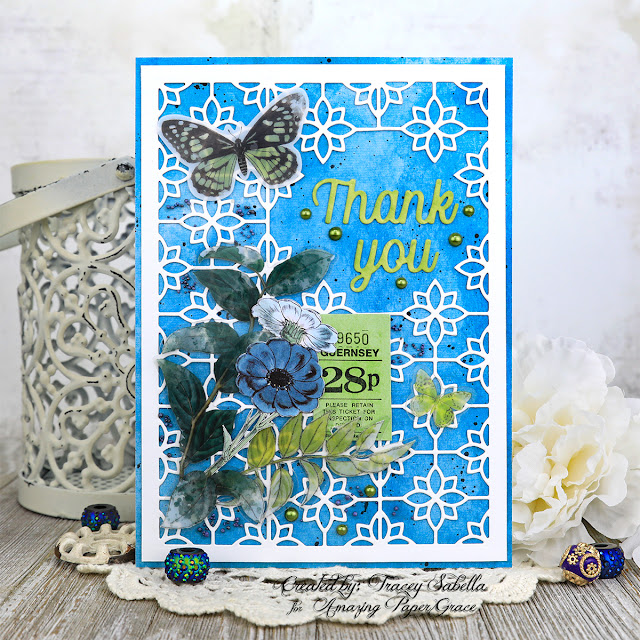
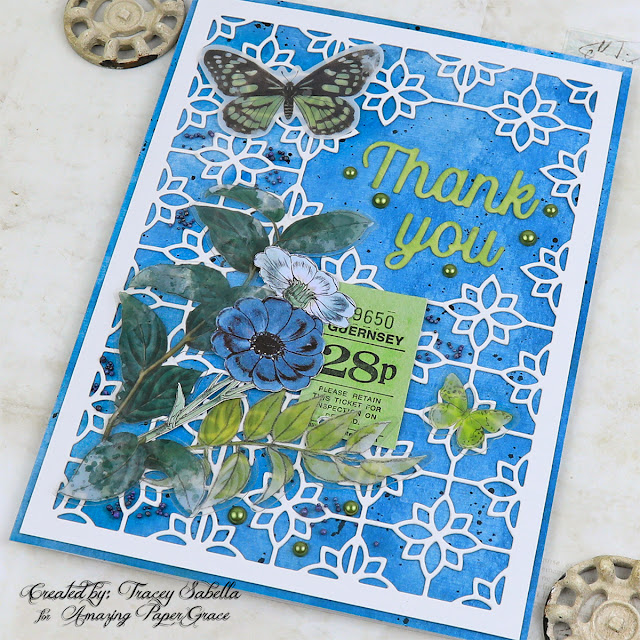
With summer in full swing, I wanted to design something with beautiful sky blues to feature the Amazing Paper Grace 'Thank You for Your Kindness' die set (S5-513) from The Right Words Collection for this lovely thank you card.

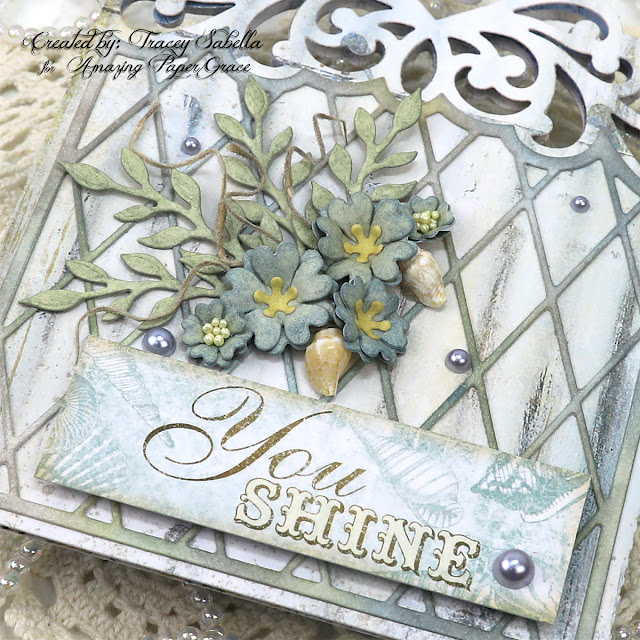
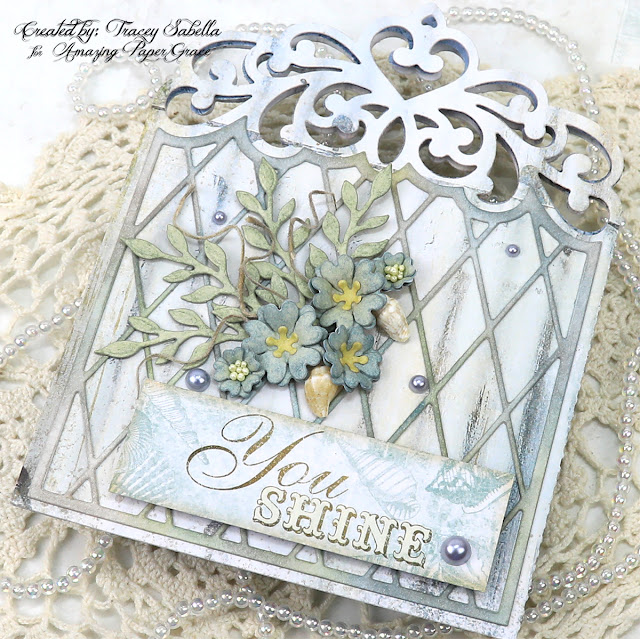
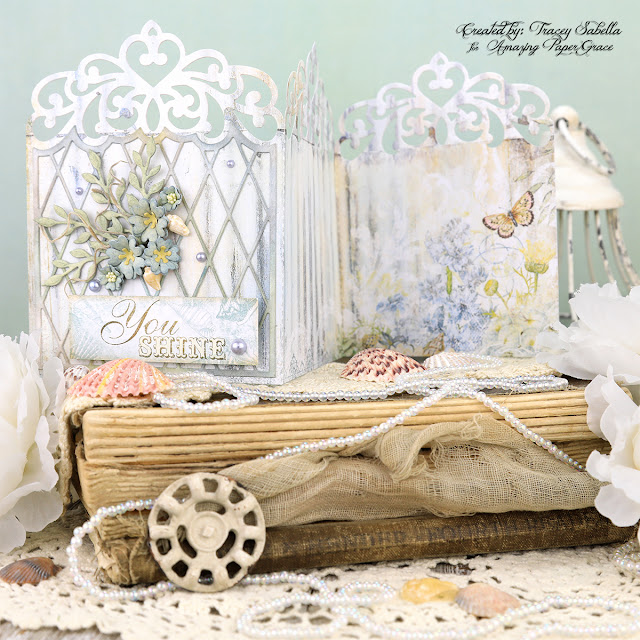
There is just something special about sending a handcrafted thank you note. Lately I've been thinking that I should have a few more of these heartfelt cards ready to send, and this die set is just what I needed with the wonderful sentiment words that create: thank you; thank you for your kindness; and you are so kind. The beautiful background die included with this set is so versatile and can be used as a single strip, or repeat cut to create an entire background like you see here. I wanted the sentiment to pop, so cut out the background section that would have been behind the thank you.

I hope you'll scroll down through the "Tips and Techniques" section below for close-ups and all the details on how to create this beautiful thank you card.

Thank you Amazing Paper Grace for providing the dies used in this project.

Tips and Techniques
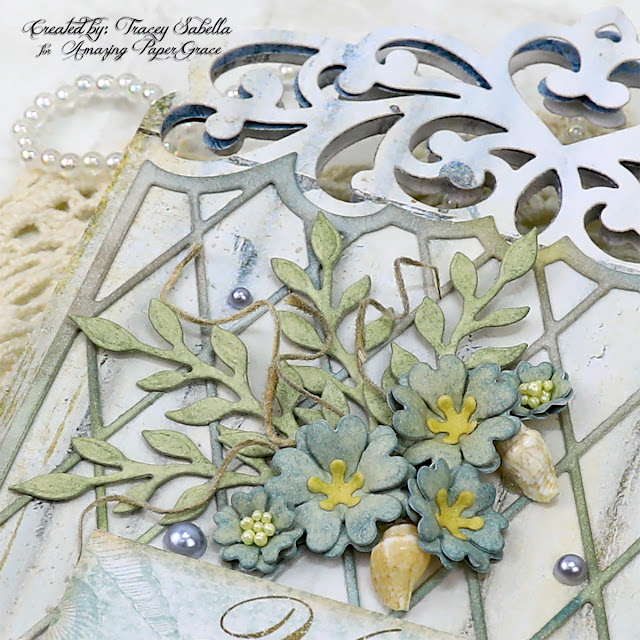
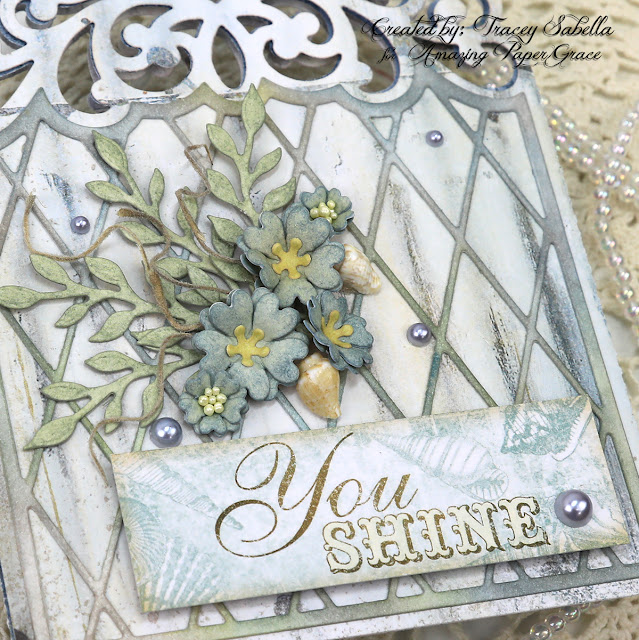
I cut the background by lining up the dies for a repeat pattern three times and yes, on the repeat, there is a line down the center of each flower which adds charm to the design. 

Designer Tip: Cut the paper about 1/2 inch larger than you need on each side, so if the design isn't quite centered, you can trim it so that the edges are perfectly even. So for example, if you want a 5x7" base, cut it to 6x8", as long as it will fit into your die cutting machine. 

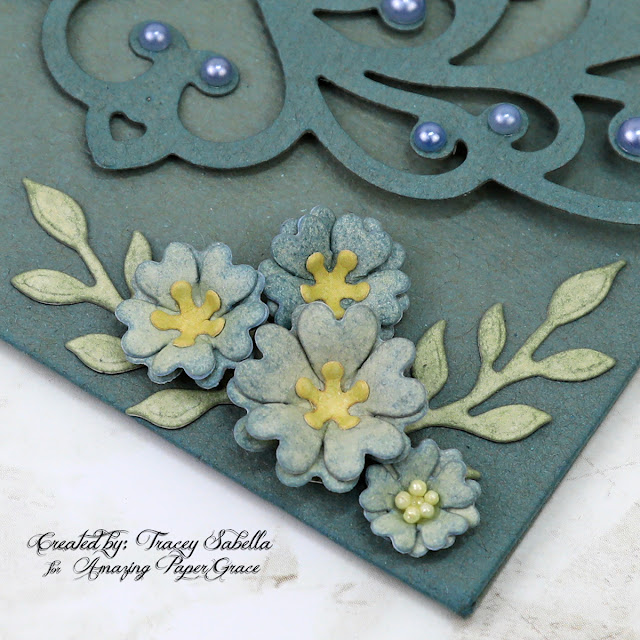
I've used paper and embellishments from the 49 and Market Sectrum Sherbet Tidal Wave Collection including the acetate leaves. The flowers and ticket are fussy cut from the included image sheet in the 6x8" paper pack.

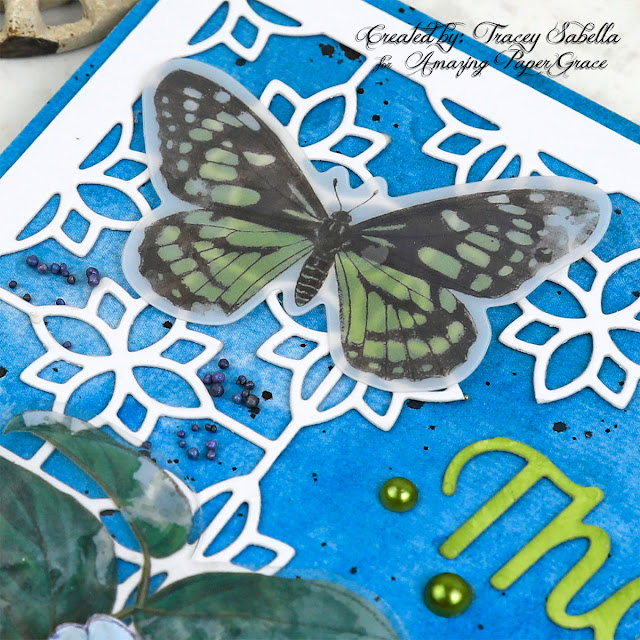
This sweet butterfly is also from the acetate leaves pack. The background paper is spattered with black ink to add visual texture. I've also added green flat back pearls and blue prills for physical texture as well.

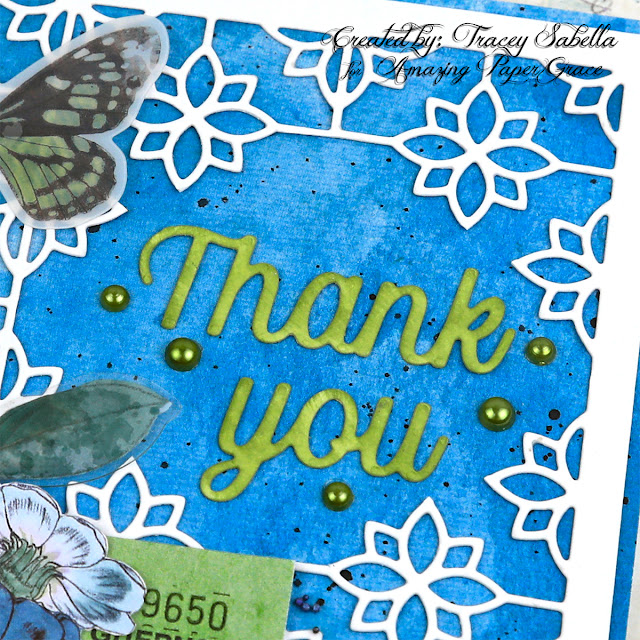
This lovely sentiment was die cut with heavy weight white cardstock, and colored with Distress Inks to coordinate with the embellishments. I used two colors of ink so that the colors would vary like the blue background paper. 

You can see here how I trimmed away some of that background die cut which is also cut in white, but not inked. I tried laying the sentiment over the floral die cut since there is a strong contrast in color, but it was just a little too busy for my taste, so cutting that section out, allows the sentiment to sing. 

Here in the bottom section of the card you can see more of the same textures and another smaller acetate butterfly.

One final view.

Below you can find the products I used to create this project including some with compensated affiliate links to Scrapbook.com. These links are at absolutely no cost to you. When you shop through the links below, I receive a small commission from Scrapbook.com. These commissions help me cover the costs of my blog and other expenses, which allows me to continue to provide you with FREE inspiration along with Tips and Techniques provided for every project. Thank you so much for your love and support!

Amazing Paper Grace:

Paper:

Ink:

Mixed Media:
Higgins Drawing Ink ~ Black
Finnabair with Prima Marketing ~ Soft Matte Gel

Embellishments:
49 and Market - Spectrum Sherbet Collection - Acetate Leaves - Tidal Wave
US Artquest ~ Blue Jean Baby
Flat Back Pearls ~ Grass Green

Adhesives:
Beacon ~ 3-IN-1 Advanced Craft Glue
Beacon ~ Fabri-Tac

Tools:

Thanks so much for stopping by to view my card. I hope you've been inspired.

~ Blessings ~

Monday, July 18, 2022

Easter Card with Lilies for Amazing Paper Grace

Welcome to my creative space!

As soon as I saw these gorgeous Amazing Paper Grace Layered Lilies dies (S4-1192), I thought of Easter and just had to create a card to celebrate this blessed holiday in lovely spring colors. So instead of Christmas in July, today we have Easter in July!

I've also use the gorgeous Filigree Marquis (S4-1164) die set for the scrolled background and this lovely Easter sentiment is from the Merry Everything Words set (S4-1205).

Be sure to scroll down through the "Tips and Techniques" section below for close-ups and all the details on how to create this beautiful butterfly Easter Card.

Thank you Amazing Paper Grace for providing the dies used in this project.

Tips and Techniques
These gorgeous lilies are so easy to put together. They are layered for dimension, and no special tools are required for shaping. I just added a little green ink at the base of the petals like you would see in natural lilies and colored the stamen with yellow. The four pieces for each flower are then glued together. The beautiful leaves and curled vines are cut from white cardstock as well and colored with the same green. I used a toothbrush style applicator in a circular motion on the leaves to give the edges a little darker coloring for more dimension and layered them under the beautiful blossoms. 

Designer Tip: I've found that using repositionable tape to hold your die cuts in place on a piece of scrap paper makes inking a quick and easy technique, especially for small die cuts like these flower petals, leaves, and word sentiments.

This lovely Easter sentiment is die cut from a coordinating green patterned paper using the S4-1205 Merry Everything Words and brushed with the same green ink to help make it pop.

The metal cross is heat embossed with white embossing enamel and while the enamel was still warm, I sanded and rubbed across it to expose some of the metal for a shabby effect. 

I've used the same enameling technique on the little bee attached below the double loop bow tied from a narrow strip of organza.

I've used three different patterned papers to bring in the colors of spring.

One final shot.

Amazing Paper Grace Dies:
 
Paper:
  • Craft and You ~ Spring Garden
  • K&Company ~ Celeste
  • Core'dinations ~ 8.5 x 11 Cardstock - Value Pack: White, 110lb

Ink:
  • Tim Holtz with Ranger ~ Distress Ink: Bundled Sage; Scattered Straw

Mixed Media:
  • Ranger ~ Embossing Powder: White
  • Ranger ~ Embossing dabber

Embellishments:
  • Momenta ~ Metal Stickers: Cross
  • Bee Charms ~ Purchased on Amazon
  • Organza Ribbon ~ White (Cut with raw edges)

Adhesives:
  • Scrapbook.com ~ Clear Double Sided Adhesive Roll, 1/4"
  • Art Glitter ~ Designer Dries Clear Adhesive
  • Tombow ~ Mono MULTI Liquid Glue
  • Beacon ~ 3-IN-1 Advanced Craft Glue
  • Scrapbook Adhesives by 3L ~ E-Z Dots, Repositionable

Tools:
  • Spellbinders ~ Platinum 6
Thanks so much for stopping by to view my card. I hope you've been inspired.

Wednesday, July 13, 2022

Masculine Industrial Card for Amazing Paper Grace with Tutorial Link for Using Crackle Paste on Die Cuts

 
Welcome to my creative space!

I just adore creating industrial masculine cards with grungy textures and feature the Amazing Paper Grace Happy Occasions Die set (S4-1206) from The Right Words collection to cut this fabulous tag showcasing a cracked leather effect using crackle paste and Distress Stain Sprays. I've added a bit of patina to the birthday sentiment also cut with this fabulous die set using Finnabair waxes as well as the metal embellishments. The black medallions cut with the A2 Radient Navette (S4-1167) die set add a a bit of a steampunk flair as well.

You can find a full video tutorial explaining this crackle technique exclusively in the Amazing Paper Grace Creative - Creative Encouragement Community Facebook Group.

This lovely group includes exclusive tutorial content. I share a mixed media tutorial there on the 13th of each month. If you're not a part of this fabulous and encouraging group you can join HERE.


Thank you Amazing Paper Grace for providing the dies used in this project.

Tips and Techniques
The gorgeous crackle effect on this tag cut with the Happy Occasions die set (S4-1206) looks like old cracked leather. A video tutorial for this easy technique can be found in the Amazing Paper Grace Creative - Creative Encouragement Community Facebook Group. The birthday sentiment is cut from metallic Kraft-Stock. I wanted to accent with patina blue and colored the words with Finnabair waxes.

I've added a few Tim Holtz embellishments to add to the industrial feel I wanted for this card including this Gauge Dial and lock which is also colored with waxes for a rusty patina effect. Gold half pearls are scattered across the bottom of the card to add texture. A tiny gear and pearl are added to the center of this paper gauge to add dimension.

This fabulous brass steam gauge is from Mitform castings and is given a patina finish with more of the waxes. I've added bits of Design Tape to add the numbers across the tag and text across the top of the card.

I just adore these black medallions behind the tag which are cut with the A2 Radient Navette (S4-1167) die set that add a steampunk feel to the card. The hinge clip on the end of the tag is from Tim Holtz and the scrolled corner is an older piece from my stash, and they are colored with the art waxes for a rusty patina finish.

One final view.

Below you can find the products I used to create this project including some with compensated affiliate links to Scrapbook.com and Spellbinders. These links are at absolutely no cost to you. When you shop through the links below, I receive a small commission from the companies.  These commissions help me cover the costs of my blog and other expenses, which allows me to continue to provide you with FREE inspiration along with detailed Tips and Techniques provided for every project. Thank you so much for your love and support!

Amazing Paper Grace Dies:

Paper:

Mixed Media:

Embellishments:

Adhesives:

Tools:

Thursday, July 7, 2022

Romantic Shabby Heart for Little Birdie Crafts

 
Welcome to my creative space.

This dreamy and romantic home decor piece features loads of gorgeous Little Birdie Crafts supplies including the MDF Heart, gorgeous flowers handcrafted by beautiful women in India, chipboard, and mixed media products. 

As spring turns to summer, we see lots of birds in our lovely rural setting as they flit across our property and among the trees looking for food. I just adore the sweet bluebird on this Decoupage Paper and couldn't resist adding another with the sweet Garden Bird flourished chipboard. These amazing Little Birdie Flowers are such a delight to work with to create a beautiful floral cluster across the heart.

Be sure to hop on over to the Little Birdie blog where I have a full photo tutorial with all the details on how I created this lovely and romantic heart card HERE. Thanks for stopping over there to leave a comment.

Thank you Little Birdie, for providing supplies used in this project!

If you would like to see a full supply list, please scroll down.
Little Birdie Crafts can be purchased at their online store.

Be sure to check out the current sales HERE.

Use code TRACEY05 for a 5% discount.

I receive a small commission at not cost to you.

A couple close-ups for you:

Monday, July 4, 2022

Amazing Paper Grace July 2022 Die of the Month: Tiara Trifo

Welcome to my creative space!

With summer in full swing, I was inspired to create an airy, beachy card with this gorgeous Amazing Paper Grace Tiara Trifold die set. 

The main card is cut as a trifold from patterned paper, so when opened up the charming summery beach design extends across the entire card. The back of this paper is printed in a lovely sky blue that peeks through the design beautifully. The lattice design for the front of the card is cut from white cardstock and inked in coordinating colors for the design to pop. The delightful cluster of flowers and foliage is also cut with dies from this fabulous set. A couple seashells and bits of moss are tucked in to highlight the beach theme. 

There are so many ways to use this gorgeous set, and I got creative to create this gift card envelope in coordinating cardstock. I had a few extra flowers from the card that I added here. 

Be sure to scroll down through the Tips and Techniques section below for all the details on how I created this summery ensemble.

Many thanks to Amazing Paper Grace for providing the dies used in this project!

There are 13 cutting dies included in the Tiara Trifold
'You Shine' Trifold Card

Gift Card Envelope

Tips and Techniques
The flower petals are cut from a pale yellow patterned paper and inked with Stormy Sky Distress ink before shaping, and the centers for the medium and larger blossoms are inked with Scattered Straw. The smallest flowers have Lemon Chiffon Prills glued into the centers. 

The foliage is cut from the same yellow paper and inked with Iced Spruce. 

This lovely and encouraging sentiment is cut from the patterned paper.

I've tucked a couple small seashells into the edge of the floral cluster and added a few strands of moss amongst the die cut foliage. 

The lattice piece is die cut from 120 lb cover weight white cardstock and brushed with inks in coordinating colors. A thinner paper would have been a challenge to ink without damaging this delicate design, so I used my heavier paper for this. Don't you just adore how the top of the lattice fits right into the tiara design? These details make this set a dream to work with. 

A few pale blue half pearls are scattered around the card. 

Here you can see how this trifold card opens up to reveal the beautiful patterned paper inside. The middle panel is less busy and would be the perfect place to write a personal note. 

Here are more of those beautiful flowers and foliage on the gift card envelope. 

The tiara design and envelope edges are inked with Stormy Sky.

Here are some details on how I put this gift card holder together. I cut one shaped panel from the card, then cut another piece of the same cardstock to 4 1/2 inches wide by 5 inches high. The second piece is scored at 1/4 inches along each side and again across the piece halfway at 2 1/2 inches. Fold in at the 1/4 inch score lines, then fold up at the 2 1/2 inch score line giving you a piece that is 4 inches wide by 2 1/2 inches high. 

Score the tiara piece about 1/8 inch or so below the bottom of the design and then score again about 1/16 inch or just below this line. (The envelope ended being a little thick with a gift card tucked in, so the double scoring helps it to lay better.) Now trim off the bottom of the tiara piece at 2 1/4 inches below the bottom score line. 

Glue the tiara piece to the inside back of the plain scored and folded piece. If it is too snug, trim the sides down just a little so that it fits nicely. Use 1/8 inch red liner tape to adhere the two inside tabs together and your gift card envelope is ready to decorate. 

In addition to the flowers, I added some of those pale blue pearls to the tiara design for a little bling. 

A fast and easy, but beautiful accessory to go with the lovely card. 

One final look.

Supplies:

Amazing Paper Grace Dies:
  • Amazing Paper Grace July 2022 Die of the Month – Tiara Trifold

Paper:
  • Blue Fern Studios ~ Seaside Cottage Collection
  • Prima Marketing ~ Timeless Memories 12x12" Paper Pad
  • Core'dinations ~ 8.5 x 11 Cardstock - Value Pack: White, 110lb
  • Tim Holtz with Idea-ology ~ Kraft Stock Classic

Ink:
  • Ranger ~ Distress Ink: Hickory Smoke; Pumice Stone; Faded Jeans: Stormy Sky; Iced Spruce; Scattered Straw; Antique Linen

Embellishments:
  • US Artiest ~ Mini Drills: Lemon Chiffon
  • KaiserCraft ~ Pearls: Denium
  • From my stash: Small Seashells; Moss

Adhesives:
  • Scrapbook.com ~ Clear Double Sided Adhesive Roll, 1/4"
  • Tombow ~ Mono MULTI Liquid Glue
  • Beacon ~ Fabri-Tac 
  • Crafter's Companion - Red Liner Double Sided Tape - Small (1/8")
  • Wonder Tape ~ Foam Tape, 3/4"
Tools:
  • Spellbinders ~ Platinum 6
The Amazing Paper Grace Die of the Month is available exclusively at Spellbinders Paper Arts during July 2022, Tiara Trifold along with other membership perks.

View this month’s Amazing Paper Grace Die of the Month!


Thanks for stopping by! I treasure your comments.

~ Blessings ~