Monday, March 28, 2022

"Own Your Dreams" Shabby Card with Amazing Paper Grace

Welcome to my creative space!

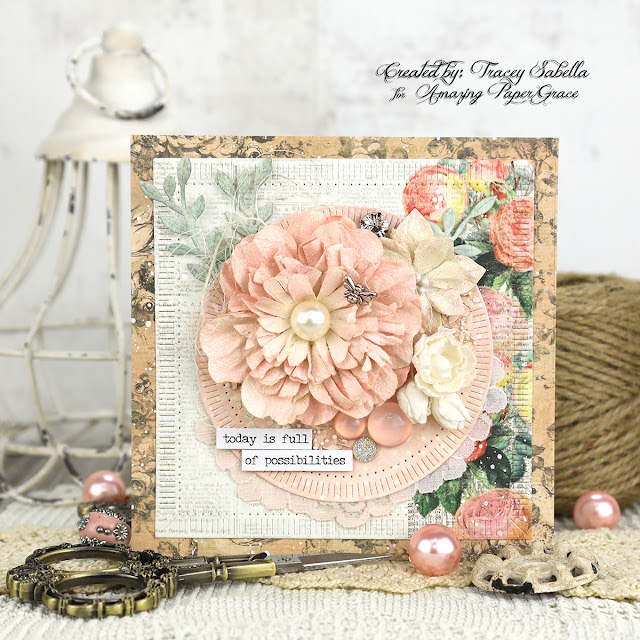
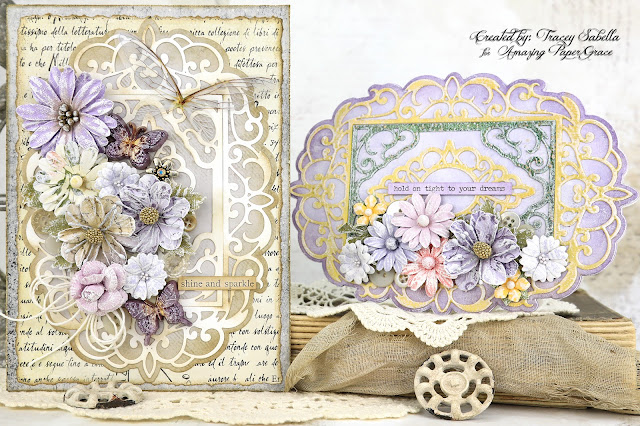
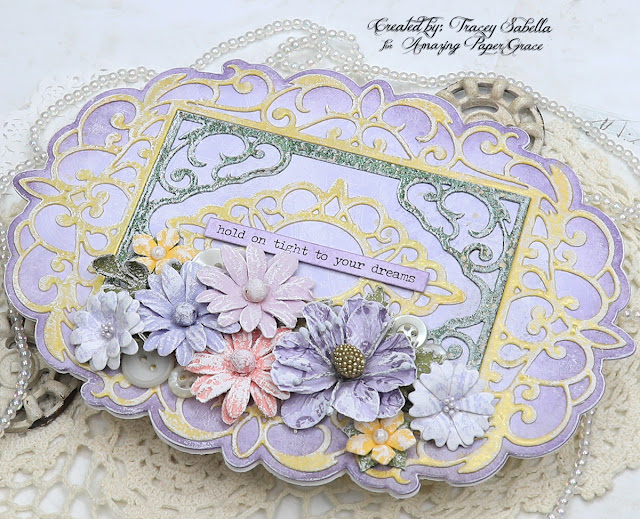
It's such a joy to be here and have the opportunity to share my passion of mixed media paper crafting with you! Today I have created a sweet and encouraging card to share featuring the Amazing Paper Grace Filigree Marquis die set (S4-1164) from the Classically Becca Collection. If you stop by regularly, you know I'm ready for spring after a long white winter (There's more snow on the ground here at the end of March.) so I've selected beautiful spring colors to use for the card. 

This die set includes the tiny sweet flower and leaf dies used to create the purple blossoms which I've paired with a larger flower and cluster of smaller pink blossoms from Little Birdie Crafts. As you scroll down through the Tips and Techniques section, you will discover the details on how I put this card together. 

Thank you Amazing Paper Grace for providing the dies used on this card!

Tips and Techniques
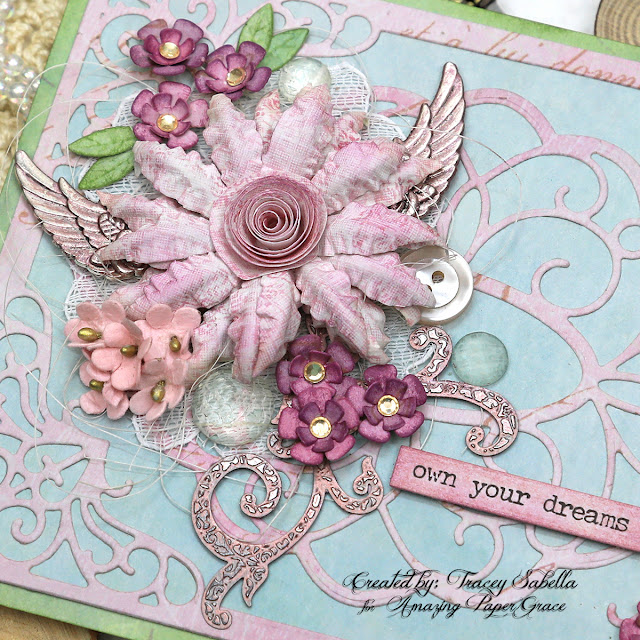
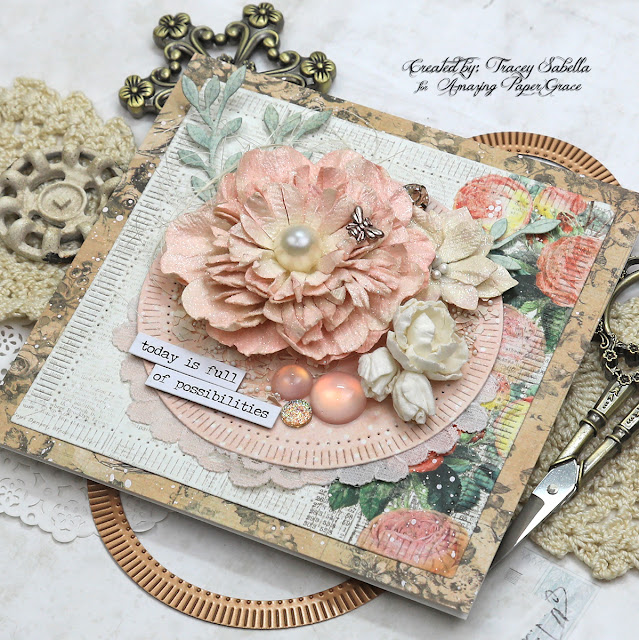
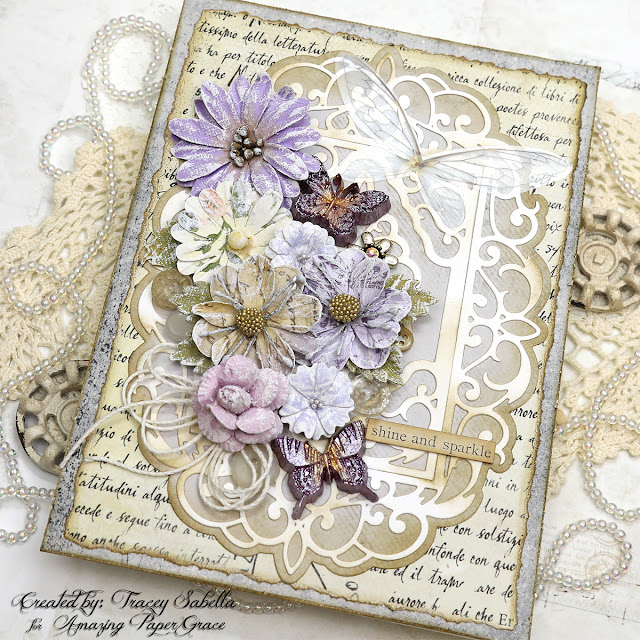
The beautiful scrolled background is a purplish pink printed paper die cut using the Filigree Marquis set. There are two pieces, an intricate frame and a medallion that perfectly fits inside the frame. I layered these gorgeous shapes over robin's egg blue patterned paper and framed the entire card with green. The green patterned paper was a little too light for my taste, so I darkened it up a little with some Peeled Paint Distress Ink.

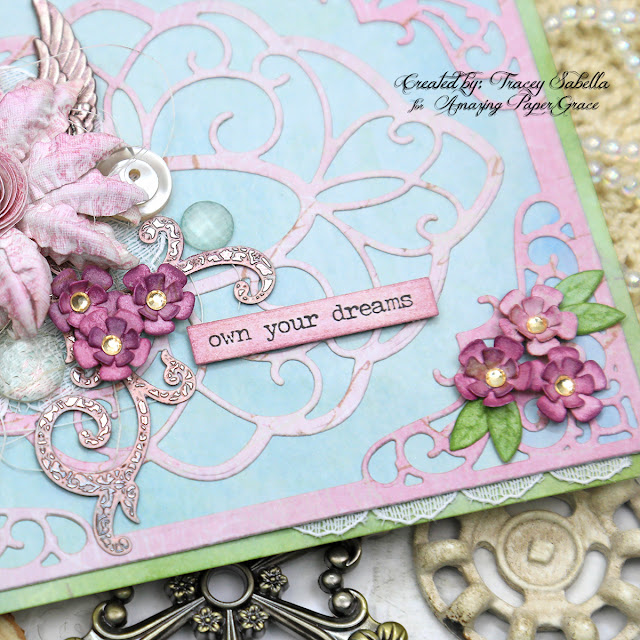
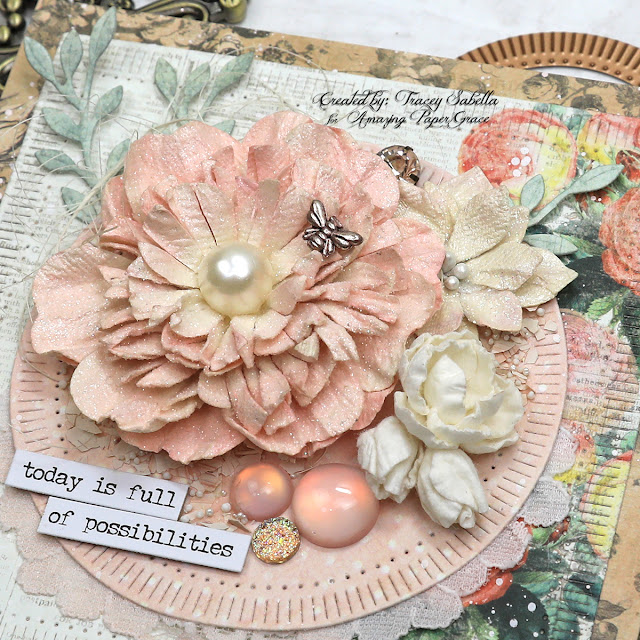
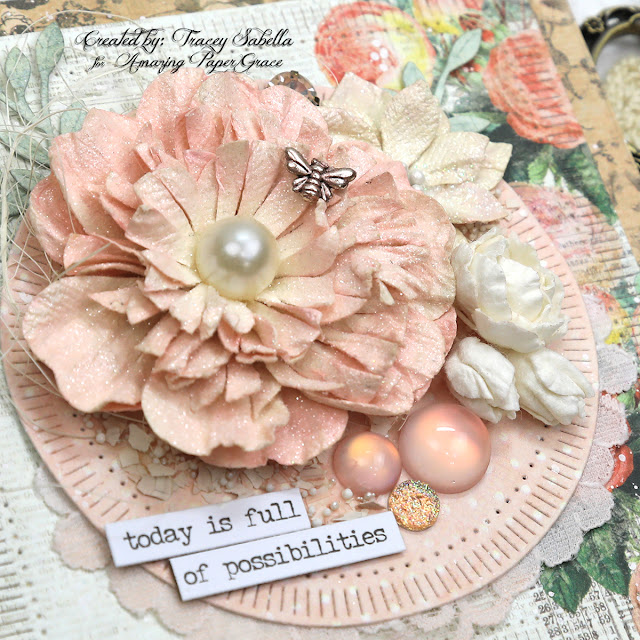
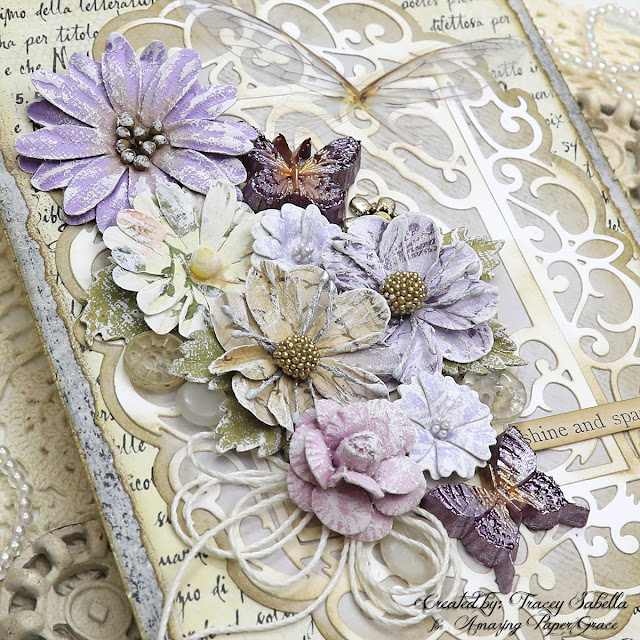
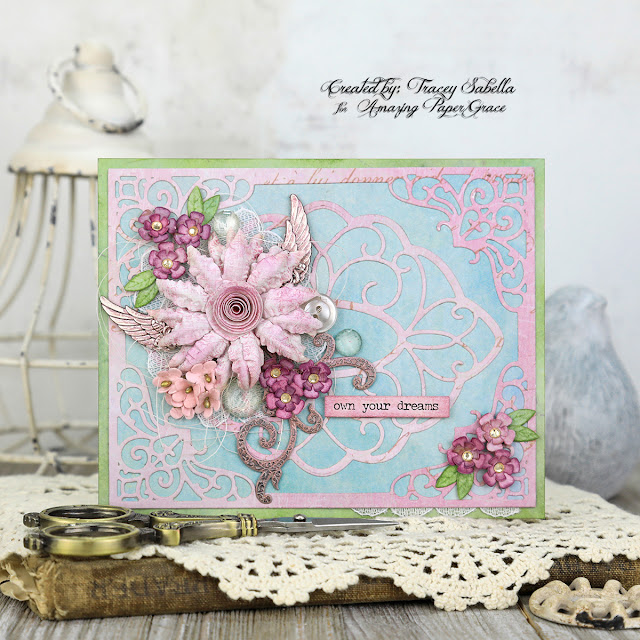
These darling little blossoms are cut with the flower dies included in the Filigree Marquis die set. They're cut from the same pink paper as the background. I wanted to add a pop of color, so inked the edges a bit with Seedless Preserves Distress Ink before shaping them. I cupped the petals forward, then rolled the larger petals back with the end of my stylus and finished them off with a tiny golden rhinestone. The leaves are die cut from the paper used to frame the card and rubbed with the same Peeled Paint ink. 

I hand cut a motif from a lace strip to tuck under the main flower cluster and had this scalloped edge piece left over that was perfect tucked into the paper layers here. The sentiment is from the Tim Holtz Small Talk set and inked with Victorian Velvet Distress Ink and just the tiniest amount of Seedless preserves to coordinate with the die cut layers. While it would have been fine to leave it white, I just like the soft color inking gives to the sentiment. 

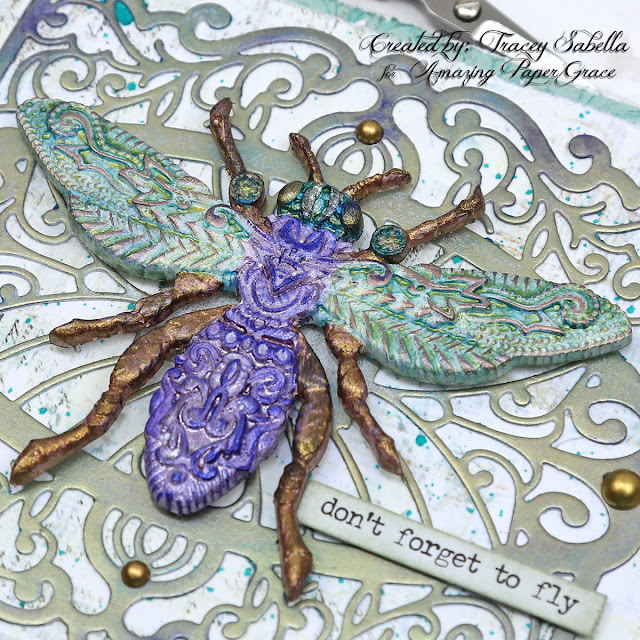
I pulled a few embellishments from my stash to create the focal cluster including gorgeous Little Birdie Crafts flowers, Finnabair Diamond Art Pebbles which are nearly clear with faceted domes that reflect colors from the card beautifully, and a vintage button along with metal wing charms (from Amazon) and an older metal flourish from my stash. The Metal pieces are colored with Finnabair Metallique waxes in pinks and purples to coordinate.

I've added textural elements by layering the flowers over the lace piece I mentioned earlier and a bed of natural sisal fiber.

Amazing Paper Grace Die Sets:

Paper:
  • Miscellaneous printed papers from my stash
  • Cardstock ~ 110lb white for card base

Ink:
  • Ranger ~ Distress Ink: Peeled Paint; Seedless Preserves; Victorian Violet

Mixed Media:
  • Finnabair with Prima Marketing ~ Metallique Wax: Rose Gold; Heather Hills; Sweet Rose

Embellishments:

Adhesives:
  • Beacon ~ 3-IN-1 Advanced Craft Glue
  • Beacon ~ Fabri-Tac
  • Double Sided Tape ~ 1/4" 
  • Tombo ~ Mono MULTI Liquid Glue
  • Scotch Quick-Dry Adhesive

Tools:
  • Spellbinders ~ Platinum 6
Thank you Little Birdie Crafts for supplying products used to create this card.

Little Birdie Crafts can be purchased at their online store.

Use code TRACEY05 for a 5% discount.

I receive a small commission at not cost to you.


Thanks for stopping by! I treasure your comments.

~ Blessings ~

Monday, March 21, 2022

"Today is Full of Possibilities" Shabby Chic Card for Amazing Paper Grace

Welcome to my creative space!

Spring is officially here and has brought with it warming temperatures and the first blossoms of the year. This floral spring card features the fabulous Amazing Paper Grace Fluted Classics Circles die set (S4-1150). I've also used the companion Fluted Classics Squares set (S4-1151). These edges are just so beautiful and can be used in a wide range of styles.

I've also used the Candlewick Rosebud Dies Candlewick Sampler Collection (S4-1015) to create tiny roses and rose buds to pair with larger Little Birdie Crafts Flowers. The leafy bits are cut with Petite Floral Potpourri (S3-420) As you scroll down through the Tips and Techniques section, you will discover the details on how I put this card together. 

Thank you Amazing Paper Grace for providing the dies used on this card!

Tips and Techniques
These gorgeous fluted edges create such beautiful layers to build this shabby chic card on. I've combined a couple larger flowers from Little Birdie Crafts with this delicate handcrafted rose and rose buds cut with the Candlewick Rosebud die set using creamy mulberry paper. They are set atop of a bed of natural sisal and leaf sprigs cut with Petite Floral Potpourri dies. I cut a motif from a lace strip to peek out from the bottom of the fluted circle. It's inked with Tattered Rose Distress Ink to coordinate with the flowers and circle.

The cluster is embellished with Finnabair Art Pebbles. I also added texture with rose colored fragments and white Prills. The sentiment is from the Tim Holtz Small Talk set. I showed the "finished" card to our granddaughter who promptly said that it needed a bug, so she helped me select this tiny bee charm and colored it with Rose Gold Metallique Wax. At the top I tucked in a sparkling gem.

This is the final shot, but the first thing I did to build this card is to adhere the two square background layers together, then spattered them with white ink to give visual texture and add to the shabby feel of this card.

I hope you've enjoyed learning the process for creating this card and will be inspired to try these dies out on a shabby chic creation.

Amazing Paper Grace Die Sets:
Paper:
  • Prima Marketing ~ Something Blue - 6x6" Paper Pad
  • Mulberry Paper ~ Cream

Ink:
  • Ranger ~ Distress Ink: Tattered Rose; Iced Spruce

Mixed Media:
  • Finnabair with Prima Marketing ~ Matter Gel Medium
  • Finnabair with Prima Marketing ~ Metallique Wax: Rose Gold
  • Higgins Drawing Ink ~ White

Embellishments:

Adhesives:
  • Beacon ~ 3-IN-1 Advanced Craft Glue
  • Beacon ~ Fabri-Tac
  • Double Sided Tape ~ 1/4" 
  • Tombo ~ Mono MULTI Liquid Glue
  • Scotch Quick-Dry Adhesive

Tools:
  • Spellbinders ~ Platinum 6
Thank you Little Birdie Crafts for supplying products used to create this card.

Little Birdie Crafts can be purchased at their online store.

Use code TRACEY05 for a 5% discount.

I receive a small commission at not cost to you.


Thanks for stopping by! I treasure your comments.

~ Blessings ~

Wednesday, March 16, 2022

"Don't Forget to Fly" Card with Tutorial Link for Altering Die Cuts with Metallic Waxes

Welcome to my creative space!

I just adore using mixed media products to create unique backgrounds and embellishments. This beautiful design behind the bee is die cut using a gorgeous Amazing Paper Grace die from the S4-1167 A2 Radiant Navette Dies from the Classically Becca Collection. I cut this shape using white card stock. For the flowing, organic metallic finished I've used metallic art waxes.

You can find a full video tutorial explaining this technique exclusively in the Amazing Paper Grace Creative - Creative Encouragement Community Facebook Group.

This lovely group includes exclusive tutorial content. I share a mixed media tutorial there on the 13th of each month (or the 16th this month). The tutorial for this project includes a detailed step by step photo tutorial teaching you how to create this one of a kind patterned paper for your projects. If you're not a part of this fabulous and encouraging group you can join HERE.

This lovely resin bee is molded with the Zuri Designs Beauty and the Beast silicone mold. I took artistic liberties with the bee using non-tradional purples for the abdomen and gave the wings a translucent effect with teals and golds. 

Thank you Amazing Paper Grace for providing the dies used in this project.

Tips and Techniques
Here you can see how this beautiful Amazing Paper Grace die cut shimmers with color from the waxes. Be sure to hop on over to the Amazing Paper Grace Creative - Creative Encouragement Community Facebook Group to watch the video tutorial. I've added a few matte gold pearls to accent.

This fabulous Zuri Designs bee was colored with a combination of Finnabair Sparks and Metallique paints, then accented with her waxes to highlight the gorgeous textures. You can find the colors I used in the product list below.

The background papers coordinate with the lovely teals from the bee wings and are spattered with green ink. The edges are lightly distressed as well.

Amazing Paper Grace Dies:

Paper:
  • Prima Marketing ~ Epiphany 6x6" Paper Pad
  • BoBunny ~ Gabrielle 6x6" Paper Pad
  • Cardstock ~ 120 lb, White

Mixed Media:
  • Zuri Designs ~ Beauty and the Beast Silicone Mold (Bee)
  • Finnabair with Prima Marketing ~ Metallique Wax: White Gold; Peacock; Electric Violet;Heather Hills
  • Finnabair with Prima Marketing ~ Metallique Acrylic Paint: Gold Rush; Emerald Green
  • Finnabair with Prima Marketing ~ Sparks Acrylic Paint: Chest of Gold; Raven Black; Iris Potion
  • Amazing Casting Resin ~ White
  • Liquitex ~ Gesso, White
  • Higgins Drawing Ink: Green

Embellishments:
  • Pink Fresh Studio ~ Metallic Pearls: Matte Gold

Adhesives:
  • Beacon ~ 3-IN-1 Advanced Craft Glue
  • Beacon ~ Fabri-Tac
  • Double Sided Tape ~ 1/4" 
  • Tombo ~ Mono MULTI Liquid Glue
Tools:
  • Spellbinders ~ Platinum 6
I am an affiliate with Zuri Designs and receive a small commission at no
cost to you if you purchase from them using a link from this post. 

You can find their online store HERE
and the Beauty and the Beast mold can be found HERE.

Thanks so much for your support!


Thanks for stopping by! I treasure your comments.

~ Blessings ~

Monday, March 7, 2022

Grungy Steampunk Bee Slimline Card for Amazing Paper Grace

Welcome to my creative space!

I just adore the industrial steampunk style and had so much fun creating this slimline card featuring the fabulous Amazing Paper Grace Fluted Classics Slimline die set (S6-186 Fluted). The medallions from this month's gorgeous Die of the Month, Bella Ovalette (DOMAPG-Mar22) fit perfectly across this card to layer under my steampunk elements.

What's better than combining grungy rust and patina with an intricate steampunk bee? This Zuri Designs bee is colored with metallic paints and waxes while the faucet knobs came with the rusted finish. The beautiful medallions are cut from both patterned paper and thin black chipboard and offset when adhered for a shadow effect. As you scroll down through the Tips and Techniques section, you will discover the details on how I put this card together. 

Thank you Amazing Paper Grace for providing the dies used on this card!

Tips and Techniques
You can see in this close-up how I layered the medallion pieces. At first I cut the black chipboard to add thickness to pop up these gorgeous pieces to give them more dimension, but realized how beautiful the shadow effect would be once I die cut the shapes. What do you think? Amazing Paper Grace Dies are so delicate and elegant, but some of them really do work quite perfectly in a steampunk design. 

This beautiful intricate insect is molded from the bee in the wonderful Zuri Designs Wings of Beauty silicone mold. It is brushed with a base of black gesso, then the wings and body are lightly dry brushed with ginger acrylic paint then some red and firebird waxes. this will give a rusty effect under the highlights I'll be adding with metallic waxes. Be sure to allow some of the black to show through.

Gold metallic paint is applied to the raised design on the abdomen, thorax, and eyes. I used a small tip paintbrush for eyes, and my finger to apply the paint to the body, but you could also use a sponge makeup wedge. I know the wings are opaque, but to give a bit of an iridescent effect, I used a mix of patina green and peacock waxes to highlight the design on the wings. The legs, face, and antennae are rubbed with firebird and red amber waxes.

You can see how fabulous the fluted design is around the edges of the card. I also added a piece of the patina blue paper behind the die cut base to frame the card and help accent the beautiful medallions. These grungy faucets came already painted, so all I needed to do was glue them down. The center was raised because the edges are sitting on the medallion design, so I addd a piece of chipboard to the center to give enough depth to adhere there as well as around the edges. I like to make sure my heavier metal pieces are good and secure. 

I just adore how perfectly these medallions fit across this fluted slimline card! The fabulous sentiment and grungy ruler were actually on the back of the bottom strips of the paper I used. I just couldn't resist incorporating them on my card. The focal paper already had a rusty patina design, so I didn't need to do much to it. I just added a bit of black ink spatter to increase the grunge level. 

I hope you've enjoyed this card and are inspired to try out a different style using Becca's Amazing Paper Grace die designs.

Amazing Paper Grace Die Sets:

Paper:
  • Kaisercraft ~ Scrap Yard Collection
  • Cardstock ~ Black
  • Thin Chipboard ~ Black

Ink:
  • Ranger ~ Bundled Sage

Mixed Media:
  • Zuri Designs ~ Wings of Beauty Silicone Mold
  • Amazing Casting Resin ~ White
  • Finnabair with Prima Marketing ~ Sparks Acrylic Paint: Ginger Magic
  • Finnabair with Prima Marketing ~ Metallique Acrylic Paint: Gold Rush
  • Finnabair with Prima Marketing ~ Metallique Wax: Firebird; Peacock
  • Finnabair with Prima Marketing ~ Antique Brilliance Wax: Red Amber
  • Finnabair with Prima Marketing ~ Matte Wax: Patina Green
  • Liquitex ~ Gesso, Black

Embellishments: 
  • Pink Fresh Studio: Metallic Pearls: Matte Gold
  • Faucet Knobs (purchased at a local craft store)

Adhesives:
  • Beacon ~ 3-IN-1 Advanced Craft Glue
  • Beacon ~ Fabri-Tac
  • Double Sided Tape ~ 1/4" 
  • Tombo ~ Mono MULTI Liquid Glue

Tools:
  • Spellbinders ~ Platinum 6

I am an affiliate with Zuri Designs and receive a small commission at no
cost to you if you purchase from them using a link from this post. 

You can find their online store HERE
and the Wings of Beauty mold can be found HERE.

Thanks so much for your support!


Thanks for stopping by! I treasure your comments.

~ Blessings ~

Friday, March 4, 2022

Amazing Paper Grace March Die of the Month - Bella Ovalette with Blog Hop

 Welcome to my creative space!

Spring is just around the corner as the temperatures here in Ohio are starting to warm and melt the winter snows. We actually saw green grass this week before waking to yet another glistening, snow covered day yesterday morning. I don't know about you, but I'm ready for the soft delicate flowers of spring along with fluttering butterflies.

I've used the fabulous Amazing Paper Grace March Die of the Month: Bella Ovalette to create these two spring inspired cards. 

Do you ever start a project and it doesn't turn out how you envisioned and is destined to be discarded? That happened to me with the shaped card on the right. The yellow was too bright, and the green turned out too dark. The contrasts were just too much for my taste, so I put it to the side and started over with the card on the left by die cutting muted neutrals and whites for the background.  


The scroll work pieces cut from white are inked with Frayed Burlap distress ink to give them the vintage, shabby look I was going for. Subtle spring purples, pinks, and yellows are added with flowers and resin butterflies. I adore combining flowers in a variety of sizes and shapes, so used a few Little Birdie Crafts flowers for the larger blossoms, and handcrafted the two smaller pale purple ones using the flower dies included in the Bella Ovalette set.


Now it was time to create an accessory, and I got to thinking about the first card I had started. I have a thing for salvaging hopeless projects, and wasn't quite ready to give up on it yet. I had cut green patterned paper to place behind the die cuts, and again it was too bright, so I decided to discard it and create a shaped card. I die cut the base from white cardstock and kept the remaining pieces which I had already assembled and glued down. The yellow and green pieces are heat embossed with enamel powder, so inking them wasn't really an option, so I dry brushed the entire piece with white gesso and breathed a sigh of relief as this softened and blended the colors perfectly. Then to finish it off, I just added the cluster of flowers and a sentiment. I used more Little Birdie Crafts flowers along with two more of my handcrafted flowers cut with the Bella Ovalette dies.

Many thanks to Amazing Paper Grace for providing the dies used in this project!

There are 12 dies included in this Bella Ovalette die set.

Tips and Techniques
I just adore the gorgeous design of these beautiful die cuts!! The solid outer layer is cut in a light grey patterned paper that's edged with brown inking. The intricate layers are cut from white cardstock and randomly inked with brown for a grungy shabby chic feel. The flowers are lightly dry brushed with white gesso and arranged to cascade down the left side of the card along with resin butterflies painted with metallic acrylic paints. I make the resin pieces to keep on hand so all I need to do is add a bit of paint or waxes for a quick and easy embellishment. I've also tucked in a few vintage buttons around the edges and tied a 4-loop bow from bamboo cord to add a soft touch.

The two smaller flowers near the butterflies are cut with the flower dies included in the Bella Ovalette die set. They are die cut and shaped. Each blossom has two layers which are adhered together with offset petals. Each petal section has a hole in the center, making it easy to add a few stamen to each flower.

I cut a 5 1/2 by 7 1/2 inch piece of script paper and tore off the edges before adding a touch of ink to them. The back layer is cut from grey patterned paper. The black dots were more visible on the left side so I used a natural bristle paint brush to pick up some black soot ink and stippled around the edges to pick up this design around the other sides. I used a printed sentiment and added brown ink around the edges.

To add a little balance to the design, I added a transparent butterfly to the top right corner. This gives more weight to that corner, but still allows you to see the gorgeous die cut design beneath it.

I've used some of the same flowers here and added a couple tiny yellow blossoms along with the two handcrafted die cut flowers. A few vintage buttons are tucked in around the edges. I'm so blessed to have had friends and family members bless me with their family button boxes and adore using these treasures on my creations. You could also use bought buttons or any little trinkets you might have on hand.

You can see here how dry brushing the background layers with white gesso adds a soft touch and tones down the vibrant colors to these lovely pale spring colors. It also adds some beautiful visual texture.

The base layer is cut from a lightly patterned purple paper and then edged with Dusty Concord Distress Ink. The printed sentiment is also colored with this ink.

Supplies:

Accessories:

Paper:
  • Vintage style scraps from my stash
  • Cardstock: Kraft; White

Ink:
  • Ranger ~ Distress Ink: Frayed Burlap; Black Soot; Dusty Concord

Mixed Media:
  • Finnabair with Prima Marketing ~ Sparks Acrylic Paint: Iris Potion; Ginger Magic
  • Finnabair with Prima Marketing ~ Gesso, Clear
  • Prima Marketing ~ Silicone Mould: Regal Findings
  • Amazing Casting Resin ~ White
  • Liquitex ~ Gesso, White
  • Stampendous ~ Embossing Enamel: Aged Green
  • Ranger ~ Embossing Pearl: Pale Gold
  • Ranger ~ Micro Glaze

Embellishments:

Adhesives:
  • Double Sided Tape ~ 1/4" 
  • Beacon ~ 3-IN-1 Advanced Craft Glue
  • Beacon ~ Fabri-Tac
  • Tombo ~ Mono MULTI Liquid Glue
  • Helmar ~ 450 Quick Dry Adhesive

Tools:
  • Spellbinders ~ Platinum 6
  • Wagner ~ HT 400 Heat Gun
Thank you Little Birdie Crafts for supplying products used to create this card.

Little Birdie Crafts can be purchased at their online store.

Use code TRACEY05 for a 5% discount.

I receive a small commission at not cost to you.

For more Bella Ovalette Inspiration from the Creative Team:

Visit each blog linked below for their take on creative paper crafting ideas with Bella Ovalette, the Amazing Paper Grace March 2022 Die of the Month!

View this month’s Amazing Paper Grace Die of the Month!

I would adore hearing from you!
Please leave a comment below letting me know how you will use these gorgeous dies!


Thanks for stopping by! I treasure your comments.

~ Blessings ~

Tuesday, March 1, 2022

Vintage Junk Journal Easel Board for Little Birdie Crafts

 
Welcome to my creative space!

I just adore the shabby vintage look of junk journals, but have never committed the time to creating one. So, I got to thinking . . . "What about creating a junk journal style home decor piece?" This is what I came up with. A while back I found this 4x8" easel board with bold Valentine graphics in the clearance section for a deep discount and thought it would be perfect to repurpose for one of my projects. Several coats of white gesso gave me a clean base to work with.

This beautiful vintage creation features Little Birdie Crafts ephemera, flowers, chipboard, and mixed media supplies along with vintage tea stained book pages along with lace, vintage buttons, and notions like snaps and hooks.  I have a full photo tutorial with all the details on how I created this card up on the Little Birdie Crafts blog HERE. Thanks for stopping over there to leave a comment.

Thank you Little Birdie, for providing supplies used in this project!

If you would like to see a full supply list, please scroll down.
Little Birdie Crafts can be purchased at their online store.

Be sure to check out the current sales HERE.

Use code TRACEY05 for a 5% discount.

I receive a small commission at not cost to you.

A couple close-ups:


Little Birdie Crafts Supplies

Other Supplies
MDF Easel Board - 4x8"
Tea Stained Vintage Book Pages and Packing Paper
Tim Holtz with Idea-ology ~ Paper Dolls
Tim Holtz with Idea-ology ~ Clippings Stickers
Ranger ~ Distress Ink: Brushed Corduroy
Lace Pieces
Vintage: Buttons; Hooks; Snaps
Silicone Glue


Thanks for stopping by! I treasure your comments.

~ Blessings ~