Showing posts with label Mixed Media. Show all posts

Monday, April 24, 2023

Cat Birthday Card Featuring Amazing Paper Grace Dies

 
Welcome to my creative space!

I have missed sharing inspiration with you. I'm finally feeling better after a tough winter. Nothing serious, but I've been catching one thing after another since October. That comes spending time with our preschool grandchildren and our granddaughter who just entered kindergarten this year. Lots of germs to spread to grandma. I'm praying for a nice healthy spring and remaining 2023.

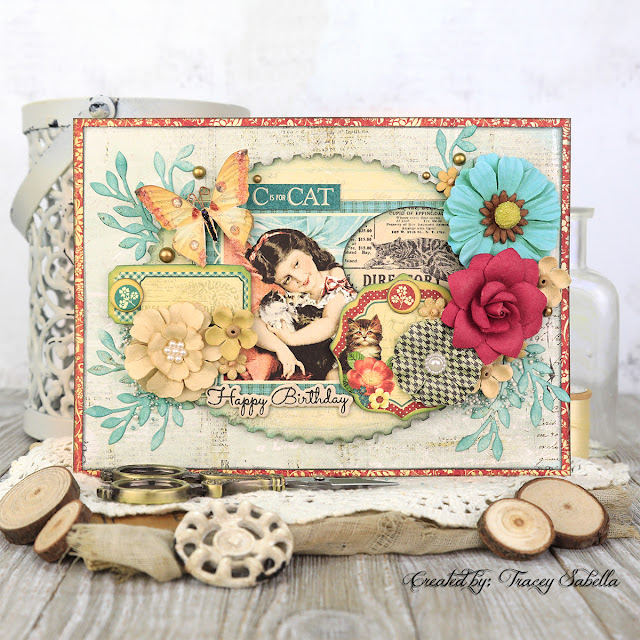
Today I'm sharing a sweet card created to celebrate our granddaughter, Avery's sixth birthday. While this may seem to be an unusual card for a six year old, she is a sweet old soul. Last year I made an adorable, age appropriate card for her. She glanced at it and set it aside. She adores the shabby chic creations I make and always asks if she can have one of them when it's time for her birthday. She has a cat she named Elpha and adores felines, so I combined her love of cats with my shabby chic style to create this card for her featuring the Amazing Paper Grace Postage Edge Ovals die set (S5-548). And yes, this card got more than a single glance from her.

This older Raining Cats & Dogs paper from Graphic 45 included dog images, so I needed to be creative in placing some of the elements to hide those pups. I used an oval die from the Postage Edge set to die cut the striped cat that covers a dog by the girl's shoulder. A creative way to showcase the dies and create layers on the card that look natural while bringing together the cat theme.

I used a mix of Prima Marketing and Little Birdie flowers paired with die cut foliage from the Petite Floral Potpourri die set (S3-420). A little inking on the leafy foliage helps it pop.

The birthday sentiment is stamped and die cut using the Lyrical Layered Florals Clear Stamp & Die Set (SDS-170). I just adore how this elegant birthday sentiment looks on this card.

For more close-ups and all the details on how to create this card, be sure to scroll down through the Tips and Techniques section below. 

Thank you Amazing Paper Grace for providing the dies used in this project.

Tips and Techniques
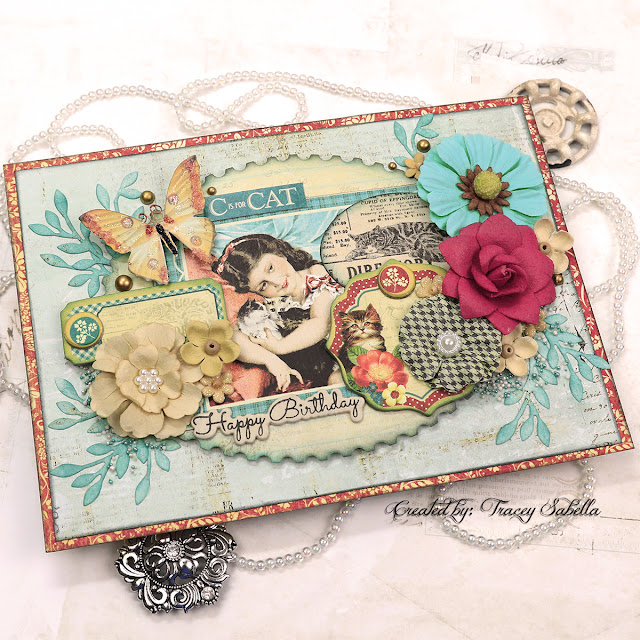
I just adore creating layers and the Postage Edge Ovals set (S5-548) is perfect for this. The larger oval is popped up with foam tape. The edges are inked with coordinating distress ink colors.
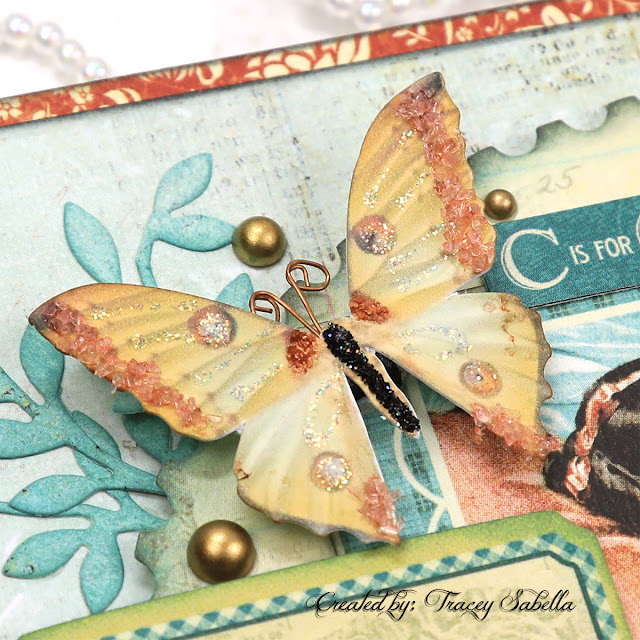

This gorgeous butterfly is an older Renea Bouquets creation. If you are not familiar with her unique and gorgeous embellishments, be sure to stop by her shop HERE. I'm a big fan of her creations and adore supporting fellow artists.
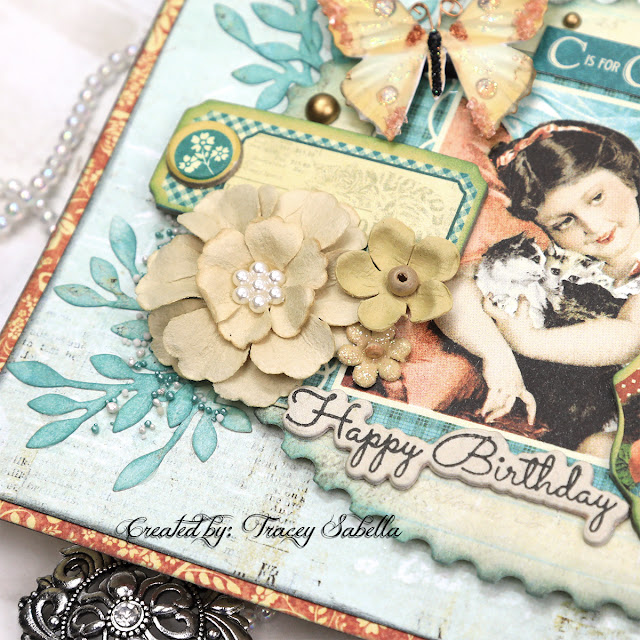
Here you can see the gorgeous birthday sentiment. The Lyrical Layered Florals Clear Stamp & Die Set (SDS-170) includes the stamp and die to create this beauty along with other lovely designs. You can see how the layers come together so beautifully.
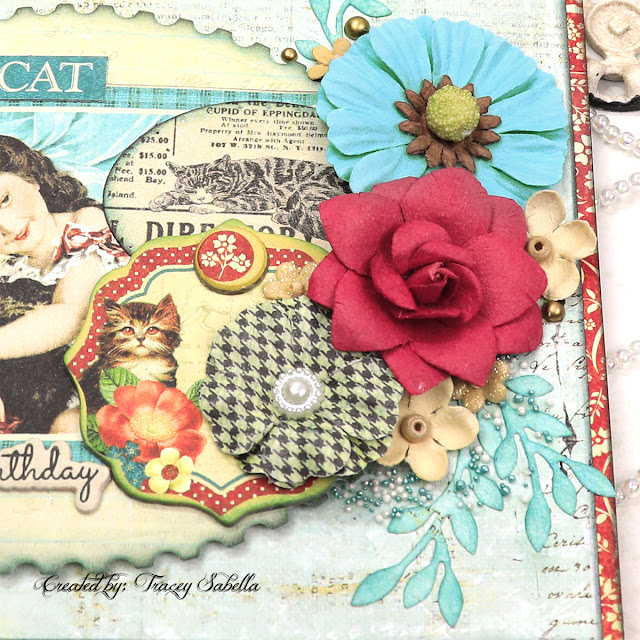

I've layered die cuts, chipboard elements, flowers and foliage cut from the Petite Floral Potpourri die set (S3-420) to create dimension. 
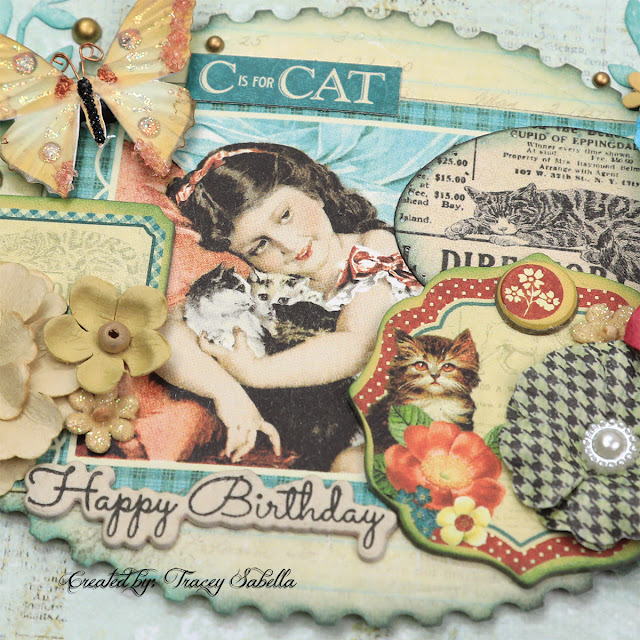
Cats, cats everywhere! The C is for Cat adds a bit of whimsey to the card to make it a bit more youthful for a six year old.  

You can see how I've inked the edges of many of the layers to help them pop.
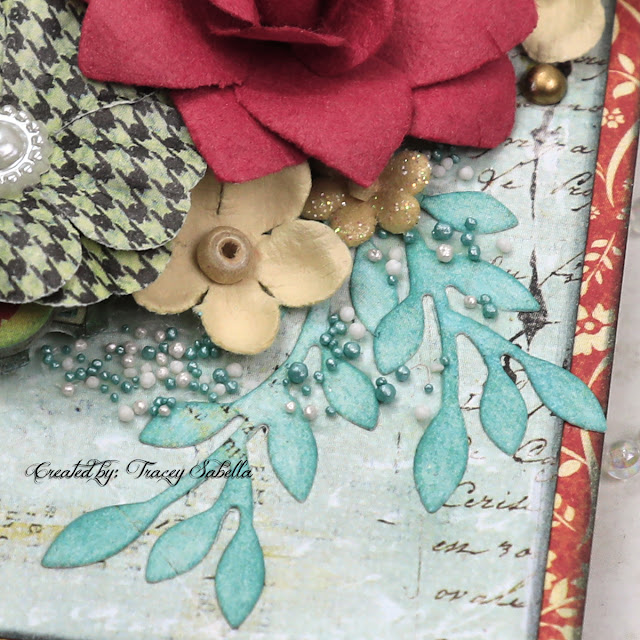
Texture is created by adding a mix of white and teal Prills using matte gel medium along with a few Matte Gold flat backed Pinkfresh Studio Pearls.

Below you can find the products I used to create this project including some with compensated affiliate links to Scrapbook.com and Spellbinders. These links are at absolutely no cost to you. When you shop through the links below, I receive a small commission from the companies.  These commissions help me cover the costs of my blog and other expenses, which allows me to continue to provide you with FREE inspiration along with detailed Tips and Techniques provided for every project. Thank you so much for your love and support!

Amazing Paper Grace Sets


Paper:
Graphic 45 - Raining Cats & Dogs (Retired)
Prima Marketing - Cigar Box Secrets (Retired)

Ink:

Mixed Media:
Prima - Finnabair - Soft Matte Gel

Embellishments:
Little Birdie Crafts - Beaded Blooms - Butter
Little Birdie Crafts - Micro Petals - Tan
Prima Marketing - Cigar Box Secrets #578626
Graphic 45 - Chipboard - Raining Cats & Dogs
Renea Bouquets - Butterfly
US ArtQuest - Mini Prills - Mini Pearls; Sage Advice

Adhesives:
Beacon - 3-IN-1: Fabri-Tac

Tools:

Thanks so much for stopping by to check out this sweet shabby cat card I created for our granddaughter. I hope you've been inspired!

Monday, November 28, 2022

All Hearts Come Home for Christmas Gingerbread House Card for Amazing Paper Grace

 
Welcome to my creative space!

Christmas is in the air, and I just couldn't resist combining mixed media touches with wintry blues, and festive reds to create this cheery gingerbread house card featuring the All Hearts Come Home A2 Card Front die set (S5-534). I treasure spending time with family over the holidays, so this sentiment adds a warm personal touch.

I hope you enjoy this deconstructed version of this die set showing you another way it can be used. Instead of the card frame with trees, gifts, and Santa's sled with reindeer, I've die cut bits and pieces from this frame using different papers to create the elements for this card. 

The card edges may look familiar since they are from the Postage Edge Rectangles set (S5-540), part of the Postage Edge Shapes Collection released earlier this month. These sweet heartfelt images pair so perfectly with the postal edges! The snowflakes are cut from white glitter paper using the Let it Snowman set (S5-533), also from the Christmas Flourishes Collection.

I hope you'll scroll down through the Tips and Techniques section for more close-ups and all the details on how to create this sweet card including how I added the music score to the background along with snowy glittered texture.

Thank you Amazing Paper Grace for providing the dies used in this project.


Tips and Techniques
This sweet house is cut from gingerbread color paper filled with darling snowflakes and backed with a lighter patterned paper to brighten it up and of course a sweet red heart. The edges of the house are inked with Ground Espresso Distress Ink.

As you can see in the die set image above, the packages and trees are part of a card frame. I decided to cut them out and use them individually instead of using the entire frame. When die cutting the packages, I placed some washi tape on the back of the red patterned paper to help hold the inserts in place. I popped out the spaces in the ribbons and between the packages, then added more washi tape to the back to keep the textured inserts in place. The package edges are inked with more of the Ground Espresso ink. 

The house and gifts are popped up with foam tape to add dimension.

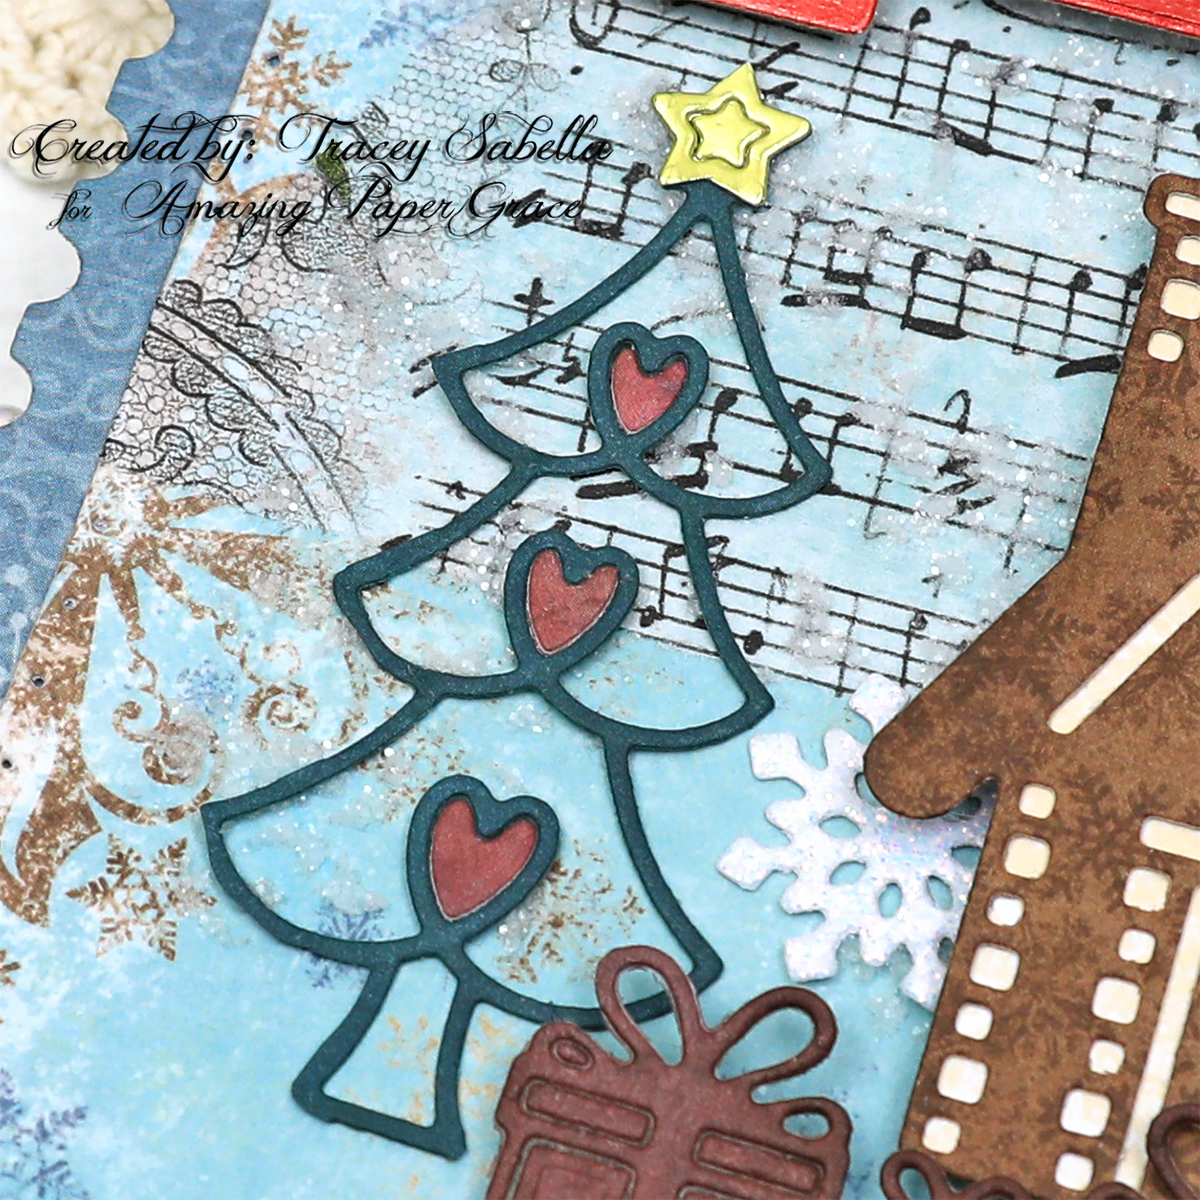
These delightful tree silhouettes are cut from green patterned paper. I just cut pieces of paper a little larger than the trees and used the frame die to cut them out, then trimmed off the excess paper with scissors. The centers of the trees are die cut with the same paper used for the packages to get the small hearts to insert into the trees. The stars are cut with the frame die using yellow metallic paper. Every Christmas tree needs a shining star topper, right? 

The green tree frames are rubbed with Pine Needles Distress Ink.  

Several frosty snowflakes are die cut from glitter paper using dies from the Let it Snowman set (S5-533).

For a bit of whimsy I added a torn bit of a music score. I had recently purchases a roll of Tim Holtz Halloween Collage Paper on clearance and hadn't put it away yet. The music notes just called out Christmas to me, so I tore them off the role to use here. It's adhered with collage medium, and I simply adore how the blue background shows through this thin paper.

The base paper was brushed with clear gesso and allowed to dry before adding the collage paper and stenciling. This helps reduce warping.

***Designer Tip***
Don't hesitate to think outside of the box and use supplies that are designed for a specific holiday all year long. Sure, you may not want to use snowflakes on a spring card, but this "halloween" music score could be used for any occasion.

I stenciled randomly over the background using Snowfall Grit Paste randomly through a damask stencil. The design on this stencil is small so it looks rather snowy. To add even more sparkle, I sprinkled Distress Rock Candy Glitter over the paste while it was still wet. The glitter stuck nicely to the paste. 

***Designer Tip*** 
When adding texture paste that you know you'll be glittering, be sure to make sure the rest of your background is completely dry first. The collage medium I used to adhere the music paper was dry to the touch, but still seemed a bit damp. I thought it was dry enough, but was wrong. The glitter stuck to the damp collage medium. Fortunately, I was able to remove most of the errant glitter by brushing it with a dry paintbrush, but it would have save time and trouble if I had set it aside until it was completely dry. 

When composing a card, I like to start in the center and work my way out. Here the house and presents are the focal point in the center, framed by the darling trees. To add to the design, I decided to add the music notes, snowflakes and glittered snowy texture. And of course the metallic red sentiment anchors the card by framing the top and bottom. The postal edges are a charming frame for the outer edges of the card. 

The sentiment pieces are cut from red metallic cardstock and the top is backed with the same yellow metallic paper as the stars. Like the house and gifts, the top sentiment is popped up with foam tape. 

Below you can find the products I used to create this project including some with compensated affiliate links to Scrapbook.com and Spellbinders. These links are at absolutely no cost to you. When you shop through the links below, I receive a small commission from the companies.  These commissions help me cover the costs of my blog and other expenses, which allows me to continue to provide you with FREE inspiration along with detailed Tips and Techniques provided for every project. Thank you so much for your love and support!

Amazing Paper Grace Sets:
Paper:
Stash - Patterned Paper

Ink:

Mixed Media:

Stencil:
SnipArt - Stencil - Up in the Air Damask 15x15 cm

Adhesives:
Beacon - 3-IN-1

Tools:

Thank so much for stopping by to view this sweet cheery Christmas card.
I hope you've been inspired.

Monday, September 19, 2022

'Celebrate New Beginnings' Spring Card for Amazing Paper Grace

Welcome to my creative space!

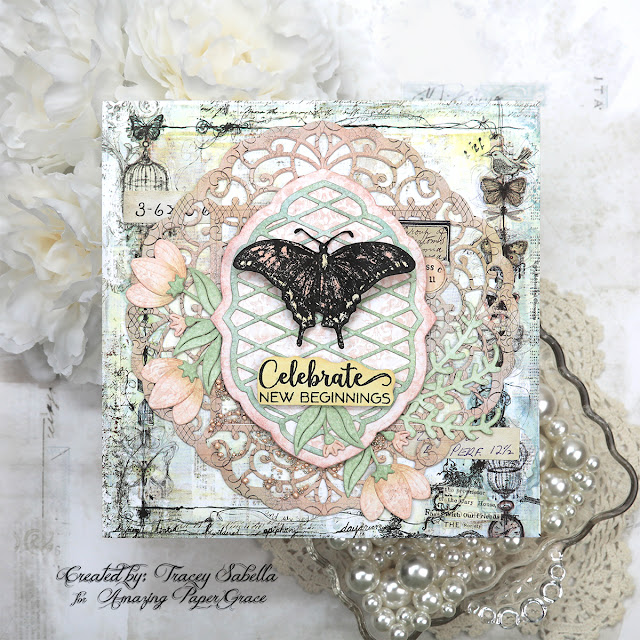
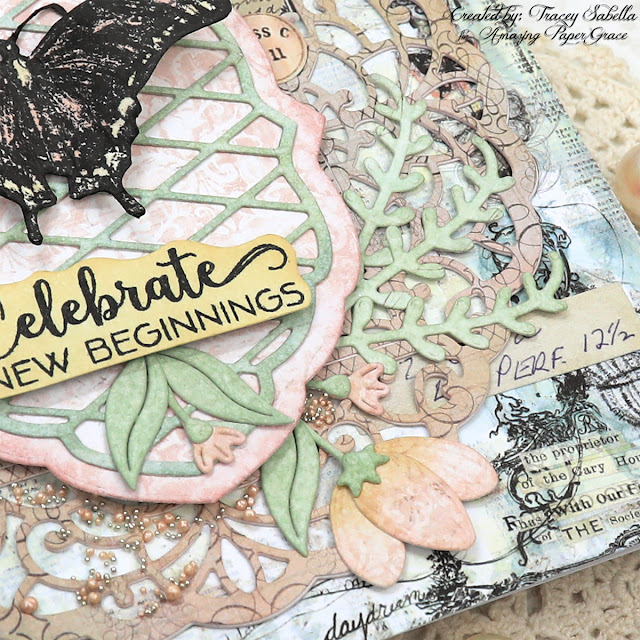
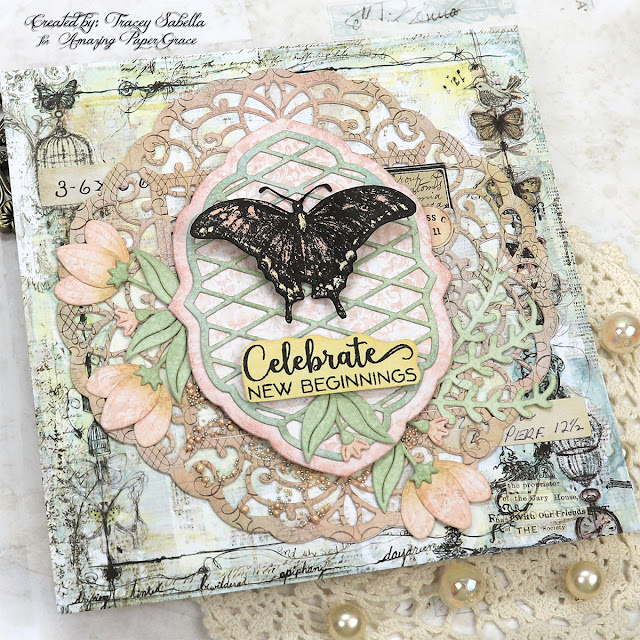
Spring is a time for new beginnings with the scent of sweet blossoms, leaves budding and popping, and new life as animal babies come along while butterflies emerge from their cocoons, so these sweet spring images from the gorgeous Amazing Paper Grace Spring Labels Motifs die set (S4-1238) are just so perfect to celebrate a new beginning in the life of someone special. This could be used for a graduation, new job or any new endeavor one may be entering. The sweet sentiment is from the coordinating Seasonal Motif Sentiments Stamp Set (STP-150). I also die cut the lovely background medallion using the Circle Meets Square Set (S5-491).

To learn more about the techniques used to create this shabby mixed media card including the gorgeous flowers and lovely butterfly, be sure to scroll down to view my 'Tips and Techniques' section below.

Thank you Amazing Paper Grace for providing the dies used in this project.

Tips and Techniques
This 6x6" card is created using older papers from my stash from a 6x6" paper pad, so the colors coordinate beautifully. I often add a frame around the edges of my card, but the focal base paper has a beautifully drawn frame around the edges, so I didn't feel that a border was needed here. 

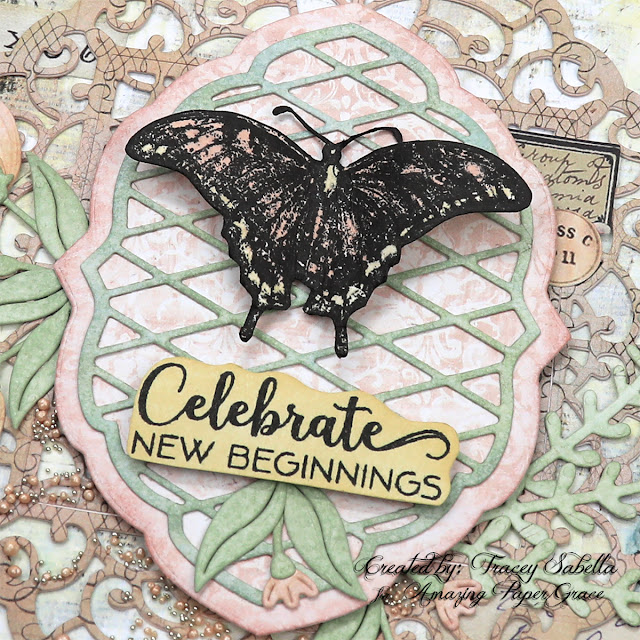
What a sweet sentiment from the Seasonal Motif Sentiments (STP-150) stamp set. It is stamped onto smooth white cardstock with permanent ink. Once the ink was dry, I colored it with Scattered Straw Distress Ink using an ink blending brush. To anchor the sentiment, a tiny die cut blossom and leaves are added below to fill in this space beautifully. 

While this die set is focused on spring, the label and lattice pieces could be a focal point for any occasion or season. I like an organic feel to my die cuts, so randomly added Bundled Sage; Iced Spruce, and Speckled Egg to the lattice and Victorian Velvet just to the edges of the pink layer. This label layer is popped up by adhering with foam squares in the center leaving the edges free to tuck flowers under.

This die set works well for adding a focal element like this butterfly. You could use a pre-made embellishment of your choice. Here I stamped a butterfly from the Tim Holtz Botanic Collage set onto the smooth side of Distress Watercolor Paper with permanent black ink then colored it using coordinating distress inks. I smooshed an ink pad onto my craft mat and picked up the ink with a fine tip paint brush to apply the ink. Once colored, I fussy cut the image. 

***Tip*** The antenna are too thin to cut out, so leave a bit of a margin around them, then go back with a black marker and color them in. I also use the marker around the edges so the white core of the paper didn't show. I use the marker from the back side for this edging, so I don't slip and color onto the stamped image.

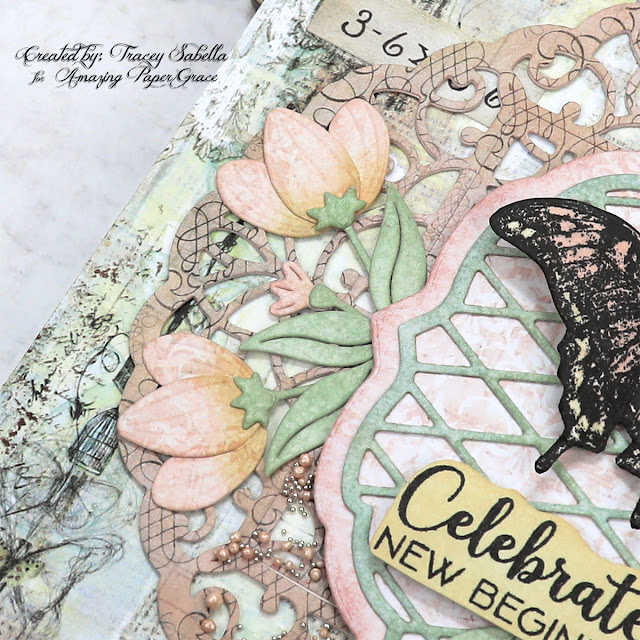
The flowers included in this die set are just so sweet. After die cutting, I brushed the base of each petal with Scattered Straw Ink and a little Victorian Velvet ink around the edges. The foliage is inked around the edges with Bundled Sage. This gives definition to make them more visible against the busy background.

***Tip*** I find that tweezers help me place these intricate blossoms.
 
Another blossom is added to the other side as well as a few sprigs of foliage.

Texture is added around the bottom nestled around the blossoms and over the medalion. Matte Soft Gel Medium is used to add the peachy prills and white gold microbeads to add some bling.

I've tucked in number and label snippets from Tim Holtz Idea-ology. You can see a couple of them in this shot.

The larger medallion piece is die cut using the gorgeous Circle Meets Square die set (S5-491). I darkened it up a little with Victorian Velvet Distress ink to make it more visible. 

***Tip*** If you have die cut a piece like this medallion, and it ends up blending into the background more than you expected, just brush on some coordinating ink in a darker shade of color to help it pop. 

Below you can find the products I used to create this project including some with compensated affiliate links to Scrapbook.com and Spellbinders. These links are at absolutely no cost to you. When you shop through the links below, I receive a small commission from the companies.  These commissions help me cover the costs of my blog and other expenses, which allows me to continue to provide you with FREE inspiration along with detailed Tips and Techniques provided for every project. Thank you so much for your love and support!

Supplies:

Amazing Paper Grace:

Paper:

Ink:

Stamps:

Mixed Media:

Embellishments:

Adhesives:

Tools:

Monday, August 22, 2022

"My Sweet Friend" Card with Mixed Media Watercolor Flowers for Amazing Paper Graace

 
Welcome to my creative space!

There's just something special about sending a handcrafted card to a treasured friend and this Amazing Paper Grace My Sweet Friend die set (S5-512) is so perfect to send a sweet greeting. This set includes the sentiment dies, foliage, and darling small flowers used on this card and also includes darling tulips and the words to create a baby card when paired with "sweet": baby; girl; and boy.

The larger flowers are die cut with the Grand Cinch and Go Flowers set (S5-436) from watercolor paper that I stamped with third generation stamping, then finished with watercolors.

In the background you'll see a piece cut with the Circle Meets Square die set (S5-491) from the Classically Becca Collection.

To learn more details with close-ups, be sure to scroll down through the Tips and Techniques section below. 

Thank you Amazing Paper Grace for providing the dies used in this project.

Tips and Techniques
To create these gorgeous flowers, I started with the smooth side of Distress Watercolor Paper and used third generation stamping with permanent black ink to apply the script images. Once the ink was dry, I spritzed the paper with water and applied teal, blue, and purple watercolor with a wash brush randomly over the surface. 

Once the watercolor was dry, I die cut the flowers and spritzed the back of the paper lightly with water before shaping the petals and finished by gluing the petal sections together with each layer of petals offset from the layer below. (This is placing the petals of one layer between the petals of the adjoining layer for an organic feel.) I then pulled stamen through the center hole to finish the blossoms.

This technique can be used with any dies for truly one of a kind mixed media flowers.

This lovely sentiment is cut from green patterned paper, then inked with Peeled Paint Distress Ink to add more visual dimension. I offset layered two pieces for "sweet." The bottom layer is inked more heavily with the same color to add a shadow effect. I also cut the words my and friend from thin chipboard and layered the colored piece on top to provide more stability and dimension.

I used the scrap pieces of the stamped watercolor paper to die cut these smaller blossoms. They are simply glued together with no shaping. Placing them around the card helps tie in the colors from the main cluster and pulls your eye across the card. 

Mixed media texture is added around the bottom of the cluster by brushing with soft matte gel medium and sprinkling on light yellow and green prills. The gel medium dries matte and clear, so isn't visible on the finished card, so you can loosely sprinkle on the prills. 

After adhering the yellow background die cut, the background was spattered with black India ink. 

The darling metal bee is from a bag of bee charms I purchased on Amazon. I brushed it with white gesso, then used a fine round tip paint brush to apply Finnabair waxes to color it. You could also use acrylic paints as well.

The little fluttering butterflies are wood veneer, but could also be chipboard or die cuts. I painted them in coordinating colors to the flowers, then applied holographic embossing powder for a bit of glittering bling. One is even resting on a blossom in the cluster.

The gorgeous leafy flora is die cut with dies from the My Sweet Friend die set (S5-512) using the same patterned paper as the sentiment and is also inked.

Below you can find the products I used to create this project including some with compensated affiliate links to Scrapbook.com. These links are at absolutely no cost to you. When you shop through the links below, I receive a small commission from Scrapbook.com. These commissions help me cover the costs of my blog and other expenses, which allows me to continue to provide you with FREE inspiration along with Tips and Techniques provided for every project. Thank you so much for your love and support!

Supplies:

Amazing Paper Grace:

Paper:

Ink:

Stamps:

Mixed Media:

Embellishments:
  • Jillibean Soup - Wood Veneer - Butterfly
  • Amazon - Bee Charms
  • Stamen - White
  • US Artiest - Mini Prills - Lemmon Chiffon; Lettuce Entertain You!

Adhesives:

Tools:

Thanks so much for stopping by to view my card. I hope you've been inspired.

~ Blessings ~

Monday, August 1, 2022

You Are Amazing Card for Amazing Paper Grace

Welcome to my creative space!

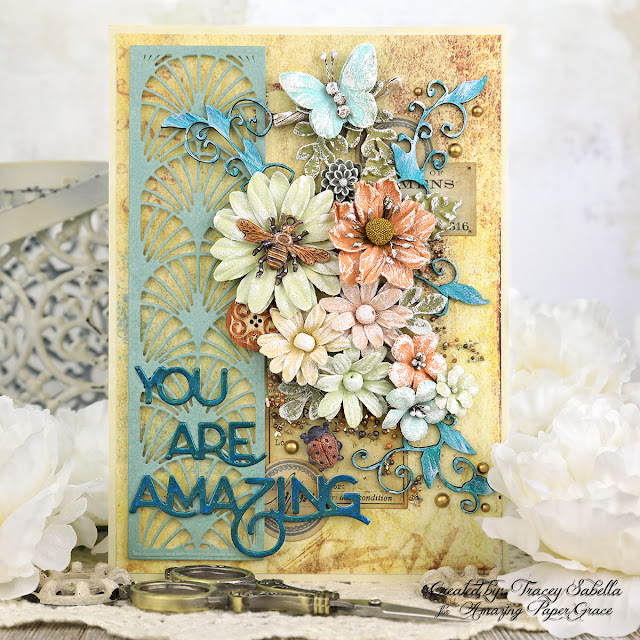
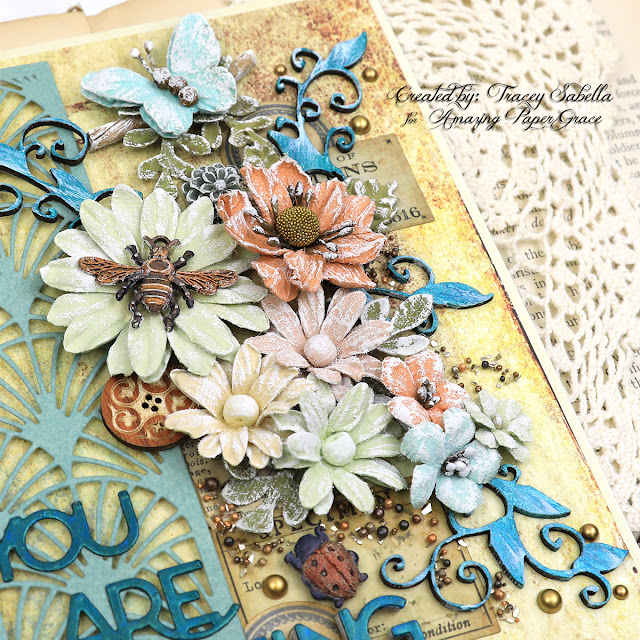
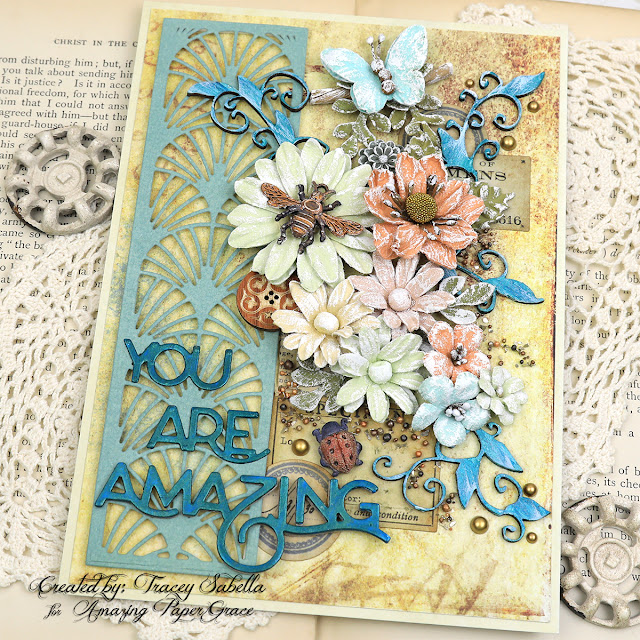
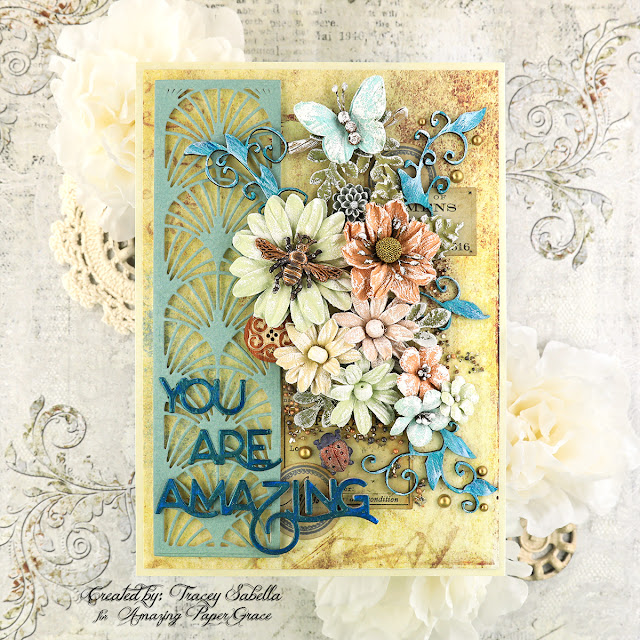
I think it's always lovely to make someone feel special with a handcrafted card and this sweet Amazing Paper Grace You're Amazing die set (S4-1203) shines with this fabulous sentiment. Not only is it such a wonderful and encouraging sentiment, but the font is just amazing too! This set includes the background die seen here which can be cut individually like I did for this card, or repeat cut to fill your background. 

When I consider summer, I think of gorgeous flowers and fluttering insects like this butterfly, bee, and the ladybug that keeps blossoms free of aphids. 

To learn all the details on how I put this sweet card together, please scroll down through my Tips and Techniques section below for close-ups and loads of details.

Thank you Amazing Paper Grace for providing the dies used in this project.

Tips and Techniques
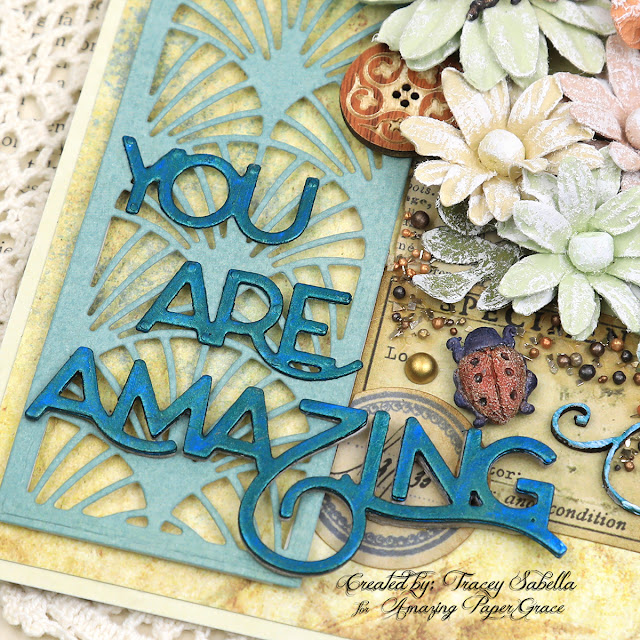
The gorgeous background piece is die cut from green patterned paper, then inked with Speckled Egg Distress Ink to add a little blue and to help make it pop against the background. I used 1/8" foam tape strips to pop it up for dimension. The sweet sentiment is cut from thin white cardstock from a piece of packaging, then painted with Finnabair Metallique Emerald Green Paint. It could also be cut from metallic cardstock, but to get this deep green/blue color, I thought the paint would work best here. I just adore how this color varies from greens to blues. I cut three more pieces of the "ing" letters from the thin chipboard and glued them to the back of the sentiment, so it would sit level over the popped up die cut piece.

I've used summery Little Birdie Crafts flowers from the Woodland Stories Collection to create this lovely floral cluster. These lovely flowers are dry brushed with white gesso to add a grungy, shabby feel. The chipboard vines are from Dusty Attic and painted with more of the Emerald Green paint along with Mermaid Teal, then dry brushed with a little white gesso.

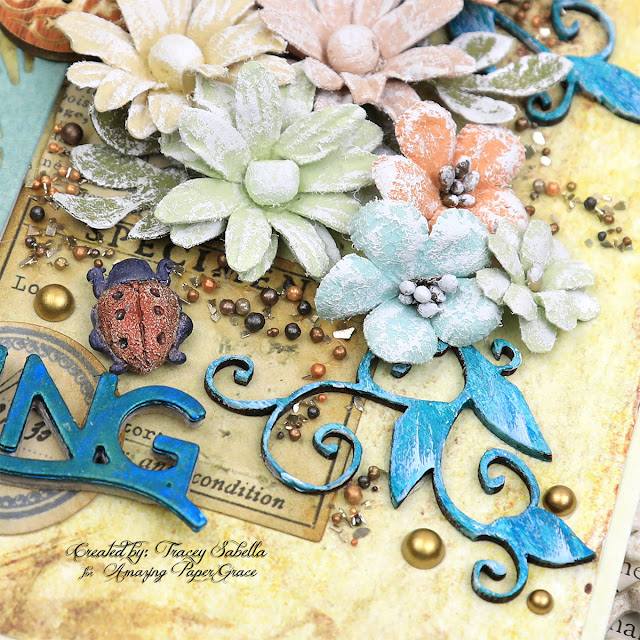
The metal bee and ladybug are brushed with white gesso, then colored with Finnabair art waxes using a fine tip paint brush.

Texture is added by brushing around the cluster with Matte Gel Medium then sprinkling with prills and chunky glass glitter. There are also a few matte gold half pearls scattered around the vines. You can see the darling lady bug a little closer here. 

Underneath the cluster, I've added a few tags and circles from the Tim Holtz Field Notes Ephemera set. The tags are inked around the edges with Vintage Photo Distress Ink. I've also tucked in a wooden button and a grey resin flower that has been dry brushed with gesso. 

One final view. 

Below you can find the products I used to create this project including some with compensated affiliate links to Scrapbook.com. These links are at absolutely no cost to you. When you shop through the links below, I receive a small commission from Scrapbook.com. These commissions help me cover the costs of my blog and other expenses, which allows me to continue to provide you with FREE inspiration along with Tips and Techniques provided for every project. Thank you so much for your love and support!

Amazing Paper Grace:

Paper:

Ink:

Mixed Media:

Embellishments:

Adhesives:

Tools: