Showing posts with label Helmar. Show all posts

Monday, June 20, 2022

Watercolor Tulip Card for Amazing Paper Grace

Welcome to my creative space.

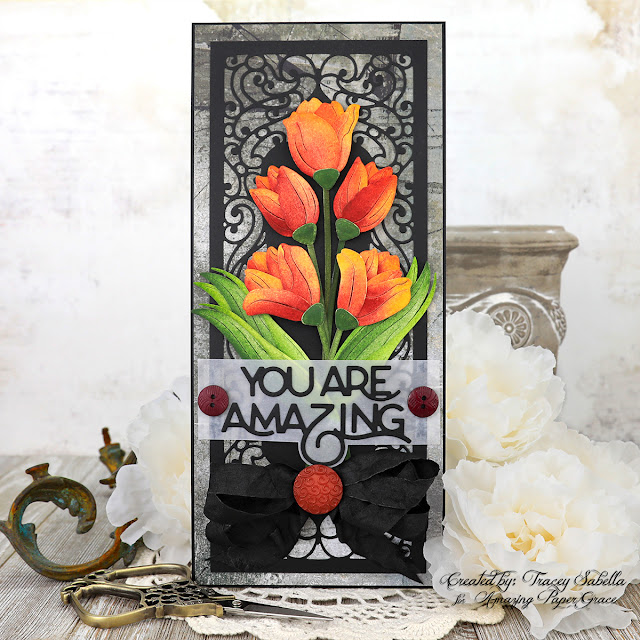
As soon as I saw this gorgeous Amazing Paper Grace Layered Tulips dies (S4-1195) I thought of the vibrant red and orange/yellow blossoms I grew up adoring. I've used a wet on wet watercolor technique for these tulips cut from watercolor paper.

I was inspired by this lovely photo.

The scrollwork layer is cut using the fabulous Half Slimline Bracket (S4-1199) with this fabulous sentiment cut from the newly released You're Amazing (S4-1203) set from The Right Words collection. I kept with darker grungy colors for my background to keep with my shabby aesthetic and to  help the colors in these vibrant beauties to pop.

Be sure to scroll down through the "Tips and Techniques" section below for close-ups and all the details on how to create this beautiful card and gorgeous tulips.

Thank you Amazing Paper Grace for providing the dies used in this project.

Tips and Techniques
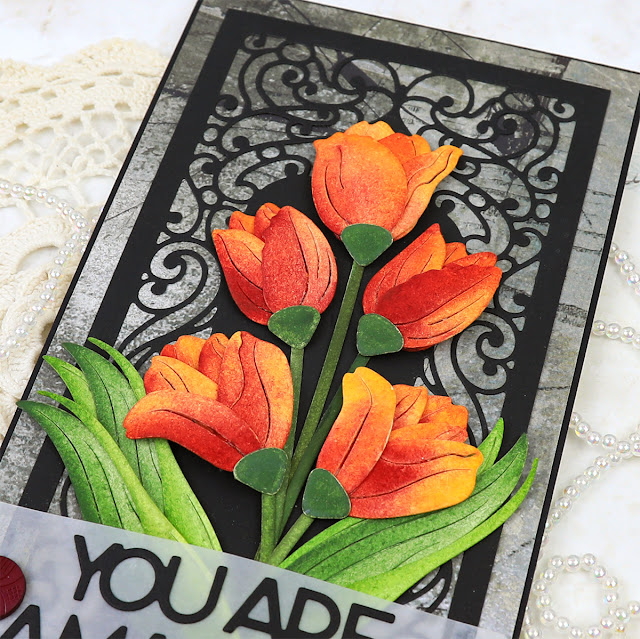
I used watercolor paper to cut these blossoms and foliage. I pulled out all the die cuts for one tulip blossom and used a wash brush to apply a generous layer of water across each petal and while wet brushed first with the yellow/orange color, then while wet came back in with the red and brushed down the left side of each petal and towards the bottom across the entire petal. At this point, I used a dry paper towel to pat off any of the red where I wanted more yellow to show through where needed. 

I just adore how the colors bloomed into each other to create such an organic flow of color that looks so much like the real tulip flowers in the photo above. I repeated this process for each of the five blossoms.
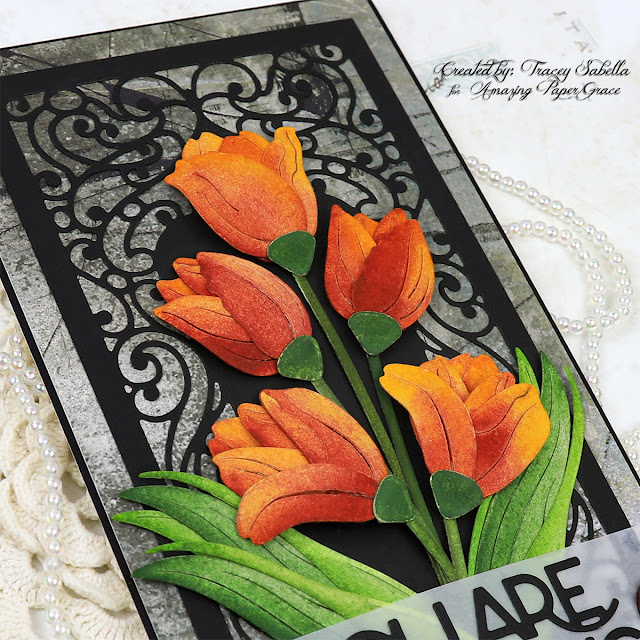
I used the same watercolor technique on the beautiful leaves using greens. The green bases and stems are washed in a solid green color. 
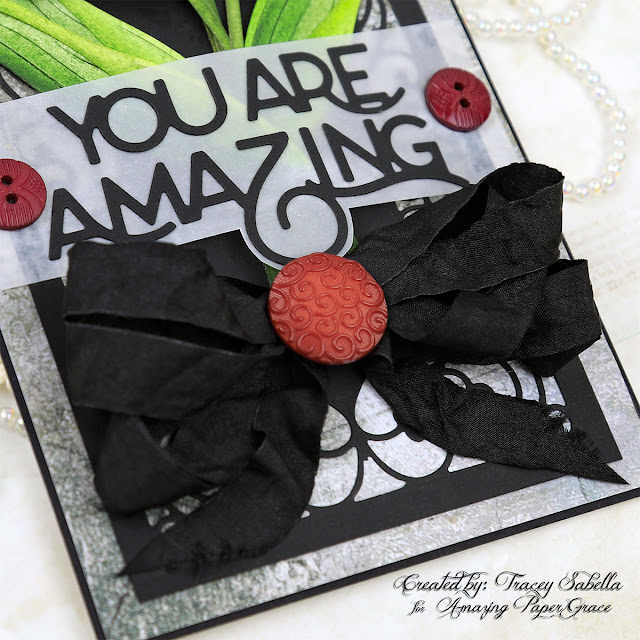
This fabulous sentiment is cut from black cardstock with the You're Amazing die set (S4-1203). I backed it with vellum that has a cloudy design in it. I trimmed around the bottom of the vellum to let more of the background show through and to add a lovely design element to the card.

I used black wrinkled ribbon to tie a three loop bow for a lovely embellishment and to help fill in this bottom area. I had laid everything out before gluing the blossoms down, but still ended up with more space on the bottom than I really wanted, so this bow was a perfect solution and really adds a gorgeous touch to this card. 

I pulled in the colors of the tulips by adding a lovely swirled button to the center of the bow and a couple smaller buttons to each side of the sentiment. 
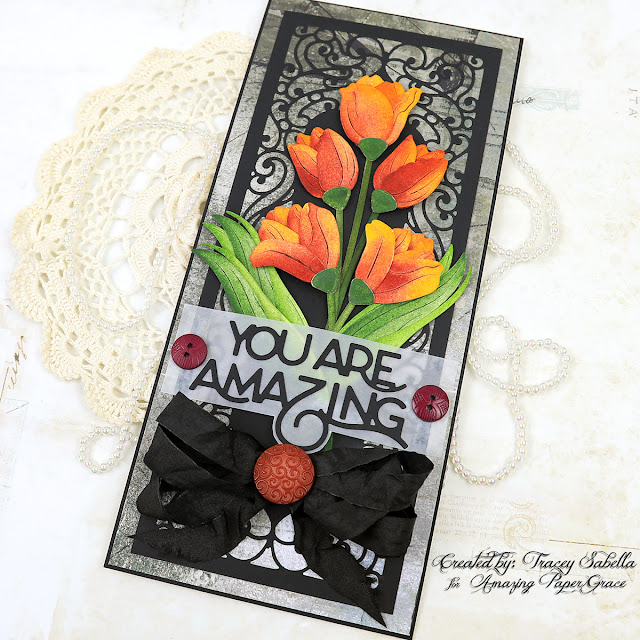

If the scrollwork design looks familiar, it's cut from the Half Slimline Bracket die set (S4-1199) which I used on my tag with Distress Oxide blending earlier this month. Wow, two strikingly different looks using the same die set. This time I cut the design directly into the paper without using the edge die, then flipped the die and matched up the design to die cut it a second time for the mirror image. The outside edge was then cut to allow a 1/4 inch border.
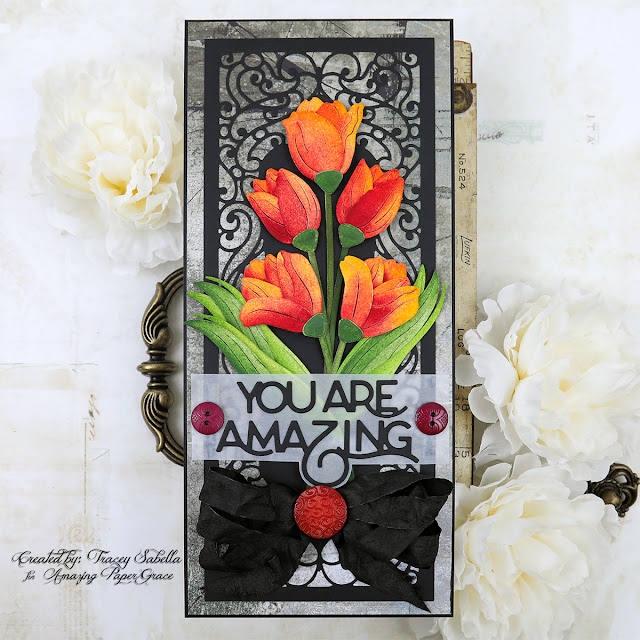
Once the black scrolled piece was cut, I laid the tulips on top and tried several patterned papers underneath to decide which one worked best. I like this grey grungy design which gave a nice contrast to the black die cut layer and helped the colors in the blossoms to pop so beautifully. 

Amazing Paper Grace Dies:

Paper:
  • Prima - Art Philosophy ~ 12 x 12 Watercolor Paper Pad
  • Dress My Craft ~ A4 Cardstock - Black - 10 Pack
  • Blue Fern Studios ~ Chesterville Collection

Mixed Media:
  • M. Graham  ~ Artists' Watercolors

Embellishments: 

Adhesives:
  • Scrapbook.com ~ Clear Double Sided Adhesive Roll, 1/4"
  • Tombow ~ Mono MULTI Liquid Glue
  • Helmar ~ 450 Quick Dry Adhesive
  • Beacon ~ 3-IN-1 Advanced Craft Glue
  • Beacon ~ Fabri-Tac 

Tools:
  • Spellbinders ~ Platinum 6


Thanks for stopping by! I treasure your comments.

~ Blessings ~

Thursday, January 13, 2022

Encouragement Card with Tutorial Link for Watercolor Die Cuts


Welcome to my creative space!

Sometimes I create a card with a specific person and event in mind, but I also like to have cards in my stash that are versatile and can be used for a variety of events. The sweet sentiment from the Amazing Paper Grace Just a Note Sentiments Tag Clear Stamp & Die Set (SDS-169) is so encouraging and could be used for a birthday, graduation, thank you, or a note of encouragement. 

I've used watercolors to create unique patterned paper for my die cut images including these amazing scrolled brackets from the Amazing Paper Grace Perfect Harmony Notecard Embellishments Set (S4-1149) and the smallest rectangle from the Fluted Classics Rectangles Dies (S5-475)You can find the full tutorial exclusively in the Amazing Paper Grace Creative - Creative Encouragement Community Facebook Group.

This lovely group includes exclusive tutorial content. I share a mixed media tutorial there on the 13th of each month. The tutorial for this project includes a detailed step by step photo tutorial teaching you how to create this one of a kind patterned paper for your projects. If you're not a part of this fabulous and encouraging group you can join HERE.

I wanted to keep the embellishments light and airy to help the watercolor diecuts to pop, so used creamy mulberry paper to cut the small cabbage roses and rose buds. The flowers are foliage are cut with the fabulous Candlewick Rosebud Dies Candlewick Sampler Collection (S4-1015) using the smallest blossom in the set. These dies create amazing roses!

Thank you Amazing Paper Grace for providing the dies used in this project.

Close-Ups
Here's a close-up of these gorgeous blossoms. I spritzed the back of the mulberry paper lightly before shaping. Three sets of petals are used to form the blossom which is shaped around a large stamen. I found these pearl colored stamen a while back in the bridal section of a local craft store. The rose buds are one set of petals shaped the same way, but glued down to the stamen to form the bud.

The floral heart charm from my stash is colored with Prima Metallic waxes to coordinate with the focal paper. I tucked in a few pearls and prills to fill out the cluster.

I wet and crinkled a length of rayon seam binding, then once dry, tied a triple loop bow for this lower cluster.

You can see in this photo how beautiful the watercolor die cut looks against the pink focal paper. 

Here you can really see the amazing visual texture on the water color paper die cut. Yes you can stamp over the watercolor. Be sure to check out my tutorial for watercolor die cuts in the Amazing Paper Grace Creative - Creative Encouragement Community Facebook Group for all the details.

One final shot.

AmazingPaper Grace Dies

Other Supplies
Prima ~ Royas Menagerie - Flutterby
Arches ~ Hot Press Watercolour Paper, 140 lb
Mulberry Paper ~ Off White
Cardstock ~ White
Tim Holtz with Idea-Ology ~ Baubles 
US ArtQuest ~ Mini Prills - Minnie Pearls
Hug Snug ~ Rayon Seam Binding, White
Charm Shop ~ Heart Charm
Large Stamen (Floral department of craft store)
M. Graham Watercolors
Colorfin ~ PanPastel: Turquoise; Phthalo Blue Shade
Versafine ~ Onyx Black Ink
Finnabair with Prima ~ Metallic Wax: Sweet Rose; Indian Pink
Finnabair with Prima ~ Matte Wax: Old White
Helmar ~ Crystal Note Matte Varnish, Permanent
Helmar ~ 450 Quick Dry Adhesive
Beacon ~ Fabri-Tac
Art Glitter ~ Designer Dries Clear
Scotch Quick-Dry Adhesive
Double Sided Tape ~ 1/4"
Watercolor Wash Brush
Painters Tape


Thanks for stopping by! I treasure your comments.

~ Blessings ~

Monday, December 20, 2021

"Thinking of You" Notecard for Amazing Paper Grace

Welcome to my creative space!

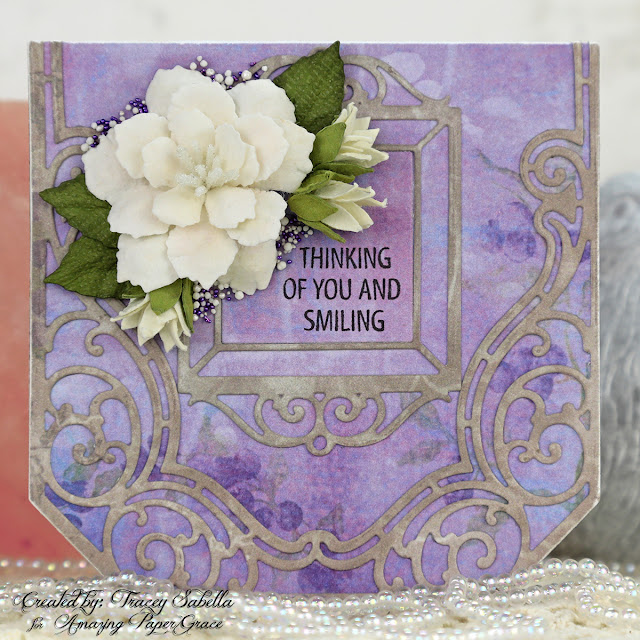
It is so wonderful to have some sweet notecards in my stash. This encouraging card features the fabulous Amazing Paper Grace Flourished Sonata Notecard Die Set from the Sweet Serenade Notecard Collection. I've also created the focal flower with the Grand Cinch and Go Flowers Set and foliage with the Candlewick Rosebud Dies and tucked in several tiny flowers from Little Birdie Crafts.

To be honest, I have mostly created birthday, holiday, and wedding cards, but not much in the way of general notecards. This die set has encouraged me to include small notecards for my stash that can be used to send a note of encouragement or thanks. Many thanks to Becca for creating this fabulous die set. 

Thank you Amazing Paper Grace for providing the dies used in this project.

Tips and Techniques
A great way to extend your stash of purchased flowers is to create a gorgeous handcrafted focal flower and foliage like I've used here, then add in a few small bought flowers.

This beautiful focal flower is die cut with the Grand Cinch and Go Flowers dies from mulberry paper. I shaped the petals and added beaded stamen to the center. The foliage uses the rose leafs from the Candlewick Rosebud Die set. They are cut from green cardstock, shaped, then inked with a darker green to highlight the texture. I also tucked in a few small Queenie flowers from Little Birdie Crafts. I also adhered white prills and purple microbeads to add texture and to fill in around the cluster.

Normally we think of centering a sentiment when stamping on a square shape, but I knew I wanted to add a cluster of flowers, so stamped in the corner of the square instead.

The scrollwork in this die set is simply amazing. I die cut the scroll pieces, then inked them randomly to add visual texture. When folding the card, this scrolled piece cracked a little on the folded edge. An easy solution was to distress all the outside edges as you can see here.

This versatile die set can be used to create a slimline card. There is also a scoring die included in the set that creates a scoreline to fold the card in half to create this notecard size. 

Amazing Paper Grace Dies

Other Supplies
Studio75 ~ The Berry Copse Collection
Mulberry Paper ~ Cream
Core-dinations ~ Tim Holtz - Cardstock, Green
**Thank you Little Birdie for providing these flowers **
Finnabair with Prima Marketing ~ Art Basics: Soft Matte Gel
Prills ~ Minnie Pearls
Microbeads ~ Amethyst
Helmar ~ 450 Quick Dry Adhesive
When purchasing from Little Birdie Crafts HERE
Use code TRACEY05 for a 5% discount.
I receive a small commission at no cost to you.

In this supply list you can find the products I used to create this project along with compensated affiliate links to Scrapbook.com These links are at absolutely no cost to you. When you shop through these links I receive a small commission from Scrapbook.com. These commissions help me cover the costs of my blog and other expenses, which allows me to continue to provide you with FREE inspiration along with Tips and Techniques. Thank you so much for your love and support!


Thanks for stopping by! I treasure your comments.

~ Blessings ~

Saturday, December 4, 2021

Amazing Paper Grace December Die of the Month - Enchanting Pocket Card Tag and Envelope


Welcome to my creative space!

The Enchanting Pocket Card, Tag and Envelope set has many different options to make your creations stand out! It is a sweet gift card-sized envelope that doubles as a card front pocket. The bonus is that there is a tag too that doubles as a label. The inspiration for this set comes from Becca’s love of giving gift cards! It can be used year-round, dressed up or dressed down, and themed for any occasion. Using the different inlay and insert designs, you can cut and make unique variations to keep the design fresh!
 
Dies for my creations today were supplied by Amazing Paper Grace.

Card with Gift Card Holder Feature

Gift Card Envelope

There are 14 dies included in the Enchanting Pocket Card, Tag and Envelope.

My Project Today: 

I use this fabulous Enchanting Pocked Card Tag and Envelope Die of the Month set to create a mixed media card that features a gorgeous die cut pocket on the front that includes a card with a filigree top tucked into the pocket to write a heartfelt note. The pocket is perfectly sized to tuck in a gift card behind the note. 

I was inspired by a magazine that delivered to our home a few weeks ago with a cover filled with a bevy of beautiful blue and purple flowers. This color combination was so fabulous that I decided to use it on my next project along with gold accents. The card base is stenciled with white gold icing paste for texture, then spritzed with metallic gold color spray. I used the sweet flower dies in the set to created the blossoms and foliage for the clusters around the pocket. The edges of the petals are inked before shaping to add visual dimension and the centers are filled with prills in coordinating colors. I added chipboard and metal pieces from my stash. The metal bits were silver, bronze, and gold, so I brushed them all with gold art wax for uniformity. The butterfly and dragonfly are colored with art wax and dimension and sparkle are added to the dragonfly by brushing the wings with stickles and gold wax and adhering prills to the body. And of course the butterfly is adorned with one of the handcrafted flowers. Chunky glass glitter and prills fill in around the edges of the floral clusters. 

One of our daughters is an author and adores writing with fountain pens, so I had her in mind when adding the pen nib. One of the joys of creating a handcrafted card is being able to personalize it for the special person it's intended for.

The paper I used was a heavy 110lb patterned cardstock and cracked just a little on the folds, so I went with it and distressed all the edges and inked them for the shabby effect I was going for with this card. (When I created a sample with a lighter weight paper, there was no cracking.)

Designer Tip: If something goes awry in the creative process, think outside of the box to fix it. Rather than starting over again when my edges cracked just a little, I just pulled out my distressing tool, and roughed up all the edges and added a little ink. Distressing and inking can fix a myriad of blunders. 

Here are some project close-ups:
The filigree designs in this die set are absolutely stunning!!

This printed sentiment is colored with Distress Ink to coordinate with the background paper.

These sweet blossoms are so delicate and beautiful!

I enjoy adding simmer and bling to projects with glitter, prills, and metallics. You may have noticed just a hint of a steampunk feel with a couple gears tucked into the flowers.

A closeup of this sweet butterfly and a view of the distressed paper edges adding such a nice shabby chic touch.

Here's the lovely duo one more time.

Supplies:
Accessories:
Paper:
  • 49 and Market ~ Scents of Nature Paper Collection
Ink:
  • Ranger ~ Distress Ink: Dusty Concord; Stormy Sky
Embellishments:
  • Tim Holtz with Idea-ology ~ Small Talk
  • Tim Holtz with Idea-ology ~ Heirloom Roses; Sprocket Gears; Story Sticks; Pen Nibs
  • Tim Holtz with Idea-ology ~ Adornments, Halloween Accents 
  • Ornate Metal Corner from my stash
  • Chipboard Butterfly and Dragonfly from my stash
  • US ArtQuest ~ Prills: Ice Queen; Gilt Trip; Lavender & Lace
  • Stampendous ~ Glass Glitter - Lavender

Mixed Media Supplies:
  • Finnabair with Prima Marketing ~ Soft Matte Gel, Transparent
  • Finnabair with Prima Marketing ~ Clear Gesso
  • Finnabair with Prima Marketing ~ Icing Paste: White Gold
  • Finnabair with Prima ~ Metallique Wax: Vintage Gold
  • Finnabair with Prima ~ Antique Brilliance Wax: Amethyst Magic
  • Finnabair with Prima ~ Matte Wax: Patina Blue
  • Ranger ~ Stickles - Crystal
  • Heidi Swapp ~ Color Shine: Gold
  • Shimmerz ~ Coloringz - Punked Up Purple
  • AAll & Create ~ Stencil - Circle of Life by Olga Heldwein

Adhesives:
  • Helmar ~ 450 Quick Dry Adhesive
  • Tombo ~ Mono MULTI Liquid Glue
  • Redline Tape ~ 1/2"
  • Imagine ~ Tear It! Double-sided Adhesive Tape
For more Enchanting Pocket Card, Tag and Envelope Inspiration:

Visit each Creative Team blog linked below for their take on creative paper crafting ideas with Enchanting Pocket Card, Tag and Envelope, the Amazing Paper Grace December 2021 Die of the Month!


The Amazing Paper Grace Die of the Month is available exclusively at Spellbinders Paper Arts during December 2021. Enchanting Pocket Card, Tag and Envelope at the special kit club price, along with other membership perks.

View this month's Amazing Paper Grace Die of the Month! 


I would adore hearing from you! Please leave a comment below letting me know how you will use these gorgeous dies!


Thanks for stopping by! I treasure your comments.

~ Blessings ~

Monday, November 22, 2021

Amazing Paper Grace Fluted Classics Intro Blog Hop ~ Fall Art Panel with Artist Trading Card

 
Welcome to my creative space!

Within the various collection introductions, Amazing Paper Grace has included sets that were inspired by classic sewing motifs. The Fluted Classics Collection is another wonderful layering shape set with ticking designs reminiscent of the blanket stitch on its edges! Nest the outer and inner rims with the insert to cut a tailored frame or for a beautiful background edge to any layering design. Keep it simple and you can cut a solid shape with just an outer rim. The Fluted Classics come in circle, square, oval, and rectangle shapes. We’ve also added a slimline version for those card makers who want to create an elegant and trendy silhouette.

Today's projects were created with dies provided by Becca Feeken of Amazing Paper Grace.

My Projects for Today:

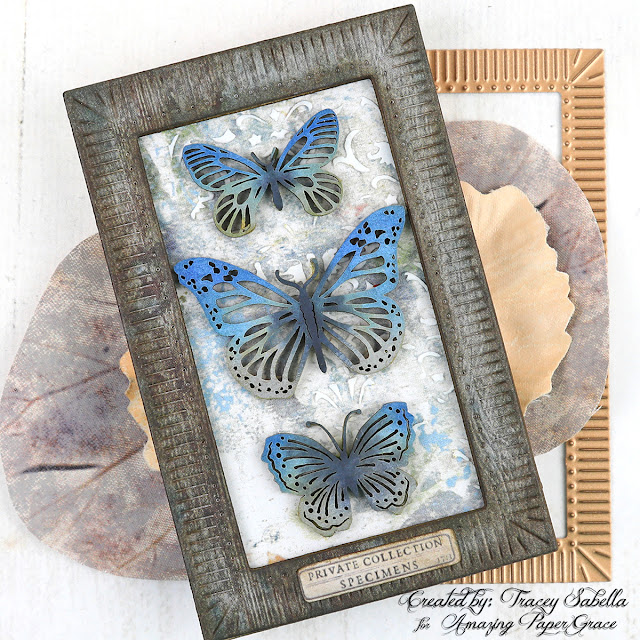
I'm featuring the Amazing Paper Grace Fluted Classics Rectangle Die Set by Becca Feeken to create a fall themed art panel and an artist trading card with chipboard butterflies in a shadowbox frame.


These gorgeous Fluted Classics Rectangles are a perfect way to frame a beautiful decor piece. I've used the two larger dies to double frame an arrangement of mushrooms and flowers. The butterfly ATC has a shadowbox frame cut with this fabulous die set. The background on both pieces is accented with delicate stenciling. Because the frames are cut from a darker patterned paper, the gorgeous design was not as visible as I wanted, so I rubbed them with Distress Ink to help highlight the gorgeous stitch inspired design. 

Designer Tip: 

To create a shadowbox frame, simply cut several frames and glue them together for beautiful depth and dimension. I used this technique for the butterfly artist trading card.

More Close-Ups with Tips and Techniques:

Gorgeous mushrooms and flowers in fall colors are arranged and overlap the frame in places to create a gorgeous home decor art panel which is backed with chipboard to make a sturdy piece to display. The specimen label is adhered to the bottom right over the frame.

Here you can see how fabulous the double frame looks. The stenciled texture paste design adds lots of wonderful texture. The inking highlights the gorgeous texture in the frame so beautifully.

This shadow box frame looks like it was cut from thick chipboard, but that wouldn't be possible with these detailed etched dies. Instead I cut 5 layers of cardstock weight patterned paper, then glued them together to created the deep frame. 

These lovely chipboard butterflies are colored with Distress and Distress Oxide Sprays. A paintbrush was used to apply the spray for more control.


Fluted Classics Availability:

These dies are available from Spellbinders right now! Click here: Fluted Classics Collection.

Supplies:
Accessories:
Paper:
Patterned paper from my stash
Tim Holtz with Idea-ology ~ Ephemera Pack - Field Notes
Ink:
Ranger ~ Distress Ink - Ground Espresso
Ranger ~ Distress Oxide Spray: Black Soot; Frayed Burlap
Mixed Media Supplies:
Ranger ~ Distress Spray: Faded Jeans; Prize Ribbon
SnipArt ~ Stencil, Up in the Air
Adhesives:
Helmar ~ 450 Quick Dry Adhesive
Tombo ~ Mono MULTI Liquid Glue

For more Fluted Classics Collection Inspiration
Visit each Creative Team blog linked below for their take on creative paper crafting ideas using the Fluted Classics Collection!

Visit Tracey Sabella <<You are here!>>

Please leave a comment letting me know which Fluted Classics set you would use first.

Follow me on Facebook!

Follow me on Instagram!

Follow me on YouTube!


Thanks for stopping by! I treasure your comments.

~ Blessings ~

Monday, November 8, 2021

"A Savior Has Been Born" Christmas Card for Amazing Paper Grace


Welcome to my creative space!

Christmas is a special time to celebrate the birth of our Lord Jesus Christ. I've created a special Christmas card featuring the gorgeous Amazing Paper Grace Celebrate Scrollwork Card Builder die set from the Holiday Medley Collection. The lovely poinsettia is handcrafted using the Cinch and Go Poinsettia die set

The Celebrate Scrollwork set includes a die with the Celebrate the Season sentiment surrounded by gorgeous scrollwork, which would also look wonderful and is quick and easy to die cut for the center. I wanted to show a little different way to use this set by stamping a sentiment on the square background piece. A stamp platform and scrap paper are a great way to line up the sentiment before stamping on your good paper. 

Amazing Paper Grace provided the dies used in this project.

Tips and Techniques
This gorgeous Poinsettia is die cut from patterned paper. The edges of the petals are inked, then shaped. The petals are adhered together then stamen are inserted into the die cut center hole and glued in place. Poinsettia's come in many different colors and this pale yellow/cream color worked perfectly against the reds and greens on the card.

The handcrafted poinsettia is paired with gorgeous red roses and a white rose bud from Little Birdie Crafts. The Tim Holtz metal snowflakes are rubbed with white gold metallique wax and then a little Old White Matte Wax to highlight the textures and give a wintry feel. To add a little sparkle, I've tucked shaved ice flakes into the cluster edges.

The scrollwork design is cut from red cardstock. I colored the center piece with distress ink to coordinate with the green background paper before stamping. I wanted to frame the card with red cardstock, so trimmed the center of the scrollwork pieces to use a slightly smaller square for the center so this slimline card would fit nicely into a standard #10 envelope.

The sweet snowflake overlapping the sentiment piece is cut from white glitter paper using a die included in the Celebrate Scrollwork set.

One final shot.

Amazing Paper Grace Dies

Other Supplies
Tim Holtz Idea-ology ~ Snowflakes 
Stamen from my stash
Tim Holtz ~ Kraft Core 
Fab Scraps ~ Gentleness 
Patterned paper from my stash
Glitter Paper ~ White
Ranger ~ Distress Ink: Sage Green; Gathered Twig
Ranger ~ Distress Glaze
Versafine ~ Onyx Black
Finnabair with Prima ~ Metallique Wax: White Gold
Finnabair with Prima ~ Matte Wax: Old White
Finnabair with Prima ~ Soft Matte Gel, Transparent
Stampendous ~ Shaved Ice
Our Daily Bread ~ Luke 2:11 Stamp Set
Scrapbook Adhesives by 3L ~ Crafty Power Tape
Helmar ~ 450 Quick Dry Adhesive
Tombo ~ Mono MULTI Liquid Glue

When purchasing from Little Birdie Crafts HERE
Use code TRACEY05 for a 5% discount.
I receive a small commission at no cost to you.


Thanks for stopping by! I treasure your comments.

~ Blessings ~