Friday, October 26, 2012

ScrapThat! November "Remember When . . ." Kit Reveal and Blog Hop

Welcome to the ScrapThat! November Kit Reveal and Blog Hop!!

We are so excited to show you our SPECTACULAR November kit featuring the gorgeous "Serenade" Collection by Bo Bunny.


We have a very talented Guest Designer joining us this month!!
We are most delighted to introduce to you, Tracey Gregory.
ScrapThat! is so pleased that she has joined us this month!!

We would also like to welcome our talented new Design Team Member,
Sarah Routledge!!
Please see our November Kit Sneak Peek post for her biography details.

So, without further ado . . .  introducing our 
~ November Kit Reveal ~
"Remember When . . ." 

This kit is full of amazing products including Wild Orchid Crafts Flowers, gorgeous ribbon, Maya Road chipboard doors and stickpin, Prima Alphabet set in two colors, Zva adhesive pearls and much much more!

Main Kit: $39.99
NOTE: The Main Kit cost for non-members is $44.99

BoBunny’s Serenade Paper Collection
1 sheet – Trellis
1 sheet – Sunrise
1 sheet – Vines
1 sheet – Pendant
1 sheet – Promenade
1 sheet – Dot
1 sheet – Dragonfly

1 sheet – Brazzill Cardstock – Honeycomb
1 sheet – Brazzill Cardstock – Leapfrog
1 sheet – Brazzill Cardstock – Brick 
1 sheet – Prima -  Alphas
1 ea – Prima, Chalk Ink, Teak Wall
2 ea – Maya Road, chipboard doors
1 ea – Maya Road, stick pin
2 ea – WOC leaves
5 ea – WOC Mulberry Paper Poppy Flowers, white
1 ea – WOC, Mulberry Paper Wild Poppy Flower,  Red
1 Pkg – Zva Self Adhesive Bling, Pewter
1 length – Tulle, black
1 length – ¼” Satin Ribbon, white
1 length – ¼” Satin Ribbon, cream
1 length – ¼” Satin Ribbon, brown

Embellishment Add-On $14.99
 NOTE: The Embellishment Add-On cost for non-members is $17.99

1 Pkg – Prima, Vintage Trinkets
1 Pkg – Prima, Decorative Wood Embellishments
1 Pkg – Prima Leaves

Flower Add-On $12.99
NOTE: The Flower Add-On cost for non-members is $14.99

1 Pkg – Prima Flowers, Cabaletta
1 Pkg – Prima Flowers, Bel Canto
1 Pkg – Prima Flowers, Gracie Vine

Paper Add-On $9.99
NOTE: The Paper Add-On cost for non-members is $12.99 

1 sheet – Trellis
1 sheet – Sunrise
1 sheet – Vines
1 sheet – Pendant
1 sheet – Promenade
1 sheet – Dot
1 sheet – Dragonfly
1 sheet – Brazzill Cardstock – Honeycomb
1 sheet – Brazzill Cardstock – Leapfrog
1 sheet – Brazzill Cardstock – Brick 

We are currently accepting new Kit Club Members.
For more information, complete the form on the link below:
 We also have our November Sketch Challenge Posted
HERE

Everyone is welcome to participate, all entries due by November 15th

My first layout was inspired by Amy's gorgeous sketch.

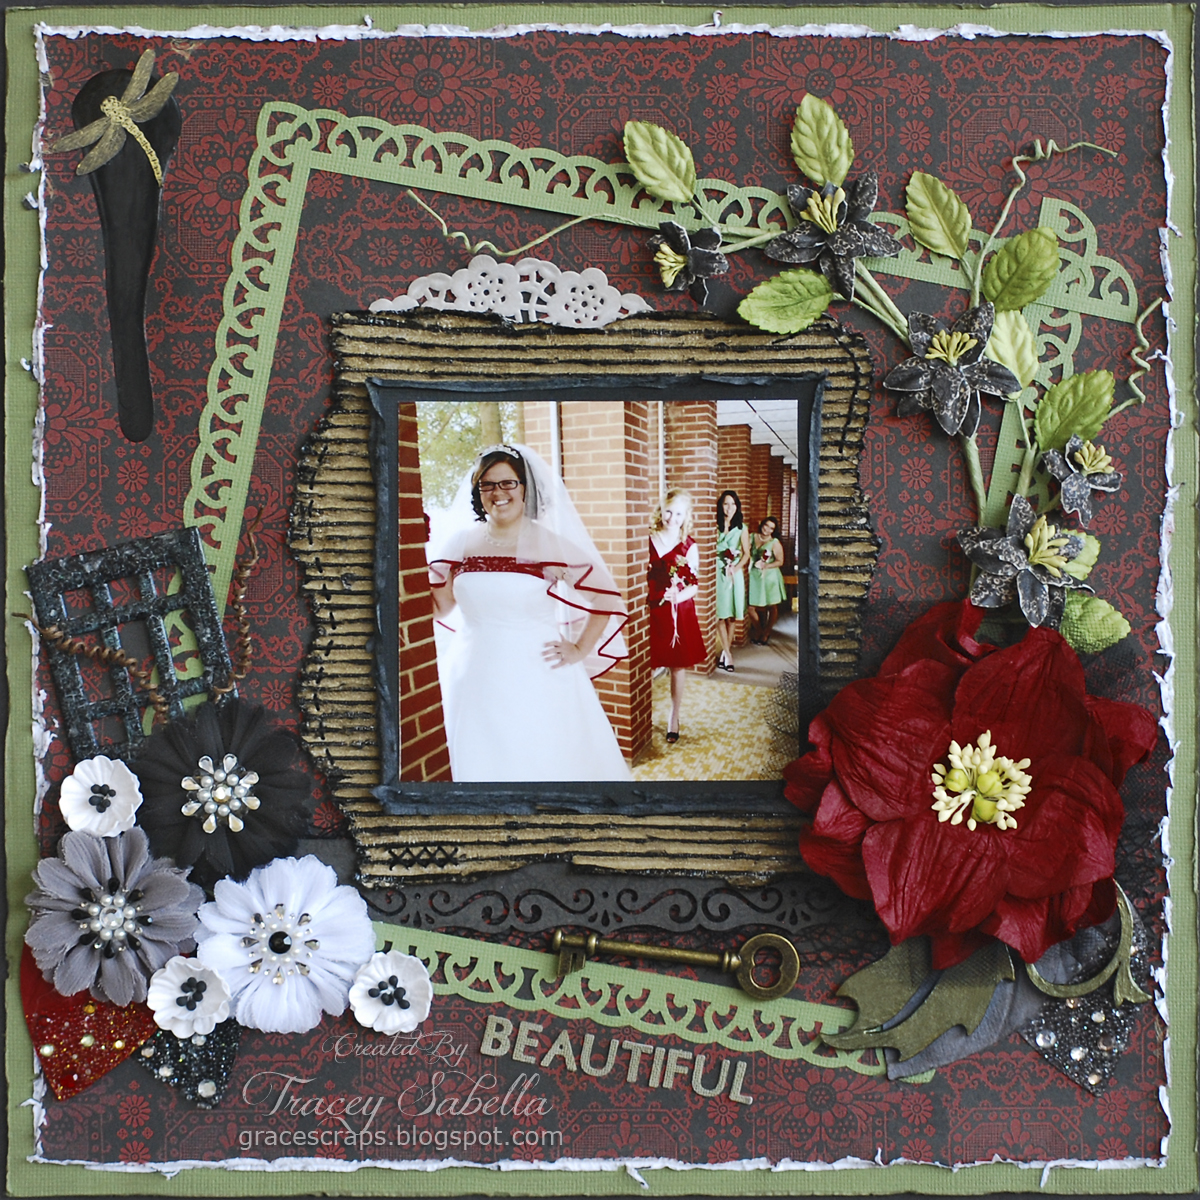
"Beautiful"
This is our lovely daughter-in-law on her wedding day with her bridesmaids this past December. I used the main, EAO, and FAO kits. I also added a piece of a corrugated box, embroidery floss for stitching, a Dusty Attic holly piece I won from a ScrapThat! Blog Hop several months ago, and the gem centers on the fabric flowers. 

Here's a little tip for you. The border frame was created with some Martha Stewart Punch Around the Page punches. They can only punch a frame in certain sizes that did not fit what I wanted for this page, so I fussy cut the two corners around the natural lines of the punched image and overlapped them to make the sweet fan shape in the upper right hand corner.  The bottom left corner of my frame is covered by my flower cluster, so I didn't need to be quite so carful there. 

"Amore"
Our son and Rachel giving their private vows to each other. I used the main, EOA, and FAO kits for this page. I added the dragonfly trinket, doily and a left-over piece of pearl flourish from my stash. I did a lot of fussy cutting on this one and used a mix of gorgeous kit flowers along with some handcrafted ones from the cardstock in the main kit. 

"Birthday Card"
Since one of my layouts is being saved for our October 30 Sketchabilities Reveal. I thought I would create a quick card from some of my extras from the kit. I used the main and FAO kits. I also used some embroidery floss for my stitching and a Bo Bunny rub-on for my sentiment. 

Be sure to stop back on Tuesday to see one more November Kit project
I created for the fabulous Sketchabilities Sketch.

I will also be sharing more details on these layouts as well as a
tutorial throughout the month.
~~~~~~~~~~~~~~~~~~~~

 Our Blog Hop features 6 fantastic blogs from our Design Team

Our SPECTACULAR November Blog Hop Prize is a ScrapThat! August Main Kit Featuring the gorgeous Charlotte's Dream by Kaisercraft!!

To qualify for this month's FABULOUS Prize you must complete the following:
* Visit each blog listed on the hop to see what each Designer has created using this month's kit and sketch (comments are very much appreciated)
* Each Designer's blog hop post will feature a word, to make up a secret sentence, collect these words along the way and follow the directions provided in ScrapThat!'s forum when you are all finished.
* You must become a FOLLOWER of each blog along the way and LIKE us on our Facebook Page!
* Post the ScrapThat! Blinkie on your blog
* The last stop on our Blog Hop is our Forum, follow the link provided and
complete the remainder of the Blog Hop Instructions

The Blog Hop ends Sunday, October 28 at 12 PM CST
The prize MUST be claimed within 3 days of the forum announcement which will also be made on the ScrapThat! Blog
If left unclaimed a NEW winner will be chosen ~
**Winner will pay actual shipping costs
for sending the kit from Canada.**
Shipping costs will be invoiced via PayPal.
Prizes won during the month will be mailed out the
first week of the following month.
Due to Customs clearance, international mailings
sometimes take 30-75 days to receive.

MY WORD IS:
 Serenade

Next hop over to:
Should you lose your way, come back here for the Blog Hop sequence:

Our Design Team is partnering with Sketchabilities for their upcoming October 30 Sketch Challenge! Be sure to stop back here next week to see the rest of our Design Team's inspiring work with this gorgeous November Kit and the reveal of the Sketchabilities new sketch!! 

Thanks for dropping by! I treasure your comments.
~ Blessings ~ 

Wednesday, October 24, 2012

ScrapThat! November Kit ~ Remember When . . . Sneak Peek

The fall colors are starting to abate, but we've had some lovely warm 70's weather this week to enjoy. I hope it has been lovely where you are as well. 

Our ScrapThat! design team has been hard at work creating some inspiration for you with our fabulous November Kit. Here's a Gorgeous Sneak Peek! 


ScrapThat! is excited to welcome our talented new design team member
*****Sarah Routledge*****


Prepare to be inspired by Sarah's ScrapThat! kit creations. She resides in Ontario, Canada with her husband and son. She loves the creative process of scrapbooking and enjoys creating her own flowers and embellishments. Her gorgeous work can be found on her blog, Scattered Pictures and Memories.

Be sure to stop by on Friday for the FABULOUS ScrapThat! November Kit Reveal and Blog Hop! 

This is my second post of the day. Be sure to scroll down and check out my GDT project for Word Art Wednesday - A lovely wooden cross I altered using mixed media techniques for the beautiful Word Art of the week. 

~ Blessings ~

Cross ~ Where Your Treasure Is - GDT Word Art Wednesday

Good Morning! It is looking to be a beautiful day here in Ohio. I hope it is lovely where you live! 

I am so enjoying creating projects with the gorgeous Word Images at Word Art Wednesday this month!! Today I would like to share an altered cross I created featuring Word Art with Matthew 6:21 ~ "Where your treasure is, there your heart will be also." This is such a great reminder to reflect on what I am treasuring and to realize that is where my heart will follow. 

Here is my project with this wonderful Word Art image:


Be sure to drop by Word Art Wednesday to see what their fabulous DT has created with this Word Art!

Techniques:
Word Art ~ I printed the Word Art onto a piece of cotton canvas. No, it was not printable canvas. I printed the Word Art onto a sheet of printer paper, then cut the fabric to size and adhered it over the printed Word Art using repositionable adhesive. I then ran it through the printer again. I pulled out some threads on each side and inked to distress.

Handcrafted Flower ~ I just bought the Donna Salazar Bitty Blossoms Die set. I have been wanting this die set for months, and was thrilled to finally create with it!

Trinkets ~ I have an assortment of fancy metal trinkets, corners, keys and clocks, and I pulled from my stash of goodies for these.


Mixed Media ~ I started with a simple, wood stained cross I found at a thrift store for less than a dollar. I sanded lightly and applied a rather thick coat of modeling paste to the front and sides of the cross, then took some punchinella with square openings - kind of like mesh and pushed it into the wet modeling paste here and there to give texture. When Dry, I brushed on white gesso. I let this dry again and spritzed on several shades of glimmer mist and spray ink - mostly browns. 

Vintage Hymn Page ~ I am so blessed to have been given two small, vintage hymnals that are tattered and well - falling apart. Because they are in such rough shape, I don't hesitate to tear them apart. I found the hymn, Wonderful Peace, which includes the words treasure and heart. I tore them out, inked just a little, then Mod Podged to the cross along with a couple other snippets. Once the Mod Podge was dry, I applied some crackle accents over the hymn pieces. While still wet, I sprinkled on a few silver micro beads. 

Mod Podge and Lace ~ Once all this was dry, I cut a piece of black lace and placed it on the cross. I brushed the entire cross, including the lace with Mod Podge and allowed to dry before adding the metal trinkets and flower. 

Alcohol Ink ~ The heart clock was too shiny silver looking, so I pulled out my alcohol inks and dabbed some onto the clock and hands. 

I also have some exciting news to share with you. 

My Peaceful Day by the Sea layout was selected as the winner for the Peace challenge at Bird is the Word. What an honor!! 

Thanks for all who went to May Arts to vote for my You Mean the World to Me layout that I entered in their Ink It Contest. It was selected among the top 10 winners for the contest. Your amazing support means so much to me!! 

Thanks for dropping by! I treasure your comments.
~ Blessings ~

Sunday, October 21, 2012

Forever ~ Tips and Techniques: ScrapThat! October Kit

I hope you're having a lovely weekend!!

Thanks for joining me today for Tips and Techniques from my Forever layout, the third and final page created with the gorgeous ScrapThat! October Kit.


Tips and Techniques:

Handcrafted Flower ~ I created the large pink flower with Donna Salazar's Grand Peony die set and added pearls from the kit to create the lovely center. I lightly inked the petals with the handy Prima ink included in this kit.

Misting ~ I glimmer misted slightly above where my photo was to be placed and then misted lightly with water to encourage the drips that you see below the photo dripping into the flower cluster.

Title ~ The felt letters were a bit grey so I inked them with distress ink to coordinate with my page. I do NOT recommend doing this. Because the letters are felt, they did not dry. I kept patting with paper towels until they no longer removed ink when patting. :-)

Fussy Cut Flowers ~ I added some flowers fussy cut from paper scraps to the edges of this cluster.


Scrunched Ribbon ~ I put some strong double sided adhesive onto my paper where I wanted the scrunched ribbon, then starting on one side with a long ribbon, started scrunching and randomly laying the ribbon onto the adhesive, then when I was finished, trimmed the other end. In a couple places where the ribbon wanted to pop up, I went back and added a bit more adhesive.


Wet Paper Scrunching ~ I wanted a depression in the top of my mat to set this lovely wood Prima clock. I wet the paper and pushed it down with my fingers and let it sit to dry before tucking the clock behind the little depression I created. I sanded the edges of the clock for a more distressed look.

Hand Stitching ~ the edge of the center mat was hand stitched with crochet thread. I have discovered that a single strand of crochet thread looks gorgeous and is easier to stitch with than several strands of embroidery floss.


ScrapThat! is currently accepting subscriptions
and this October Kit is available for sale in the store

Thanks for stopping by! I treasure your comments.
~ Blessings ~

Saturday, October 20, 2012

Love of My Life ~ Tips and Techniques: ScrapThat! October Kit

I'm back with more tips and techniques this morning from my Love of My Live layout created using the fabulous ScrapThat! October Kit. The photo on this page is Elizabeth and Andrew's favorite shot from their engagement photos.


Tips and Techniques:

Twine Flowers ~ I created the twine flower from jute twine. My tutorial for these flowers can be found here.

Handcrafted Flower ~ I created the pink flower with Donna Salazar's Grand Peony die set, and added one of the kit pearls to the center.

Wood Flower ~ I used a rock salt, mist, crackle technique on the wood flower. I'll be posting a photo tutorial on this technique next month.

Altered Ticket ~ I liked the hand on this ticket, but wanted different words to go with my layout, so I painted around the hand with gesso, inked the edges with black soot Distress Ink, and hand wrote "True Love."

Torn Edge ~ I tucked in the prima wood clock behind the torn edge. 

Drip ~ I put a blob of gesso below the torn edge and tapped my paper to encourage the drip to form, then placed a flower created with the Donna Salazar Rose Creations die set at the top of the drip. 

Scalloped Circle ~ This was so easy peasy. I cut a border strip, then snipped each of the scallops and arranged them around the layered circles, adhering each piece as I went.

Swirled Twine ~ I adore the look of something swirling across my page and through the flower clusters, dots of glue hold the twine in place. 

Colored, Stenciled, Modeling Paste ~ I spread the modeling paste over my stencil, allowed to dry, then used Distress Markers to color. I also used this technique in the bottom corner for my title and above the scalloped circle without the color for the phrase "I adore you!"

Hand Stitching ~ I used a circle template by In Stitch'z to pierce the stitching holes in my layered circles.

Layered Embossed Butterfly ~ The tutorial for these sweet butterflies can be found here.

ScrapThat! is currently accepting subscriptions
and this October Kit is available for sale in the store

Tomorrow, I'll be sharing tips and techniques for my Forever layout.

Thanks for stopping by! I treasure your comments.
~ Blessings ~

Friday, October 19, 2012

First Dance ~ Tips and Techniques ScrapThat! October Kit

I hope you are having a delightful week and have some fun times planned for this weekend. I have some scrappy projects due next week, so I get to do some creating this weekend. Today, I'll be spending the day creating with my friend, Mandy who has some craft fair projects to work on. Then Saturday and Sunday I'm heading to a crop at our local craft store, Pat Catan's, for their monthly crop.

Today, I would like to share with you the details of my First Dance Layout created with the amazing October ScrapThat! Kit featuring Prima's Tea Thyme papers. This is our son and his beautiful bride sharing their first dance on their wedding day, December 2011.


Tips and Techniques:

Transparency Butterflies ~ These sweet butterflies were created by printing butterfly images onto inkjet transparency paper. While the ink was still wet, I covered the images with clear embossing powder and heat set. To prevent the transparency paper from shrinking and warping, I kept the heat tool further from the image than I normally would, and took my time melting the embossing powder. While the embossing was still hot and wet, I added more clear embossing powder and heat set again. Once it was set and dry, pulled the wings forward from the body for some added dimension.

Hand Stitching ~ I drew a curved, looped line around the border of the page stopping at the edge of the bricks and horizontal paper strip. I used this line to pierce stitching holes for my hand stitching.

Ceramic Stucco Bricks ~ I sprayed the back of my brick stencil with some removable adhesive, allowed it to dry, then placed it on my page where I wanted a brick wall image. I used a craft spatula to spread the Ceramic Stucco Medium over the stencil. After carefully removing the stencil, I used my heat tool to dry, then moved the stencil to coordinate with the bricks already on the page and repeated this process around the page. Once all the brick work was dry, I spritzed with several colors of inks and mists to get the brick color I was looking for. I love that they are mottled and the color varied just like it would be on an actual brick wall. You can't see it in the photo, but the walls in the reception hall were exposed brick, making this a perfect background for this page.


Altered Flowers ~ I altered the Petaloo flowers with several shades of mist and gesso. For the flower on the left side, I removed the center and used the pearls from the kit to create a new one. The Prima clock was a perfect addition to this cluster.

Photo Mat Layers ~ The layers behind the photo were fussy cut from scraps of the Prima paper. Two sheets of paper had lovely frame pieces that were just the right size to cut and layer. The colors didn't go with this page, so I misted them and inked the edges. I also added a doily from my stash that I misted before tucking into the layers. The square photo mat and layout edges were distressed with my Zutter Distrezz-It-All by Donna Salazar.


Vines ~ The swirled vine tendrils were created with wires cut from the kit flowers and leaves. I simply wrapped them around a small diameter paint brush, then pulled and bent them to look more natural.

Fussy Cutting ~ I added some fussy cut flowers to this cluster. I like to get a lot of milage out of my papers, so whenever possible I cut out paper that is covered up by other papers. For instance when I have a frame around my page, I cut it about 1 inch wide, so I still have a 10 x 10 inch piece of paper to use for photo mats, cutting flowers, fussy cutting .  .  .

If there are any techniques here that you would like a step by step tutorial for, please let me know!!

Thanks for stopping by! I treasure your comments.
~ Blessings ~ 

Wednesday, October 17, 2012

Wedding Card Box ~ GDT Word Art Wednesday

What a lovely week!! Our children all gathered here yesterday to celebrate Elizabeth's birthday and to watch Elizabeth and Andrew open their wedding gifts. It is always so wonderful to have the family together. The fall leaves are turning more vibrant with each passing day. The gorgeous color won't last long, but it sure is beautiful right now!! 

It is reveal day at Word Art Wednesday. What an amazing privilege to work with this gorgeous Word Art!! This week's Word Art comes from my favorite book of the Bible. James 1:17 ~ Every good gift and perfect gift is from above and comes down from the Father of lights. This verse is such a beautiful reminder that while we live in a fallen world and unfortunate things happen around us and to us, our Lord gives us perfect, beautiful gifts. My life has been blessed in so many ways! 

One of the items I created for Elizabeth and Andrew's wedding was the card box for the gift table. What a perfect verse to include on their box:


Visit Word Art Wednesday for your free copy of this gorgeous Word Art
and to see the inspiring creations by their talented DT!

There are two wonderful sponsors this week.


Patsy Paterno of www.papemelroti.com
has donated this gorgeous necklace.
Please take a moment to browse her store.

Here's the top of the card box:

Techniques:

Handcrafted Flowers ~ I had some sheer white fabric in my stash which I cut into concentric circles. I lit a tea light candle and using tweezers heated the edges of my fabric circles. As the edges melted, they curled upwards creating lovely flower petals. A dab of FabriTac in the center of each petal works perfectly to put these beauties together. Then, I applied a circle of Art Institute Designer Dries Clear glue to the center of each flower to hold the marine blue microbeads ~ the color of the lovely bridesmaid dresses. 

Vines ~ I'm always looking for a bargain and a couple years ago during the after Christmas markdowns, I found a huge berry vine that I thought would work perfectly into some of my paper crafting projects. I just painted the bright Christmas red berries with a coat of white gesso for an elegant vine for the box. The leaves were left-overs from the wedding party flowers. 

Cut Work ~ Their names were cut with my Gazelle. Such a handy machine that will cut any font I have downloaded onto my computer. 

Word Art ~ Because I was placing the Word Art across the lid of the box, I needed to cut the Word Art apart. I wanted it to be all one connected piece, so I did the cutting in Photoshop. I opened the Word Art file in Photoshop, cropped each line, then lined up the individual pieces in layer windows before welding them together. I resized it to fit the 12 inch width of my box and printed on a 12 x 12 piece of pearlized vellum from my stash. It takes a long time for ink to dry on vellum. It's best to let it sit overnight to dry completely before cutting and applying to your project. 

Decorative Paper ~ I used elegant flocked paper to decorate the box. When selecting the box to decorate I made sure it was no larger than 12 x 12, so 4 sheets of paper would cover it. I created a lid to fit the box and covered it with black fabric before decorating. 

~ May Arts/Helmar Ink It Contest Reminder ~ 
I have a scrapbook layout posted over at the May Arts blog. If you would like to vote for me, I would appreciate the support. Leave your vote in the comment section, and you will be entered into a drawing to win some of their gorgeous ribbon!! 

Thanks for stopping by! I treasure your comments.
~ Blessings ~

Monday, October 15, 2012

May Arts Ink It Contest Voting

Hi everyone. The May Arts Ink It Submissions have been posted over on the May Arts Blog. If you go vote for your favorite, you will have the chance to win some May Arts Ribbon for yourself. While the winner will NOT be selected by votes, I'd sure appreciate your support. My entry is the last one at the bottom of the page. Place your vote by Thursday, Oct 18 to be eligible to win the ribbon. Thanks so much!! For project details and close-ups please stop by my blog post for this page.


Thanks for dropping by! I treasure your comments.
~ Blessings ~

Sunday, October 14, 2012

Layered, Embossed Butterfly Tutorial ~ ScrapThat!

I hope you are having a lovely weekend!! I had the chance to go scrapbook with friends Saturday and had a lovely time.

I would like to share a tutorial with you for the Layered Embossed Butterfly I created to use on the Love of My Life layout I created with my October ScrapThat! Kit.


The stamp included in the kit is gorgeous, but wasn't quite a fit with the photos I was planning to scrap, so I thought I'd use the butterfly on the stamp to create a sweet little embellishment for my page. Here's how I created it:

1. Gather Supplies

Embossing Powder - Copper and Gold
Kit Stamp
Kit Ink Pad
One larger or two small paper scraps from kit (only one small scrap pictured)
Scissors - my favorite fussy cutting scissor are any of the EK Success "Scissors.

2. Ink up the butterfly portion of the stamp. If you have embossing ink in your stash, it will give a more crisp image, but the Prima ink pad worked just fine.

3. I mixed two colors of embossing powder together - copper and gold. You can use any color or combination of colors that work with your page, or if you want your ink color to shine through, you can use clear embossing powder. The prima ink dries quickly, so have your embossing powder open and ready to pour onto the stamped image immediately. If you are working with embossing ink or other slow drying ink you will have more time to work with.  Don't worry if you have complete coverage with the powder - that will add to the charm of your butterfly. You will need to stamp and emboss the  butterfly portion of the stamp twice.

4. Heat emboss ~ while the powder is still hot and melted, quickly add another layer of embossing power, tap off any excess and heat again. You can do this several times to build up the embossed image. I used three layers of embossing powder on these butterflies. 

5. Fussy cut around the embossed butterflies using sharp scissors or craft knife. 

6. Trim off the antennae from one of the butterflies. Take the one with the best embossed image and bend the wings forward and curl the wings with your fingers. I find that a small paintbrush can be helpful to curl the wings. Using super sticky tape or glue of your choice, adhere the bodies of the two butterflies together. Here is the finished embellishment:

And my layout using the
Layered Embossed Butterfly:

These butterflies are super easy to make.
I hope you'll give them a try!

If you are looking for innovative tutorials to try in your scrapbooking,
I encourage you to come join us at the ScrapThat! Forum.

The ScrapThat! October Tip Toe Through Fall Kit
is now available in the ScrapThat! Store
ScrapThat! is currently accepting Subscribers.

Thanks for stopping by! I treasure your comments. 
~ Blessings ~

Friday, October 12, 2012

You Mean the World to Me ~ May Arts/Helmar September Challenge - Ink It!

I hope each of you is having a lovely week. It is fall here in Ohio, and I am enjoying the lovely trees as the leaves turn brilliant hues of yellow, red, and orange. Gary and I took a drive this afternoon to take in the gorgeous colors. 

I had such a wonderful time working with my May Arts ribbons and Helmar 450 Quick Dry Adhesive. I started out with an assortment of gorgeous May Arts ribbons all in white/ivory. The challenge was to color them to use in a project. Their products take color beautifully!! Here is my take on the challenge with a layout featuring a photo of Elizabeth and Andrew in front of the church where their reception was held on their wedding day. I used the remainder of my October ScrapThat! Kit with some additional Prima flowers and architectural metal frame. 

The May Arts products I selected to use include: Frayed Flowers - white, Faux Suede Leaves - ivory, Solid Canvas Ribbon - ivory, and Net Ribbon - ivory. And of course I used the Helmar 450 glue. I have always preferred tape over glue for most of my scrapbooking, but in this project I used mostly the glue. I also used some Helmar V2 Vellum Adhesive to adhere the Net Ribbon and Helmar Scrap Dots under some of the flowers where part of the flower was on the raised cardboard and I needed some extra height under the rest of the flower.


When I saw this sketch posted on Sketches With A Twist, I knew it would be perfect for the Ink It Challenge with all the flowers and ribbons. The twist is to include stars in one way or another. Mine are stamped below the long grey paper strip. 


Techniques:
Frayed Flowers ~ I fussy cut the flowers which came stitched to a length of sheer ribbon. I then misted the pink with Tattered Angels glimmer mist and the blue with some home made glimmer mist I had in my stash. I then went back with a darker mist for the centers, but rather than spritzing it on, I put a few drops into a small bowl and painted the flower centers to darken them up. When dry, I brushed on some gesso to give a more shabby feel. Finally I added some jeweled flower brads to the center of each Frayed Flower. I alcohol inked the gem centers to coordinate with the misted flowers.  

Canvas Ribbon ~ For the title ribbon, I cut a piece long enough for my title and misted with Tattered Angels glimmer mist. I crinkled it into a ball and let it sit until dry to get the wrinkled, distressed look. Once dry, I laid my template across the ribbon and smoothed flexible modeling paste over the stencil. The brown ribbons were colored and crinkled in the same manner, but no modeling paste. 

Faux Suede Leaves ~ These leaves took the misted color so beautifully. I then went back with distress ink to darken the edges and center of each leaf for added visual interest. 

Net Ribbon ~ I dyed this ribbon by spritzing with a color mist. Using a piece of scalloped edge paper as a template, I fussy cut the net ribbon into scallops. 

Hand Stitching ~ done around the center mat.

Distressing ~ I distressed all the edges using my Donna Salazar Distrezz-It-All. 

Modeling Paste ~ In addition to using modeling paste for the title, I used a stencil and modeling paste on the top mat. 

Corrugated Board ~ I tore a scrap from a cardboard box for my photo mat. I used a foam brush to apply gesso to the board. 

Fussy Cutting ~ The Prima paper had a lovely corner that I cut and tucked the photo into.

Stamping ~ I used the lighter Pumice Stone Distress Ink to stamp the words Hand in Hand at the bottom corner and for the strip of stars. 

Glue ~ This Helmar 450 glue was amazing. I used it to glue everything from paper and flowers to ribbon. The only thing that wasn't quite successful was using the glue on the doily which was a bit delicate for the glue. Where the glue showed through the doily paper, I placed the title ribbon over top. Problem averted!! This glue worked perfectly to adhere the metal frame to the photo!!

Thanks for stopping by! I treasure your comments
~ Blessings ~ 

Wednesday, October 10, 2012

Tenderhearted Canvas - GDT at Word Art Wednesday

I hope you all have had a wonderful week!! Mine was filled with the joy of a precious wedding with Elizabeth adding Andrew to our fold. 

This is my second week as a Guest Designer at Word Art Wednesday working with the lovely Word Art of the week. This verse shares attributes of God that I want to be reminded to incorporate into my life each day, kindness, tenderheartedness, forgiveness, and God's amazing gift of forgiveness towards me. When I saw this precious Scripture, I thought it was something I wanted to display rather than include on a scrapbook page or card, so I thought I would try creating my first canvas. Let me know what you think. 


Be sure to head on over to Word Art Wednesday
to get your free copy of this fabulous Scripture. 

Techniques:
Paper Pieced Ballerina ~ One of my favorite scrap artists is Gabriella Pollacco. I receive so much inspiration from her work. I've seen a fair number of she art canvases, but when I saw hers, I just ooohed and aaaawed over it. She provided a pattern, which I used, and video tutorial. I thought with this help, I would try my hand at it. The details and shoes were added with a fine tip marker. If you look closely you will see the words kind and forgiven taken from the verse and added to the edges of her skirt. 

Doodling ~ I always love doodling, but rarely use it. With the doodled details on her dress, I thought the doodling around the Word Art and the vine edge would be nice details. 

Mixed Media ~ I painted the edges of the canvas to coordinate with the colors of my girl, then Mod Podged torn pieces of paper to my canvas. I swiped some pale green paint across the center of the canvas then spritzed with water and dabbed with a paper towel to soften the color. I brushed white paint onto some bubble wrap and used it to stamp across the piece, then spritzed on some mist through some square holed punchinella. 

I lightly laid some inexpensive sticker letters down the side to form the word tenderhearted, again from the verse, then spritzed two different shades of mist over them. Once dry, I removed the stickers and edged the letters with marker. I then created my girl as above. The white script was added last. I recently purchased Donna Salazar's Mixed Media Inx. I have to say the white "Jasmine" really showed up nicely. I've tried a number of different white inks only to be disappointed with the lack of coverage. Not the case with "Jasmine". 

Butterflies ~ I received these charming little butterflies from Elena Olinevich last week. I painted them with alcohol ink, then sanded to bring out the details of the raised edges. 

Be sure to head over to Word Art Wednesday
to see what the talented DT has created
with this week's fabulous Word Art.

I thought I'd end with a photo of Elizabeth and Andrew in front of the
Greek church where their reception was held. 
Photography by Rachel Adkins.

Thanks for stopping by! I treasure your comments.
~ Blessings ~

Wednesday, October 3, 2012

Wedding Card ~ Word Art Wednesday GDT Reveal

I hope you are having a lovely week!! It's a busy one here with Elizabeth and Andrew's wedding only three days away!!

As I shared yesterday, I am delighted to be guest designing this month for Word Art Wednesday!! When I saw this Word Art for I Corinthians 13:4-7, I knew it would be perfect to use for Elizabeth and Andrew's wedding card. Charity is another word for love, and I pray that they will keep these verses at the center of their marriage always. 

It is a DOUBLE PRIZE WEEK at Word Art Wednesday, so you have the opportunity to win a lovely prize by  one of these two sponsors: My Craft Spot by Kimberly and My Heart Pieces.

Techniques
Tri-Shutter Fold ~ I modified a tutorial by Bonnie Szwalkiewicz posted at Split Coast Stampers. Because I wanted more space to place the Word Art, I adjusted the top and bottom strips to 1 inch rather than 1 1/2 inches, giving me the extra needed space in the center of the card. 


Handcrafted Flower ~ I used my Donna Salazar Rose Creations Dies to create this rose. I brushed on some Art Glitter Clear Adhesive, then sprinkled on some diamond dust for sparkle. This is the best glue I have found for adhering glitter and diamond dust. It really holds the glitter in place, so I don't have sparkle all over my project. 


Word Art ~ Since this is a verse about love for a wedding card, I found this lovely free SVG heart bordered mat, which I cut on my Gazelle. I cut the mat first. I then printed the Word Art onto a sheet of printer paper. Finally I adhered the cut mat on the printer paper over the Word Art image with removable tape. You can use a sunny window or light box to center the mat over your Word Art. Finally, I ran the paper through my printer again with the adhered mat for a perfectly centered, matted Word Art. A speck of printer ink got on the mat edge, so I brushed white gesso onto the edges and covered the unwanted black spot in the process. I placed rhinestones into the mat holes for just the right touch of bling. 


Heat Embossing ~
 I wanted the love image in the center of the card to be subtle, so I heat embossed it with silver embossing powder, giving almost a watermark effect (It photographed darker than it looks in real life). 

Edging ~ Each of the patterned paper pieces were cut to fit the tri-shutter pieces as in the tri-shutter tutorial. Each piece was lightly distressed using my Prima distress tool. The pieces cut to fit the 1 inch strips were then machine stitched and the center piece has dry embossed lines at the edges. 

Be sure to stop by Word Art Wednesday to download
your free copy of this week's gorgeous Word Art
and to see what the talented DT have created. 

I hope you will enter the Word Art Wednesday Challenge this week. Don't forget, if you aren't working on a project that is suitable for this week's Word Art, you may enter any project with Scripture or an encouraging message. 

I have entered this card at:
Frosted Designs ~ Fabulous Friday Challenge - Embossing (10/4)••
Stampin' for the Weekend ~ Challenge 18 -Feeling Floral (10/12)
Platypus Creek Digitals ~ Challenge 13 Pears and Lace (10/10)
Sentimental Sundays ~ Challenge #122: 3-2-1 Recipe (10/9)**
Lollipop Crafts ~ Challenge # 91 Something Old, Something New, My paper is over 2 years in my stash & the love stamp is new - purchased for this project. (10/15)
Ladybug Crafts Ink TLT Challenge Blog ~ Let's Play Bingo (10/9)**
Paper Expressions ~ Tuesday's Testimonial Linky Party - Use Scripture on project.**
Use It Tuesday ~ Challenge #40: Use Your Scraps!!(10/7)**
Divas by Design ~ Challenge 55 Use some texture (10/11)**
My Mums Craft Shop Challenges ~ Challenge 78 - Love is all around (10/11)**

Thanks for stopping by! I treasure your comments.
~ Blessings ~

Tuesday, October 2, 2012

October Guest Designer at Word Art Wednesday

I was so delighted when Karen asked me to guest design for Word Art Wednesday this month. It is such an uplifting challenge site with the most amazing Scripture/Word Art provided each week ~ so wonderful for cards, scrapbook pages, art journals and altered projects. If the Word Art of the week doesn't fit with the project you are working on, you may enter any project that includes Scripture or an encouraging message in their weekly challenge. 

I will be sharing a variety of projects with you this month. My first project will be revealed tomorrow; however, I thought I would share a sneak peek with you. Here's a close-up of the front of the card I created for Elizabeth and Andrew's wedding this Saturday. Only four more days, but who's counting?? 


Be sure to drop by tomorrow for the reveal.

Thanks for stopping by! I treasure your comments.
~ Blessings ~