Showing posts with label DSD Grand Peony. Show all posts

Tuesday, July 30, 2013

Want2Scrap Top Secret Birthday Party Blog Hop

Welcome to the Want2Scrap Birthday Party Blog Hop for Michele Parrish. If you would like to start at the beginning, head on over to the Want2Scrap Blog.

Happy 50th Birthday, Michele!! I hope you have a fabulous day!!

Bling is the theme!! 

Michele loves pink and bling.
Here's the card I created for her:


I've been a big fan of Michele's Want2Scrap bling and chipboard for a long time. My newest Want2Scrap must have products are her wonderful stencils designed by Donna Salazar!!

Project Details
Aren't the Want2Scrap chipboard pieces so gorgeous heat embossed with Fran-tage embossing powders? I used Donna Salazar's Spellbinders Grand Peony Dies to create these Crushed Voile Peonies centered with one of her Bitty Blossoms flowers. My tutorial for these flowers can be found here. The triple looped bow is created with white organza ribbon. All of these items from the delicate flowers to the heavier chipboard are adhered with Helmar 450 Quick Dry Adhesive. 

Here's another view showing off the gorgeous Want2Scrap Chipboard and pearl flourish.

Can I just say how much I adore these teardrop pearls?? Let's just say, I have several packages in my stash!! They are just perfect to accent this doily!! I colored the doily using DSD Mix'd Media Inx and ran some embroidery floss around the center circle. I stamped and embossed the sentiment then inked the cardstock background. I just love how Donna's Inx work so well with her papers. I used her Natural Beauty collection here. My DSD Distrezz-It-All made quick work of distressing the edges. 

Want2Scrap Products

Other Products
Donna Salazar Designs, GCD Studios ~ Natural Beauty - Twiggy
Donna Salazar Designs, GCD Studios ~ Family Jeans - Family Eyelet
Donna Salazar Designs, GCD Studios ~ Mix'd Media Stax 2
Donna Salazar Designs, Spellbinders ~ Bitty Blossoms
Donna Salazar Designs, Spellbinders ~ Grand Peony
Donna Salazar Designs, Clearsnap ~ Mix'd Media Inx
Donna Salazar Designs, Zutter ~ Distrezz-It-All
Crushed Voile Fabric
Sewing Machine ~ Viking Husqvarna Designer 1
White Thread
DMC Embroidery Thread
Doily
White Organza Ribbon
Helmar 450 Quick Dry Adhesive

Be sure to check out the RaffleCopter to find extra ways to enter the giveaway drawing. 

Here's a mobil link for entries:

I'm so glad you have joined us to wish Michele a very happy 50th birthday. 

Follow on Bloglovin

Thanks for stopping by! I treasure your comments.

~ Blessings ~

Wednesday, June 19, 2013

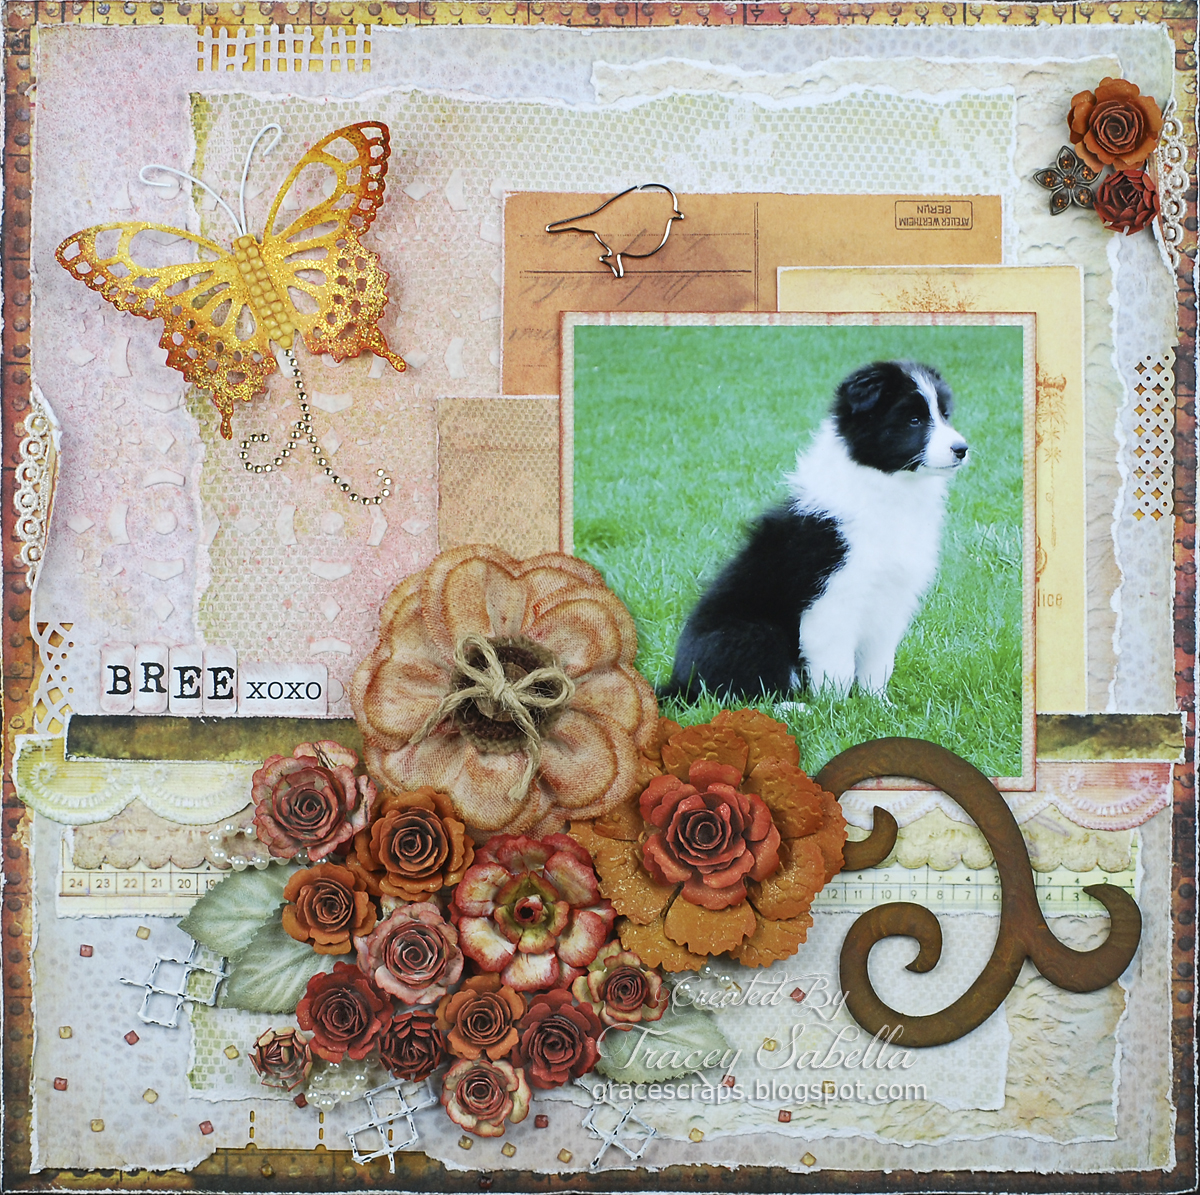
"Bree" details for ScrapThat!

When we moved back to Ohio in 2000, dogs became an important part of our lives. My brother gave Grace 15 month old Ellie, a German shepherd/Belgian malinois mix so that she could take part in his 4-H dog club. After years of work and training, they ended up becoming one of the top United Kennel Club obedience teams in the country. Ellie is no longer with us, and it's time for a new dog. Bree is her new border collie pup. Isn't she adorable?? 

This page was created with the ScrapThat! June Kit using the Main Kit only and Amy's inspiring sketch. 

"Bree"
MK Only

Amy's June Sketch:

Stop by the ScrapThat! Forum to add your sketch based layout to Amy's Sketch Challenge.

Tips and Techniques:

Altered Canvas Flower ~ The Prima Canvas Flower from the MK was inked and a jute bow tied through the button. 

Handcrafted flowers ~ I created a bevy of flowers from kit paper and cardstock using Tattered Florals  dies and Donna Salazar's Grand Peony and Bitty Blossoms dies. I also did some embossing, inking, and spritzing to add texture, dimension, and sparkle. 

Leaves ~ I painted the kit flowers with a gesso wash to soften, but still let some of the green show. 

Black Mesh ~ Oh my, I just adore this black mesh!! I just snipped several strips, painted with gesso and when dry scratched off some of the paint to distress. 

Gems ~ The Prima Sunrise Sunset crystal sheet is one solid sheet of crystals, but I pulled some of them apart and scattered them below the cluster. 

Border Punching ~ I used several border punches to punch random places into the edges. 


More of my Bitty Blossoms flowers here with a bejeweled flower trinket from my stash. I also tucked some bits of lace into the distressed edges. 


Handcrafted Butterfly ~ I used Donna Salazar's Wonderful Wings Dies to cut this butterfly from kit paper, and pulled more gems to arrange for the body. The antenna are wires cut from the MK flowers, painted white, and bent to shape. I inked the wing edges and brushed with stickles. Just a snippet of a crystal flourish from my stash for the trail. 

Mixed Media ~ I used molding paste to stencil this background and once dry misted. I wiped the mist off of the molding paste to make it pop. 


Vintage Rusted Ironwork Chipboard ~ My tutorial can be found here. 

Fussy Cutting ~ I fussy cut lace strips from kit paper for the border strips below the photo. 

Distressed Edges ~ I used a mix of torn edges and my DSD Distrezz-It-All. 

We have 4 Design team challenges going on this month
in addition to our Sketch Challenge:


The ScrapThat! June kit is available in our store.

Follow on Bloglovin

Thanks for stopping by! I treasure your comments.

~ Blessings ~
Tuesday, June 18, 2013

"Abby" details for ScrapThat!

My parents' home is on a small lake and is a family gathering place. This fun photo is my niece showing off her dirty hands from her afternoon of fishing. As you can see by her captivating smile, she enjoys fishing!  I used the fabulous ScrapThat! June Kit featuring the Prima Sunrise Sunset Collection and pulled the blues from the lake to accent the page.

"Abby"
MK, EAO, FAO

I used the Dusty Attic May sketch for inspiration:

Tips and Techniques:

Zipper Flower ~ Isn't this Prima zipper flower from the Flower Add-On Kit just gorgeous.

Altered Flowers ~ I altered FAO Kit flowers to coordinate with this LO and to bring in the blues of the lake. The Petaloo mulberry paper flowers were brushed with teal and blue mists. The larger paper Petaloo flower was painted with Lumiere paints, while I highlighted the MK tissue paper flower and carnation with a touch of rust ink. 

Handcrafted flowers ~ The rust color flowers were created using kit cardstock. For the larger one ~ the outer petals are cut with Donna Salazar's Grand Peony Spellbinder dies then embossed with a brocade embossing folder and topped with a Donna Salazar Bitty Blossoms Spellbinder rolled flower. The smaller flowers are also cut with the Bitty Blossoms dies.


Twine Flowers ~ I used jute string and bamboo cording from Really Reasonable Ribbon to create the twine flowers and added EAO Kit buttons and gems for centers. My tutorial for the twine flowers can be found here. 

Stenciling ~ I added copper paint to ceramic stucco medium and used a stencil to add the quarter round floral design. 

Painted Chipboard ~ I used Lumiere metallic and pearlized paints on the Dusty Attic chipboard from my stash and inked the stems and leaf edges with a darker green.


Alcohol Inked Butterflies ~ You can just see the edge of the wings here, but these sweet Maya Road metal butterflies are in the EAO Kit. It is so easy to dab alcohol ink onto nonporous embellies to change up the color. 

Altered Kit Flowers ~ You can really see how I transformed these pale lavender flowers to teal/blue. To get the shaded blue accents, I spritzed some mist on my craft mat and used a paint brush to add the darker blue on just one side of each petal. 


Distressing ~ You know how much I enjoy using my Donna Salazar Distrezz-It-All to make fast work of these wonderful distressed edges. 


Layered Doilies ~ I inked the Main Kit doilies and die cut another using Spellbinders Ironwork Accents and layered them at the photo's corner to add a sunny day accent to the blues of the photo. 


Clip ~ The Idea-ology hinge clip from the MK is such a fun accent here. 


Painted Mesh ~ I just adore the black mesh included in the Main Kit. I used it on all of my pages. I painted it then scratched off bits of the paint to expose the black for a grungy look.

Corrugated Board ~ This corrugated photo mat was created with cardboard from a shipping box. I pulled the top layer off, roughly tore to size and painted with gesso. I then inked with blue and sprinkled on clear embossing powder to give the feel of the watery blue from the lake. 

Vintage Map Page ~ During my days of home educating, I collected scores of old (now outdated) books including one with gorgeous color maps which has now moved into my scrapbooking stash. I used a snippet under the photo. 


Title ~ The Prima Sunrise Sunset has to be my favorite Alpha set!! I love all the different shapes and sizes of little letters including these typeset letters used for my title.


The June Kit and Add-ons are currently available in the ScrapThat! Store.

Thanks for stopping by! I treasure your comments.

~ Blessings ~

Follow on Bloglovin

Saturday, June 1, 2013

"Men in Black" ~ Really Reasonable June 1 Challenge

If you are here for the ScrapThat! June Kit
Reveal and Blog Hop, please go here.

I enjoy creating grungy masculine pages, and the Really Reasonable Ribbon Challenge #73 gave me the opportunity to put one together. I just adore this photo of Andrew and his groomsmen enjoying those last final moments before the wedding. 

I ordered some of my favorite masculine jutes and burlaps from the
RRR store and the quality is so wonderful! 


To enter this challenge, create a card, layout, or any handcrafted project. Just be sure to follow the theme and use ribbon, lace, or trim somewhere on your project.

"Men in Black"


Really Reasonable Ribbon Products:

I'm also featuring some Donna Salazar Products on this layout which I will list at the end of my post. Donna's Girly Grunge style (emphasis on grunge) is just perfect for a masculine page. 

Tips and Techniques:

Jute Twine Flowers ~ I used Jute String to create the twine flowers and my tutorial can be viewed here.  I selected buttons from the Natural Button Grab Bag for my flower centers sized so that you can still see the woven stitching. Of course I tied the buttons with some of the Jute String. 

Rolled Burlap Flower ~ I used the Burlap Woven Ribbon to create the smaller burlap flower and some vintage washers and a screw for the center.

Chipboard Flourishes ~ I painted Donna Salazar's card size Hand Drawn Swirls chipboard, then stamped with her "Dear Sir" Stamp and edged with Chox Mix'd Media Inx. 

Textured Flower Background ~ I cut flower petal sections from black card stock using Donna Salazar's Grand Peony Dies just larger than each of the jute/burlap flowers. I then dry embossed using the Tim Holtz Burlap embossing folder. I rubbed the raised portion with a little Faber-Castell Gold Gelato. 

Textured Leaves ~ The leaves are also cut from black cardstock using the Grand Peony leaf dies. I hand creased the leaves where the natural veining would be and colored by dry rubbing with Gelatos. 

Stenciling ~ I used Donna's new Midnight Chox Inx over the TCW Diamond Stencil for a fabulous masculine design over the bricked background. 


Woven Gears ~ My friend, Mandy, gave me these vintage gears and machined pieces that her grandfather had stashed in his basement. I wove them together using Black Grosgrain Ribbon. Aren't they a delightful touch? I cut pieces of Score-Tape to adhere this piece to the page. This strong yet thin tape is perfect to adhere anything from delicate ribbon to heavier metal pieces. 

Layers ~ I love how the photo was taken at an angle. I turned it so the guys are straight and the photo angled. I layered lots of textured pieces at more angles under the photo - More embossed and Gelato'd card stock, grunged DSD Corrugated board, and this delightful Jute Ribbon. 


Gears ~ I used a mix of metal and die cut gears to tuck into the edges of my page and around the cluster. I die cut and embossed black card stock with Donna's Sprightly Sprockets dies and rubbed gold Viva Ink Gold to give the grungy metallic sheen. 

Distressing ~ I used the DSD Distrezz-It-All for all my distressing.


Arrows ~ I mixed black paint into Liquitex Blended Fibers and used Donna's new Want2Scrap Large Arrow Stencil to create these arrows.

You can see more of the grungy layers here and how gorgeous the Jute Ribbon is in the mix. 

Bonnie's natural fiber burlap and jute really take the show on this page. I hope you've been inspired to join us in creating a masculine project for Really Reasonable Ribbon Challenge #73. 


Be sure to check out the RRR Blog for all the details and prize information.

Donna Salazar Products Used:
Antiquities ~ Steampunk Gentleman; Tags Ribbons, and Mosaics by GCD 
13x13 Corrugated Board by Zutter
Hand Drawn Swirls Chipboard by Want2Scrap
Mix'd Media Inx ~ Truffle by Clearsnap
Mix'd Media Inx Chox ~ Sparrow, Midnight by Clearsnap
8x10 Large Arrows Stencil by Want2Scrap
Dear Sir Stamp by Art Gone Wild
Grand Peony Dies by Spellbinders
Sprightly Sprockets Dies by Spellbinders
Distrezz-It-All by Zutter

Other Products Used:
Black Cardstock
Basic Grey Alphabet Stickers ~ Lime Rickey
Kaisercraft Fonza Alphabet ~ Chocolate
Vintage washers, screw, and machined pieces
Tim Holtz - Mini Paper Clip
Spare Parts - Arrow Photo Turn
Bead Landing Found Parts ~ Gears
Bead Landing Bezels, Frames and Filigree ~ Gears
7Gypsies Vintage Clip ~ Antique Silver
Faber-Castell Gelatos ~ Pistachio, Gold, Black
Tattered Angels Glimmer Mist ~ Cork
Heidi Swapp Color Shine ~ Bronzer
Art@ Gltter Mist Copper
Deco Art Acrylic Paint ~ Black
Deco Art Americana ~ Driftwood
Liquitex Blended Fibers
Viva Inka Gold
Distress Ink ~ Pumice Stone
Tim Holtz Embossing Folders ~ Gridlock, Burlap
TCW 12x12 Diamond Stencil
Beacon Fabri-Tac
Beacon 3-in-1
Scotch ATG
Sizzix Big Shot
Ranger Heat-It Craft Tool
Basic Grey Craft Files

I have entered this project at:
Word Art Wednesday


Thanks for stopping by! I treasure your comments.

~ Blessings ~

Monday, May 13, 2013

Patriotic Birthday Card for the Really Reasonable Ribbon May Blog Hop

Good morning and welcome to the Really Reasonable Ribbon May Blog Hop.


If you've just been inspired by Jeannie's fabulous work, you are in the right place. If not, you can join us for some patriotic inspiration with the gorgeous May RRR Ribbon Club Assortment by hopping on over to the RRR Blog to start at the beginning. There you will find all the blog hop and prize details.


Just look at the gorgeous ribbons in this month's RRR Ribbon Club Assortment! They are perfect to create projects for those Memorial Day and 4th of July family get togethers. My dad is a proud Air Force veteran, so I selected several ribbons from this collection to feature on the birthday card I created for him. 

"Patriotic Birthday Card"

Tips and Techniques:

Ribbon Star ~ I wanted to go with a vintage, masculine look for this card, so I colored the white patriotic dot grosgrain from the May Ribbon Club Assortment with distress inks. I folded it into a partial Moravian Star design to create a wonderful masculine center for my twine flower. 

Layered Flower ~ The base of this flower was cut from denim using my Donna Salazar Grand Peony dies by Spellbinders. Next I created a loomed twine flower with RRR Natural Jute String. My twine flower tutorial can be found here. And of course on top is the ribbon star I created with the RRR May Ribbon Club Assortment. 

Title ~ I fussy cut the title mat from BoBunny Liberty Cut Outs. The letters were cut using my Tim Holtz Typeset strip die. I colored some speckled cardstock to coordinate with the BoBunny Liberty Collection papers used to created this card. 

Stamping ~ The flourish next to the twine and ribbon flower was stamped with a BoBunny Liberty stamp with distress inks. 


Ribbon Strip ~ To achieve a more vintage feel, I layered the red swiss dot grosgrain from the May Ribbon Club Assortment behind the sheer portion of the blue ribbon also found in the May Assortment.   I added this vintage BoBunny flag trinket over the layered ribbons. Every project needs a little bling and the iridescent stitching on the blue ribbon adds that nice touch without looking "girly."

Distressing ~ I distressed the paper layers with my Donna Salazar Distrezz-It-All by Zutter. 

~ ~ ~ ~ ~ ~ ~

The May RRR Club Assortment is so versatile and can also be used for more elegant projects as well. I used two of the red ribbons and white lace here in this wedding layout posted earlier this month of our sweet daughter-in-law, Rachel and her maid of honor. The red ribbon was an absolutely perfect match to the red in the dresses with the lace being a perfect accent for a wedding page. 

"Maid of Honor"

For close-ups and details of this layout go here. 

I hope you've been inspired to grab your May RRR Ribbon Club Assortment and start creating!

Your next stop on the RRR May Blog hop will take you to 
to some amazing inspiration from Cheryl. 

Thanks for following me with Bloglovin.

Follow on Bloglovin

Thanks for stopping by! I treasure your comments.

  ~ Blessings ~

Thursday, April 18, 2013

"Flower Girl" details for ScrapThat!

You may remember another flower girl page with my sweet niece, Abby. She was the flower girl in Joseph's wedding and again here for Elizabeth. It is obvious by her charming smile that she greatly enjoyed the honor!!

I used the April ScrapThat! Kit featuring Donna Salazar's Natural Beauty Collection and add-on kits to created this page.

"Flower Girl"
MK, EAO, FAO

Tips and Techniques:

Handcrafted Flowers ~ The two flowers in the top left of cluster were created using thick mulberry paper and Donna Salazar's Grand Peony and Bitty Blossoms dies. It's hard to see here, but the larger of the two also is edged with white puffy paint for added texture and dimension.

Kit flowers ~ The FAO is loaded with gorgeous flowers. The large focal flower is by Petaloo and the canvas flower is Prima. The tiny white roses are in the main kit. The main kit leaves were gold and green which didn't quite work with the colors on this page, so I painted them with gesso, stamped with a large font script, then inked the veins and edges. I also tucked in one of the EAO metal roses. The flourish is from my stash.


Fussy Cutting ~ I fussy cut the bird and cage to tuck into my cluster.

Flowers ~ More of my Bitty Blossoms mulberry paper flowers and little white MK roses. The larger rose here is by Zva and in the MK. 


Chipboard ~ This gorgeous Fabscrap sign is included in the MK. The post was painted with a thick coat of antique gold metallic paint. While still wet, I used my heat tool to bubble the paint to achieve this lovely texture. I also rubbed on a little black soot distress ink to highlight the texture. The sign piece was painted. When dry, I inked the edges then covered with Crackle Accents. (Crackle Accents acts as a resist, so ink first, then cover with this medium.) I allowed the sign to dry overnight, allowing these lovely cracks to form. The title letters were cut using my Tim Holtz Typeset die and a scrap of kit paper. I inked the edges to help them pop.

Distressing ~ I used my all time favorite scrapbooking tool, my Donna Salazar Distrezz-It-All. I love how quick it is to get this lovely distressing on my straight edges!! 

Stenciling ~ I stenciled this flower using my Plaid Summer Floral stencil and Golden Light Molding Paste. I have found that my local craft stores carry quite a selection of beautiful stencils in their paint department, so if this is a technique you've been wanting to try check out your paint department for stencils. When using molding or texture paste, it is important to used "flexible" texture paste or "light molding paste. Paper has a lot of give and the regular versions of these mediums can crack on paper. (Ask me how I know. lol) I also used my Donna Salazar Houndstooth stencil along the bottom of the page. After the molding paste dried, I spritzed with Tattered Angels Moonlight Glimmer Mist and just a little water, then held the paper up and tapped it to achieve the drips. 

Corded frame ~ I just adore the cording in the MK. It is not regular Jute, but covered in a soft, natural wrapping and it looks solid rather than twisted. It looped beautifully for my photo frame. I got a little happy with the glue and it was visible in a couple places, so I added a few of the little MK white roses in strategic places. 

Punched Doily ~ It was so easy to create my blue punched doily. I cut a circle from the kit paper, then used my Martha Stewart French Scroll punch on the edges. Leave the side wings closed for this technique and turn the punch upside down so you can see the design as you are punching. Make your first punch, then line up the next cut with the edge of the punch just barely touching the previous cut and make sure the top of the punch is even with the edge of your circle. Most likely your punches with not match up when you get back to the first punch, but that is OK since part of the doily edge is under the flower clusters. I put one of the tiny MK pearls in the center of each visible scallop. The layered white doilies are from my personal stash. 


Peek-A-Boo ~ I wet the edge of the paper and pushed it up. Once dry, I decorated it with more of these sweet MK roses and the EAO Maya Road Metal Roses. Some of the metal roses were a little squished in the package, but easily reshaped to form these little beauties. 

I am hosting the ScrapThat! DT Challenge this month to use fibers other than lace and ribbon on your project such as cording, thread, fabric . . . Stop by the ScrapThat! Forum to check out the details and enter your project. 

While you are there be sure to check out Amy's Sketch Challenge as well. 

If you are looking to purchase high quality scrapbook kits, stop by the ScrapThat! Store to do some shopping. 

Thanks for following me on Bloglovin:

Follow on Bloglovin

Thanks for stopping by! I treasure your comments. 

~ Blessings ~ 

Thursday, March 21, 2013

"Cherish this Moment" Details ~ ScrapThat! March Kit

There is just something special about a dad and his daughter on her wedding day. This photo of Gary dancing with Elizabeth is so sweet. I love the way he whispered and talked with her during this special dance. 

The ScrapThat! March kit with these Meg's Garden papers was so wonderful to work with! Beautiful fussy cutting opportunities and such gorgeous flowers!! 

If you happened to miss my exciting announcement about being named to the Donna Salazar 2013 Guest Design Team with a group of amazingly talented artists, check out my Tuesday post. 

Cherish this Moment
MK, EAO, FAO

I used Amy's gorgeous sketch:

For details on Amy's sketch challenge and prizes go here.

If you would like to play along with our March DT Challenge, check out the details here. 

Tips and Techniques:


Flower Cluster ~ The full brown roses and green open roses are included in the FAO kit while these fun prima gears are in the EAO. I added a few small roses cut from kit cardstock and Donna Salazar's Bitty Blossoms dies. The sweet yellow carnation used Donna's Carnation Creations dies. I added a Zva flourish from my stash that I cut apart and tucked here and there on the page. 

Fussy Cutting ~ There are so many fussy cutting opportunities with this gorgeous Meg's Garden Papers. From borders and frames to flowers and leaves.


Layering ~ I cut several strips of the striped papers for my layering. With the dark paper I distressed the edges and scratched the top with my Prima distress tool to soften the black. I then pleated it for extra dimension. The other layers were distressed and punched with kit pearls added to the punched strip. I topped the papers with the MK filmstrip which I only attached under the fussy cut flowers so it would lie loosely and ribbon-like. 

Distressing ~ I distressed all the edges and mats with my Donna Salazar Distrezz-It-All by Zutter. 


Title ~ I punched out the word Cherish with a circle punch. I punched a strip of scallops from some of the striped paper and cut each scallop apart. I adhered them around the circle, overlapping slightly to make the doily edge. I had a few extra crystals from my flourish, which I cut apart and placed around the edge. 

More Fussy Cutting ~ The sprays of little pink flowers were fussy cut and tucked into the cluster.

Handcrafted Flowers ~ The larger pink Full Open Rose was hand crafted using Donna Salazar Grand Peony and Bitty Blossoms. My tutorial can be found here. 


Dragonfly ~ This sweet little dragonfly by Gina's Designs is from my stash and so easy. I simply painted with rich, metallic Lumiere paints. 

Flower ~ Another of my Carnation Creations flowers close-up, and fussy cut leaves tucked into this peek-a-boo space at the edge of my paper. 

Thanks for stopping by! I treasure your comments. 

~ Blessings ~

Monday, March 4, 2013

Movin' On

I'm back to share the details of my personal favorite layout I created from the ScrapThat! March Kit. Normally my layouts evolve as I create them; however, for this one I had this fun idea pop into my mind. Amazingly, it came out just as I had envisioned. I've had this photo set aside to scrap for some time. It is an older photo of our daughter, Elizabeth taking a drive with her cousin, Tyler. We didn't have a battery operated car, so she was so thrilled with the ride, and I just adore Tyler's serious expression as he is trucking her on down the path. 

The ScrapThat! Main Kit is just packed with gorgeous embellishments included on this page.

Movin' On
MK

Tips and Techniques:


Title Banner ~ I used my CTMH Artiste cartridge to cut the layered banner from the MK cardstock. I added eyelets from my stash to run the brown kit cording through. The letters are from the Basic Grey Alphas included in the kit. These little letters are just perfect and so versatile  I inked them just a bit to take the edge off the bright white, and they can be inked to any color to coordinate. I also inked the edges of the banner pieces. You will notice a flourish from my stash tucked into my flower cluster. I cut up the random extra crystals to embellish the banner. 

Eggshell Path ~ I was inspired by Gabrielle Pollacco's egg shell mosaic to create this little road. I cut a piece of cardstock into the shape of a curved path, then followed Gabby's great tutorial to apply and color the eggshells. At first I tried some small pebbles, but they were too large, and the eggshells worked perfectly.

Mixed Media ~ For this page, the pink flowers in the bottom right corner of the page didn't really fit my plans for the layout, so I used a credit card to apply gesso over them. It took two coats to completely cover, and I let the gesso dry between coats. I then spritzed with mists in green and brown. To get the inky drips. Spritz with mist, then a bit of water and tap the page to get the drips. Be sure to allow each color to dry before adding the next color. Heat set if you don't want to wait for them to air dry.  If your paper gets more warped than you like, mist the back of the warped section with a tiny bit of water, layer between paper towels and stack heavy books on top and let sit overnight. I usually put a large glass mat between the page and books to evenly distribute the weight. 

Bead Gel ~ After all my misting, I applied glass bead gel below the path using a stencil. I love how it picked up just a little golden hue from the mist I had applied to the page. 


Flowers ~ I just had to show you a couple different views of the flowers. The  pink roses are created with kit card stock and colored with Distress Ink. You can find my tutorial for the larger Full Open Rose created with Donna Salazar's Grand Peony and Bitty Blossoms dies here and the smaller rose is created with the largest of the Bitty Blossoms Dies. The yellow carnation is from her Carnation Creations die set. The gorgeous white blossoms, velvet leaves, and skeleton leaves are all in the Main Kit. 


Chipboard Sun ~ I used one of the flower chipboard pieces from the kit to create this sweet sun. Be sure to come back next Tuesday, March 12 for my tutorial. 


More Flowers ~ I want my layout to feel like Elizabeth and Tyler are driving on a path through a yard, so included these DA grass clusters with more of these sweet kit roses. A quick brush of paint colored the chippies. 

Nut Tree ~ I told some friends this was my insanity tree because I fussy cut an embossed image to create it. They told me I was nuts, so now I call it my "Nut" tree. I know, I know - there are plenty of cut files for leafy trees out there, but this Darice embossing folder tree was the perfect size and shape. I probably won't ever fussy cut another, but love this one for this page. 

I had so much fun creating this page and hope that you
have found some inspiration for your own pages. 

Thanks for stopping by! I treasure your comments.

~ Blessings ~