Showing posts with label Hand Stitching. Show all posts

Saturday, September 21, 2013

Thanks Big Time for Really Reasonable Ribbon

I can't believe how quickly the year is passing by. I'm enjoying the cooler fall weather that's arrived this week.

I have so many things to be grateful for, and it's always nice to share a thank you for a special kindness. My card features lace, flowers, and twine from the Really Reasonable Ribbon Store along with Donna Salazar Designs papers.

I normally include a tutorial with this post, but I'm changing things up this month, so be sure to check back on Sept. 30 for a layout and tutorial for two kinds of Grungy Jute/Burlap Flowers.

"Thanks Big Time"

Really Reasonable Ribbon Products


Tips and Techniques
Aren't these WOC Cosmos and Sweetheart Blossom Flowers so darling? The Cosmos Daisy required some propping up on the top where the chipboard ended, and the Tombow 3-D Tabs were perfect for this task. 

I played around with this flower cluster, and although a larger bow overwhelmed these delicate flowers, this thin 10-lb Bamboo Cord tied into a simple little bow was just right.

The Blue Fern chipboard was dabbed with Jasmine Mix'd Media Inx and then lightly sprinkled with MMI Jasmine Embossing powder and heat set for a grungy look.

I used 20-lb Bamboo Cord to "tie" each end of my sentiment die-cut. 

I added Juliet Natural Crochet Lace below the paper block, adhered with a strip of Scor-Tape. It is so easy to use Scor-Tape to adhere lace and ribbon to my projects! The Juliet lace is so pretty with the lovely scalloped edge! 

The top border is hand stitched, and I distressed and inked all the edges. 

I hope you've been inspired to pull out your Really Reasonable Ribbon supplies and create!! 

Thanks for stopping by! I treasure your comments.

~ Blessings ~

Friday, September 13, 2013

You're So Sweet for the September Really Reasonable Ribbon Blog Hop

Good morning and welcome to the Really Reasonable Ribbon September Blog Hop.


If you've just been inspired by Jeannie's fabulous work, you are in the right place. If not, you can join us for some autumn inspiration with the gorgeous September RRR Ribbon Club Assortment by hopping on over to the RRR Blog to start at the beginning. There you will find all the blog hop and prize details.


Just look at the gorgeous ribbons in this month's RRR Ribbon Club Assortment! Fall is in the air and these ribbons are just perfect for your fall cards, layouts, and decor projects! Are you a Ribbon Club Subscriber? If not, you can sign up here and start receiving one of these gorgeous assortments each month. 

"You're So Sweet"
Birthday Card

Tips and Techniques:

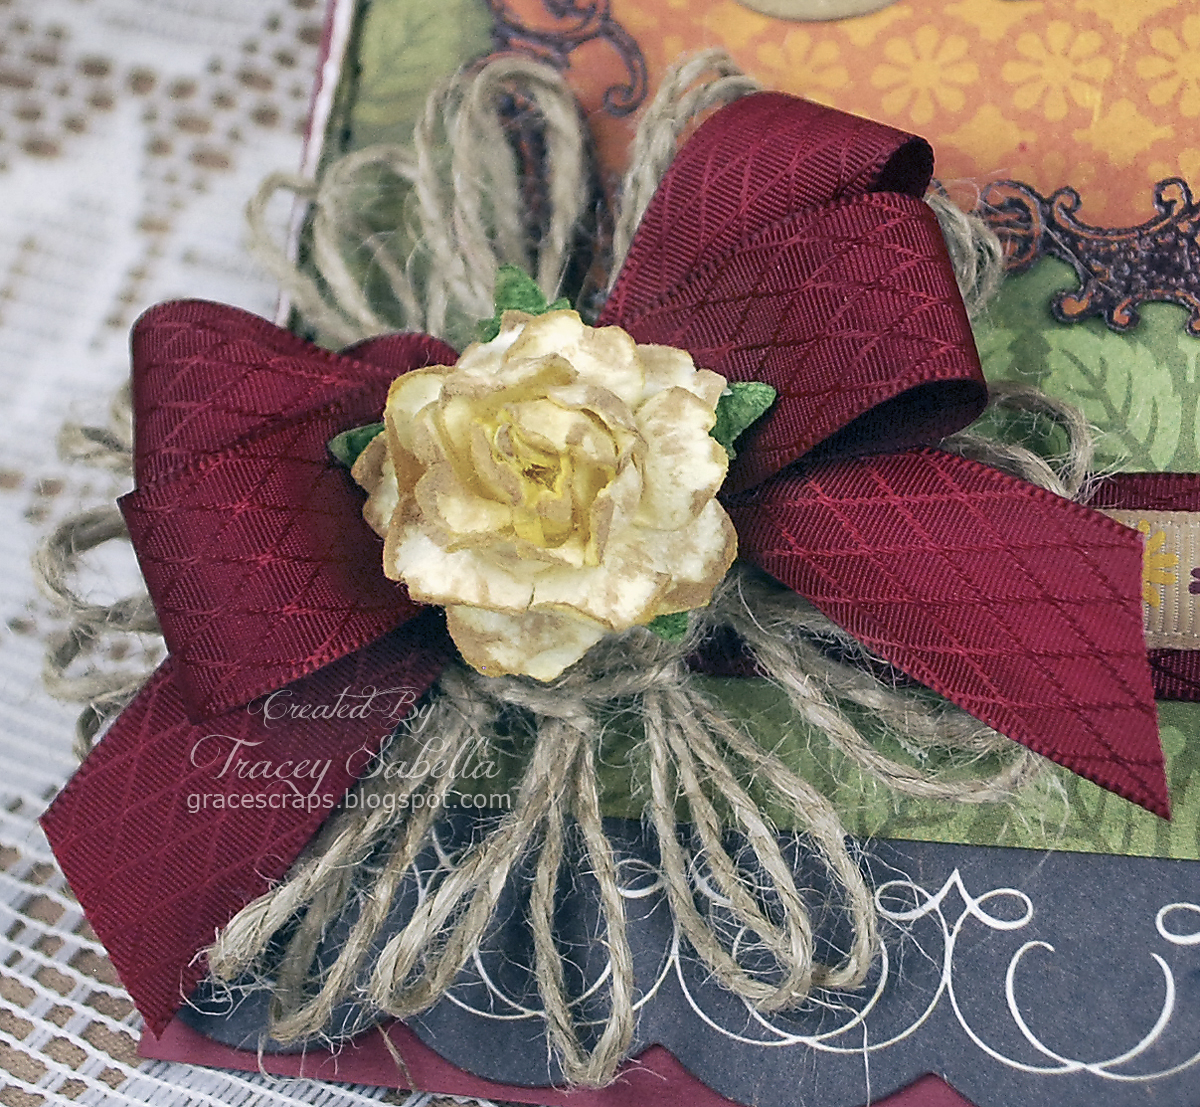
This burgundy Diamond Satin Ribbon is part of the September RRR Ribbon Club Assortment. This ribbon has a right and wrong side, so to tie a double loop bow, you need to twist the ribbon one turn each time you wrap it around your fingers so the right side always stays on top. Ginny's bow tutorial can be found here

Bonnie is now carrying a large selection of Wild Orchid Crafts flowers. Here I used a 25mm White Cottage Rose. I layered my flower and bow over one of my twine flowers created with Natural Jute String. The spot where I placed the flower was uneven, so I used Tombow 3D Foam Tabs to help keep the flower in the right position. A tutorial for my Twine Flowers can be located here.

I layered more of the September Ribbon Club Assortment across the card. I lightly inked the floral grosgrain. Scor-Tape is a great way to adhere ribbon to paper and ribbon to ribbon. Bonnie carries a wide variety of widths and sheets of Scor-Tape here


My signature style is Shabby Chic, so as you can see on the top of the card, I inked and distressed all my edges and sentiment. The mat behind the sentiment was stamped and heat embossed. I fussy cut it out, added the script stamp to the corners - Dear Sir by Donna Salazar Designs, and inked the edges. I also hand stitched around the edge of the card. I don't use a lot of fall colors in my work; however, they are perfect to create a card for our daughter's November birthday. 

I hope you've been inspired to grab your September RRR Ribbon Club Assortment and start creating!

Your next stop on the RRR September Blog hop will take you to 
to some amazing inspiration from Cheryl

Thank you for hopping through the RRR Blog Hop with us today.

Thanks for stopping by! I treasure your comments.

~ Blessings ~

Tuesday, August 20, 2013

Love Sweet Elizabeth details for ScrapThat!

It was a sad day when I received the news that Kaitlyn had created her final kit for ScrapThat! I've had an amazing time creating with these lovely kits and the creative, talented, and sweet Design Team there. Each of you ladies will always have a special place in my heart!! 

The ScrapThat! Store is open, so you can purchase this kit and all available retired kits here

I took a step back in time to create this page featuring a baby photo of our daughter, Elizabeth. Isn't her spiky hair adorable!! Yes, she is the one I've been scrapping all the wedding photos of. Boy oh boy the time flies by so quickly. Enjoy every moment you can with your children as they grow up, because they will find their way to adulthood and be on their own all too soon!! 

"Love Sweet Elizabeth"
MK


Tips and Techniques:

The August kit includes a handful of white rose petals. I melted the edges with a candle flame to curl them in, then glued them to a circle of paper to create this white focal flower. I put a small paper rose in the center cut with Donna Salazar's Bitty Blossoms Spellbinder dies. I clustered some of the pink and purple kit flowers with it around the edge of my photo. 

Here's a close-up of the cluster below the white rose. I dry brushed the kit flowers with white gesso. You can see here how I fussy cut the frame from this gorgeous Maja Paper. I cut around the flowers to include them in the frame. I glued microbeads to the cherry blossom centers for added dimension. Spanish moss is included in the kit which I tucked in around the flowers. 


I wanted to do something creative with the Pink Paislee circle mat, so I pulled out my crocheting skills from my crafty days. I cut off one strip of the circles, dry brushed them with white gesso, then crocheted this lace onto the rings using ivory cotton crochet thread, then embellished with the Want2Scrap pearls included in the MK. Each of these gorgeous Maja papers has a decorative strip at the bottom. The butterfly paper below the rings is one of those strips layered with more strips cut from these gorgeous papers. 

To stretch the pink flowers I pulled some of them apart giving me a tiny rose bud and small open rose. I added a pearl to finish off the center of the small open blossom. I love how the crystal pieces add subtle sparkle. I just glued them down around the clusters. 


I am always keeping my eyes open for clearanced jewelry findings and have an entire drawer of odds and ends to incorporate into my pages. This scrolled metal piece is a jewelry link. I pulled an organza ribbon through each end and tied the ends of the ribbon with loose knots. 


You can see more of my fussy cut frame here. The background of this paper had been a beige calendar, and I thought this yellow dot paper would be a perfect background to pick up the yellows in my photo. 

This corner needed something so I pulled out another jewelry link, this time square. I cut up scraps of my kit paper into these little banner flags. I layered the flags, metal piece tied with more organza ribbon, and a couple rose medallions cut from the kit ribbon topped with pearls. 

I used several stencils with gesso to add subtle design to my background. Here you can see the chevrons, and at the bottom I've used Donna Salazar's Want2Scrap Alphabet and Heart Stencils. 


I have a small collection of Fran-tage embossing powders, micas and glitters. I combined several of them to heat emboss on the Maya Road butterfly included in the kit. I topped it with a metal butterfly from my jewelry finding stash that I drybrushed and rubbed with white gesso. The white medallion and Prima resin corner are also from my stash. 

The layered photo frame is a mix of papers distressed with my Donna Salazar Distrezz-It-All and others punched and embellished with the lavender kit pearls. 


I stitched this border around the page and just adore the gorgeous rose lace included in the main kit. 

Just a reminder that our mid-month challenge has been posted at Really Reasonable Ribbon. Challenge #78 is to create a project using the colors pink and brown along with ribbon. I hope you'll join us for the challenge. You can link up your project here. You can purchase beautiful white organza like I used on my page here.

I have entered this page at:
Word Art Wednesday ~ Challenge #93 - Anything goes

Follow on Bloglovin

Thanks for stopping by! I treasure your comments.

~ Blessings ~

Friday, May 10, 2013

"Dancer" Birthday Card for RRR

My niece is turning nine, and she's is a tom boy who loves frilly things. She takes gymnastics and placed in our local beauty pageant for her age group last summer, so I thought this dancer card would be perfect for her. It features Really Reasonable Ribbon along with some extra supplies from my May ScrapThat! Kit

"Dancer" Birthday Card


Tips and Techniques:

Ribbon Skirt ~ I fussy cut this dancer from the Prima Divine paper and thought the RRR Silky Crush Ribbon would create a sweet skirt. I cut three strips of the Silky Crush ribbon twice the length of her skirt, finger pressed a crease at the half way point of each and machine basted across them one at a time, right next to each other so the three pieces were connected by the basting. I then folded on the stitching line and snipped strips up to about 1/4 inch from the stitching line. The "skirt" was then gathered to the width of the dancer's waist. The weave in this ribbon is tight enough to hold up to this technique without much fraying. 

Braided Belt ~ I cut three lengths of the Metallic White String and braided it to created the belt at her waist. The sparkly belt covered the edge of the skirt to hide the gathering stitches. 

Ribbon Flower ~ I wanted just a tiny flower for her waist, so created this ribbon flower using white seam binding


Hand Stitching ~ I drew a line for the butterfly trail, pierced stitching holes, then stitched with Iridescent White String. In this close-up you can see the gorgeous iridescence of the metallic string. I cut a little more than usual to allow for some fraying on the string ends. 

Glitter ~ I dabbed each of the flowers on the dancer with Art Glitter Designer Dries Clear glue, then sprinkled with Donna Salazar Sugar Shimmer Fairy Dust Glitter. This is the first time I used her glitter, and you can't believe how much sparkle and shimmer it produces!! 


Flowers ~ I added a little cluster of Prima flowers to the corner. 

Distressing and stitching ~ I used my handy DSD Distrezz-It-All to distress the layers before zigzag stitching around the card. 

I hope I've inspired you to pull out some ribbon to embellish your projects!! 

Thanks for stopping by! I treasure your comments.

~ Blessings ~

Tuesday, March 12, 2013

Sparkling Chipboard Sun Tutorial ~ ScrapThat! March Kit

I enjoy repurposing my supplies for unexpected uses. I had a picture in my mind of what I wanted my "Movin' On" page to look like. That vision included a sparkly sun. I was so blessed that our ScrapThat! March Kit included the Maya Road Chipboard frame pieces. My set included a flower frame. I kept the center circle in place and transformed it into my sun using the following steps. For the tutorial below, I used a flower chippie from my stash, so if your kit includes different shapes than mine, try checking your chippie stash to find something that will work. 

This is a technique that would work with a number of different products, so I have included some ideas that may work if you don't have the exact products I used. I am a firm believer in using what you have on hand when possible. 


Sparkling Chipboard Sun Tutorial

Supplies:

Supply List:
1. Flower or sun shaped chipboard piece.
2. Big Shot or other machine that will emboss. 
3. Darice Swirls embossing folder or any embossing folder with texture you like for your sun.
4. DecoArt Dazzling Metallics Paint or other yellow/gold colorant.
5. Ranger Crackle Accents or other clear crackle or non-crackle medium.
6. Mini Marbles or microbeads. While microbeads are smaller, they would still catch light for the sparking effect. 

Step 1. Run chipboard through a textured embossing folder. I used the Swirl folder by Darice. Any embossing folder with dots or swirled texture should work. The raised portion of the embossing is on the top of the "sun". 

Because the chipboard is thick, you may need to shim with cardstock in place of one of your normal embossing plates. I was OK with the plates for my Big Shot, but it was a tight fit.


Step 2. Paint with gold metallic paint. Because my chipboard is bare, it took two coats for good coverage. I used DecoArt Dazzling Metallics Splendid Gold. 

If you don’t have gold metallic paint, you could try, ink, mist, yellow paint or other colorant.


Step 3. Cover with a clear crackle medium dropping clear mini marbles or microbeads into the wet crackle. I used Ranger Crackle Accents and Beadies Mini Marbles. Allow to air dry.

Ranger Clear Rock Candy Crackle Paint should work as well. If you don’t have either, you could also use Glossy Accents or other clear medium. Although a clear medium won't have the crackles, it will adhere the microbeads for the sparking effect. The result would look much like the first photo below.

Wet Crackle with Mini Marbles:

When Dry:

Step 4. To create the rays I penciled in lines of different lengths extending from the sun with a ruler. I used my Tim Holtz Design Ruler and piercing tool to create holes every 1/8 inch. I erased the lines, then hand stitched with yellow embroidery thread, randomly adding yellow seed beads as I stitched. Depending on the beads, you may need a beading needle. Fortunately mine had large enough holes that a "sharps" needle worked fine. 

If you don't have a ruler with piercing holes, you could simply pierce the holes down the lines, not worrying if the spacing is exactly even. 

"Movin' On"
ScrapThat! Main Kit

See how easy this charming sun is to create? I hope you have been inspired to give it a try. Please stop by and leave a link for your project if you do. I'd love to see your sunny project. 

Thanks for stopping by, I treasure your comments.

~ Blessings ~
Monday, March 4, 2013

Movin' On

I'm back to share the details of my personal favorite layout I created from the ScrapThat! March Kit. Normally my layouts evolve as I create them; however, for this one I had this fun idea pop into my mind. Amazingly, it came out just as I had envisioned. I've had this photo set aside to scrap for some time. It is an older photo of our daughter, Elizabeth taking a drive with her cousin, Tyler. We didn't have a battery operated car, so she was so thrilled with the ride, and I just adore Tyler's serious expression as he is trucking her on down the path. 

The ScrapThat! Main Kit is just packed with gorgeous embellishments included on this page.

Movin' On
MK

Tips and Techniques:


Title Banner ~ I used my CTMH Artiste cartridge to cut the layered banner from the MK cardstock. I added eyelets from my stash to run the brown kit cording through. The letters are from the Basic Grey Alphas included in the kit. These little letters are just perfect and so versatile  I inked them just a bit to take the edge off the bright white, and they can be inked to any color to coordinate. I also inked the edges of the banner pieces. You will notice a flourish from my stash tucked into my flower cluster. I cut up the random extra crystals to embellish the banner. 

Eggshell Path ~ I was inspired by Gabrielle Pollacco's egg shell mosaic to create this little road. I cut a piece of cardstock into the shape of a curved path, then followed Gabby's great tutorial to apply and color the eggshells. At first I tried some small pebbles, but they were too large, and the eggshells worked perfectly.

Mixed Media ~ For this page, the pink flowers in the bottom right corner of the page didn't really fit my plans for the layout, so I used a credit card to apply gesso over them. It took two coats to completely cover, and I let the gesso dry between coats. I then spritzed with mists in green and brown. To get the inky drips. Spritz with mist, then a bit of water and tap the page to get the drips. Be sure to allow each color to dry before adding the next color. Heat set if you don't want to wait for them to air dry.  If your paper gets more warped than you like, mist the back of the warped section with a tiny bit of water, layer between paper towels and stack heavy books on top and let sit overnight. I usually put a large glass mat between the page and books to evenly distribute the weight. 

Bead Gel ~ After all my misting, I applied glass bead gel below the path using a stencil. I love how it picked up just a little golden hue from the mist I had applied to the page. 


Flowers ~ I just had to show you a couple different views of the flowers. The  pink roses are created with kit card stock and colored with Distress Ink. You can find my tutorial for the larger Full Open Rose created with Donna Salazar's Grand Peony and Bitty Blossoms dies here and the smaller rose is created with the largest of the Bitty Blossoms Dies. The yellow carnation is from her Carnation Creations die set. The gorgeous white blossoms, velvet leaves, and skeleton leaves are all in the Main Kit. 


Chipboard Sun ~ I used one of the flower chipboard pieces from the kit to create this sweet sun. Be sure to come back next Tuesday, March 12 for my tutorial. 


More Flowers ~ I want my layout to feel like Elizabeth and Tyler are driving on a path through a yard, so included these DA grass clusters with more of these sweet kit roses. A quick brush of paint colored the chippies. 

Nut Tree ~ I told some friends this was my insanity tree because I fussy cut an embossed image to create it. They told me I was nuts, so now I call it my "Nut" tree. I know, I know - there are plenty of cut files for leafy trees out there, but this Darice embossing folder tree was the perfect size and shape. I probably won't ever fussy cut another, but love this one for this page. 

I had so much fun creating this page and hope that you
have found some inspiration for your own pages. 

Thanks for stopping by! I treasure your comments.

~ Blessings ~

Saturday, February 16, 2013

"Dream Come True"

It was such a joy to our family when Elizabeth and Andrew announced their engagement last May. Elizabeth decided at an early age that she didn't want to date a lot of guys, but would wait for the Lord to bring just the right man into her life ~ Andrew, her "Dream Come True." Here are the details on my final page created with the wonderful February ScrapThat! Kit. 

"Dream Come True"
MK, EAO, FAO

I flipped Amy's fabulous February ScrapThat! Sketch for this page:

I hope you will create a page for our Sketch Challenge using this sweet sketch. The details can be found here.

Tips and Techniques:


Full Open Rose ~ The tutorial for the focal rose using Donna Salazar's Grand Peony and Bitty Blossoms Spellbinder dies can be found here. I used the Smooch Accents included in the kit to color the edges of the rose. 

Chipboard ~ I tinted texture paste with Distress reinker and spread it across my chipboard piece. When dry I went back and inked the edges for more depth and visual dimension. 

Cluster ~ Aren't these sweet pink flowers in the main kit just darling? I coiled the wire snipped from the blossoms to create the vines. 


Beads ~ I was inspired by a project created by ScrapThat! designer, Tracey Gregory, to add some scattered beads to my page. I also dabble in creating jewelry and have lots of seed beads in my collection. I used tweezers to dip each bead in Glossy Accents and place on the page. The Glossy Accents is a great glue for this. Just a little dab has a lot of holding power and dries perfectly clear. 


Hearts ~ The canvas heart included in the main kit were stamped with different designs and the edges inked. The little charms were from a package of charms I found clearanced at my craft store for a mere 50 cents a while back. 

Sparkling Strip ~ I created this sparkling strip by placing a 12 inch piece of Crafty Power Tape on my craft mat. I then sprinkled some different embossing powders and mica flakes on the adhesive. I melted them with a heat tool. The back of the tape remains sticky, so I just pulled it up and placed it down the center of the hearts. 


Title Block ~ I fussy cut one of the notebook pages and inked with Distress ink. I used texture paste over a doily stencil and stamped my title in the center of the doily.

Distressing ~ What is a page without pulling out my Donna Salazar/Zutter Distrezz-It-All? I love the texture I get with this machine. 


Cluster ~ More of the sweet Main Kit flowers spilling out of the peak-a-boo tear. I tied some charms with the silky pink baker's twine also included in the kit. 

Hand Stitching ~ You can see my hand stitching around the page border. I also stitched around the photo mat. 

ScrapThat! also has our DT Challenge to create a page with at least 4 layers of patterned paper. I hope you'll come on over and add your project. Details can be found here.  

Be sure to come back tomorrow to see my guest designer project for Scrapping Everyday Memories. Here is a sneak peek from my page featuring my stash of Donna Salazar goodies:


Thanks for stopping by! I treasure your comments. 

~ Blessings ~ 

Friday, February 8, 2013

"A Perfect Day" Details ~ ScrapThat! Feb. Kit

I'm back today to share the details of "A Perfect Day" Created with the February ScrapThat! Kit. As you may remember, Elizabeth brought Andrew into our family back in October. We were delighted to receive the wedding photos last month just in time for me to use one to create the final LO with my gorgeous February Kit. Aren't they a sweet couple?

Before I share the details, I have some exciting news to share. My Misted Rock Salt Chipboard Tutorial has been published by Scrapbooking.com. They have taken my photos and created a wonderful video tutorial. I hope you will stop over there to check it out. Here are the links:


"A Perfect Day"
MK, EAO

Tips and Techniques:


Ribbons ~ I used the cream cardstock in the kit to cut ribbons. I then used a foam applicator to apply Distress inks to pull out the colors found on the focal background paper. Finally I distressed the edges with my Prima distressing tool and edged with a darker distress ink. To make them look more like actual ribbon, I gently bent and crumpled them until they had a soft fabric like appearance. I then snipped some pieces from two of the kit ribbons to layer over top of the paper ribbon strips. Our former DT, Marilyn Rivera, is a master of transforming paper to look and drape like fabric and I got this idea from her. You will be inspired by a visit her blog, Treasuring Memories.

A side view:

Netting ~ The kit came with gorgeous netting that works so well to add extra dimension. Here I tucked some behind my flower cluster.

Wood Heart Flourish ~ I painted the KaiserCraft Heart with gold metalic paint and when dry stamped across the piece with a script stamp using black Stazon.


Chipboard Frame ~ I added this Dusty Attic Chipboard piece from my stash. I love this photo, but Andrew's had around Elizabeth's shoulder a bit pronounced when placed on a scrapbook page. Using the chipboard piece to frame and layer over the photo took care of that little "problem." The technique here is so easy peasy. I simply painted with metallic paint and when dry took some Distress ink in a darker shade to add dimension on the edges. 

Puffy Hearts ~ These Green Tara hearts are included in the EAO kit. They were just a little bright for this page, so I spritzed them with some cork Glimmer Mist to get more of a burgundy color. 

Distressed Layers ~ I framed the photo with two of the kit cardstock papers and used my Donna Salazar/Zutter Distrezz-It-All on the edges. Behind the top right corner, I placed a corner from the gorgeous square doily found in the main kit. 


Medallion ~ The kit includes these kraft journal spots which made the perfect base for my medallion. The pearl ribbon slide is also in the kit and the paper ribbons are described earlier. The metal heart is from my stash. 

Hand Stitching ~ I drew a swirled line around the border of my layout in pencil, then went back and pierced stitching holes, erased the pencil mark and stitched with coordinating embroidery floss. I used to cross stitch, so I have an entire box of DMC floss to choose from. 


Mixed Media Butterfly ~ What is a page without some mixed media? I used some Martha Stewart White Texture Effect over one of her butterfly stencils, then sprinkled on some gold microbeads. 


Title ~ This really was a perfect day, so this title worked perfectly for my page. Originally, I cut it out in the beautiful bracket frame from the page. I brushed on some Ranger Rock Candy Distress Paint. I didn't set it aside far enough to allow it to dry, because I accidentally laid some scrap paper on top, ruining the edge. It was one of those happy mistakes, since I like the words cut out better than I did in the frame. I'm here to tell you, always look for the lemonade when those scrappy lemons happen. 

The February Kits are now in the ScrapThat! Store, so be sure to drop by and get yours before they are sold out. 

I hope you will have a chance to stop by and see my Misted Rock Salt Video over at Scrapbooking.com. 

Thanks for stopping by! I treasure your comments.
~ Blessings ~