Showing posts with label Flowers. Show all posts

Friday, June 3, 2022

Shabby Chic Botanical Garden Card for Little Birdie Crafts

 
Welcome to my creative space!

As spring transforms into summer, the Little Birdie Crafts Botanical Garden Collection is simply perfect to create a beautiful shabby chic card. It was such a delight to work with these gorgeous papers! The teapot is fussy cut from the image page in the 12×12″ paper set and creates a stunning focal point among beautiful Little Birdie flowers in coordinating colors.

I have a full photo tutorial with all the details on how I created this shabby chic card up on the Little Birdie Crafts blog HERE. Thanks for stopping over there to leave a comment.

Thank you Little Birdie, for providing supplies used in this project!

If you would like to see a full supply list, please scroll down.
Little Birdie Crafts can be purchased at their online store.

Be sure to check out the current sales HERE.

Use code TRACEY05 for a 5% discount.

I receive a small commission at not cost to you.

A couple close-ups for you:

Wednesday, May 4, 2022

Amazing Paper Grace May Die of the Month: Pop Up 3D Vignette What's Bakin' Oven with Blog Hop

Welcome to my creative space!

What could be more special than this fabulous retro stove to create a card for someone who loves to cook with the Amazing Paper Grace May Die of the Month: What's Baking' Oven die set (DOMAPG-MAY22)? I really wanted to embrace the retro feel of this die set, so used this fabulous mint green metallic paper to die cut the vignette card and used similar colors from cardstock surrounded by sweet spring flowers for the flat card.  

Be sure to scroll down through the Tips and Techniques section below for all the details on how I created these sweet cards.

Many thanks to Amazing Paper Grace for providing the dies used in this project!

There are 14 dies included in the Pop Up 3D Vignette What's Bakin' Oven.

3D Vignette Retro Stove Card

Flat Hey Cookie, What's Bakin' Card

Tips and Techniques
When I think of retro kitchen appliance, I think of fun colors like this cool mint green. I used metallic papers to get that enameled feel and accented with metallic silver. I found this fabulous image to use for inspiration, but went with the green instead of yellow:


Of course this vignette card is designed to fold up to fit into a flat envelope. The top of the stove opens like a box lid flap, then the card slides right over to lie flat. 

The oven door is backed with acetate for a glassy finish and the oven grates are also cut from silver metallic paper. I inked up some white cardstock in a coordinating green color to back the words in the oven. 

The grates for the stove top are cut from thing black chipboard to give a cast iron feel, while the knobs, utensils and oven are cut from black gloss paper for an enameled look. I found a snippet of fun patterned paper to cut the pot holder from that also had a bit of a retro feel to it. 

Each of the cookies is cut three times from yellow cardstock and adhered together to give them a bit more dimension. When baking, my cookies are not lined up perfectly, so I used a more random placement here on my cookie sheet which is also cut from metallic card stock. 

Here's a view of both cards with their oven doors open to see the fun and fabulous sentiments inside. 

For this flat card, I wanted to show you something quick and easy that you could create with this die set. The stove is cut from regular cardstock and accented with metallic silver. The dials are simplified by using just the two center pieces for the burner dials. 

I found this delightful spring paper in my stash which complements the stove colors. It's cut with the Fluted Classics Rectangles Die Set (S5-475) to add a lovely border around the paper. I also cut a larger piece from the lighter green paper used on the stove to frame the card and tie everything together. 

To keep this easy, I used Little Birdie Crafts flowers and a butterfly to embellish the card. I also found a snippet of chipboard left from a previous project that fit perfectly here and heat embossed it in pale gold. 

The doors fold open to see the sweet sentiments below.

Supplies:

Accessories:

Paper:
  • Tim Holtz with Idea-Ology ~ Metallic Kraft Stock Confections (mint green)
  • Tim Holtz with Idea-Ology ~ Metallic Kraft Stock Gold/Silver
  • Tim Holtz with Idea-Ology ~ Metallic Kraft Stock 3 Champagne/Onyx 
  • Tim Holtz with Core'dinations Kraft-core, Assorted Colors
  • Craft and You ~ Spring Garden 03
  • Studio Calico ~ Memoir, 6x6" Paper Pack
  • Cardstock: Black Gloss; Yellow

Ink:
  • Ranger ~ Distress Ink: Evergreen Bough; Bundled Sage

Mixed Media:
  • Ranger ~ Embossing Pearl: Pale Gold

Embellishments:

Adhesives:
  • Tombow ~ Mono MULTI Liquid Glue
  • Beacon ~ 3-IN-1 Advanced Craft Glue
  • Beacon ~ Fabri-Tac
  • Double Sided Tape ~ 1/4" 
  • Red Line Tape ~ 1/4"; 1/8"

Tools:
  • Spellbinders ~ Platinum 6
Thank you Little Birdie Crafts for supplying products used to create this card.

Little Birdie Crafts can be purchased at their online store.

Use code TRACEY05 for a 5% discount.

I receive a small commission at not cost to you.

For more Pop Up 3D Vignette What's Bakin' Oven Inspiration from the Creative Team:

Visit each Creative Team blog linked below for their take on creative paper crafting ideas with  Pop Up 3D Vignette What's Bakin' Oven, the Amazing Paper Grace May 2022 Die of the Month!


The Amazing Paper Grace Die of the Month is available exclusively at Spellbinders Paper Arts during May 2022, Pop Up 3D Vignette What's Bakin' Oven along with other membership perks.

View this month’s Amazing Paper Grace Die of the Month:

I would adore hearing from you! Please leave a comment below letting me know how you will use these gorgeous dies!


Thanks for stopping by! I treasure your comments.

~ Blessings ~

Tuesday, March 1, 2022

Vintage Junk Journal Easel Board for Little Birdie Crafts

 
Welcome to my creative space!

I just adore the shabby vintage look of junk journals, but have never committed the time to creating one. So, I got to thinking . . . "What about creating a junk journal style home decor piece?" This is what I came up with. A while back I found this 4x8" easel board with bold Valentine graphics in the clearance section for a deep discount and thought it would be perfect to repurpose for one of my projects. Several coats of white gesso gave me a clean base to work with.

This beautiful vintage creation features Little Birdie Crafts ephemera, flowers, chipboard, and mixed media supplies along with vintage tea stained book pages along with lace, vintage buttons, and notions like snaps and hooks.  I have a full photo tutorial with all the details on how I created this card up on the Little Birdie Crafts blog HERE. Thanks for stopping over there to leave a comment.

Thank you Little Birdie, for providing supplies used in this project!

If you would like to see a full supply list, please scroll down.
Little Birdie Crafts can be purchased at their online store.

Be sure to check out the current sales HERE.

Use code TRACEY05 for a 5% discount.

I receive a small commission at not cost to you.

A couple close-ups:


Little Birdie Crafts Supplies

Other Supplies
MDF Easel Board - 4x8"
Tea Stained Vintage Book Pages and Packing Paper
Tim Holtz with Idea-ology ~ Paper Dolls
Tim Holtz with Idea-ology ~ Clippings Stickers
Ranger ~ Distress Ink: Brushed Corduroy
Lace Pieces
Vintage: Buttons; Hooks; Snaps
Silicone Glue


Thanks for stopping by! I treasure your comments.

~ Blessings ~

Monday, July 1, 2019

Feminine Mixed Media Card for Little Birdie Crafts

"Happy Day" Mixed Media Card by Tracey Sabella for Little Birdie Crafts: #traceysabella #littlebirdiecrafts #littlebirdieonline #littlebirdieflowers #chipboard #mixedmedia #diycard #diycards #diycrafts #diycraft #stencil #stencils #graduationcard
Welcome to my creative space!

I'm up on the Little Birdie Crafts blog today with this sweet feminine mixed media card featuring flowers and paper from the gorgeous Fairy Sparkle Collection along with Primed Chipboard and fabulous Little Birdie Mixed Media and texture products.

I have several friends who adore purple, so it will be a challenge figuring out who will receive this lovely card!

To see how I created this card, please hop on over to the Little Birdie Crafts blog HERE where I have a full photo tutorial. I hope you'll leave some love while you're there.

Here's a supply list for all the products used on this beautiful card:

Little Birdie Crafts Supplies
Fairy Sparkle Flowers - Fairy Rose
Fairy Sparkle Flowers - Marina
Fairy Sparkle Flowers - Calypso
Fairy Sparkle - Pearl Butterflies
Fairy Sparkle 12x12" Paper Collection
Fairy Sparkle 6x6" Paper Collection
Premium Card Stock ~ Bright White (for card base and sentiment)
Primed Chipboard ~ Garden Greens
Crochet Lace Trim ~ White
Cotton Cord ~ Assorted
Metal Microbeads ~ Mystique Rose
Metal Microbeads ~ Mute Orchid
Stencil ~ Script - 10x8cm
Mixed Media Paste ~ 2 in 1 Gesso & Modelling Paste
Acrylic Soft Gel Medium ~ Matte
Gesso ~ White
Tinted Metallic Paint ~ Glazed Berries
Sparkle Paste ~ Mulberry Glaze
Silicone Glue

Other Supplies
Beadcraft ~ Jewelry Essentials - Pearl Beads in assorted sizes
Queen & Co. ~ 1/2 Pearls - Natural Pearl
Vintage Lace ~ From my Stash
Charm ~ Hanger
Liquitex ~ Gesso, Clear
Ranger ~ Distress Ink: Seedless Preserves; Dusty Concord
Tsukineko ~ Versafine Ink - Imperial Purple
Spellbinders ~ Decorative Labels Tewnty-Two Die Set
Close To My Heart ~ Short & Sweet Sentiments Stamp Set
Wonder Tape ~ Double Sided Adhesive Tape - 1 1/2"
Wonder Tape ~ Double Sided Tape - 1/2"
Tombo ~ Mono MULTI Liquid Glue
Catalyst by Princeton ~ 01 Mini Silicone Spatula


Thanks for stopping by! I treasure your comments.

~ Blessings ~

Monday, March 11, 2019

"You are Stronger" Spring Mixed Media Panel for Little Birdie Crafts with Photo Tutorial

"You are Stronger" Spring Mixed Media Panel by Tracey Sabella for Little Birdie Crafts #littlebirdiecrafts #littlebirdieflowers #littlebirdieonline #littlebirdieembellishments #mixedmedia #shabbychic #framedpanel, #timholtz #helmar #art #craft #crafts #chipboard #handmade #texture #realbrushmarkers

Welcome to my creative space.

I'm so excited and honored to be part of the 2019 Little Birdie Crafts Design Team. I'm sharing my first project, a 2-piece framed mixed media panel featuring their gorgeous flowers and wonderful mixed media products. 

Please stop by the Little Birdie Crafts blog for a full photo tutorial HERE.
I hope you'll pop over there and leave some love.

Here's a supply list of all the products used to create this gorgeous piece:

Little Birdie Crafts Products
A True Love Story Paper Pack ~ 12x12"
Premium Card Stock ~ Bright White
Caila ~ Moon Light
Valerie ~ Butter Milk
Aislinn ~ Pink
Beaded Blooms ~ Buttermilk
Micro Jewlled Floretts ~ Grape Tan
Primed Chipboard ~ Vine
Hope Wishes Embellishments
White Gesso
Soft Gel Medium ~ Matte 
Grainy Texture Paste
Sparkle Paste ~ Mulberry Glaze
Color Splash ~ Black Current
Tinted Metallic Paint ~ Golden Glaze
Stencil 10x18cm ~ Cobbles Stone
Clear Stamp ~ Melody
Clear Stamp ~ Script Heart
Crystal Drops
Metal Microbeads ~ Summer Gold

Other Supplies
Tim Holtz with Idea-ology 6x8" 2-Piece Framed Panel
Melissa Francis ~ 1962 Embellishments - Mini Resin Frames
Beadcraft ~ Jewellry Essentials - Pearls
Darice ~ Designs by Me - Lavender Jeweled Beads
Pearls
Jeweled Beads ~ Lavender
Martha Stewart Crafts ~ Microbeads - Lavender
US ArtQuest ~ Mini Prills - Lavender & Lace
Stampendous ~ Fran-tage - Chunky Glass Glitter, Lavender
Liquitex ~ Gesso - Clear
StazOn ~ Dove Gray Ink Pad
Versafine ~ Onyx Black Ink Pad
Zig ~ Real Brush Markers - Lilac, Light Violet, Mustard
Tim Holtz with Stampers Anonymous - Flutter Butterfly Stamps
Tim Holtz with Sizzix ~ Flutter Framelits Dies
Tim Holtz with Sizzix ~ Skeleton Leaves Thinlits Dies
Scrapbook Adhesives by 3L ~ Thin 3D Foam Squares - Black
Helmar ~ 450 Quick Dry Adhesive


Thanks for stopping by! I treasure your comments.
~ Blessings ~

Monday, April 1, 2013

"Adventure" SEM April Main Challenge #27 ~ All God's Creatures

I hope you had a wonderful Easter! We went to church then had all the family over for some homemade lasagne and a time of sweet family fellowship.

It's the first Monday of the month and that means it's time to share the Scrapping Everyday Miracles Main Challenge. Nicole is hosting a wonderful challenge for you this month. Here are the details:
For this month's main challenge we would like you to create a project inspired by your pets.  Even if you arent animal person or don't have any pets you can still be inspired by this challenge.  You can create a project inspired by any animal in God's creation. Your projects can even be about an animal related experience like a day at the zoo or a farm. What is important is that we see that God is blessing us with everyday miracles using both the animals within our families and those outside our homes.  

SCRAP TWIST: USE AN ANIMAL RELATED QUOTE SAYING OR EVEN BIBLE VERSE ON YOUR PROJECT.   You can use it for your title, journaling or just addition to your project! Just to help you get started here's a link to a bunch of animal quotes :

Here is my project based on this challenge:

"Adventure"

My husband and I never had a dog. or even discussed the possibility of getting one. Then we moved back to Ohio in 2000 to be closer to our families. My brother taught dog obedience classes including a dog 4-H club. He also did a little breeding. He decided to keep one of the pups as an experiment. He often had clients bring in 2 or 3 year old dogs with no former obedience training, and these dogs were more of a challenge. So he decided to keep Ellie. While he didn't allow her to jump on people, she had no obedience training and had only been on a leash a couple times to go to the vet. You may have guessed it. He offered Grace the opportunity to have 15 month old Ellie so she could be in his 4-H club, and Grace became part of the experiment. Now dogs became a "big" part of our lives. Grace wanted to make Uncle Paul proud and put a lot of time and effort into training her new pal. She defied the odds and with Ellie became one of the top obedience teams in the UKC. They attained every possible obedience title and in their final year of competition placed 3rd in the country in Utility - the most advanced obedience class. 

Now, you do see three dogs in the photo. It didn't take long for our two other daughters to get dogs and join in the fun. From the left you see Tori, Ellie then Bounder. The girls have always been in charge of their dogs including training, feeding, grooming, vet appointments ~ everything. They learned so much responsibility, and the Lord has opened up many doors for us to share our faith along the way. There are people from many walks of life in the dog world, and I pray that the Lord has been able to touch some of them through us. While Elizabeth and Maria did not train for the advanced classes, they were recognized as top Junior handlers by qualifying for an invitation to the National UKC Dog Show each year they showed. 

This sweet photo was taken a year ago ~ one of the last photos before Ellie left us. Grace has just picked a new border collie puppy and is excited to have a dog in her life again. 

Tips and Techniques:
Inking ~ The larger jeweled flower started out as layers of creamy Prima flowers - the kind you used to buy in the pillars - I simply rubbed on some distress ink. The wooden leaves were also lightly inked. The background paper was somewhat teal, so more rubbing with distress ink brought it to the right color to coordinate with this photo. The white doilies were inked up as well. 

Lace Trim ~ Such an easy addition to any border strip to add a pretty touch.

Title and Trinkets ~ I was so thrilled the other day to find these fabulous vintage lightbulb word trinkets by Prima and thought the word "Adventure" would be the perfect title for this page since our daughters have had quite an adventure with their dogs!! I also enjoy adding little trinkets, buttons, wooden pieces into my clusters.


Stamping ~ I repeated this charming background stamp before adding my embellishments. To get a soft edge, I just tear a piece of paper towel and place where I want the stamped edges to be and stamp right over it.

Flourishes ~ I cut this gorgeous flourish into two pieces and used in each corner for balance.


Twine Flower ~ My tutorial for the handcrafted twine flower can be found here.

Distressing ~ So quick and easy with my Donna Salazar Distrezz-It-All by Zutter to get these nice "thick" edges. 

Canvas Tape ~ I simply folded and laid some this canvas tape at the edge of the clusters. A little talc powder on the adhesive edge that is up takes care of the stickiness. 

Fussy Cutting ~ I tucked a few fussy cut pieces in as well. 


Journaling ~ I wanted my "required element" to blend seamlessly into my layout, so hand wrote it at the bottom under the green paper strip. It says "Dogs are not our whole lives, but they make our lives whole." Roger Caras

Our Sponsor this month is:

Hello there! I'm Leena and I live in the tiny island of Singapore. I've been scrapbooking for 6 years now and the recent one year, I've turned from a traditional scrapbooker to Project Lifer. It's been an amazing year just dedicating my time and days documenting week after week worth of stories about me, my family and friends, my full time job, the places I've travelled to for work and holidays, celebrations and many more interesting journey of my life. I've also set up a very small online shop just a year ago, just to share handmade items that was originally created for my own use. Then I realized, I had a lot of request from scrapbookers all over the world asking for my handmade items to be made available for sale. That's how it got started. The response has been overwhelming and I'm so thankful to all my buyers for their support. My shop sells mainly core handmade items such as flair buttons or also known as badges which can be used for any kind of craft projects. They're a very popular scrapbook product amongst scrapbookers! Once again thank you to Scrapping Everyday Miracles for this opportunity to sponsor my shop products for their challenge this April! 

Instagram - username is "findingnana"

Leena has sponsored it us with a wonderful prize that you could win by linking up a project to our April Challenges!  Wanna see it? That is $40 worth of flair buttons!  WOW!

Guess what everyone? Leena has prepared a discount code for all of you!!!! You can save  20% off total purchase of any products in her shop, valid from now until April 30thThe code is SEM20You just need to enter this during check out. This discount does not apply on the shipping fee. She ships from Singapore to all over the world. 

**NOTE: You may submit the project you create for Scrapping Everyday Miracles to other challenge blogs but your project must be mainly created for the Scrapping Everyday Miracles challenge in order to win the sponsor prize and/or be one of Top 3**

 All entries must be linked HERE by April 30th, 11:59pm PST.

*Important: Make sure your link is to the blog post with your project & not just your blog in general...and be sure to remember the SCRAP TWIST!

Thanks for stopping by! I treasure your comments.

~ Blessings ~

Friday, March 29, 2013

Scrapping Everyday Miracles Spring Blog Hop

SCRAPPING EVERYDAY MIRACLES
HOP into SPRING BLOG HOP!
MARCH 29th - 31st


Spring is my favorite time of the year, and Scrapping Everyday Miracles is celebrating this special season!! The design team has put together some fabulous spring and Easter projects to inspire you this weekend. I hope you enjoy the hop! 

I've been invited to join the delightful SEM design team. Scrapping Everyday Miracles is such a sweet site with challenges designed to encourage us to consider our faith in our crafting, and I'm so delighted to be a part of this special team.

Thanks Nicole for this opportunity!

You should have arrived here from:
Cara

Here are the links for the hops along the way in case you want to start at the beginning or get lost along the way.

Toni
Nicole
You are here --> Tracey S.
Kelly <-- Your next stop

Our Blog Hop prize is sponsored by...

Genuinely Jane Studios (GJS) manufactures small and medium sized mini-albums for scrapbooking, mixed media and altered arts in a variety of shapes and sizes. 100% American-made, our facility is located in rural, north-central Missouri and uses only the highest quality materials.  

Owned by a military veteran, and accomplished woodworker,  Mark Carosiello and a lifelong crafter, industry manufacturer’s rep, design team member,  passionate scrapbooker and altered artist, Susan Wojtkowski, we understand the craft and the crafter.

One of the first signs of spring here in ohio is seeing the crocuses popping up with their sweet, colorful blossoms. I was able to get a photo of these gems before the snow and cold descended back upon us this week. 
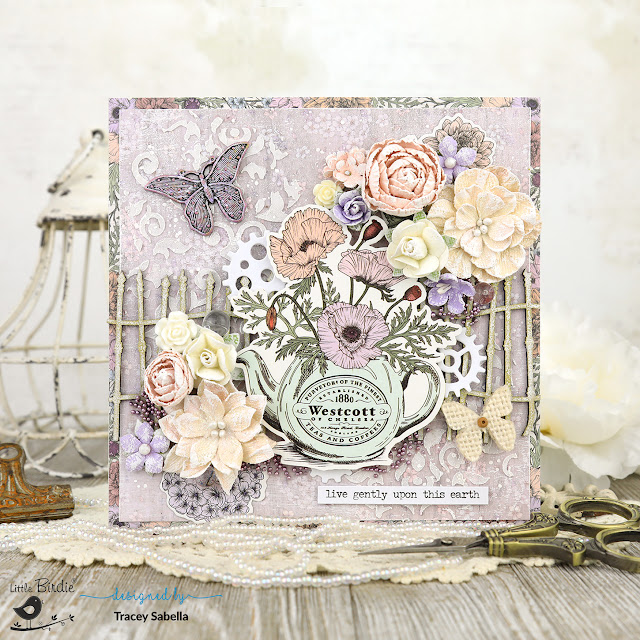
"Spring Time"

I created this page with inspiration from the Prima Build-A-Page Sketch:

These lovely flowers remind me of Isaiah 40:7-9, "The grass withers, the flower fades, But the word of our God stands forever."

These spring beauties lasted but a day before winter-like cold temperatures and snow  returned to quickly fade them away. This precious verse reminds me that I have a God who is unchanging and is always there for me. His beauty is always present, and never fades away.

Tips and Techniques:
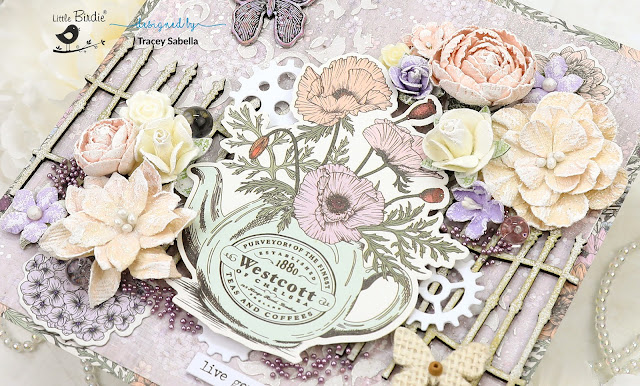
Fussy Cutting ~ I fussy cut flowers and leaf stems from the vibrant and gorgeous Prima Garden Party paper.

Stenciling ~ I mixed Lumiere pearl violet paint into flexible modeling paste to get this gorgeous purple  to spread over the Prima Flourish stencil.

Rayon Crinkle Ribbon ~ I sprayed several colors of mist on my craft mat and pulled this rayon seam binding through it. The color variation is subtle, but there. I simply balled up the wet ribbon and dried it with a heat tool to set the crinkles. 

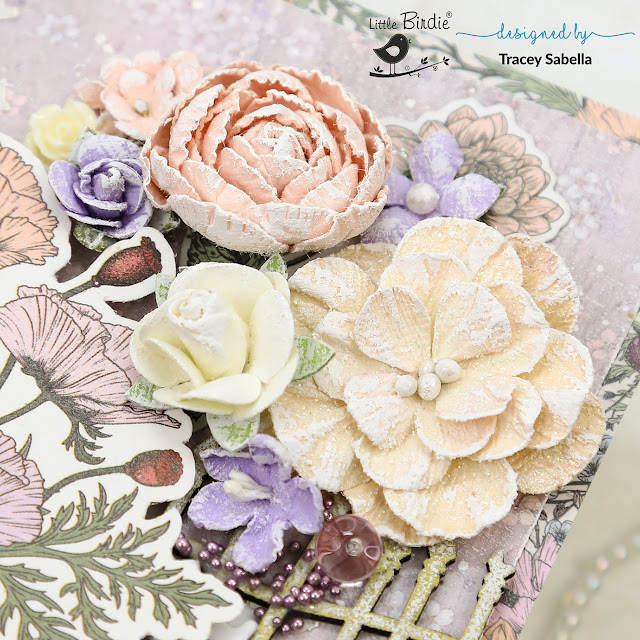
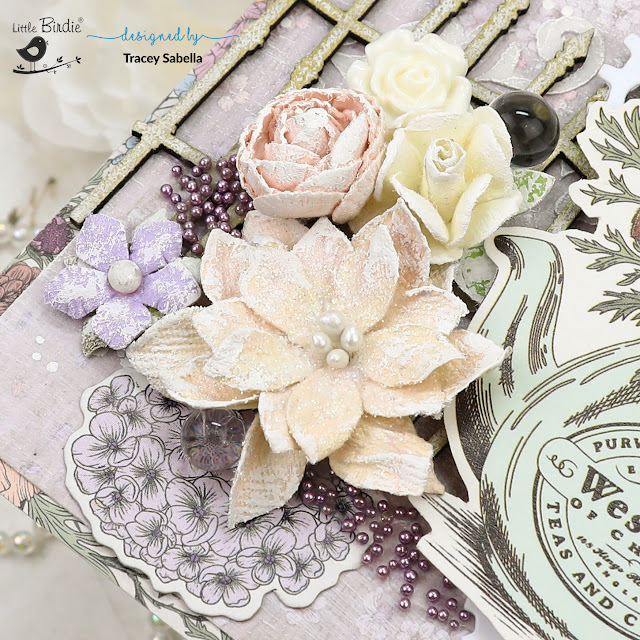
Cluster ~ Since this is a Prima page, I pulled a variety of spring colored prima flowers from my stash in different shapes and sizes, along with some charms, chipboard, doily, and trinkets. I played until I found an arrangement I liked, then glued in place. 

Crystal Bling ~ The package of pearlized crystals is so perfect for this spring page, so I scattered them randomly across the bottom corner of the page. I also used a piece of a Prima crystal flourish as a butterfly trail and to tuck into the top cluster. 


Splats ~ Using an eyedropper of Dylusions Crushed Grape Spray Ink, I release drops of mist ink from well above the page to create the fun and gorgeous splats of color in the corners. 

Tulle ~ I cut rectangles of glittery tulle and wrapped with wire to create little picks to tuck into the cluster. 

Double photo ~ I printed two photos - one about an inch larger than the other. I sanded the edges and centered the smaller over the larger. 

Garden Gate ~ Isn't the vintage metal garden gate such a darling embellishment to accent the flower photo? 

Feathery Butterfly ~ I just had to include a butterfly to represent the metamorphosis and change that spring represents to me, and this pretty pink Prima butterfly fit the page so perfectly. 

Dangling Crystal ~ The photo doesn't do justice to the light that the dangling crystal picks up and reflects. I used one of the new Tim Holtz ring fastners to attach it to the page. 

I have entered this page at:

We were asked to share our answers to these two questions so you can get to know us better:

What do I love most about Spring? I live out in the country, and I love to see the rebirth of God's creation as the flowers push their way through the soil to share their gorgeous blossoms that fill the air with wafts of their amazing scents, as the trees bud, blossom, and leaf out, and as the animals give birth to their young. We have been blessed to see turkey chicks following their mamas and fawns gamboling near their sweet mothers.

Where do you live? I live in northeast Ohio out in the county. I live with my husband who supports my paper crafting and our 18 year old daughter who will be graduating from high school this spring. We also have 3 adult children and two of them are married. No grandchildren ~ yet. 

~ Prizes ~

You have several chances to win. First, I will be offering a RAK of some spring themed  and inspirational embossing folders. All you have to do is leave a comment and become a follower if you aren't already. I'll give you a second draw if you also follow me using Bloglovin. 

My Rack includes these 4 packages of embossing folders by Darice.

Brick Wall & Thank You with Flowers:

Rose Boquet & Inspiration 3 Pack

Here are the SEM blog prizes:

Our Hop into Spring Blog Hop Prize is two Genuinely Jane Wood albums!  You will receive both the dress form album and the flower album.


Here is an example of a flower album after it has been decorated!


To win this prize you'll want to leave a comment on each DT member's blog and we'll randomly choose one blog to select the winner from. All winners will be announced Saturday, April 6th.

Also you'll want to head over to our SEM Facebook Chit-Chat Page for another chance to win.. We have a fun Blog Hop Challenge for you and another great prize from Geniunely Jane Studio. (If you're not already part of the Chit-Chat page, just request an invitation, and we'll get you added in a jiffy).

Your next stop on the hop is Kelly.
You are sure to enjoy her page and sweet insights!!

Now...have fun Hopping!! Happy Spring from all of us at SEM!!