Showing posts with label Masculine Card. Show all posts

Monday, June 19, 2023

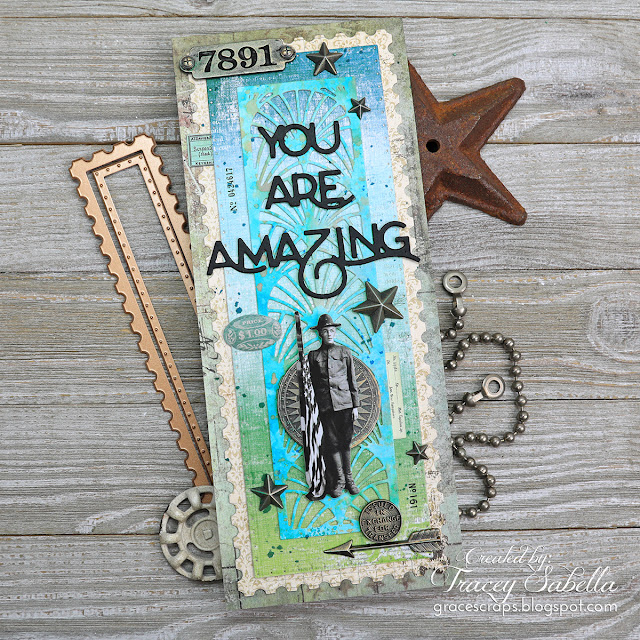
Masculine Patriotic Card for Father's Day featuring Amazing Paper Grace Dies paired with Tim Holtz Idea-ology

 
Welcome to my creative space!

Father's Day is a special time to honor our fathers and other special men in our lives. I hope you had the opportunity to celebrate with a loved one this year. My dad served in the Air Force in the photomapping division and has proud memories of his service to our country. To honor that legacy, I created this Father's Day card for him featuring the Amazing Paper Grace Postage Edge Slimlines (S5-541) and You're Amazing (S4-1203) die sets, pairing the slimline die cuts with Tim Holtz Idea-ology ephemera and metal pieces. When looking through my paper dolls this military figure with the flag caught my eye.

I just adore how the Slimline Postage edge dies work perfectly with the intricate background die cut from the You're Amazing set to form a wonderful masculine background for this special card. 

For more close-ups and all the details on how to create this card, be sure to scroll down through the Tips and Techniques section below. 

Thank you Amazing Paper Grace for providing the dies used in this project.

You can add visual interest by repeating elements. I've accented this card with numbers that can be found on the metal tag and used remnant rubs to add number strips to the background. I've also placed 3D metal stars across the card. These repeated elements help move your eyes across the image. 

I'm entering this week's Simon Says Stamp Monday Challenge: Pick a Number. You can find this number challenge HERE. They have wonderful challenges each week, and if you aren't familiar, be sure to go check them out!

Tips and Techniques
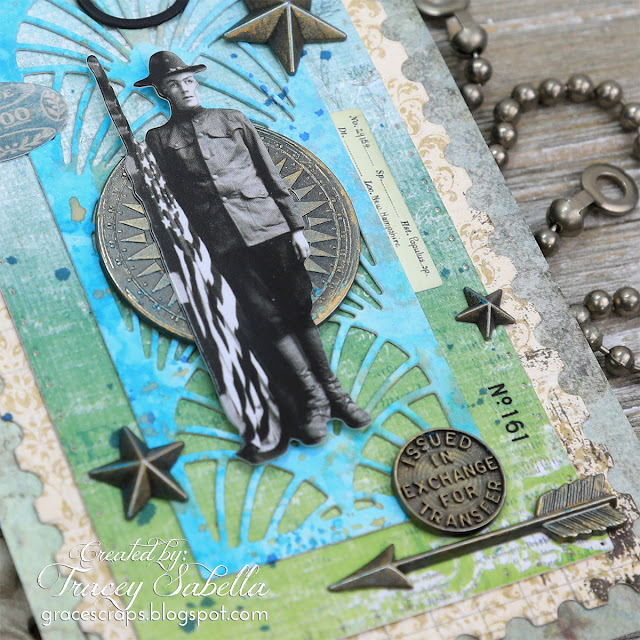
This soldier carrying a flag from the Tim Holtz Idea-Ology Paper Dolls Minis pack is the perfect image to honor my dad with this card. 

I want to share how the background for this card came together. The top die cut uses a scrap of paper that I had created using Distress Spray Stains and Distress Oxide Sprays on Distress Heavystock Paper. Because this was in my stash I don't remember the exact colors that I used to create it, but they were in the teal range with splashes of orange. This intricate die cut using the hand-colored paper adds so much interest and visual dimension. It's layered over a blended tri-color paper from the 49 and Market - Spectrum Sherbet Collection - 6 x 8 Collection Pack. I positioned the soldier so that it looks like he's standing in a grassy meadow with a blue sky overhead. This piece was cut and embossed using the largest inner die from the Postage Edge Slimlines set. You can see the pierced design around the edges.

From there I went to some older papers from my stash to cut the outer postage edge layer from a cream and brown design, then for the card base layer I went back to earthy greens cut to 3 1/2 by 8 1/2". I wanted each layer to be different enough in color and tone so that while coordinating into one beautiful background, the design of each layer would be clearly visible. You don't need to use these exact papers and colors to create a wonderful masculine card, but consider how the colors and designs will pull together cohesively while allowing the die cut designs to shine.
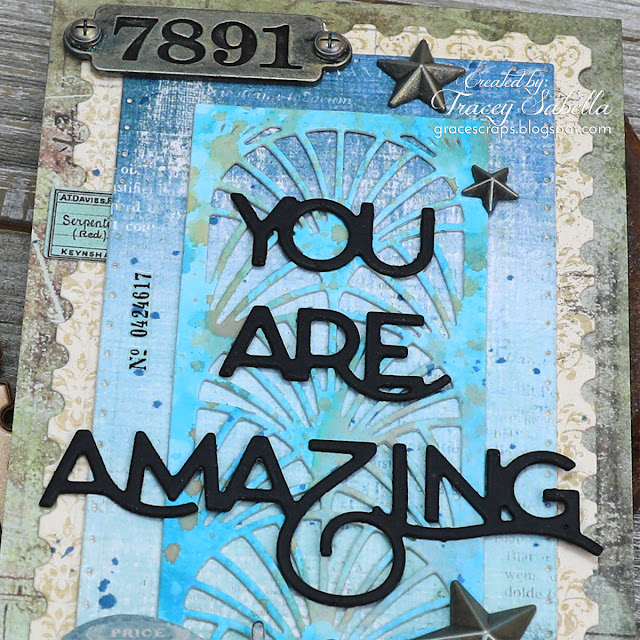

This fabulous sentiment is cut from the You're Amazing die set that also includes the beautiful die that cut the top intricate layer of the background. The words are cut from a heavyweight black cardstock so that they would show up against the busy background. This masculine card with this encouraging sentiment would be suitable for so many types of events including Father's Day, a birthday, graduation, promotion, or any milestone event.

To add interest, random numbers are applied to the background using Remnant Rubs from the Tim Holtz Special Delivery set as well as a couple pieces of ephemera tucked in from the Curator Snippets set. 
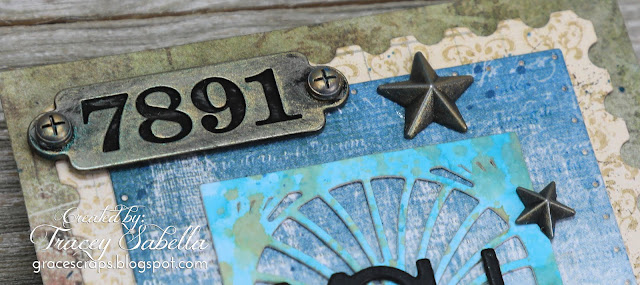
This number plate from the Factory Tags set is adorned with screws from the Hardware Heads set. The numbers were not very visible, so I rubbed Black Soot Distress Ink into the numbers to help them stand out. Of course the entire piece was covered in black paint, so I used a soft paper towel to remove most of the paint from the surface, but left a little for a grungy aged feel. 

The Idea-ology Stars that are scattered across the card reference this patriotic image from the flag. For a tarnished brass effect all of the silver metal pieces were rubbed with Finnabair Metallic Wax in Aged Brass and Peacock.
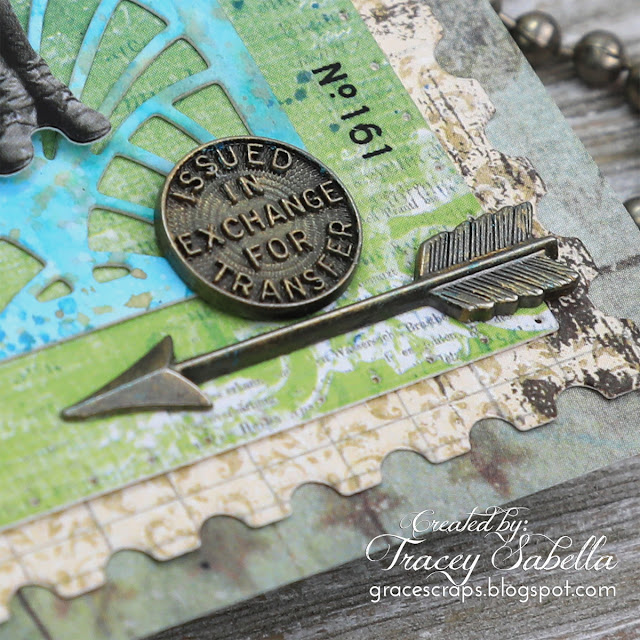
I find it a challenge sometimes to fill out a slimline card, so I've added this arrow and word coin to the bottom left of the card to balance the number plate on the top left corner. You can also see another of the number rub-ons in this photo. 

Once all the background layers were adhered together and before the embellishments were adhered, I splattered Uncharted Mariner Distress Spray Stain over the background to add more visual dimension.

Don't you just adore the effect of these postage edges? They're so perfect for this masculine Father's Day card!

Below you can find the products I used to create this project including some with compensated affiliate links to Scrapbook.com and Spellbinders. These links are at absolutely no cost to you. When you shop through the links below, I receive a small commission from the companies.  These commissions help me cover the costs of my blog and other expenses, which allows me to continue to provide you with FREE inspiration along with detailed Tips and Techniques provided for every project. Thank you so much for your love and support!

Amazing Paper Grace Sets:

Paper:
Thick black cardstock
Retired pattern papers from my stash

Mixed Media:
Ranger Ink - Tim Holtz Distress Sprays and Distress Oxide Sprays in teals and orange.
Ranger Ink - Tim Holtz - Distress Paint - Black Soot
Prima - Finnabair Collection - Art Alchemy - Metallique Wax - Aged Brass

Embellishments:
Idea-ology - Tim Holtz - Adornments - Stars
Idea-ology - Tim Holtz - Remnant Rubs - Special Delivery
Idea-ology - Tim Holtz - Compass Coins
Idea-ology - Tim Holtz - Arrows

Adhesives:
Beacon - 3-IN-1: Fabri-Tac
Helmar - 450 Quick Dry Adhesive

Tools:

Thanks so much for stopping by to learn more about creating this masculine card.
I hope you've been inspired!

Wednesday, July 13, 2022

Masculine Industrial Card for Amazing Paper Grace with Tutorial Link for Using Crackle Paste on Die Cuts

 
Welcome to my creative space!

I just adore creating industrial masculine cards with grungy textures and feature the Amazing Paper Grace Happy Occasions Die set (S4-1206) from The Right Words collection to cut this fabulous tag showcasing a cracked leather effect using crackle paste and Distress Stain Sprays. I've added a bit of patina to the birthday sentiment also cut with this fabulous die set using Finnabair waxes as well as the metal embellishments. The black medallions cut with the A2 Radient Navette (S4-1167) die set add a a bit of a steampunk flair as well.

You can find a full video tutorial explaining this crackle technique exclusively in the Amazing Paper Grace Creative - Creative Encouragement Community Facebook Group.

This lovely group includes exclusive tutorial content. I share a mixed media tutorial there on the 13th of each month. If you're not a part of this fabulous and encouraging group you can join HERE.


Thank you Amazing Paper Grace for providing the dies used in this project.

Tips and Techniques
The gorgeous crackle effect on this tag cut with the Happy Occasions die set (S4-1206) looks like old cracked leather. A video tutorial for this easy technique can be found in the Amazing Paper Grace Creative - Creative Encouragement Community Facebook Group. The birthday sentiment is cut from metallic Kraft-Stock. I wanted to accent with patina blue and colored the words with Finnabair waxes.

I've added a few Tim Holtz embellishments to add to the industrial feel I wanted for this card including this Gauge Dial and lock which is also colored with waxes for a rusty patina effect. Gold half pearls are scattered across the bottom of the card to add texture. A tiny gear and pearl are added to the center of this paper gauge to add dimension.

This fabulous brass steam gauge is from Mitform castings and is given a patina finish with more of the waxes. I've added bits of Design Tape to add the numbers across the tag and text across the top of the card.

I just adore these black medallions behind the tag which are cut with the A2 Radient Navette (S4-1167) die set that add a steampunk feel to the card. The hinge clip on the end of the tag is from Tim Holtz and the scrolled corner is an older piece from my stash, and they are colored with the art waxes for a rusty patina finish.

One final view.

Below you can find the products I used to create this project including some with compensated affiliate links to Scrapbook.com and Spellbinders. These links are at absolutely no cost to you. When you shop through the links below, I receive a small commission from the companies.  These commissions help me cover the costs of my blog and other expenses, which allows me to continue to provide you with FREE inspiration along with detailed Tips and Techniques provided for every project. Thank you so much for your love and support!

Amazing Paper Grace Dies:

Paper:

Mixed Media:

Embellishments:

Adhesives:

Tools:

Monday, June 6, 2022

Amazing Paper Grace June 2022 Die of the Month: Pop-Up 3D Vignette Road Trip

 
Welcome to my creative space!

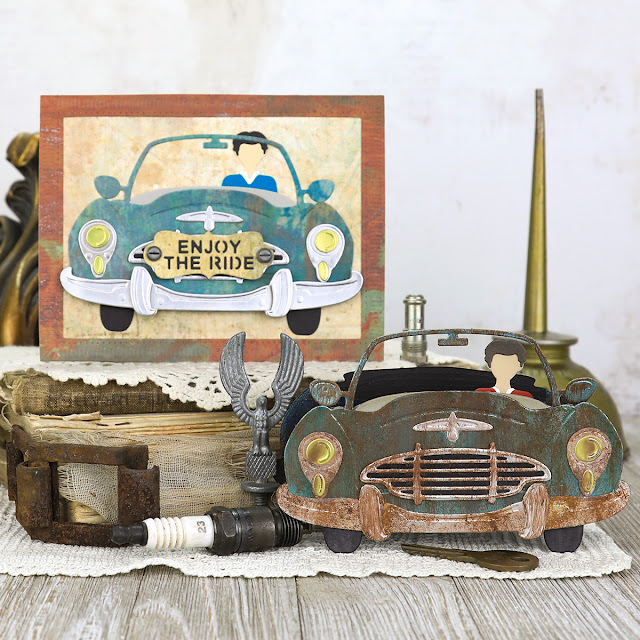
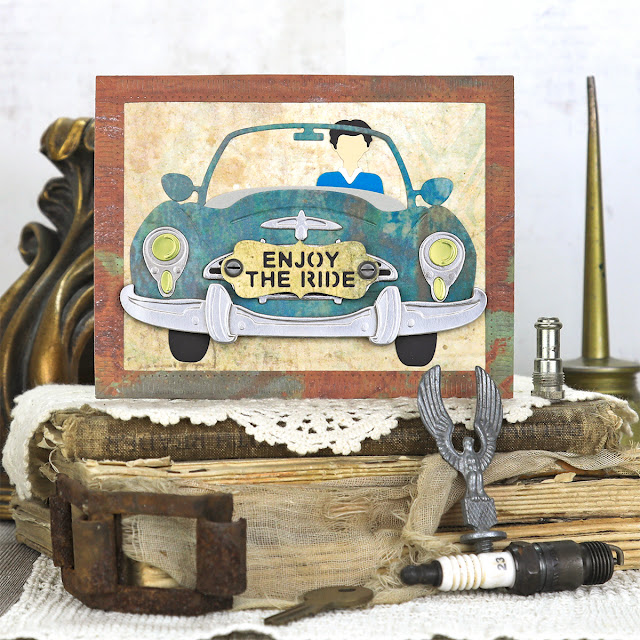
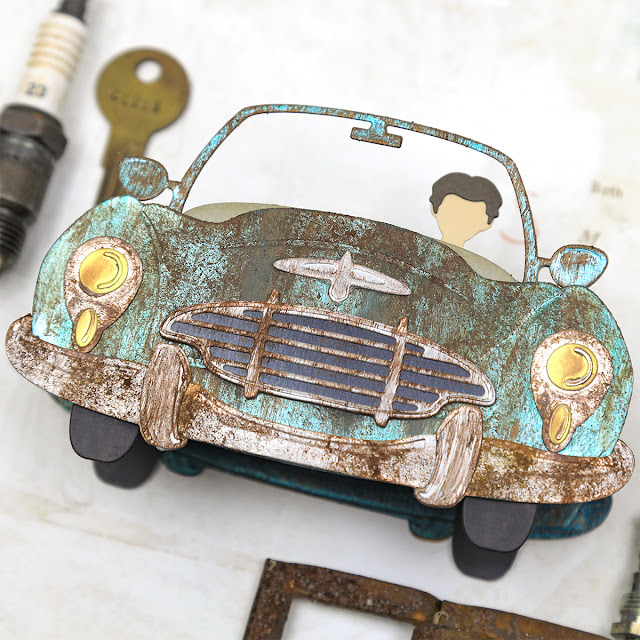
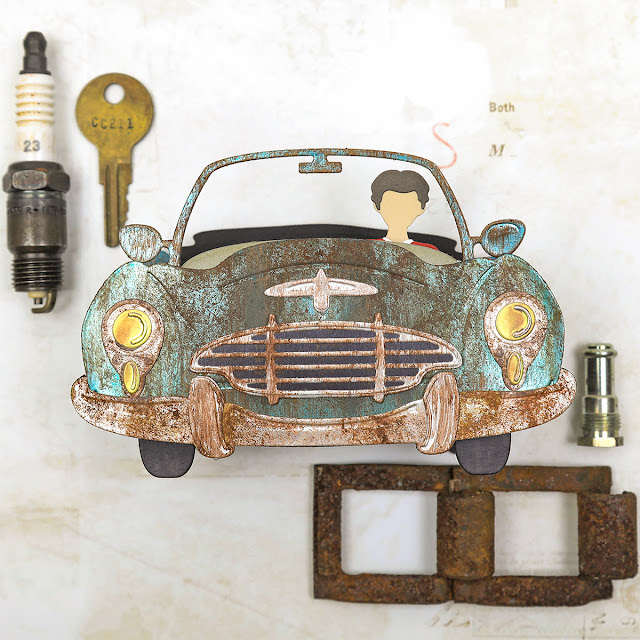
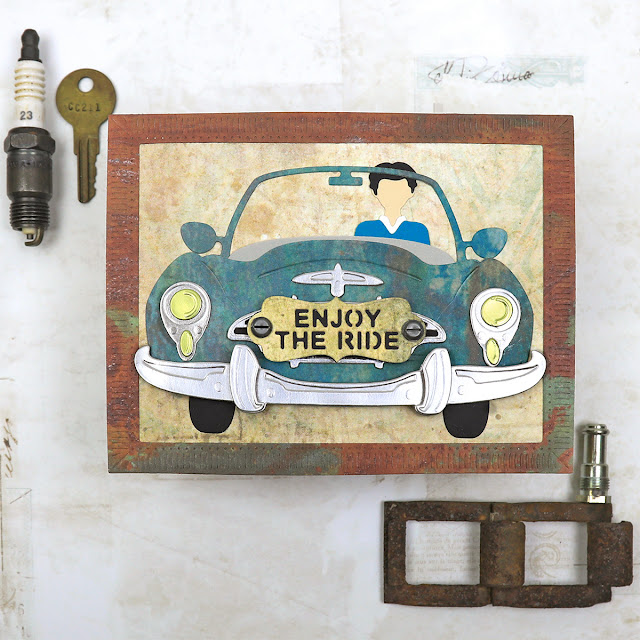
When I saw this fabulous Amazing Paper Grace June Die of the Month I thought what an adorable card it would make for my husband who's a car guy. He likes his cars shiny and clean, so that was the direction I planned to go with this 3D car die set. Then . . . . . . . the more I looked at the shape of this car, I started thinking of old barn find roadsters covered in rust and patina. I searched for images and there was no turning back. I had to transform this adorable car into a grungy "American Pickers" rusty classic. I'd adore hearing from you in the comments to let me know what you think! (Oh and by the way, that's my husband in the driver's seat. He adores taking his cars out for drives around the countryside.)

While it took some time and effort to achieve the rusty patina effect on this car, it was well worth it! I also wanted to show you something that still has that rusty patina effect, but is quick and easy to put together. On the flat card, the car is die cut from paper with a rusty patina print. It still has that grungy patina feel, but in a fraction of the time. With Father's Day just around the corner, these cards would be perfect for that special dad or father figure in your life. 

Be sure to scroll down through the Tips and Techniques section below for all the details on how I created these barn find roadster cards.

Many thanks to Amazing Paper Grace for providing the dies used in this project!

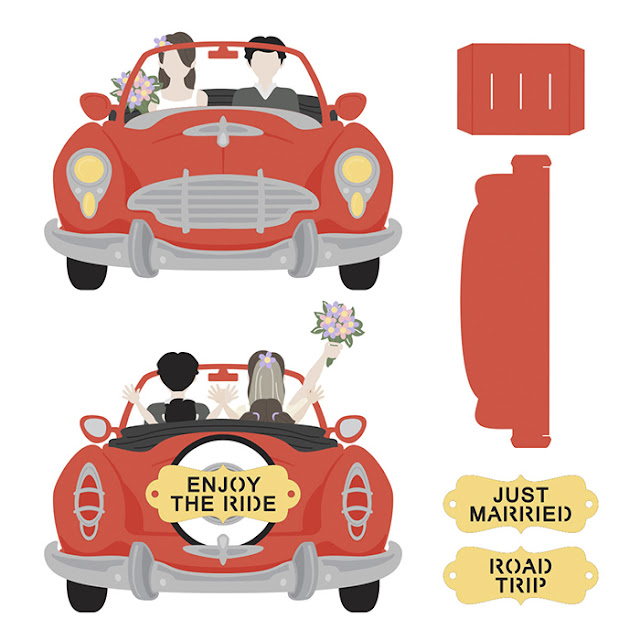
There are 26 cutting dies included in the Pop Up 3D Vignette Road Trip.

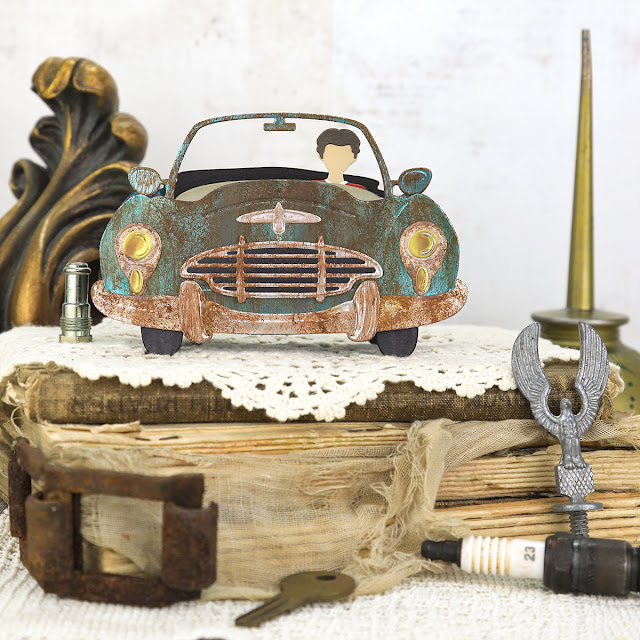
3D Roadster Card


"Enjoy the Ride" Flat Roadster Card

Tips and Techniques
I used a combination of Rust Paste, which is basically rust and patina colored acrylic paints with grit added for rusty texture, metallic acrylic paint, liquid acrylic paint, and Artisan Powder to create this patina effect. You could really use whatever rusty paint colors you have in your stash to create a similar effect. 

I mixed the mediums on a palette, but left streaks of the various colors just like you would find in natural rust and patina. I used a dabbing motion to apply the paints, then lightly brushed over it while still wet in a downward motion to give the feel of rust that has happened over time dripping down over the car. The yellow headlights are rubbed with Rusty Brown Matte Wax to make them look a bit dirty.

The dash board is lightly rubbed with distress inks to add to the grungy feel.

***Tip*** When using paints containing any kind of grit, be sure to use an old or inexpensive brush, as the grit will fray the bristles and damage the brush. I have a couple brushes set aside just for this use.

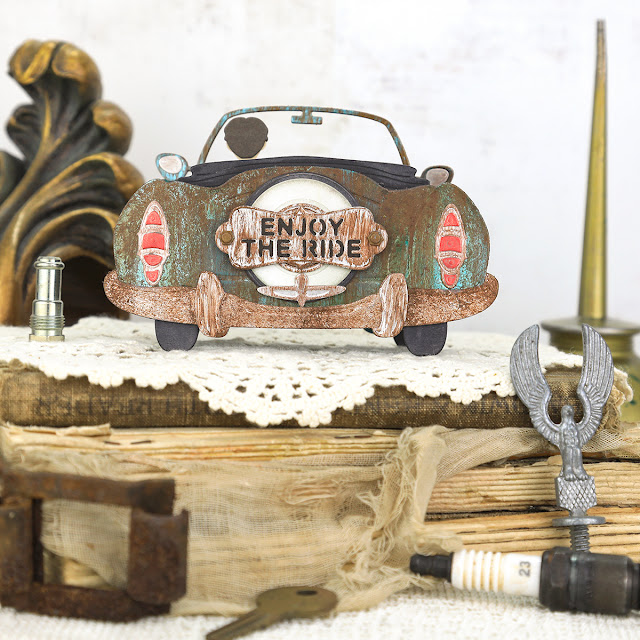
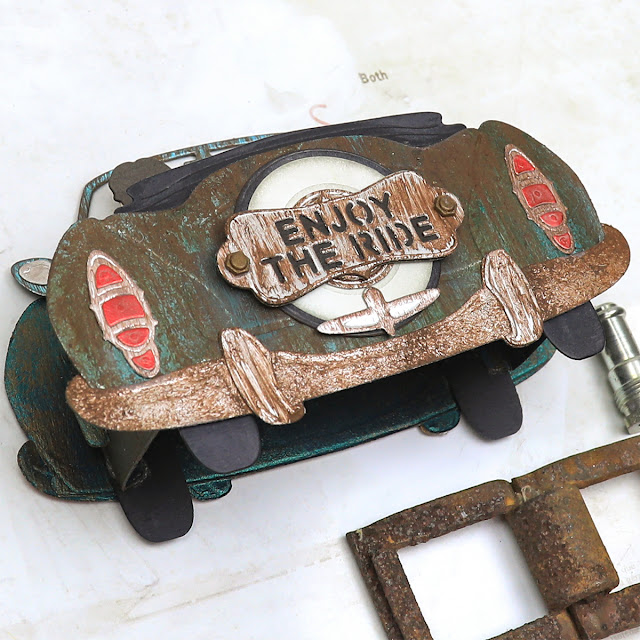
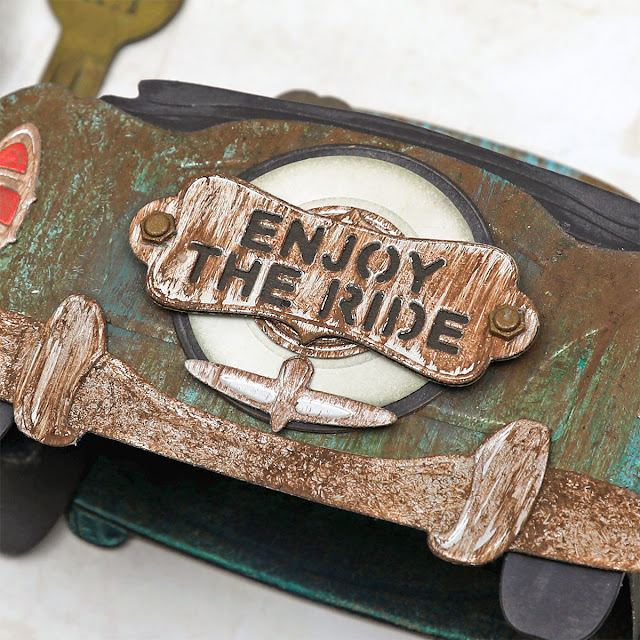
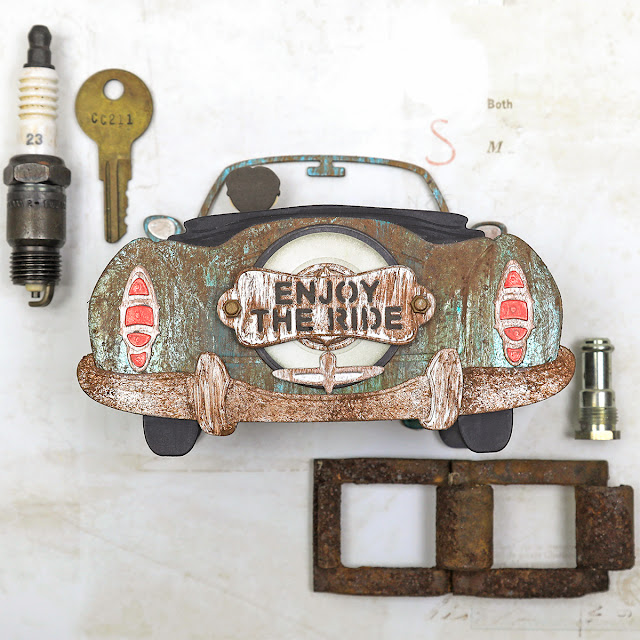
The back of this card is just as fun as the front with with the spare tire and fun sentiments to pick from. I used the same paint technique here on the back. I applied a little grungy ink to the white wall on the tire. The shiny red lights are toned down by rubbing with Rusty Brown Matte Wax, but no rust since glass doesn't rust.

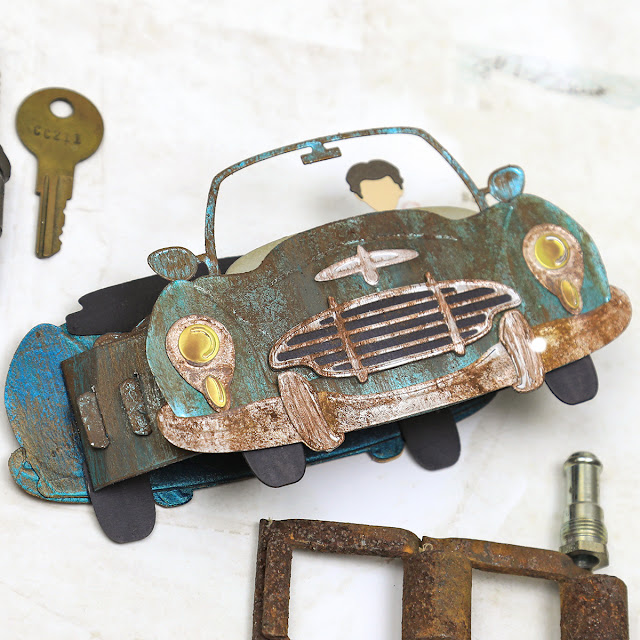
Don't you just adore how these 3D Vignette cards slide to lie flat for posting? I added the rusty patina effect to the hinges and slot pieces that make up the center of the card as well. 

Because this card has a front and a back, I needed to do something to the back of each piece. The metallic paper that I used has a kraft back, and would not have looked right if left as is. The solution was quite simple. I mixed up some emerald and deep blue metallic paints to brush over the back of each piece. Once dry, I lightly dry brushed the pieces with Hazelnut metallic paint in a downward motion to give a bit of that rusty feel. I didn't go all out with the patina mixture on the backs but this quick paint on the backs helps give a cohesive look to the card. 

***Tip*** The paint caused the pieces to curl, so once they were dry to the touch, I layered them in paper towels between two glass mats with a few heavy books on top and let them sit overnight. By the next day they were perfectly flat again. 

A close-up of this fun sentiment on the back. You can see that the mix of pouncing on the rusty color along with brushing over it gives a natural rusty feel. The shiny black tires and back seat are rubbed with a bit more of that rusty brown matte wax to grunge them up just a little. 

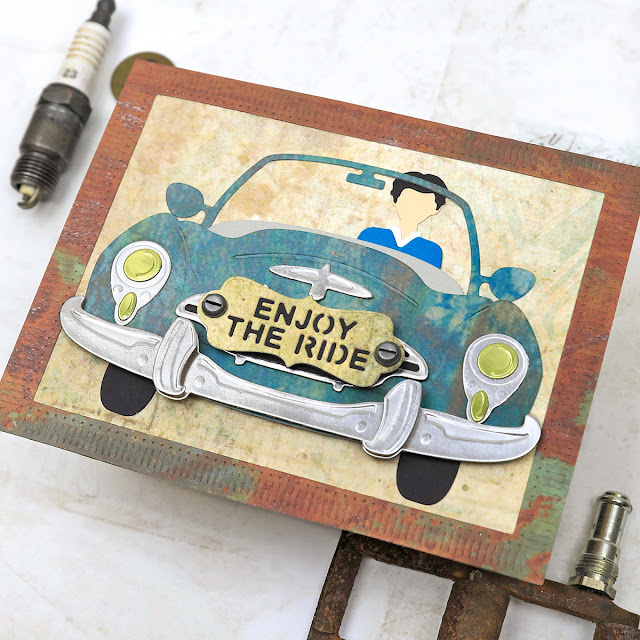
Here you get a perfectly grungy car just by die cutting it from paper with a rusty patina design. This car image fits perfectly into the largest Fluted Classics Rectangle. This fluted frame is cut from a different section of the same paper that has more of the rust color in it and is placed over a grungy printed paper in a lighter color so the car image will pop. The sentiment is cut from the lighter paper as well.

The metal accent pieces like the bumper and grille are cut from metallic silver cardstock. To keep it simple, I didn't add any inking or grungy mixed media affects to this card, but just adore the way it turned out. 

My husband wears a lot of red and blue, so I gave him a red shirt in the 3D car and blue here on the flat card.

A few final shots


Supplies:

Amazing Paper Grace Dies:

Paper:
  • Scrapbook.com ~ Christmas - Smooth Cardstock Paper Pad - Slimline
  • Tim Holtz with Idea-ology ~ 8 x 8 Kraft Stock - Metallic - Confections
  • Tim Holtz with Idea-ology ~ 8 x 8 Kraft Stock - Metallic - Jewels
  • Tim Holtz with Idea-ology ~ 8 x 8 Kraft Stock - Metallic
  • Craft Consortium ~ Patina, 12x12" Paper Pad
  • Prima ~ Timeless Memories, 12x12" Paper Pad
  • Concord & 9th ~ Dove 
  • Cardstock ~ Black, Red, Blue, White, Skin Tone

Ink:
  • Distress Ink ~ Frayed Burlap; Pumice Stone

Mixed Media:
  • Finnabair with Prima Marketing ~ Rust Effect Paste: Gold Rust; Red Rust; Turquoise
  • Finnabair with Prima Marketing ~ Liquid Acrylic: Burnt Sienna; Emerald
  • Finnabair with Prima Marketing ~ Matte Wax: Rusty Brown
  • Finnabair with Prima Marketing ~ Metallique Acrylic Paint: Hazelnut; Emerald Green; Deep Waters
  • Frank Garcia with Prima Marketing ~ Artisan Powder: Clay

Embellishments:
  • Tim Holtz with Idea-ology ~ Hardware Heads

Adhesives:
  • Scrapbook.com ~ Clear Double Sided Adhesive Roll - Permanent
  • Helmar ~ 450 Quick Dry Adhesive
  • Beacon ~ 3-IN-1 Advanced Craft Glue
  • Beacon ~ Fabri-Tac 
  • Tombow ~ Mono MULTI Liquid Glue
  • Foam Tape ~ 1"

Tools:
  • Spellbinders ~ Platinum 6
The Amazing Paper Grace Die of the Month is available exclusively at Spellbinders Paper Arts during June 2022, Pop Up 3D Vignette Road Trip along with other membership perks.

View this month’s Amazing Paper Grace Die of the Month! 

I would adore hearing from you! Please leave a comment below letting me know how you will use these fabulous dies!


Thanks for stopping by! I treasure your comments.

~ Blessings ~

Monday, May 30, 2022

"Adoring You" Fathers Day Card for Amazing Paper Grace

Welcome to my creative space!

Father's Day is just around the corner, and I thought I'd share how to transform delicate and feminine Amazing Grace Die sets into a masculine card for that special father in your life. I know that some makers are challenged to create guy cards, so I hope this helps inspire you to try out a masculine card with Amazing Paper Grace dies if you haven't already. 

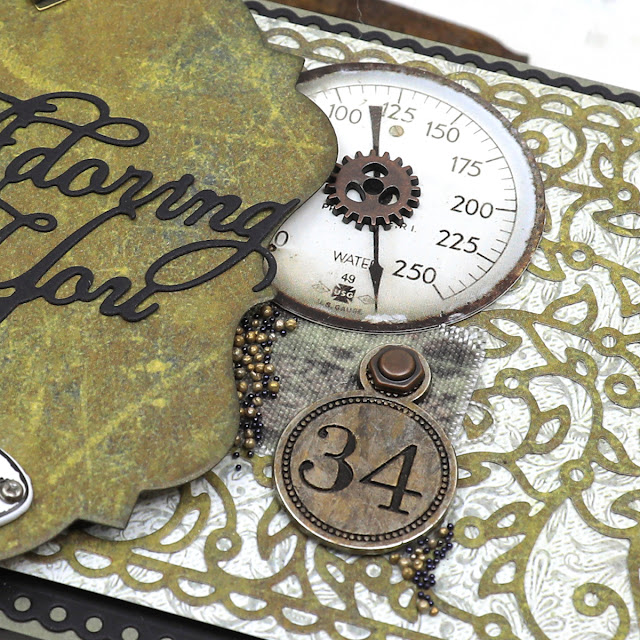
I've featured the Adoring Fleurette Card Builder set (S5-493) to create this Father's Day card for my sweet husband. By using neutral colors and arranging some industrial steampunk elements around the center you can get a nice masculine feel. I cut the black border frame with the Scalloped Symphony Notecard set (S6-177). The metal embellishments were mostly silver so I rubbed them with art waxes to give them that aged industrial feel. 

Be sure to scroll down through the "Tips and Techniques" section below for close-ups and all the details on how to create this masculine Father's Day card.

Thank you Amazing Paper Grace for providing the dies used in this project.

Tips and Techniques
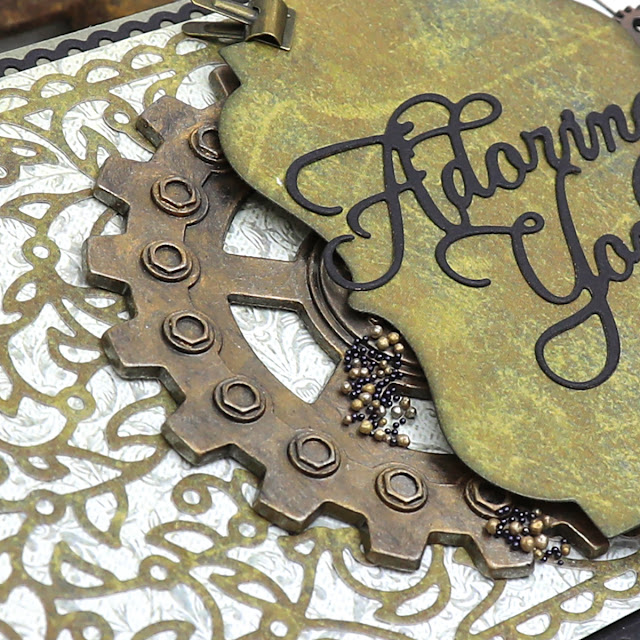
Here's a close-up of the center of the card. The scrolled background is die cut in two pieces which gives it a lot of versatility and allows you to vary the width of the card. I wanted to use this black border piece from the Scalloped Symphony Notecard set, but the two background pieces did not fit snugly together to fit the dimension of the black border piece. No problem at all. The emblem piece behind the sentiment covers the gap between the two pieces. Easy peasy fix! Both the scrolled background and the emblem are cut from a beautiful leather print paper for a masculine feel. The edges of the emblem are inked lightly with Black Soot Distress Ink. 

The emblem is popped up using foam tape, so that you can tuck some of the other elements underneath. This layering gives beautiful dimension. I rubbed several grungy colors of art wax in both metallic and matte finishes to add an aged industrial metal feel to the metal pieces. The edges of the fabric tape are frayed to add to the vintage look. 

This half gear has more of the wax finish on it. For a list of colors used, scroll down to my supply list below. I adore texture, so added some microbeads and prills in black and metallic colors.

The number piece below the sentiment is simply glued in place and adds such a nice touch to balance everything out.

I used foam tape to adhere the light base behind the scrollwork to the black frame piece to pop it up and add more depth and dimension.

One final view. I bet you can tell from my staging pieces that I enjoy designing masculine creations and hope that this excitement is contagious! 

Amazing Paper Grace Dies:

Paper:
  • Tim Holtz with Idea-ology ~ Backdrops Vol 1
  • Tim Holtz Core'dinations Cardstock, Neutral

Ink:
  • Ranger ~ Distress Ink: Black Soot

Mixed Media:
  • Finnabair with Prima ~ Metallique Wax: Bronze Age; Aged Brass
  • Finnabair with Prima ~ Matte Wax: Rusty Brown; Charcoal Black
  • Finnabair with Prima ~ Microbeads, Black
  • Finnabair with Prima ~ Soft Matte Gel
  • US ArtQuest ~ Prills: Gilt Trip

Embellishments:
  • Tim Holtz with Idea-ology ~ Gauge Dials
  • Tim Holtz with Idea-ology ~ Linen Tape: Patchwork
  • Tim Holtz with Idea-ology ~ Industrial Gears
  • Tim Holtz with Idea-ology ~ Mini Plaquetttes
  • Tim Holtz with Idea-ology ~ Adornments: Foundry
  • Tim Holtz with Idea-ology ~ Tiny Clips
  • Tim Holtz with Idea-ology ~ Hex Fasteners
  • Tim Holtz with Idea-ology ~ Mini Gears

Adhesives:
  • Beacon ~ 3-IN-1 Advanced Craft Glue
  • Beacon ~ Fabri-Tac 
  • Tombow ~ Mono MULTI Liquid Glue
  • Double Sided Tape ~ 1/4" 
  • Helmar ~ 450 Quick Dry Adhesive
  • Scrapbook Adhesives by 3L ~ 3D Foam Squares, Black
  • Scrapbook Adhesives by 3L ~ Thin 3D Foam Squares, Black
  • Scrapbook Adhesives by 3L ~ Crafty Foam Tape, Black

Tools:
  • Spellbinders ~ Platinum 6


Thanks for stopping by! I treasure your comments.

~ Blessings ~

Monday, May 9, 2022

"Live this Life" Industrial Steampunk Card for Amazing Paper Grace

Welcome to my creative space!

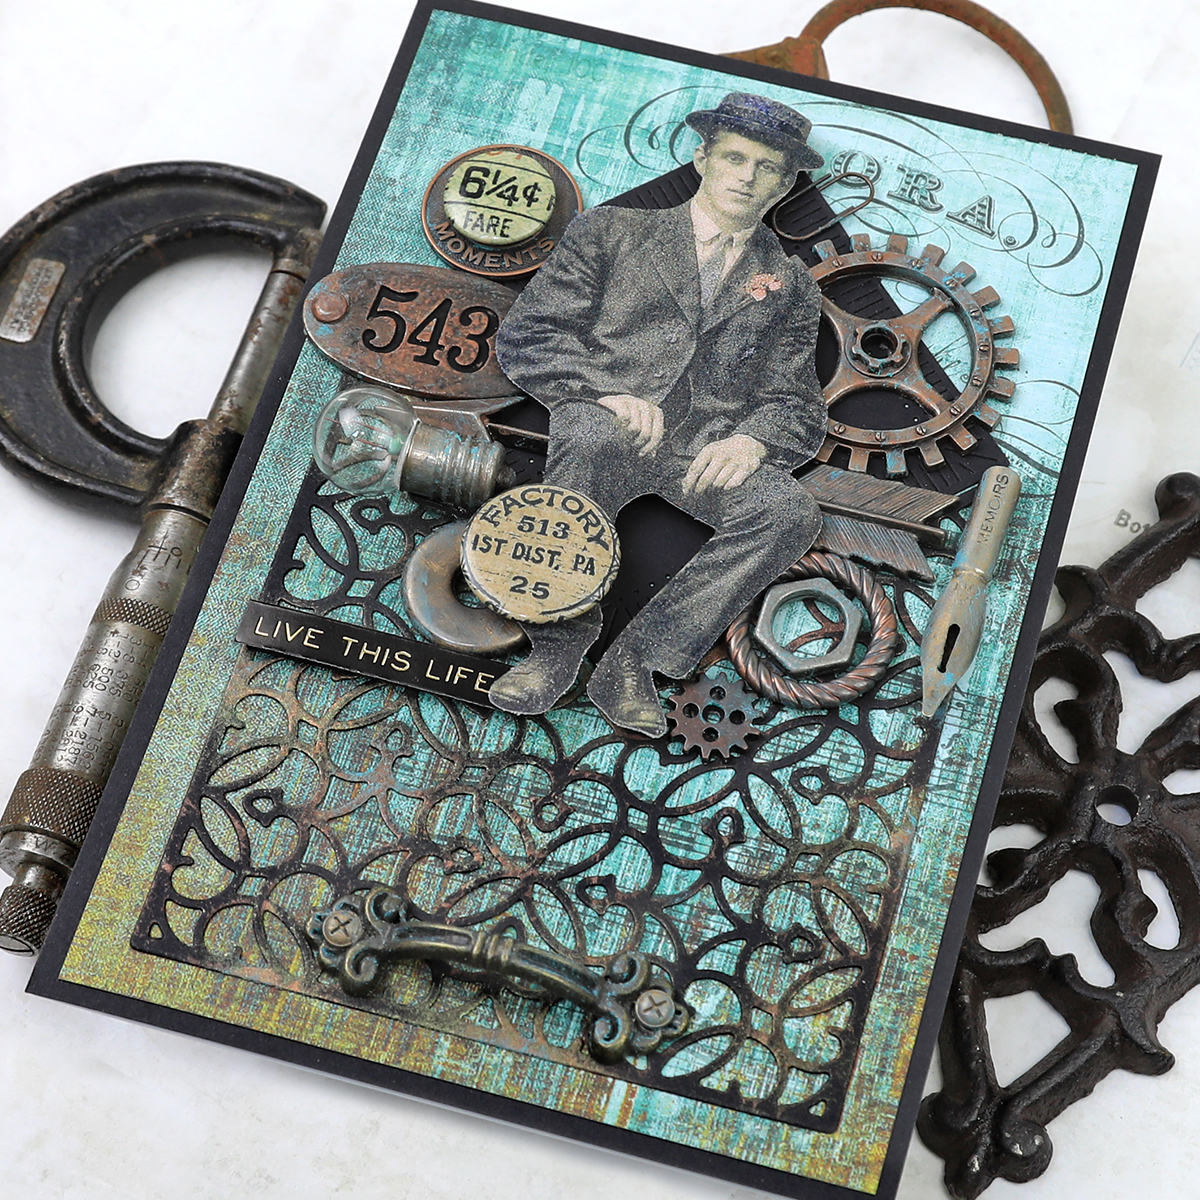
I just adore creating in the industrial steampunk style, and as soon as I laid eyes on the fabulous Amazing Paper Grace With Love Regalia Card Builder (S5-492) die set, I thought it looked like old wrought iron fencing that would be perfect to create a card in this style. As I looked through my stash of embellishments, I found this dapper gentleman from the Tim Holtz Paper Dolls set to perch perfectly atop the fence. Yes, this is another "who knew" Amazing Paper Grace could be fabulous for a masculine creation!

Since this die has a V shape at the top, I cut a square of black cardstock using the smallest dies in the Fluted Classics Squares set to provide a backdrop for my gentleman and industrial elements. This square fits the opening perfectly and those fluted edges add wonderful texture here.

The fence has been given a coppery patina finish in places using the new Tim Holtz Foundry Waxes along with classic Finnabair art waxes. These mediums are also used to add a grungy finish to the metal elements.

Be sure to scroll down through the "Tips and Techniques" section below for close-ups and all the details on how to create this industrial steampunk card.

Thank you Amazing Paper Grace for providing the dies used in this project.

Tips and Techniques
Here you can see just how gorgeous this die cut is as a wrought iron fence. It's cut from 120lb black cardstock. I randomly applied Mined Foundry Wax across the piece where you might see corrosion naturally appearing on an old weathered iron fence, then heat set the wax to bring out it's shiny luster. Green Patina Matte Wax is rubbed on around the copper for a grungy patina finish. I wanted a little something on the bottom of the card to help balance the detailed top, so found this ornate handle in my stash that's the perfect size to use here. 

The small square from the Fluted Classics Squares set fits into the "fence" opening perfectly and helps the man and embellishments stand out. I felt that he would have gotten a little "lost" against the colorful patterned paper.

This vintage gentleman is sitting atop the fence on a whimsical arrow. I applied and heated Mined and Statue Foundry Wax across many of these industrial elements to age them. I also applied Matte Patina Green, Bronze Age, and Rich Copper waxes around those areas to accentuate the aged patina look I wanted to achieve. Nearly all of these embellishments are from the Tim Holtz Idea-ology collection.

***Tip*** The engraved numbers on the 543 piece were colored with the waxes and no longer very visible. My solution to fix that problem was to rub black acrylic paint into the numbers, then gently use a soft cloth to remove most of the paint from the patina surface. Not all of the black paint came off, but that just adds to the grungy look and the numerals now pop!

One final look so you can see how all the grungy, aged elements come together so beautifully to create a wonderful masculine card. Don't you agree that this die is perfect to create a weathered wrought iron fence?

Amazing Paper Grace Dies:

Paper:
  • Tim Holtz with Idea-ology ~ Paper Stash: Abandoned
  • Cardstock ~ Black 120lb; White 120lb

Ink:
  • Tim Holtz with Ranger ~ Distress Ink: Chipped Sapphire
  • Tim Holtz with Ranger ~ Distress Ink: Saltwater Taffy

Mixed Media
  • Tim Holtz with Ranger ~ Foundry Wax: Mined
  • Tim Holtz with Ranger ~ Foundry Wax: Statue
  • Tim Holtz with Ranger ~ Distress Frosted Crystal 
  • Tim Holtz with Ranger ~ Distress Embossing Dabber
  • Tim Holtz with Ranger ~ Distress Paint: Black Soot
  • Finnabair with Prima ~ Metallique Wax: Bronze Age; Rich Copper
  • Finnabair with Prima ~ Matte Wax: Patina Green

Embellishments:
  • Tim Holtz with Idea-ology ~ Paper Dolls
  • Tim Holtz with Idea-ology ~ Industrial Gears
  • Tim Holtz with Idea-ology ~ Adornments: Arrows
  • Tim Holtz with Idea-ology ~ Adornments: Foundry
  • Tim Holtz with Idea-ology ~ Pen Nibs
  • Tim Holtz with Idea-ology ~ Muse Tokens
  • Tim Holtz with Idea-ology ~ Mini Paper Clips
  • Tim Holtz with Idea-ology ~ Mini Gears
  • Tim Holtz with Idea-ology ~ Hardware Heads
  • Tim Holtz with Idea-ology ~ Mini Flair
  • Spare Parts ~ Mini Light Bulbs
  • Spare Parts ~ Small Metal Handles
  • Washers ~ From my stash

Adhesives:
  • Tombow ~ Mono MULTI Liquid Glue
  • Helmar ~ 450 Quick Dry Adhesive
  • Beacon ~ 3-IN-1 Advanced Craft Glue
  • Scrapbook Adhesives by 3L ~ Thin 3D Foam Squares, Black
  • Scrapbook Adhesives by 3L ~ Crafty Foam Tape, Black
  • Helmar ~ ZapDots: 1/4" Black; 1/2" Black
  • Double Sided Tape ~ 1/4" 

Tools:
  • Spellbinders ~ Platinum 6


Thanks for stopping by! I treasure your comments.

~ Blessings ~