Showing posts with label Finnabair. Show all posts

Monday, June 19, 2023

Masculine Patriotic Card for Father's Day featuring Amazing Paper Grace Dies paired with Tim Holtz Idea-ology

 
Welcome to my creative space!

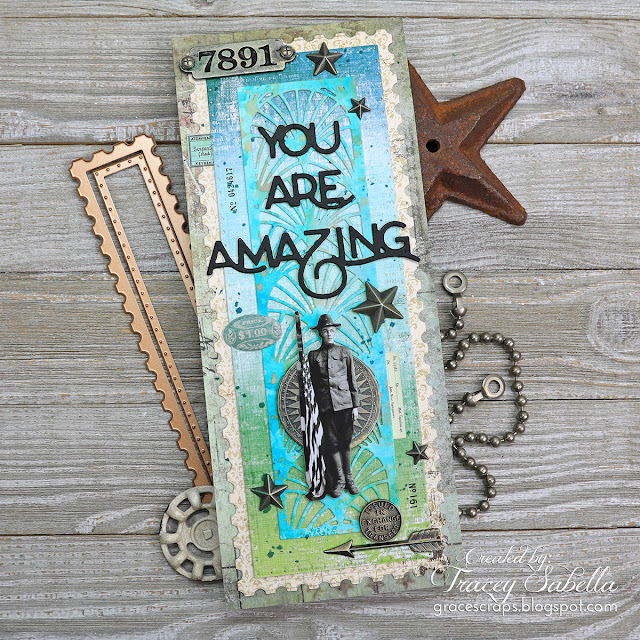
Father's Day is a special time to honor our fathers and other special men in our lives. I hope you had the opportunity to celebrate with a loved one this year. My dad served in the Air Force in the photomapping division and has proud memories of his service to our country. To honor that legacy, I created this Father's Day card for him featuring the Amazing Paper Grace Postage Edge Slimlines (S5-541) and You're Amazing (S4-1203) die sets, pairing the slimline die cuts with Tim Holtz Idea-ology ephemera and metal pieces. When looking through my paper dolls this military figure with the flag caught my eye.

I just adore how the Slimline Postage edge dies work perfectly with the intricate background die cut from the You're Amazing set to form a wonderful masculine background for this special card. 

For more close-ups and all the details on how to create this card, be sure to scroll down through the Tips and Techniques section below. 

Thank you Amazing Paper Grace for providing the dies used in this project.

You can add visual interest by repeating elements. I've accented this card with numbers that can be found on the metal tag and used remnant rubs to add number strips to the background. I've also placed 3D metal stars across the card. These repeated elements help move your eyes across the image. 

I'm entering this week's Simon Says Stamp Monday Challenge: Pick a Number. You can find this number challenge HERE. They have wonderful challenges each week, and if you aren't familiar, be sure to go check them out!

Tips and Techniques
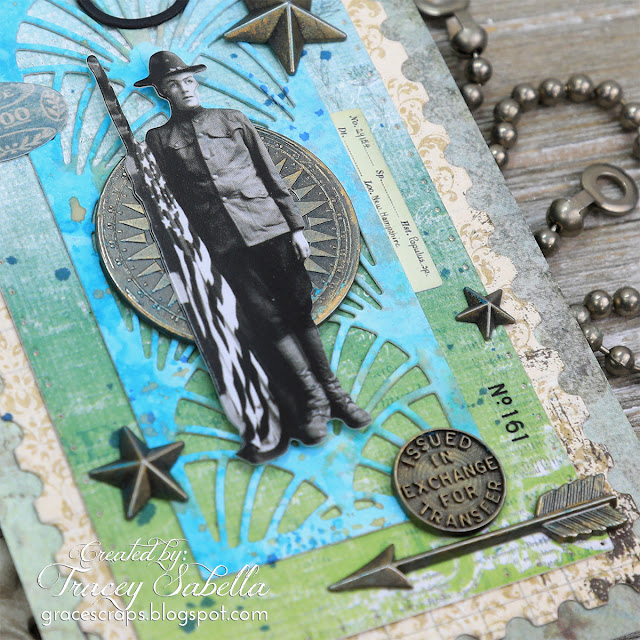
This soldier carrying a flag from the Tim Holtz Idea-Ology Paper Dolls Minis pack is the perfect image to honor my dad with this card. 

I want to share how the background for this card came together. The top die cut uses a scrap of paper that I had created using Distress Spray Stains and Distress Oxide Sprays on Distress Heavystock Paper. Because this was in my stash I don't remember the exact colors that I used to create it, but they were in the teal range with splashes of orange. This intricate die cut using the hand-colored paper adds so much interest and visual dimension. It's layered over a blended tri-color paper from the 49 and Market - Spectrum Sherbet Collection - 6 x 8 Collection Pack. I positioned the soldier so that it looks like he's standing in a grassy meadow with a blue sky overhead. This piece was cut and embossed using the largest inner die from the Postage Edge Slimlines set. You can see the pierced design around the edges.

From there I went to some older papers from my stash to cut the outer postage edge layer from a cream and brown design, then for the card base layer I went back to earthy greens cut to 3 1/2 by 8 1/2". I wanted each layer to be different enough in color and tone so that while coordinating into one beautiful background, the design of each layer would be clearly visible. You don't need to use these exact papers and colors to create a wonderful masculine card, but consider how the colors and designs will pull together cohesively while allowing the die cut designs to shine.
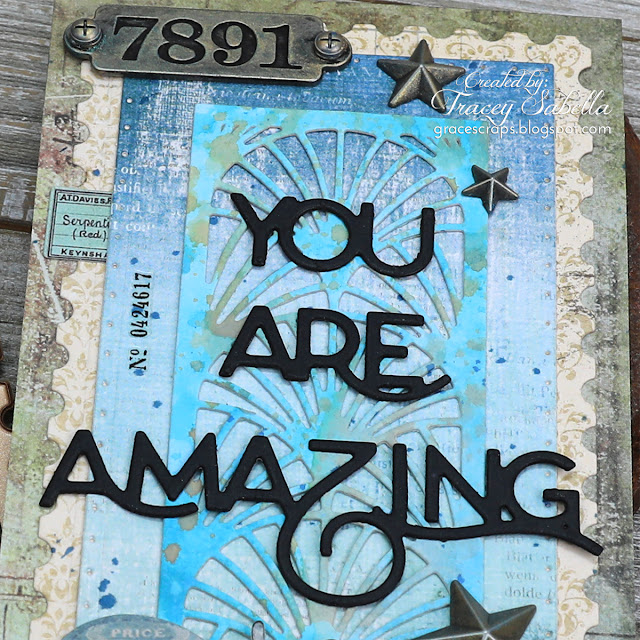

This fabulous sentiment is cut from the You're Amazing die set that also includes the beautiful die that cut the top intricate layer of the background. The words are cut from a heavyweight black cardstock so that they would show up against the busy background. This masculine card with this encouraging sentiment would be suitable for so many types of events including Father's Day, a birthday, graduation, promotion, or any milestone event.

To add interest, random numbers are applied to the background using Remnant Rubs from the Tim Holtz Special Delivery set as well as a couple pieces of ephemera tucked in from the Curator Snippets set. 
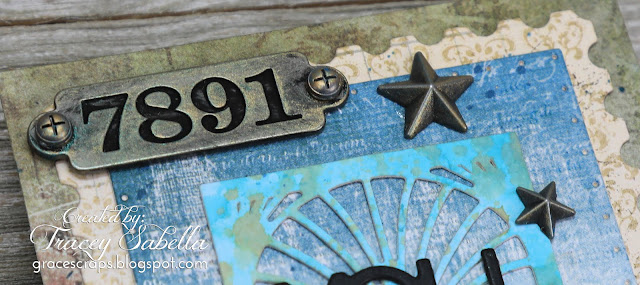
This number plate from the Factory Tags set is adorned with screws from the Hardware Heads set. The numbers were not very visible, so I rubbed Black Soot Distress Ink into the numbers to help them stand out. Of course the entire piece was covered in black paint, so I used a soft paper towel to remove most of the paint from the surface, but left a little for a grungy aged feel. 

The Idea-ology Stars that are scattered across the card reference this patriotic image from the flag. For a tarnished brass effect all of the silver metal pieces were rubbed with Finnabair Metallic Wax in Aged Brass and Peacock.
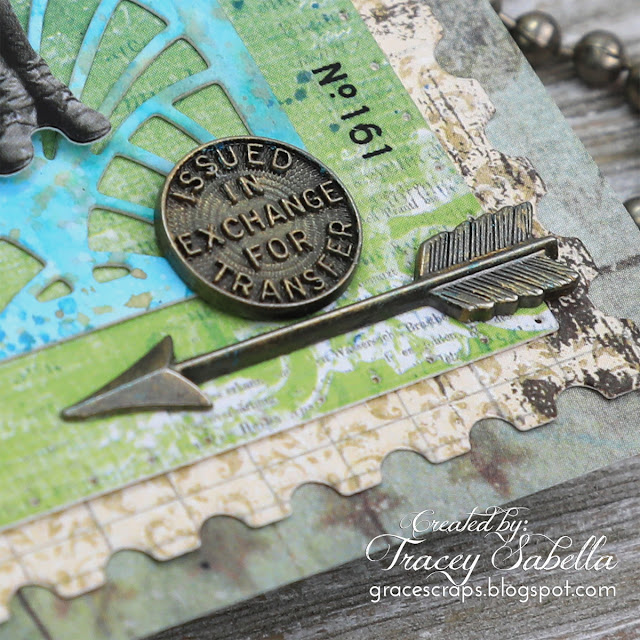
I find it a challenge sometimes to fill out a slimline card, so I've added this arrow and word coin to the bottom left of the card to balance the number plate on the top left corner. You can also see another of the number rub-ons in this photo. 

Once all the background layers were adhered together and before the embellishments were adhered, I splattered Uncharted Mariner Distress Spray Stain over the background to add more visual dimension.

Don't you just adore the effect of these postage edges? They're so perfect for this masculine Father's Day card!

Below you can find the products I used to create this project including some with compensated affiliate links to Scrapbook.com and Spellbinders. These links are at absolutely no cost to you. When you shop through the links below, I receive a small commission from the companies.  These commissions help me cover the costs of my blog and other expenses, which allows me to continue to provide you with FREE inspiration along with detailed Tips and Techniques provided for every project. Thank you so much for your love and support!

Amazing Paper Grace Sets:

Paper:
Thick black cardstock
Retired pattern papers from my stash

Mixed Media:
Ranger Ink - Tim Holtz Distress Sprays and Distress Oxide Sprays in teals and orange.
Ranger Ink - Tim Holtz - Distress Paint - Black Soot
Prima - Finnabair Collection - Art Alchemy - Metallique Wax - Aged Brass

Embellishments:
Idea-ology - Tim Holtz - Adornments - Stars
Idea-ology - Tim Holtz - Remnant Rubs - Special Delivery
Idea-ology - Tim Holtz - Compass Coins
Idea-ology - Tim Holtz - Arrows

Adhesives:
Beacon - 3-IN-1: Fabri-Tac
Helmar - 450 Quick Dry Adhesive

Tools:

Thanks so much for stopping by to learn more about creating this masculine card.
I hope you've been inspired!

Monday, December 5, 2022

Amazing Paper Grace December Die of the Month: Sweetheart Envelope & Notecard Set - Steampunk Valentine's Day Card and Gift Card Holder

 
Welcome to my creative space.

I try to keep to a more masculine style when creating Valentine's cards for my husband so decided to go steampunk with this fabulous Amazing Paper Grace December Die of the Month Set: Sweetheart Envelope & Notecard Set. This set also included some amazing flowers which I did not use, but would be fabulous on a more elegant and feminine creation.

The intricate details in this gorgeous die set have a definite steampunk vibe with the fabulous scrollwork design, so I enhanced this genre by adding rusty gears, star, and metal key, along with masculine twine. The papers I selected have subtle patterns, so I added some stamping to add more visual texture. Inking is added to help the heart designs and edges pop.

Please scroll down through the Tips and Techniques section to find close-ups and all the details on how to create this steampunk Valentine card and gift card holder.

Many thanks to Amazing Paper Grace for providing the dies used in this project!


Steampunk Valentine Card

Steampunk Valentine Gift Card Holder

Tips and Techniques
I selected patterned papers in neutral colors with a touch of peach to give a Valentine feel without being too feminine, since this card is for my husband. 

***Designer Tip*** When selecting patterned papers for this die set, keep in mind that both sides will be showing and need to make sense for the design. The peach color is the back of the more neutral cream paper used to die cut the envelope feature.

To enhance the masculine steampunk feel of this card, stamping is added with a grungy script and dotted squares. 

The heart is cut from the same paper that is behind it, so it is rubbed with Distress Inks in Tea Dye and Vintage Photo to give it some contrast. 

The envelope feature is popped up with foam tape for added dimension and to leave room to tuck gears underneath as well as the twine wrap.

This sentiment is stamped with Vintage Photo Archival Ink on the same paper as the envelope piece and edged with Vintage photo Distress Ink.

Rusty steampunk gears are tucked under the envelope flap. 

As you can see in the top right corner, the inside background layer is distressed and both background layers are rubbed at the edges with Vingtage Photo Distress Ink.

Here's a side view of the heart so you can see how dimension is built. The heart is adhered to the envelope, then the envelope is wrapped with twine over the heart. The rusty star is added and a small copper gear is centered onto the star. These wonderful layers give beautiful dimension to the card.

One final photo. You can see there's even a rusty faucet handle added to the card insert. This insert is a great place to add a special private note!

Now let's take a look at the gift card holder. It's created with the larger envelope die that's left open on the card. I just folded the flap over to create this envelope gift card holder. 

This particular paper was a little thicker and cracked just a little on the fold lines. I went with that and lightly distressed the folded edges, then inked with Vintage Photo Distress Ink. Just make sure you don't distress the edges too much or you might go all the way through the paper. 

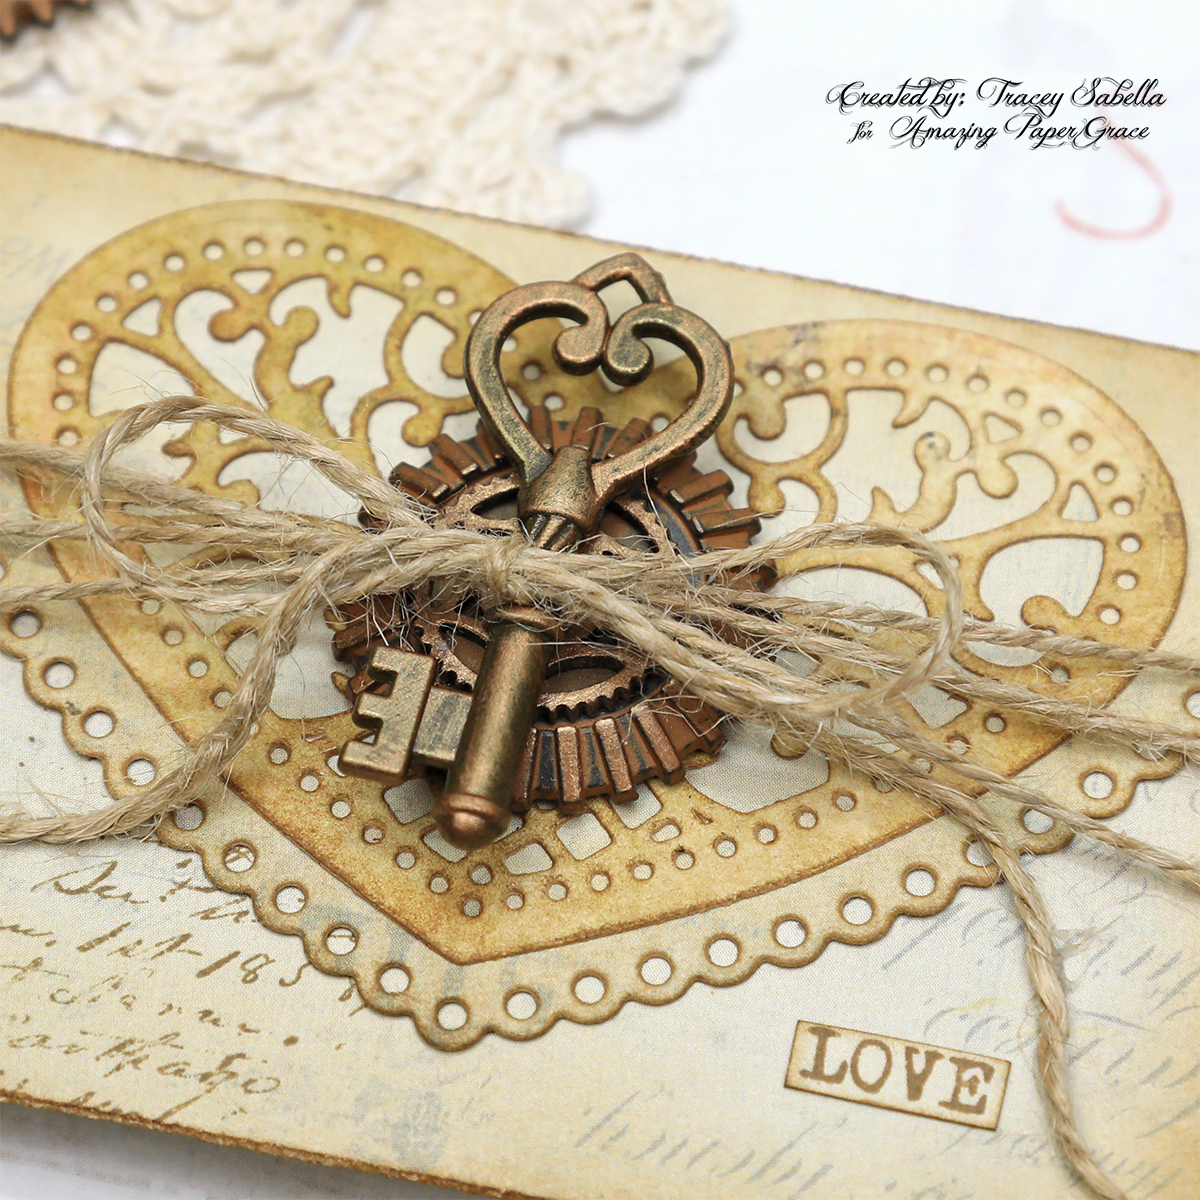
This beautiful heart is rubbed with more of the Vintage photo ink to highlight the gorgeous intricate design. The card is wrapped and tied with twine for a closure. 

Here's a side view to see the dimension. The heart die cut is centered onto the envelope flap, then a rusty gear is added. This gear has a large flat center, so I found a chipboard gear that fit perfectly. The chipboard is painted with a mix of Brass Hardware and Hazelnut Metallique paints to coordinate. A brass key is added to the top of the gears. It is dry brushed with the same paint mixture used for the chipboard gear to add highlights. Then the entire card is wrapped with twine to act as a closure. 

One final view. The sentiment is also stamped and edged in Vintage Photo Ink. 

Below you can find the products I used to create this project including some with compensated affiliate links to Scrapbook.com and Spellbinders. These links are at absolutely no cost to you. When you shop through the links below, I receive a small commission from the companies.  These commissions help me cover the costs of my blog and other expenses, which allows me to continue to provide you with FREE inspiration along with detailed Tips and Techniques provided for every project. Thank you so much for your love and support!

Amazing Paper Grace Sets:

Paper:

Ink: 

Mixed Media:

Stamps:

Embellishments:
  • Prima - Finnabair Collection - Mechanicals - Steampunk Gears
  • Prima - Finnabair Collection - Mechanicals - Rustic Knobs
  • Prima - Finnabair Collection - Mechanicals - Barn Stars
  • Prima - Tiny Junkyard Findings - Vintage Trinkets
  • Creative Embellishments - Gears - Steampunk - Industrial
  • Hobby Lobby - Sunny Side Up - Bakery Twine (thin)
  • Michaels - Metal Embellishments - A Place in Time - Keys

Adhesives:

Tools:

The Amazing Paper Grace Die of the Month is available exclusively at Spellbinders Paper Arts during December 2022, Sweetheart Envelope and Notecard Set along with other membership perks.

View this month’s Amazing Paper Grace Die of the Month: 

Thanks so much for stopping by to view this steampunk Valentine ensemble.
I hope you've been inspired!

Sunday, October 16, 2022

Introducing the Amazing Paper Grace 3D Vignette Collection with Hot Air Balloon Cards

Welcome to my creative space!

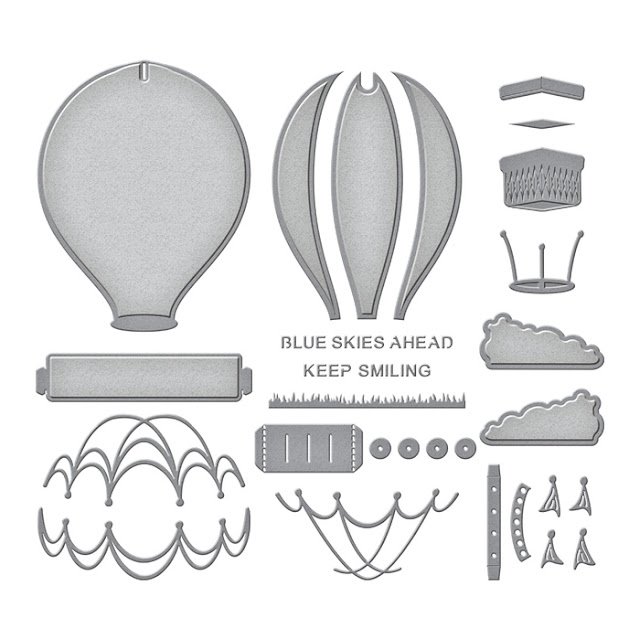
As soon as I saw this fabulous Amazing Paper Grace 3D Vignette Hot Air Balloon die set (S6-200), my creativity started flowing. I took two different approaches to my cards using different techniques and colors. You are in for a treat with this new release of 3D vignette dies including this Hot Air Balloon, a Twin Lens Camera, Pet house, and Retro Television. You can head over to Spellbinders to see the entire collection HERE.

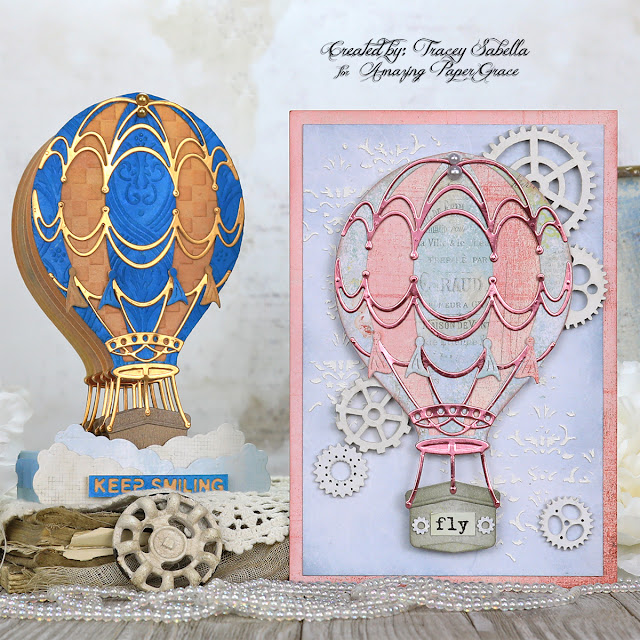
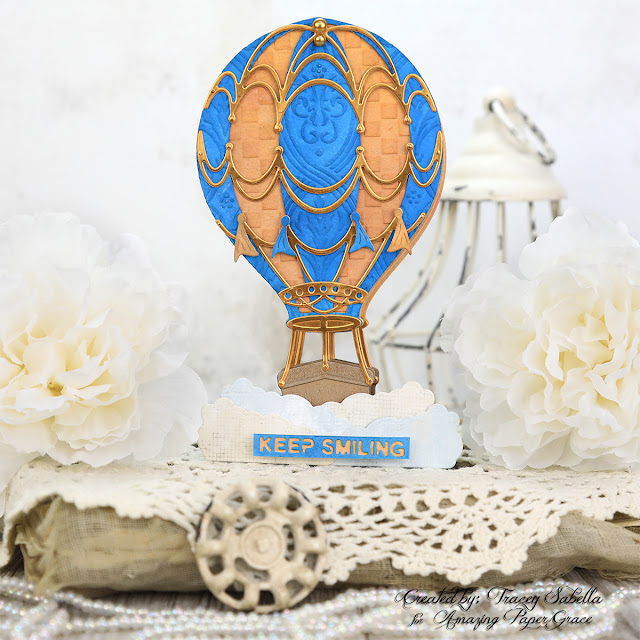
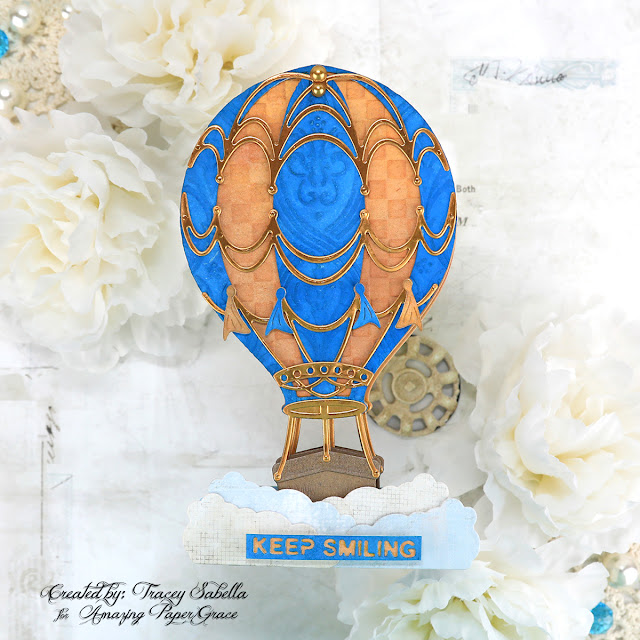
There is just a rich feel to this first 3D card. I can just picture a royal couple taking a ride through the countryside in it. For this card, I used rich patina colors with copper and blue. Both the coppery background paper and the blue accent paper were created with spray color mists on watercolor paper. From a distance, these look more like solid colors, but when holding this card in your hands, you can see the beautiful variations of color achieved with the spray mists. 

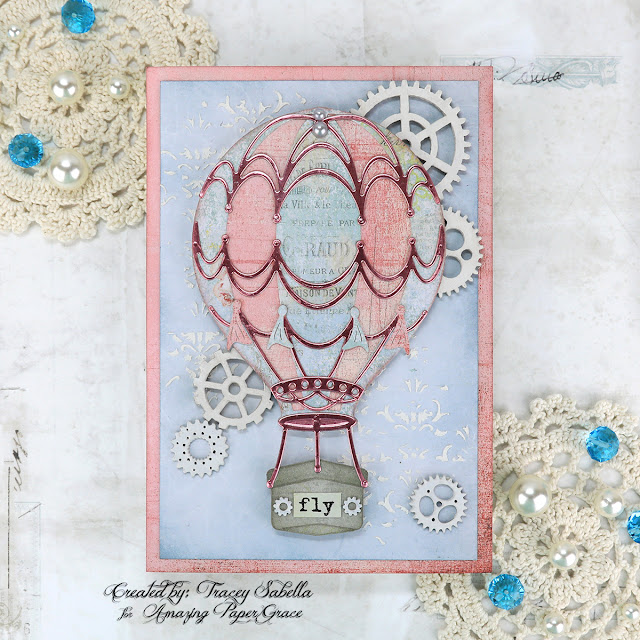
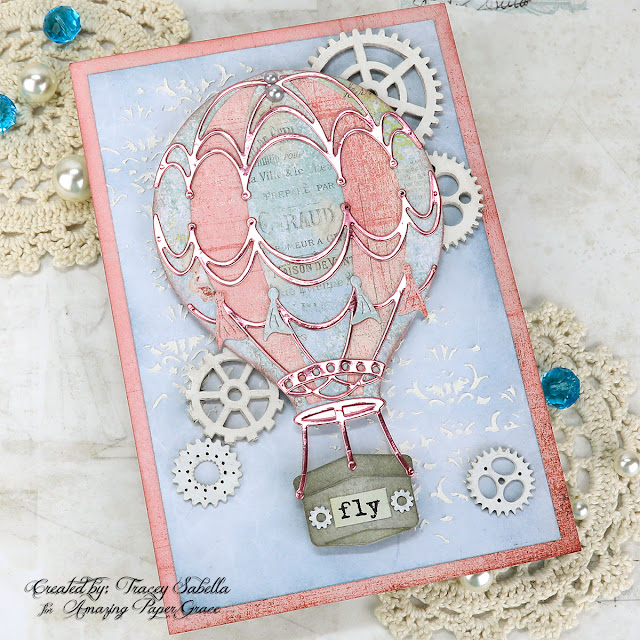
Growing up, we lived near a hot air balloon lift off field, so it was a treat to see these balloons floating across the sky.  For this second card, I went with softer shabby chic colors with these pale pinks and blues that remind me of some of those balloons that would float by on a warm summer afternoon. The background paper has a cloudy design on it to help give the feel of a floating balloon. I added a bit of textured design using a stencil with Paper Paste to create whimsical clouds and just couldn't resist a touch of feminine steampunk whimsy by adding the gears. 

If you'd like more information on how these hot air balloon cards are put together including how I added the textured design to the front of the 3D card, be sure to scroll down to my Tips and Techniques section below where you'll find close-ups and all the details. 

Today's projects were created with dies provided by Amazing Paper Grace.

My Projects for Today


Tips and Techniques
The papers used for this 3D Vignette Hot Air Ballon are created by spritzing watercolor paper with several colors of coppery oranges for the background, and patina blues for the accent pieces. I allowed it to air dry, then pressed the paper between layers of paper toweling between two glass plates overnight to flatten out the paper so it would stand nicely for this 3D creation.

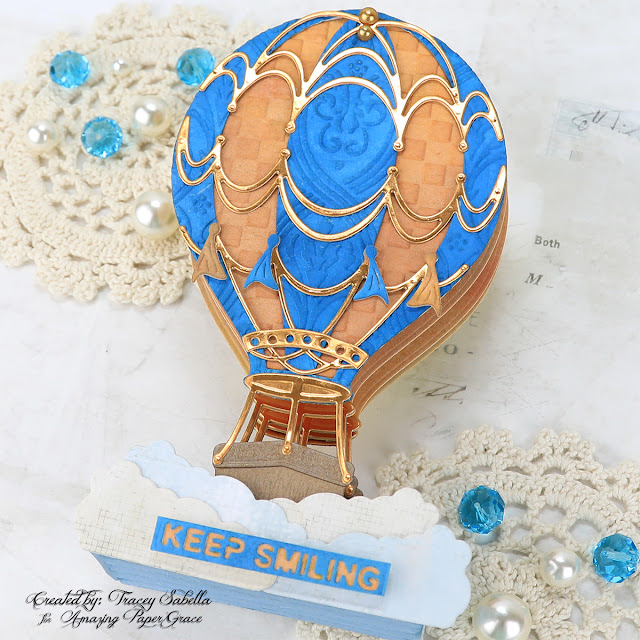
Once the paper was dry and flat, I cut the balloon images. For the front layer, I ran the pieces through embossing folders. The coppery background paper is embossed with a small checkered design, while the blue layer is embossed with a damask design. I made sure to center the piece in the embossing folder so the design would be symetrical on the finished card. Once embossed, distress ink is rubbed over the design to highlight the textures.

The intricate scrolled design is cut from copper metallic paper. The shimmer of the metallic paper gives it such a beautiful finish! A couple coppery half pearls are added to the top to add texture and to hide the slot where the pieces are connected to form the 3D vignette. 

The basket is cut from a pale brown paper to give it a natural organic feel of a woven basket. It's inked in a darker brown to highlight the layers and texture. 

These fluffy clouds are cut from patterned paper in pale blue and cream and attached to the front of the vignette box that holds the bottom of the 3D card together. The vignette box pieces are cut in sky blue paper. This sweet sentiment is cut from leftover pieces of the spritzed watercolor papers. 

As you can see in this shot, the 3D layers behind the decorated front piece are cut from the coppery watercolor paper I created, but there is no embossing on these layers.

I wanted this second card to be an example of how you could make a quick and easy version of this card on a flat base. I found some papers in my stash that had wonderful designs on them that were a nice scale for this die set. The only inking I did on the balloon was to use a darker pink on the edges so it would pop against the similarly colored background. 

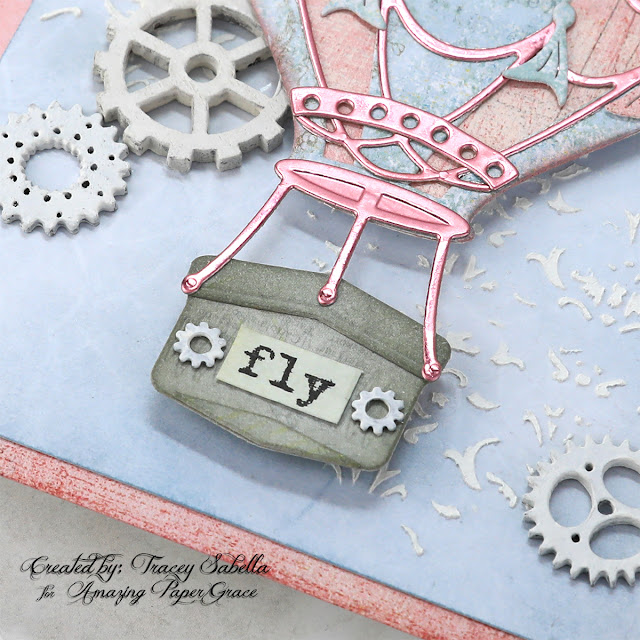
The basket is cut from a grey patterned paper and inked to highlight the layers and basket weave texture.

I wanted to keep the sentiment simple, so found this 'fly' sentiment from a sticker book. It's just so perfect for a hot air balloon card and conveys the idea of soaring and would work nicely for so many events including a graduation, job promotion, or birthday.

Yes, I collect steampunk objects when I can find them and have quite a nice assemblage of gears ready to add to projects. The ones selected for this card vary in size and materials, so they're brushed with white gesso to add some cohesiveness and to enhance the shabby chic feel.

The hot air balloon is popped up with two layers of small foam squares for dimension and to give room to tuck the gears underneath.

The scrolled pieces are cut from pink metallic paper. Don't you just adore the shimmer and shine where the light catches this metallic paper?

The background paper was pale grey with a cloudy design. To give it more of a sky feel, I rubbed Weathered Wood Distress ink across the paper with a heavier application around the edges. I added a white damask design with Finnabair Paper Texture Paste for whimsical clouds.

The 3D Vignette Availability:
These dies and plates are available from Spellbinders right now! Click here: The 3D Vignette Collection.

Below you can find the products I used to create this project including some with compensated affiliate links to Scrapbook.com and Spellbinders. These links are at absolutely no cost to you. When you shop through the links below, I receive a small commission from the companies.  These commissions help me cover the costs of my blog and other expenses, which allows me to continue to provide you with FREE inspiration along with detailed Tips and Techniques provided for every project. Thank you so much for your love and support!

Amazing Paper Grace:

Paper:

Ink:

Mixed Media:

Stencil: 
  • SnipArt - Stencil - Up in the Air Damask 15x15 cm

Embossing Folder:
  • Darice - Embossing Folder - Checkered
  • Cuttlebug - Embossing Folder - Piruette

Embellishments:
  • Prima Marketing - Finnabair - Sentiment Stickers
  • Stash - Half Pearls in slate grey and Sunflower
  • Amazon - Wood Veneer Gears
  • Creative Embellishments - Gears
  • Bead Landing - Found Objects - Mini Gears

Adhesives:

Tools:

For more The 3D Vignette Collection Inspiration
Visit each Creative Team blog linked below for their take on creative paper crafting ideas using  The 3D Vignette Collection.

I would adore hearing from you! Please leave a comment below letting me know how you will use these gorgeous dies!


Thanks for stopping by! I treasure your comments.

~ Blessings ~

Monday, September 19, 2022

'Celebrate New Beginnings' Spring Card for Amazing Paper Grace

Welcome to my creative space!

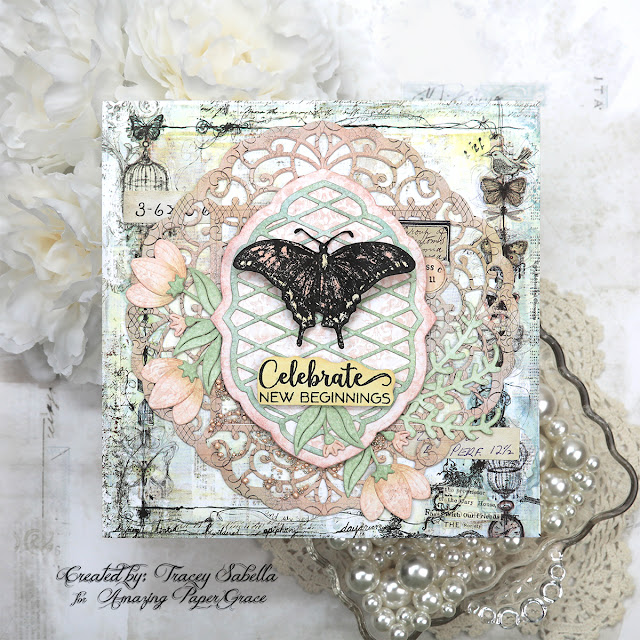
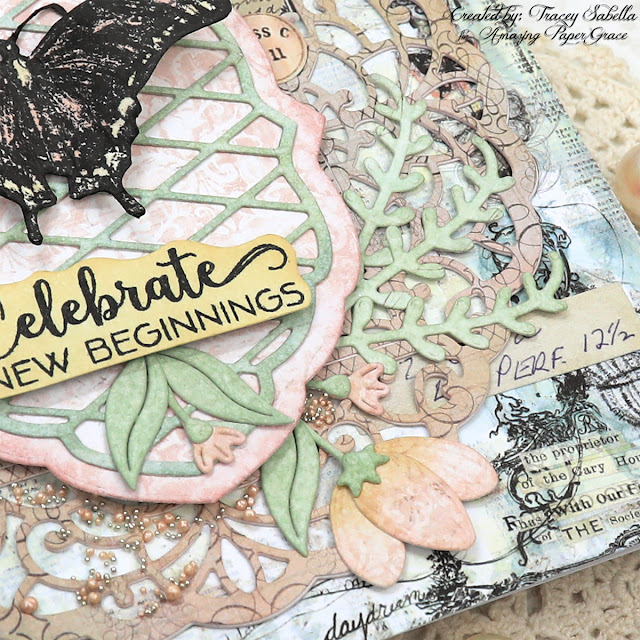
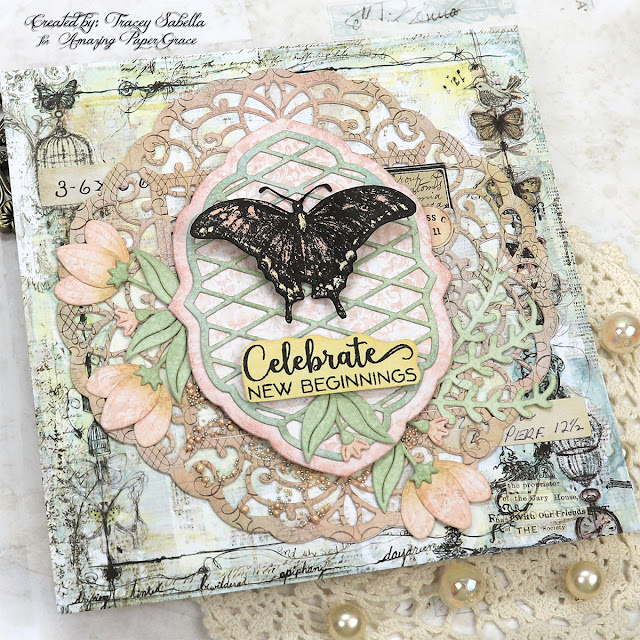
Spring is a time for new beginnings with the scent of sweet blossoms, leaves budding and popping, and new life as animal babies come along while butterflies emerge from their cocoons, so these sweet spring images from the gorgeous Amazing Paper Grace Spring Labels Motifs die set (S4-1238) are just so perfect to celebrate a new beginning in the life of someone special. This could be used for a graduation, new job or any new endeavor one may be entering. The sweet sentiment is from the coordinating Seasonal Motif Sentiments Stamp Set (STP-150). I also die cut the lovely background medallion using the Circle Meets Square Set (S5-491).

To learn more about the techniques used to create this shabby mixed media card including the gorgeous flowers and lovely butterfly, be sure to scroll down to view my 'Tips and Techniques' section below.

Thank you Amazing Paper Grace for providing the dies used in this project.

Tips and Techniques
This 6x6" card is created using older papers from my stash from a 6x6" paper pad, so the colors coordinate beautifully. I often add a frame around the edges of my card, but the focal base paper has a beautifully drawn frame around the edges, so I didn't feel that a border was needed here. 

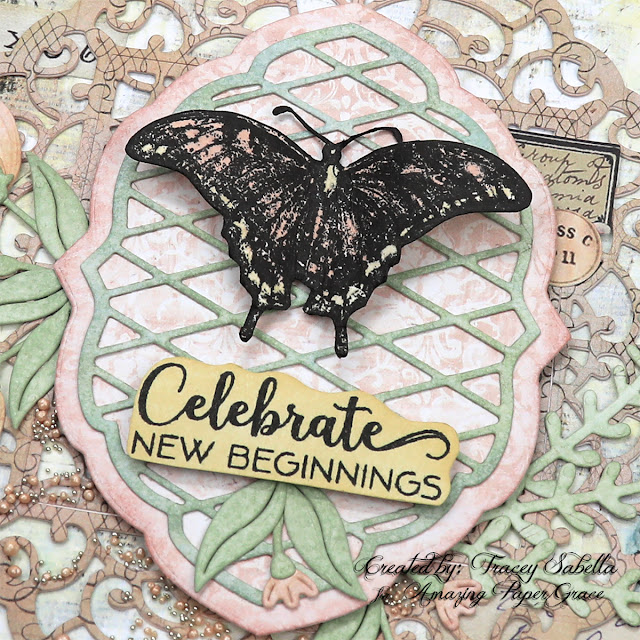
What a sweet sentiment from the Seasonal Motif Sentiments (STP-150) stamp set. It is stamped onto smooth white cardstock with permanent ink. Once the ink was dry, I colored it with Scattered Straw Distress Ink using an ink blending brush. To anchor the sentiment, a tiny die cut blossom and leaves are added below to fill in this space beautifully. 

While this die set is focused on spring, the label and lattice pieces could be a focal point for any occasion or season. I like an organic feel to my die cuts, so randomly added Bundled Sage; Iced Spruce, and Speckled Egg to the lattice and Victorian Velvet just to the edges of the pink layer. This label layer is popped up by adhering with foam squares in the center leaving the edges free to tuck flowers under.

This die set works well for adding a focal element like this butterfly. You could use a pre-made embellishment of your choice. Here I stamped a butterfly from the Tim Holtz Botanic Collage set onto the smooth side of Distress Watercolor Paper with permanent black ink then colored it using coordinating distress inks. I smooshed an ink pad onto my craft mat and picked up the ink with a fine tip paint brush to apply the ink. Once colored, I fussy cut the image. 

***Tip*** The antenna are too thin to cut out, so leave a bit of a margin around them, then go back with a black marker and color them in. I also use the marker around the edges so the white core of the paper didn't show. I use the marker from the back side for this edging, so I don't slip and color onto the stamped image.

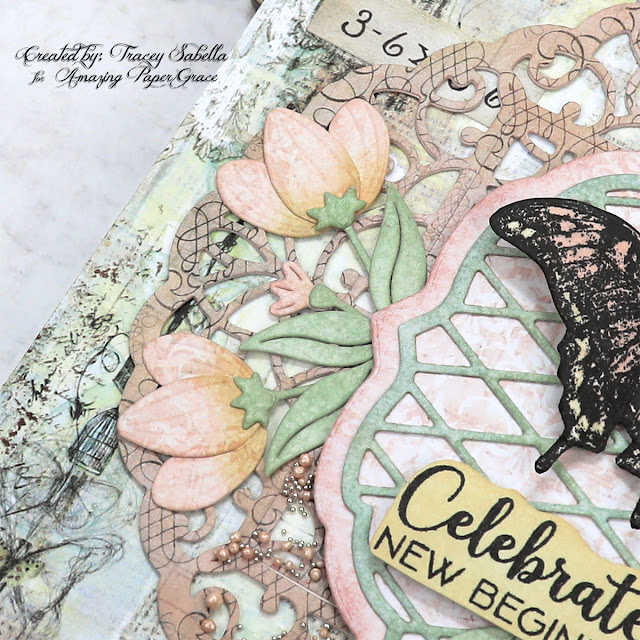
The flowers included in this die set are just so sweet. After die cutting, I brushed the base of each petal with Scattered Straw Ink and a little Victorian Velvet ink around the edges. The foliage is inked around the edges with Bundled Sage. This gives definition to make them more visible against the busy background.

***Tip*** I find that tweezers help me place these intricate blossoms.
 
Another blossom is added to the other side as well as a few sprigs of foliage.

Texture is added around the bottom nestled around the blossoms and over the medalion. Matte Soft Gel Medium is used to add the peachy prills and white gold microbeads to add some bling.

I've tucked in number and label snippets from Tim Holtz Idea-ology. You can see a couple of them in this shot.

The larger medallion piece is die cut using the gorgeous Circle Meets Square die set (S5-491). I darkened it up a little with Victorian Velvet Distress ink to make it more visible. 

***Tip*** If you have die cut a piece like this medallion, and it ends up blending into the background more than you expected, just brush on some coordinating ink in a darker shade of color to help it pop. 

Below you can find the products I used to create this project including some with compensated affiliate links to Scrapbook.com and Spellbinders. These links are at absolutely no cost to you. When you shop through the links below, I receive a small commission from the companies.  These commissions help me cover the costs of my blog and other expenses, which allows me to continue to provide you with FREE inspiration along with detailed Tips and Techniques provided for every project. Thank you so much for your love and support!

Supplies:

Amazing Paper Grace:

Paper:

Ink:

Stamps:

Mixed Media:

Embellishments:

Adhesives:

Tools: