Showing posts with label Industrial Steampunk. Show all posts

Monday, December 5, 2022

Amazing Paper Grace December Die of the Month: Sweetheart Envelope & Notecard Set - Steampunk Valentine's Day Card and Gift Card Holder

 
Welcome to my creative space.

I try to keep to a more masculine style when creating Valentine's cards for my husband so decided to go steampunk with this fabulous Amazing Paper Grace December Die of the Month Set: Sweetheart Envelope & Notecard Set. This set also included some amazing flowers which I did not use, but would be fabulous on a more elegant and feminine creation.

The intricate details in this gorgeous die set have a definite steampunk vibe with the fabulous scrollwork design, so I enhanced this genre by adding rusty gears, star, and metal key, along with masculine twine. The papers I selected have subtle patterns, so I added some stamping to add more visual texture. Inking is added to help the heart designs and edges pop.

Please scroll down through the Tips and Techniques section to find close-ups and all the details on how to create this steampunk Valentine card and gift card holder.

Many thanks to Amazing Paper Grace for providing the dies used in this project!


Steampunk Valentine Card

Steampunk Valentine Gift Card Holder

Tips and Techniques
I selected patterned papers in neutral colors with a touch of peach to give a Valentine feel without being too feminine, since this card is for my husband. 

***Designer Tip*** When selecting patterned papers for this die set, keep in mind that both sides will be showing and need to make sense for the design. The peach color is the back of the more neutral cream paper used to die cut the envelope feature.

To enhance the masculine steampunk feel of this card, stamping is added with a grungy script and dotted squares. 

The heart is cut from the same paper that is behind it, so it is rubbed with Distress Inks in Tea Dye and Vintage Photo to give it some contrast. 

The envelope feature is popped up with foam tape for added dimension and to leave room to tuck gears underneath as well as the twine wrap.

This sentiment is stamped with Vintage Photo Archival Ink on the same paper as the envelope piece and edged with Vintage photo Distress Ink.

Rusty steampunk gears are tucked under the envelope flap. 

As you can see in the top right corner, the inside background layer is distressed and both background layers are rubbed at the edges with Vingtage Photo Distress Ink.

Here's a side view of the heart so you can see how dimension is built. The heart is adhered to the envelope, then the envelope is wrapped with twine over the heart. The rusty star is added and a small copper gear is centered onto the star. These wonderful layers give beautiful dimension to the card.

One final photo. You can see there's even a rusty faucet handle added to the card insert. This insert is a great place to add a special private note!

Now let's take a look at the gift card holder. It's created with the larger envelope die that's left open on the card. I just folded the flap over to create this envelope gift card holder. 

This particular paper was a little thicker and cracked just a little on the fold lines. I went with that and lightly distressed the folded edges, then inked with Vintage Photo Distress Ink. Just make sure you don't distress the edges too much or you might go all the way through the paper. 
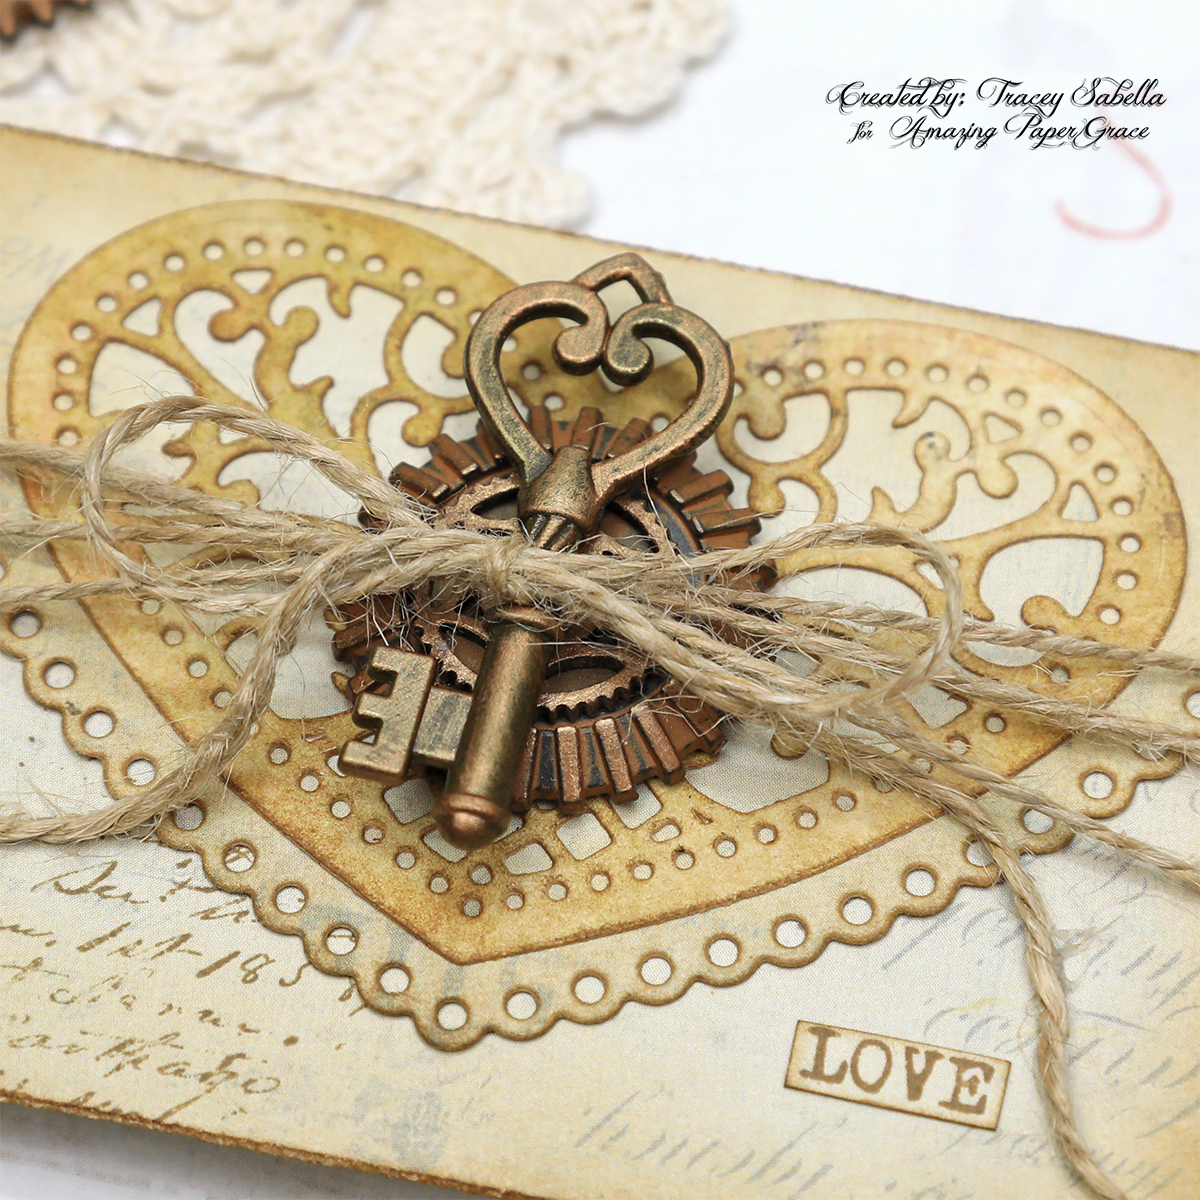
This beautiful heart is rubbed with more of the Vintage photo ink to highlight the gorgeous intricate design. The card is wrapped and tied with twine for a closure. 

Here's a side view to see the dimension. The heart die cut is centered onto the envelope flap, then a rusty gear is added. This gear has a large flat center, so I found a chipboard gear that fit perfectly. The chipboard is painted with a mix of Brass Hardware and Hazelnut Metallique paints to coordinate. A brass key is added to the top of the gears. It is dry brushed with the same paint mixture used for the chipboard gear to add highlights. Then the entire card is wrapped with twine to act as a closure. 

One final view. The sentiment is also stamped and edged in Vintage Photo Ink. 

Below you can find the products I used to create this project including some with compensated affiliate links to Scrapbook.com and Spellbinders. These links are at absolutely no cost to you. When you shop through the links below, I receive a small commission from the companies.  These commissions help me cover the costs of my blog and other expenses, which allows me to continue to provide you with FREE inspiration along with detailed Tips and Techniques provided for every project. Thank you so much for your love and support!

Amazing Paper Grace Sets:

Paper:

Ink: 

Mixed Media:

Stamps:

Embellishments:
  • Prima - Finnabair Collection - Mechanicals - Steampunk Gears
  • Prima - Finnabair Collection - Mechanicals - Rustic Knobs
  • Prima - Finnabair Collection - Mechanicals - Barn Stars
  • Prima - Tiny Junkyard Findings - Vintage Trinkets
  • Creative Embellishments - Gears - Steampunk - Industrial
  • Hobby Lobby - Sunny Side Up - Bakery Twine (thin)
  • Michaels - Metal Embellishments - A Place in Time - Keys

Adhesives:

Tools:

The Amazing Paper Grace Die of the Month is available exclusively at Spellbinders Paper Arts during December 2022, Sweetheart Envelope and Notecard Set along with other membership perks.

View this month’s Amazing Paper Grace Die of the Month: 

Thanks so much for stopping by to view this steampunk Valentine ensemble.
I hope you've been inspired!

Monday, November 7, 2022

Amazing Paper Grace November Die of the Month: Pop Up 3D Vignette Alarm Clock

Welcome to my creative space!

As soon as I saw this fabulous Amazing Paper Grace Pop Up 3D Vignette Alarm Clock November Die of the Month, I just knew I wanted to create a patina finish to give a vintage feel to this amazing design.

These cards show patina two ways. The 3D vignette card uses mixed media products to create the patina. I explain this process below in the Tips and Techniques section. On the flat card I used patina printed paper to show you a quick and easy way to get this effect with just paper. While they look very similar in this photo, the metallic finishes truly look like old patina copper.

I'm always looking for ways to create masculine cards for the special men in my life and either of these cards could be used for a guy. The flat card even has a touch of steampunk with the black gears tucked behind the clock.

Please scroll down through the Tips and Techniques section to find close-ups and all the details on how to create these two vintage clock cards.

Many thanks to Amazing Paper Grace for providing the dies used in this project!

There are 21 cutting dies included in the Pop Up 3D Vignette Alarm Clock.

Pop Up 3D Vignette Alarm Clock

Flat Steampunk Card

Tips and Techniques
To create the patina effect, I started with a lightly patterned teal paper and rubbed Salvaged Patina Distress Oxide Ink randomly over the die cut paper, I went back and added a few touches of Uncharted Mariner Distress Oxide Ink. I then spritzed the inked paper with a fine mist of water to activate the oxide inks. Once dry to the touch, randomly rub Finnabair Copper Metallique Wax over the surface. Then go back and repeat the oxide ink process with the same colors so the oxide looks like it's coming out of the copper from years of oxidation.

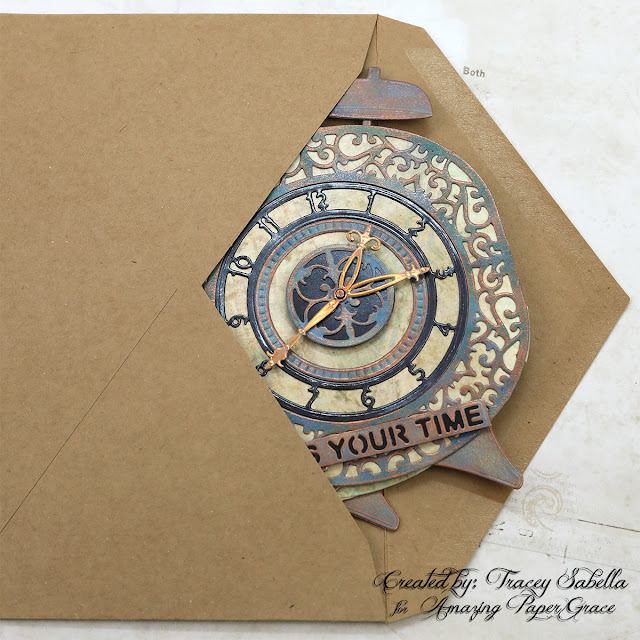
Pieces that are "oxidized" include the scrolled clock frame, center decorative piece, ring with minute marks, alarm bells, hammers, sentiment strip and base.

The clock hands are cut from metallic copper cardstock and rubbed with the oxide inks. They are held in place with a mini brad which is colored with more of the copper wax. 

The number ring and backing for the center scrolled piece are cut from black metallic cardstock. The cream paper backing the entire design is a grungy masculine printed paper. This paper has touches of teal in it that works so perfectly with the patina finish.

This close-up of the bells shows the shimmering copper blended with the patina finish. It truly does look like old metal.  

The center scrolled piece backed in black is popped up with thin foam squares to give dimension and so that the clock hands will be raised up above the number ring. 

This fabulous 3D card folds flat for mailing. 

And tucks right into an envelope.

This card is cut from patina printed paper for a similar feel. If you don't have the mixed media products needed and want a quicker card, this is a great way to go. 

The background paper and gears give this card a more masculine industrial steampunk feel for that special guy in your life. The focal paper is inked with Pumice Stone Distress Ink to add to the vintage vibe. I wanted to keep this card simple, so didn't do any other inking. 

The card frame layer is cut from the same patina paper used to cut the clock design. 

The number circle and center background piece are cut from regular black cardstock and the clock hands from the same metallique copper paper used on the 3D card. I found this sentiment in the Idea-ology Small Talk pack that works so perfectly with the clock image. 

The cream clock base is the same paper used for the 3D clock card. 

These chipboard gears are heat embossed with black embossing powder for a rustic industrial feel. The clock image is popped up with foam tape so that the gears can be tucked underneath.

Below you can find the products I used to create this project including some with compensated affiliate links to Scrapbook.com and Spellbinders. These links are at absolutely no cost to you. When you shop through the links below, I receive a small commission from the companies.  These commissions help me cover the costs of my blog and other expenses, which allows me to continue to provide you with FREE inspiration along with detailed Tips and Techniques provided for every project. Thank you so much for your love and support!

Amazing Paper Grace Sets:

Paper:

Ink:

Mixed Media:

Embellishments:
  • Idea-ology - Tim Holtz - Mini Fasteners
  • Idea-ology - Tim Holtz - Small Talk
  • Stash - Chipboard Gears

Adhesives:

Tools:

The Amazing Paper Grace Die of the Month is available exclusively at Spellbinders Paper Arts during November 2022, Pop Up 3D Vignette Alarm Clock along with other membership perks.

View this month’s Amazing Paper Grace Die of the Month!

Thanks so much for stopping by to view this patina alarm clock ensemble. I hope you've been inspired.

Monday, September 5, 2022

Amazing Paper Grace September 2022 Die of the Month: Pop Up 3D Vignette Bubble Gum Machine

Welcome to my creative space.

The Amazing Paper Grace September Die of the Month: Pop Up 3D Vignette Bubble Gum Machine is such a sweet die set. For my main project card I selected a teal metallic paper and used gold paper for the accents to give it a fun retro feel. What a fun card for a child or someone who adores nostalgic retro machines.

My second card is a nod to my passion for industrial rust and patina. I had been stumped on what to do for my accessory project until I walked through my studio and spied a recent vintage purchase, a rusty steam gauge piece. A light went off in my head and I wondered . . . "what if I transform the bubble gum machine into an industrial steam gauge machine?" I had just the right pieces to fit perfectly to make the transformation. I hope you adore it as much as I do.

Be sure to check out my Tips and Techniques section below for more close-ups and all the details on how I created these wonderful cards including the cracked vintage glass over the industrial steam gauge. 

Many thanks to Amazing Paper Grace for providing the dies used in this project!

There are 26 cutting dies included in the Pop Up 3D Vignette Bubble Gum Machine.

Pop Up 3D Bubble Gum Machine Card

Vintage Steam Gauge Machine Card

Tips and Techniques
I kept this card pretty straight forward by keeping with the beautiful die cut design. The fun and whimsical retro design comes from the teal metallic and gold papers that are die cut and embossed. This just looks so much like the gumball machines I grew up with. I pulled out my metallic paper scraps to cut the gumballs, so they also have the shiny gumball appeal. 

I adhered one gumball to each of the spots on the die cut, then filled in and added more to make it full. On the inner layers, I just adhered gumballs across the top of each layer, since the lower portion of these layers isn't seen.

The trim pieces are cut and embossed in metallic gold cardstock. The layers of the mechanism are popped up with thin foam squares for added dimension and a more realistic feel. I even added a few gumballs falling out of the opening. 

The penny is cut from copper cardstock, but was too shiny and bright for my taste, so I brushed a little Worn Penny metallic paint to add the patina found on a well used penny.

I just adore how these 3D Vignette cards fold over so that they can be tucked into an envelope to hand deliver or as suggested a padded envelope for mailing. The card pops right back into place after being folded and stands on its own to be displayed.

Of course a vintage bubble gum machine needs a little bling, so a rhinestone is added to the top and onto the money mechanism. There are three fun sentiments included in this die set. 

It's hard to tell in the photos, but there is a piece of clear acetate cut to fit the window of the front piece so it looks like the gumballs are behind glass.

I just can't express how happy I was to find that this gauge frame and dial from Tim Holtz fit the opening so perfectly. To create the bubbled and cracked glass front, I used a mica tile. Mica is slightly yellowed with beautiful natural imperfections and easy to cut, so was a great choice for the glass front here. I bent the mica in a couple places just enough to get a cracked look.

The machine is cut three times using the insert so that the gumballs are not diecut into the piece. Once with a lighter rusty patina paper for the top layer. Once from a darker rusty paper for the bottom piece that shows behind the gauge. And one more time from light weight chipboard. The top piece is adhered to the chipboard piece for more stability. The bottom layer is adhered directly to the card. I brushed black paint on the edges of the chipboard layer for a more finished look.

I popped up the top layer with a couple layers of thicker cardboard placed under this lower section. I also adhered two stacks of thin black chipboard cut into narrow strips that are the same height as this cardboard shim. Each one is abut 3/4 inch long. These were adhered under the top corners of the upper frame to keep the machine the same height and to add stability. The shims are high enough that the mica window sits slightly above the gauge so they are not touching.

The trim pieces are cut from black metallic cardstock and rubbed with silver wax to give a vintage feel. Most of the metal embellishments were already a tarnished silver color, but a couple were copper, so I rubbed those pieces with more of the silver wax for a cohesive look.

Decorative tape is placed on both sides of the machine. It's easiest to add this tape before adhering the bottom machine layer to the card. To keep things more simple, I used patterned paper printed with a rusty patina design to die cut the machine layers. I rubbed the edges of the top layer with a little black soon Distress Ink to age it a little more.

I cut a panel from brown cardstock just a little larger than the printed paper base to frame the card. The edges of the printed paper are inked with pumice stone Distress Ink. 

I hope you agree that this bubble gum machine is the perfect base for a vintage industrial steam gauge! 

Below you can find the products I used to create this project including some with compensated affiliate links to Scrapbook.com. These links are at absolutely no cost to you. When you shop through the links below, I receive a small commission from Scrapbook.com. These commissions help me cover the costs of my blog and other expenses, which allows me to continue to provide you with FREE inspiration along with Tips and Techniques provided for every project. Thank you so much for your love and support!

Supplies:

Amazing Paper Grace:

Paper:

Ink:

Mixed Media:

Embellishments:

Adhesives:

Tools:

The Amazing Paper Grace Die of the Month is available exclusively at Spellbinders Paper Arts during September 2022, Pop Up 3D Vignette Bubble Gum Machine along with other membership perks.

View this month’s Amazing Paper Grace Die of the Month!


Thanks for stopping by! I treasure your comments.

~ Blessings ~