Showing posts with label Twine Flower. Show all posts

Friday, September 13, 2013

You're So Sweet for the September Really Reasonable Ribbon Blog Hop

Good morning and welcome to the Really Reasonable Ribbon September Blog Hop.


If you've just been inspired by Jeannie's fabulous work, you are in the right place. If not, you can join us for some autumn inspiration with the gorgeous September RRR Ribbon Club Assortment by hopping on over to the RRR Blog to start at the beginning. There you will find all the blog hop and prize details.


Just look at the gorgeous ribbons in this month's RRR Ribbon Club Assortment! Fall is in the air and these ribbons are just perfect for your fall cards, layouts, and decor projects! Are you a Ribbon Club Subscriber? If not, you can sign up here and start receiving one of these gorgeous assortments each month. 

"You're So Sweet"
Birthday Card

Tips and Techniques:
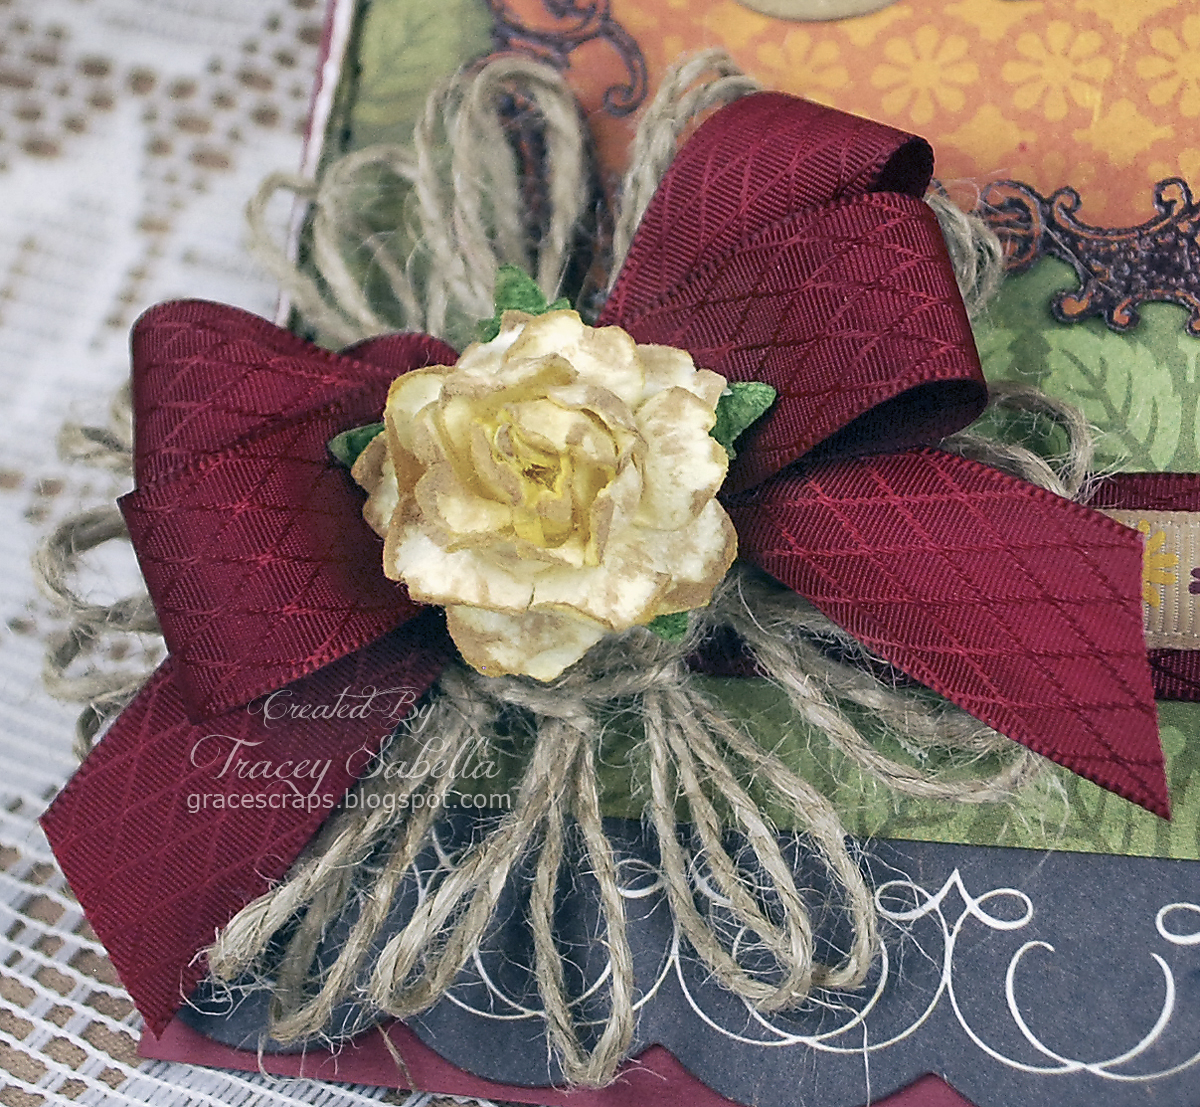
This burgundy Diamond Satin Ribbon is part of the September RRR Ribbon Club Assortment. This ribbon has a right and wrong side, so to tie a double loop bow, you need to twist the ribbon one turn each time you wrap it around your fingers so the right side always stays on top. Ginny's bow tutorial can be found here. 

Bonnie is now carrying a large selection of Wild Orchid Crafts flowers. Here I used a 25mm White Cottage Rose. I layered my flower and bow over one of my twine flowers created with Natural Jute String. The spot where I placed the flower was uneven, so I used Tombow 3D Foam Tabs to help keep the flower in the right position. A tutorial for my Twine Flowers can be located here.

I layered more of the September Ribbon Club Assortment across the card. I lightly inked the floral grosgrain. Scor-Tape is a great way to adhere ribbon to paper and ribbon to ribbon. Bonnie carries a wide variety of widths and sheets of Scor-Tape here. 


My signature style is Shabby Chic, so as you can see on the top of the card, I inked and distressed all my edges and sentiment. The mat behind the sentiment was stamped and heat embossed. I fussy cut it out, added the script stamp to the corners - Dear Sir by Donna Salazar Designs, and inked the edges. I also hand stitched around the edge of the card. I don't use a lot of fall colors in my work; however, they are perfect to create a card for our daughter's November birthday. 

I hope you've been inspired to grab your September RRR Ribbon Club Assortment and start creating!

Your next stop on the RRR September Blog hop will take you to 
to some amazing inspiration from Cheryl. 

Thank you for hopping through the RRR Blog Hop with us today.

Thanks for stopping by! I treasure your comments.

~ Blessings ~

Sunday, July 21, 2013

Happiness is . . . Card and Pleated Ribbon Tutorial for Really Reasonable Ribbon

Gary and I are celebrating our 31st anniversary in a few days. Here is the card I created for him featuring a variety of natural, masculine ribbons from Really Reasonable Ribbon. 

"Happiness is . . . Being with you"

Really Reasonable Ribbon Products:

Tips and Techniques:

Pleated Ribbon ~ This May Arts Burlap Wired Ribbon is a dream to work with and pleat. I've included a tutorial to create pleated ribbon below. 

Layered and Wrapped Ribbons ~ I layered four of Bonnie's fabulous natural ribbons starting with the Natural Jute Ribbon topped by Wired Pleated Burlap Ribbon, then 5/8" Jute Ribbon, and finally wrapped with white Bamboo Cording.

Twine Flower ~ Who says you can't use flowers on a masculine project? This one is created with 20lb Natural Hemp Cord using my Twine Flower Tutorial found here. I topped it with a button from the Natural Button Grab Bag. There is such a nice variety of buttons in the grab bags! 

Leaves ~ I trimmed several small sections of May Arts White Leaves and tucked around my flower. 

Trinkets ~ The lovely Heart Skeleton Key which perfectly fits the anniversary theme is from the Craftpon.com Etsy Store. The heart lock is from my stash. 

~ ~ ~ ~ ~ ~ ~

Pleated Burlap Wired Ribbon Tutorial


Supplies:
Ruler
Pencil

To determine the length of ribbon needed, each 1 inch pleat takes 2 inches of ribbon with an extra ½ inch on each end, so the 6 inch section of pleated ribbon on my card required 13 inches of wired burlap ribbon. You can work directly off your roll of ribbon, so there is no need to cut until your pleating is completed, but this guide will help you assure that you have enough ribbon for your project. 

Step 1. On the back of your ribbon, make a small pencil mark at 1.5 inches from the end, then ½ inch from that mark, then repeat across the length of your ribbon. Your pattern will be 1.5 inches, ½ inch, 1.5 inches, ½ inch, 1.5 inches, ½ inch etc . .


Step 2. Fold the end of the ribbon at the first 1.5 inch mark towards the back with wrong sides together.


Step 3.  At the next mark, ½ inch further into the ribbon fold in the opposite direction this time with right sides together to create your first pleat.

Here’s what it should look like from the top side:

Here’s a side view so you can see the direction of the folds:

Step 4. Fold again on the next mark 1.5 inches further into the ribbon with wrong sides together.

Here’s a view from the back side after this fold:

Step 5. Fold again on the next mark ½ inch further into the ribbon with right sides together.

Here’s a view from the top of the ribbon after the fold.

And a side view:

Step 6. Continue to repeat these folds until you get the length of pleated ribbon required for your project:

Note, I have shown the side view with the folds slightly open so you can see the direction of the folds. You will actually pinch the wired ribbon so it lays flat:


The wired ribbon holds the pleats well, but I tucked a piece of Scor-Tape in the fabric layers to hold the pleats in place before adhering to my card with more Score-Tape. 

Be sure to stop by the Really Reasonable Ribbon Store to check out Bonnie's amazing selection of ribbon. 

Follow on Bloglovin

Thanks for stopping by! I treasure your comments.

~ Blessings ~

Monday, April 1, 2013

"Adventure" SEM April Main Challenge #27 ~ All God's Creatures

I hope you had a wonderful Easter! We went to church then had all the family over for some homemade lasagne and a time of sweet family fellowship.

It's the first Monday of the month and that means it's time to share the Scrapping Everyday Miracles Main Challenge. Nicole is hosting a wonderful challenge for you this month. Here are the details:
For this month's main challenge we would like you to create a project inspired by your pets.  Even if you arent animal person or don't have any pets you can still be inspired by this challenge.  You can create a project inspired by any animal in God's creation. Your projects can even be about an animal related experience like a day at the zoo or a farm. What is important is that we see that God is blessing us with everyday miracles using both the animals within our families and those outside our homes.  

SCRAP TWIST: USE AN ANIMAL RELATED QUOTE SAYING OR EVEN BIBLE VERSE ON YOUR PROJECT.   You can use it for your title, journaling or just addition to your project! Just to help you get started here's a link to a bunch of animal quotes :

Here is my project based on this challenge:

"Adventure"

My husband and I never had a dog. or even discussed the possibility of getting one. Then we moved back to Ohio in 2000 to be closer to our families. My brother taught dog obedience classes including a dog 4-H club. He also did a little breeding. He decided to keep one of the pups as an experiment. He often had clients bring in 2 or 3 year old dogs with no former obedience training, and these dogs were more of a challenge. So he decided to keep Ellie. While he didn't allow her to jump on people, she had no obedience training and had only been on a leash a couple times to go to the vet. You may have guessed it. He offered Grace the opportunity to have 15 month old Ellie so she could be in his 4-H club, and Grace became part of the experiment. Now dogs became a "big" part of our lives. Grace wanted to make Uncle Paul proud and put a lot of time and effort into training her new pal. She defied the odds and with Ellie became one of the top obedience teams in the UKC. They attained every possible obedience title and in their final year of competition placed 3rd in the country in Utility - the most advanced obedience class. 

Now, you do see three dogs in the photo. It didn't take long for our two other daughters to get dogs and join in the fun. From the left you see Tori, Ellie then Bounder. The girls have always been in charge of their dogs including training, feeding, grooming, vet appointments ~ everything. They learned so much responsibility, and the Lord has opened up many doors for us to share our faith along the way. There are people from many walks of life in the dog world, and I pray that the Lord has been able to touch some of them through us. While Elizabeth and Maria did not train for the advanced classes, they were recognized as top Junior handlers by qualifying for an invitation to the National UKC Dog Show each year they showed. 

This sweet photo was taken a year ago ~ one of the last photos before Ellie left us. Grace has just picked a new border collie puppy and is excited to have a dog in her life again. 

Tips and Techniques:
Inking ~ The larger jeweled flower started out as layers of creamy Prima flowers - the kind you used to buy in the pillars - I simply rubbed on some distress ink. The wooden leaves were also lightly inked. The background paper was somewhat teal, so more rubbing with distress ink brought it to the right color to coordinate with this photo. The white doilies were inked up as well. 

Lace Trim ~ Such an easy addition to any border strip to add a pretty touch.

Title and Trinkets ~ I was so thrilled the other day to find these fabulous vintage lightbulb word trinkets by Prima and thought the word "Adventure" would be the perfect title for this page since our daughters have had quite an adventure with their dogs!! I also enjoy adding little trinkets, buttons, wooden pieces into my clusters.


Stamping ~ I repeated this charming background stamp before adding my embellishments. To get a soft edge, I just tear a piece of paper towel and place where I want the stamped edges to be and stamp right over it.

Flourishes ~ I cut this gorgeous flourish into two pieces and used in each corner for balance.


Twine Flower ~ My tutorial for the handcrafted twine flower can be found here.

Distressing ~ So quick and easy with my Donna Salazar Distrezz-It-All by Zutter to get these nice "thick" edges. 

Canvas Tape ~ I simply folded and laid some this canvas tape at the edge of the clusters. A little talc powder on the adhesive edge that is up takes care of the stickiness. 

Fussy Cutting ~ I tucked a few fussy cut pieces in as well. 


Journaling ~ I wanted my "required element" to blend seamlessly into my layout, so hand wrote it at the bottom under the green paper strip. It says "Dogs are not our whole lives, but they make our lives whole." Roger Caras

Our Sponsor this month is:

Hello there! I'm Leena and I live in the tiny island of Singapore. I've been scrapbooking for 6 years now and the recent one year, I've turned from a traditional scrapbooker to Project Lifer. It's been an amazing year just dedicating my time and days documenting week after week worth of stories about me, my family and friends, my full time job, the places I've travelled to for work and holidays, celebrations and many more interesting journey of my life. I've also set up a very small online shop just a year ago, just to share handmade items that was originally created for my own use. Then I realized, I had a lot of request from scrapbookers all over the world asking for my handmade items to be made available for sale. That's how it got started. The response has been overwhelming and I'm so thankful to all my buyers for their support. My shop sells mainly core handmade items such as flair buttons or also known as badges which can be used for any kind of craft projects. They're a very popular scrapbook product amongst scrapbookers! Once again thank you to Scrapping Everyday Miracles for this opportunity to sponsor my shop products for their challenge this April! 

Instagram - username is "findingnana"

Leena has sponsored it us with a wonderful prize that you could win by linking up a project to our April Challenges!  Wanna see it? That is $40 worth of flair buttons!  WOW!

Guess what everyone? Leena has prepared a discount code for all of you!!!! You can save  20% off total purchase of any products in her shop, valid from now until April 30th. The code is SEM20. You just need to enter this during check out. This discount does not apply on the shipping fee. She ships from Singapore to all over the world. 

**NOTE: You may submit the project you create for Scrapping Everyday Miracles to other challenge blogs but your project must be mainly created for the Scrapping Everyday Miracles challenge in order to win the sponsor prize and/or be one of Top 3**

 All entries must be linked HERE by April 30th, 11:59pm PST.

*Important: Make sure your link is to the blog post with your project & not just your blog in general...and be sure to remember the SCRAP TWIST!

Thanks for stopping by! I treasure your comments.

~ Blessings ~

Monday, December 31, 2012

Christmas Memories ~ DT for The Scrapping Stamper

Christmas is always a very special time of the year!! This layout is of a photo taken when our children were much younger. Our three oldest and a cousin gathered around my husband at his parents' home. He's reading the Christmas story to them, explaining how Jesus' birth is the reason for our celebration. It has been such a joy over the years for us to share our love of the Lord with our children and to see them grow to love Him as well. 

I hope you and your families have a wonderful and blessed 2013!!
Enjoy your New Year celebrations!

I created this page for the December Scrapping Stamper sketch by Shannon White.

"Christmas Memories"

Shannon's Gorgeous December Sketch:

It is such a blessing to be on Shannon's Design team and work with her lovely sketches each month! I used Donna Salazar Products for this page to enter into her December Challenge to create a holiday themed project using ribbon and at least one Donna Salazar product. 

Tips and Techniques:


Hand Crafted Flower ~ I used a combination of DSD Spellbinder Bitty Blossoms and Grand Peony dies to create this lovely rose with one of my twine flowers underneath made in jute. My tutorial on creating the twine flowers can be found here. 


Ribbon and Pearls ~ This is an older technique that I revived for this project. I punched a small hole on both sides of a corrugated ridge, leaving two ridges without holes to space. On each end I just punched one hole on the side where the ribbon would end. I laced my sheer, iridescent ribbon onto a yarn needle and laced it through the holes, but not pulling tight, so there would be a puff of ribbon between each set of holes. To hide the holes, I placed a red pearl between each puff.

Corrugated Board Mat ~ I love the grungy look of Donna's corrugated board by Zutter. I use a foam brush to apply paint to the ridges and leave the valleys the natural kraft color. When I try using a bristle brush the paint tends to go down into the valleys as well. I went back and lightly rubbed the torn edges with some distress ink.

Distrezzing ~ I distressed all the straight edges including my photo with my handy DSD Distrezz-It-All by Zutter to get the heavily distressed edges in a flash.


Hanging Christmas Ornaments ~ I didn't have any punches or dies for ornaments, so I traced an ornament and hand cut them. I used my finger to apply a little glue and some Mojo Dust that Natasha sneaked into my last order. If you are looking for Donna Salazar products, be sure to check out Natasha's Store. To achieve the hanging effect, I hand stitched from the ornaments to the top of the page. 

Crackled Border ~ I applied a nice thick coat of white DecoArt Texture Crackle to the top edges of my page. It cracks as it dries. It takes a while to dry so some patience is required. ;-) When dry, I used my finger to apply some gold Rub and Buff. 

Antiqued Doily ~ Several colors of Distress Ink rubbed over the doily gives the nice antiqued look and brings out the design. 

DSD Products used:
Antiquities ~ Vintage Gears
Antiquities ~ Die Cut Ribbons
Antiquities ~ Harmony
Antiquities ~ Queen Bees
Antiquities ~ Time for Tea
Stamp ~ A-Note-Ation
Spellbinder Grand Peony Dies
Spellbinder Bitty Blossoms Dies
Zutter Corrugated Board 
Zutter Distrezz-It-All

Other Products Used:
Tim Holtz Typeset Alphabet Decorative Strip Die
Sizzlets ~ Branch w/Leaves
Martha Stewart Punch Around the Page ~ Swirling Lace
Want2Scrap ~ Self Adhesive Pearls, red
DMC Embroidery Floss
Doily ~ My Stash
Ranger Distress Markers ~ Fired Brick, Aged Mahogany, Vintage Photo
Ranger Distress Ink ~ multiple colors
DecoArt ~ White Texture Crackle

Adhesives:
Beacon ~ 3 in 1 Advanced Craft Glue
Scothc ATG
Crafty Power Tape
Designer Dries Clear Glue
Xyron Permanent
Krylon Spray Adhesive

I've also entered this at:
Word Art Wednesday Challenge #60 Faith; Anything Goes
Scrapping Every Day Miracles December Main Challenge ~ Scrap where you find joy during the  Christmas Holidays with a twist - include glimmer and/or sparkle. Gary and I find great joy in sharing our love for Christ with our family during the holidays. This photo is Gary sharing the Christmas story with our children when they were younger. The sparkle is the glittery dust on the ornaments and bright shiny pearls with iridescent sheer lace. 

Thanks for stopping by! I treasure your comments.

~ Blessings ~

Saturday, July 21, 2012

Beautiful Life - Bo Bunny July Layout Challenge and Scrapping Stamper July Sketch

I hope you are having a wonderful weekend. I'm busy getting ready to go on a trip to the New Jersey Shore and Baltimore with my husband. He has a business trip scheduled and asked me to come along. I've never traveled on one of his business trips before, so thought I'd give it a try. Besides we'll be celebrating our 30th anniversary on Monday. Of course, I'll be taking some scrapping supplies with me for the down time while he's working.

Our precious Ellie left this world earlier this year. The Lord gave us nearly 13 wonderful years with her. My brother gave her to Grace as a 4-H project back in 2000 when we moved back to Ohio. Ellie was 15 months old with no training, and Grace was a mere 11 years old. What a team they made. Grace ended up capturing every UKC obedience title with her. She also captured 2 National Junior wins and was nationally ranked among the adults for several years. In their final year of competition, they placed third in the county at the UKC National Invitational among some of the best dog handler teams in the country. 

I don't normally create many white space pages, but when I saw the challenge to use White Space for the July Bo Bunny challenge, I knew this Beautiful Life paper would be so perfect for this photo and for a white space design. I glittered up the letters on the word beautiful by painting some stickles on certain parts of the letters. It doesn't show up real well in the photo, but adds so much sparkle in person. I also highlighted the flower on the left side of the paper by stitching around the printed image. 

I used Shannon's gorgeous July sketch for design inspiration.


Here is Shannon's amazing sketch:


Be sure to stop by The Scrapping Stamper (Shannon) to see what her talented DT created with this beautiful sketch.

Techniques:


Stacked Trinkets ~ for my large flower I Misted a Petaloo flower for the base, removed the center, then layered on one of my twine flowers. For the center, I glued the Forever Fall oval trinket piece over top of the square piece. 

Leaves ~ The leaves where cut with my Donna Salazar Rose Creations Die, then shaped and inked. 

Misting ~ I misted several of the flower pieces and the larger chipboard border with Donna Salazar Smooch Spritz in Caramel Latte, and for the rust colored flower I also used her Woodgrain Smooch. 


Inking ~ I used several chipboard pieces from the Bo Bunny Et Cetera collection. I modified the colors to go with the Beautiful Life papers by inking them with several colors of distress ink. Isn't my butterfly so pretty resting atop this Et Cetera chippie!! 

Corrugated Butterfly ~ I've created this butterfly using Donna Salazar Corrugated Board, distress ink, and lots of luscious Caramel Latte Smooch!! I really inked this one up more than I normally do to give a more distressed look to go with these gorgeous papers. 


Stitching ~ These delicate flowers got lost into the background, so I decided to accent them with some hand stitching. Yes, I know, quite time consuming but worth the effort, don't you think? 

Bling ~ The chipboard border needed just a touch of sparkle, so I added the Bo Bunny icandy rhinestones across the top, and the Smooch Spritz gives a bit of shimmer as well. 

Twine Frame ~ I've seen these twine frame starting to pop up and knew that this photo would be a perfect one to frame up this way. 

Doily ~ The gorgeous doily was cut from the Beautiful Life Dots paper using my Art Philosophy Cricut Cartridge. 

Distressing ~ Of course I used my DSD Distrezz-It-All for all of the straight edges, and my Prima Distressing tool for the little flags. 

Products Used

Paper
Bo Bunny Beautiful Life, Beautiful Life Dots, Olivia Dot

Embellishments
Bo Bunny Et Cetera Chipboard
Bo Bunny Trinkets Forever Fall
Bo Bunny Cardstock Stickers Country Garden Tiny Type
Bo Bunny iCandy Jewels Touch of Spice
Queen & Company Adhesive Pearls - Chocolate Delight
Donna Salazar Zutter Corrugated Board
Petaloo Floral Embelishments: Canterbury Rose - Paprika; Darjeling Collection - Poppy Mix, Mini Mix Black/Cream/Brown

Technique Products
DMC Embroidery Floss #3776
Donna Salazar Smooch Spritz - Caramel Latte; Woodgrain
Distress Ink - multiple colors
Ranger Stickles Diamond

Adhesives
Helmar V2 Vellum Adhesive (spray)
Helmar Zap Dots 1/4" clear squares
Hercules Tape
Scotch ATG
Scotch Acid Free Quick Dry Adhesive

Tools
Donna Salazar Distrezz-It-All
Donna Salazar Rose Creations Die Set
Art Philosophy Cartridge
Cricut Expression 2
Tonic Studios Piercing Tool
Prima Distressing Tool
Bazzill In Stitch'z Foam Mat

I also entered this at:
Stampin' Sisters in Christ as a second entry in Challenge #148 to add sparkle to your project - Rhinestones and Smooch Spritz. **
Word Art Wednesday - Use an encouraging sentiment. **
Scrapping Everyday Miracles - Challenge #18 Created Beauty/twist - use stitching - This LO celebrates the beautiful life our Lord gave us with Ellie - friend and companion to our daughter, Grace. I stitched around the flowers. **
Scrapbook Sisters - Spring or Summer challenge - Spring photo of Ellie. (July 31)

Thanks for stopping by! I treasure your comments.

~ Blessings ~