Showing posts with label Birthday Card. Show all posts

Monday, February 21, 2022

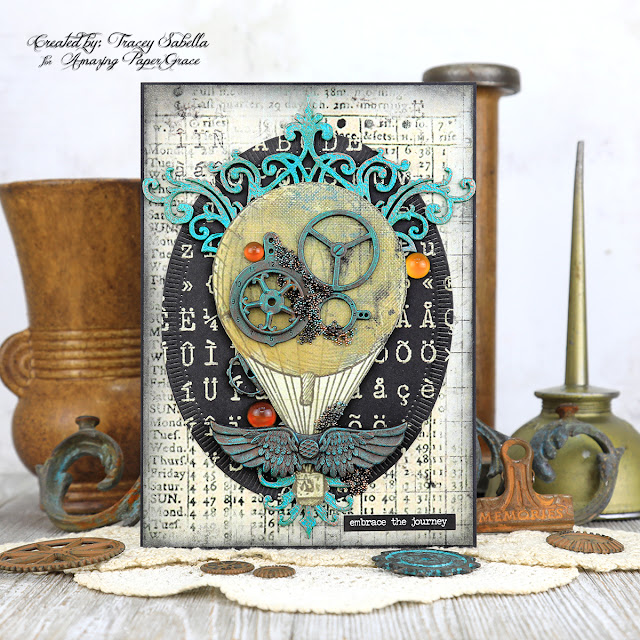
"Embrace the Journey" Steampunk Card for Amazing Paper Grace

 Welcome to my creative space!

I simply adore the Amazing Paper Grace Fluted Classics die collection designed by Becca Feeken. Here I'm featuring the Fluted Classics Ovals set (S5-474). As soon as I saw these dies, I just knew the fluted design would work so perfectly in the steampunk style. What do you think?

My husband has a birthday coming up, so I created this card for him in a more masculine style, but I know a lot of gals who would simply adore this as well. The "embrace the journey" sentiment allows this card to be used for many occasions from birthdays to graduations, or anyone moving into a new phase of life. 

I wanted some nice contrasts so I used the largest fluted oval die to cut a dark panel to go behind the lighter hot air balloon so it pops and then cut a 5x7" panel in a lighter color trimmed with a sliver of a frame in black. Be sure to scroll through these photos for all the details on how I created this classic steampunk card.

Tips and Techniques
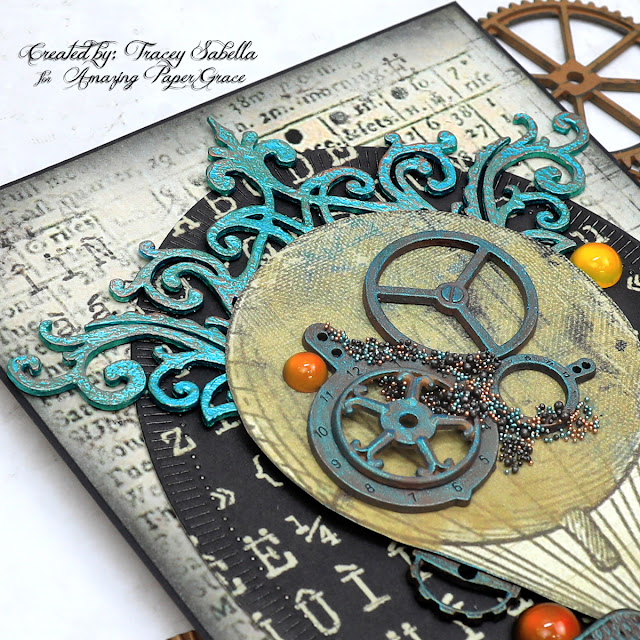
Just look how gorgeous these fluted edges look with the steampunk design! I fussy cut this hot air balloon from a paper in the older Prima Romance Novel collection and embellished it with gears and mechanical pieces to give it that steampunk feel. Any vintage hot air balloon can be transformed into a steampunk beauty by adding a few gears! The metal pieces were in different metals (silver, brass, copper) from a couple different manufactures, so I used art waxes to color them and give a cohesive feel. A few prills and microbeads in black and copper tie everything together with grungy texture. A few baubles add a nice touch of coppery color.

I cut apart an ornate corner chipboard piece to tuck in above and below the balloon, It's brushed with white gesso (to make the next color which is a little translucent be true to color and not muddied by the natural chipboard color), then metallic peacock paint. Finally I added patina by rubbing it with touches of brass and copper art wax.
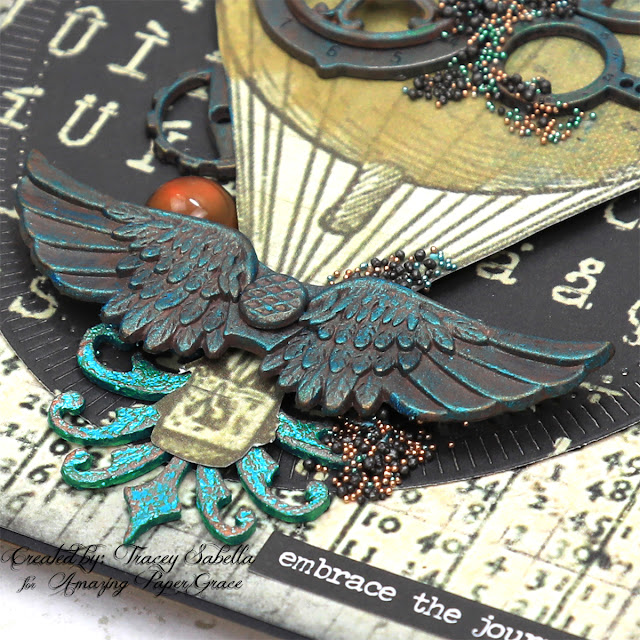
These metal steampunk wings are also colored with art waxes and a screw brad placed into the center. You can see more of those fabulous fluted edges behind the wings. 

This gorgeous bit of chipboard was too fabulous to be hidden behind the balloon, so I snipped it off and placed it behind the basket to help draw your eye across the card with more of this rich patina at the bottom.
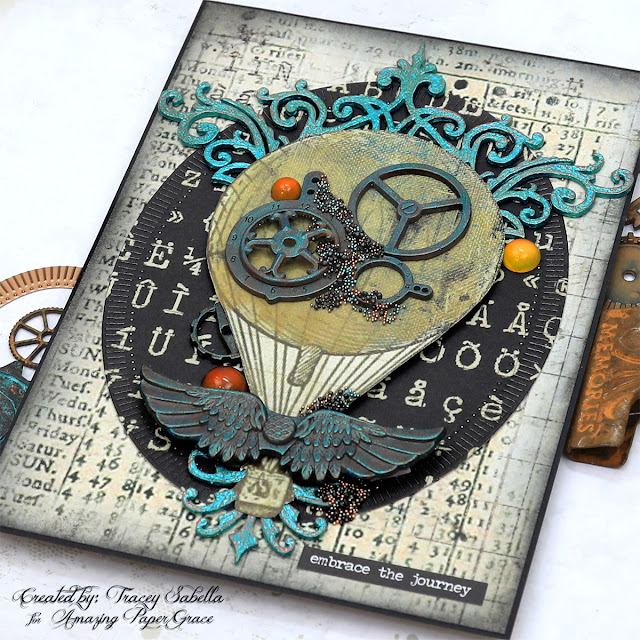

One final look. You can see how the contrasting layers work beautifully together to make all the steampunk details pop. While a simple oval might have worked for the dark center piece, the fluted edges from this fabulous die give a perfect steampunk edge to this layer.

Amazing Paper Grace Dies:

Paper:
  • Prima Marketing ~ Romance Novel Collection
  • Cardstock ~ Black

Ink:
  • Ranger ~ Distress Ink: Black Soot

Mixed Media:
  • Finnabair with Prima Marketing ~ Metallic Wax: Peacock; Copper; Bronze Age
  • Finnabair with Prima Marketing ~ Matte Wax: Patina Green; Rusty Red; Rusty Brown
  • Finnabair with Prima Marketing ~Soft Matte Gel 
  • DecoArt ~ Dazzling Metallics: Peacock Pearl
  • Liquitex ~ Gesso, White

Embellishments:
  • Finnabair with Prima Marketing ~ Mini Brads - Screws
  • Finnabair with Prima Marketing ~ Mechanicals: Winged; Machine Parts
  • Finnabair with Prima Marketing ~ Melange Art Pebbles: Vintage
  • Tim Holtz with Idea-ology ~ Clipping Stickers
  • 7gypsies ~ Gears - Industrial
  • Chipboard ~ Ornate Corner
  • Finnabair with Prima Marketing ~ Microbeads: Copper
  • Martha Stewart Crafts ~ Microbeads: Apatite
  • US Artiest ~ Prills - Power Outage

Adhesives:
  • Double Sided Tape ~ 1/4" 
  • Beacon ~ 3-IN-1 Advanced Craft Glue
  • Beacon ~ Fabri-Tac
  • Tombo ~ Mono MULTI Liquid Glue
  • Foam Tape ~ 1 inch

Tools:
  • Spellbinders ~ Platinum 6


Thanks for stopping by! I treasure your comments.

~ Blessings ~

Monday, February 7, 2022

"Let's Party" Birthday Card for Amazing Paper Grace

Welcome to my creative space!

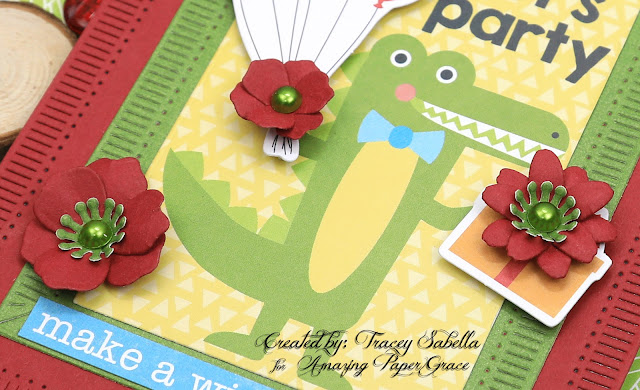
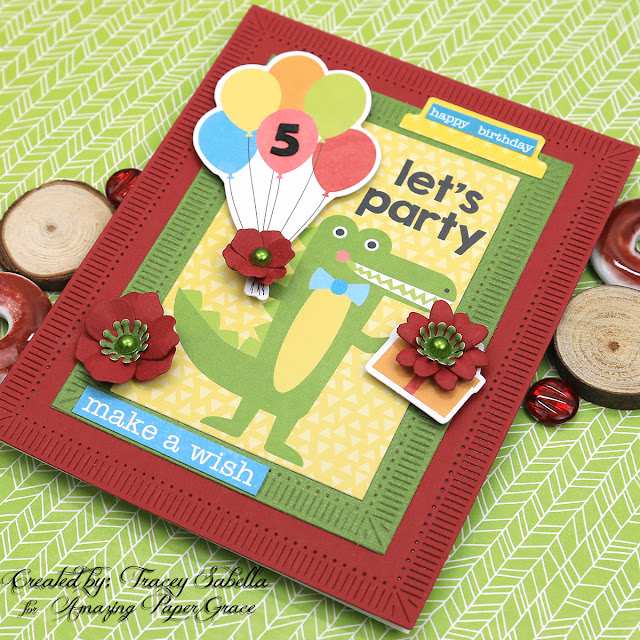
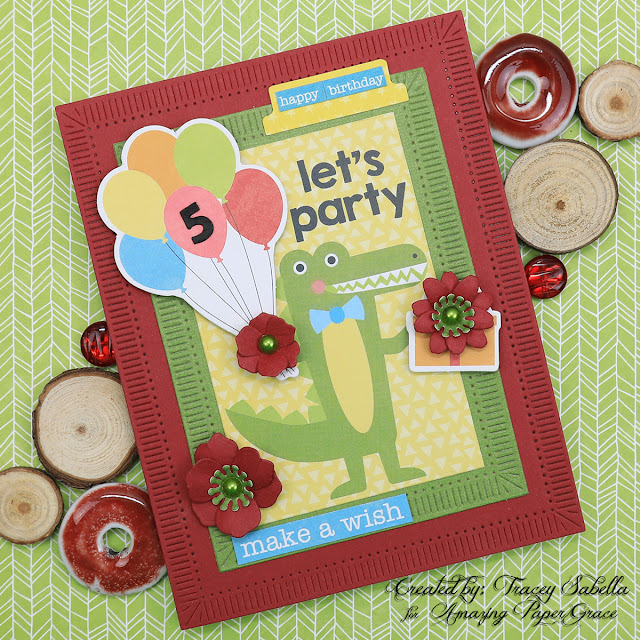
Our sweet little granddaughter is turning five already. She's enamored by huge animals like dinosaurs, crocodiles, and hippos, so I just couldn't resist pulling out this fun paper with an adorable birthday croc. She's also quite girly, so I'm featuring flowers die cut with the beautiful Amazing Paper Grace Cinch and Go Blossoms set (S4-1163) from the Classically Becca Collection. These beautiful blossoms add a sweet feminine touch that works so well with this darling clean and simple birthday card.

To add texture to the layers, I die cut the green and red cardstock frames using the Fluted Classics Rectangles Dies (S5-475) from the Fluted Classics Collection

When I think of Becca's Amazing Paper Grace designs, I picture elegant feminine grace. If you've been following my work with her dies, you have seen some of her designs take on a more grungy and shabby chic feel. Today I'm taking yet another twist to show you how perfect they can be for a clean and simple card for a child. There are so many amazing ways to use these fabulous dies!

I appreciate all styles of paper crafting and while I don't typically create in the clean and simple style, it just seemed right to create a darling birthday card for our granddaughter.

Tips and Techniques
Here's a close-up of these sweet blossoms. They're die cut from red cardstock, then shaped. I've used two sets of petals for each blossom. Each one is centered with a green flatback pearl and the two larger flowers also have stamen die cut from green cardstock. This beautiful die set includes these two styles of flowers in a variety of sizes including these tiny blossoms. 

The green and red layers framing the focal image are die cut with Fluted Classics Rectangles Dies. Don't you think this fluted design is a perfect complement to the fun birthday croc image?

The balloons and flower embellished gift are popped up with foam squares and foam tape. The numeral 5 was a white cardstock sticker that I colored with a black marker to pop against the colorful bunch of balloons.

The dots and slits in this fluted die cut design allow you to see through to the next layer just a tiny bit, so I backed the red layer with a sheet of black cardstock to give a shadowed effect to the design, rather than a hint of bright white used for the card base. 

Amazing Paper Grace Dies:

Paper:
Jillibean Soup ~ Souper Celebration
Cardstock: Green; Red

Ink:
Faber Castell ~ Pitt Artist Pen - Big Brush, Black

Embellishments:
Jillibean Soup ~ Souper Celebration - Label Stickers
Jillibean Soup  ~ Souper Celebration - Pea Pods Die Cut Embellishments
Flatback Pearls: Green

Adhesives:
Scrapbook Adhesives by 3L ~ 3D Foam Squares
Double Sided Tape ~ 1/4" 
Scotch ~ Quick Dry Adhesive
Beacon ~ 3-IN-1 Advanced Craft Glue
Beacon ~ Fabri-Tac
Tombow ~ Mono MULTI Liquid Glue
Foam Tape ~ 1/4"

Tools:
Spellbinders ~ Platinum 6


Thanks for stopping by! I treasure your comments.

~ Blessings ~

Monday, January 24, 2022

Interactive Birthday Flip Card for Amazing Paper Grace


Welcome to my creative space!

I'm really enjoying creating interactive cards with the fabulous Amazing Paper Grace Garden Shutters Collection. This sweet birthday card features the Daisy Delight Garden Shutters A2 Card Base (S5-479) die set. We're in the dead of winter with over a foot of snow on the ground and more on the way with temperatures below zero at night, so I just couldn't resist pulling out summery blues and yellows for this card to go with the beautiful daisies. A girl can dream, right?? 

Here's a view of the card with the shutters open:

It's such a fun and beautiful card. The sentiment and sweet daisies are included in the die set. The pull tabs are created using the Butterfly Bliss Garden Shutters 5x7 Card Base Set (S6-183).

Thank you Amazing Paper Grace for providing the dies used in this project.

Tips and Techniques
Don't you just adore the intricate lattice that fits the shutters? I cut a solid background piece and the lattice pieces from the same grungy blue paper (which is the back of the yellow patterned paper), then inked the lattice with a darker blue so it would pop against the lighter background. This entire card was cut from just one piece of 12x12" paper including the three base and shutter pieces, the lattice, and the pull tabs. I used scraps from my stash to cut the daisies.

This interactive card is three layers deep. You can cut all three pieces from the same 12x12" piece of paper like I did here or use papers that coordinate. Keep in mind that the middle piece is die cut for the shutters that flip, so the back of the paper will be part of the design as well. 

The pull tabs are cut from the back of my patterned paper and the edges are inked. A second solid tab piece is cut. I inked this piece with the same darker blue I used on the lattice, so the word pull would be more visible.

There are three different daisies in this set. Each one has three pieces - two sets of petals and a center. Each flower is a separate die with all three pieces, so it's easy to know which pieces go together. After die cutting, I inked the petals before shaping. The centers are inked and would look great with just the inking, but for added texture and a bit of glittery sparkle I adhered Gold Flower Soft to the centers.

This sweet birthday sentiment is included in the set. I used Tombow Mono MULTI liquid glue on the back and let it dry before adhering. This glue stays tacky when dry works well for intricate die cuts like this. I used a ruler to help line up and center the sentiment pieces.

Amazing Paper Grace Dies

Paper:
Blue Fern Studios ~ Happy Accident
Patterned Paper Scrap ~ Yellow (for daisies)

Ink: 
Ranger ~ Distress Ink: Scattered Straw; Faded Jeans; Broken China

Mixed Media: 
Flower Soft ~ Gold

Adhesives:
Scrapbook Adhesives by 3L ~ 3D Foam Squares
1/4" Foam Tape
Beacon ~ 3-IN-1 Advanced Craft Glue
Red Line Tape ~ 1/8"
Tombo ~ Mono MULTI Liquid Glue
Scotch ~ Quick Dry Adhesive


Thanks for stopping by! I treasure your comments.

~ Blessings ~
Tuesday, January 4, 2022

Amazing Paper Grace January Die of the Month - Pop Up Vignette Coffee Tea or Me

Welcome to my creative space!

Today I'm sharing a sweet three dimensional teacup card paired with a tea bag chocolate holder featuring the fabulous Amazing Paper Grace January Die of the Month: Pop Up Vignette Coffee Tea or Me. What's better than a decadent piece of chocolate to go with a hot cup of tea? I'm a tea drinker so this die set is extra special with delicate scrollwork fit for a delicious cup of tea. The heart shaped flowers are perfect for a special Valentine, so even though this is a birthday card, I used colors that would work well for this sweet holiday. As you can see in the photos below, this card folds perfectly flat to fit into an envelope to be sent in the mail.

Thank you Amazing Paper Grace for providing the dies used in this project!


Teacup Card

Tea Bag Chocolate Holder

Tips and Techniques
There are so many ways to use this fabulous die set. Here I've decorated the front panel with patterned paper layered over burgundy cardstock with inking to add visual dimension. The tiny flowers are cut with a die included in the set, inked, then shaped before adhering prills in the center of each blossom. I stamped a small birthday greeting with a stamp from my stash. The back panel is also front facing with more of the darling stir stick flowers peeking through.

Every cup of tea needs a stir of sweet honey and these beautiful flowers are perfect for the job. I just couldn't resist posing these lovely daisies in a downward position and the hearts are just so darling with die cut foliage. The "stems" are designed to be stir sticks. You could easily layer these die cuts as is, but I have inked each layer for added visual dimension.

Designer Tip: Die cut the stir stick pieces from thin chipboard and adhere your die cut cardstock pieces to the chipboard for added strength.

Three of the flowers are grouped on the right side of the front teacup with two more arranged on the left side of the back cup to give wonderful depth to this card.

There is so much amazing dimension created with all the layers in this fabulous card.

The clever die cut design slides over for the card to lay flat to slip into an envelope.

Solid burgundy cardstock is cut for the interior teacup panels.

This darling tea bag is just the right size to slip a piece of gourmet chocolate into for a sweet treat. It's designed to coordinate with the card by using the same patterned paper and burgundy cardstock. It's embellished with a daisy layered with one of the smaller flowers and a small cluster of flowers in the top corner. 

The dies for the words "Tea Lover" are designed to fit into the tea bag die so it is all cut at once. A piece of burgundy cardstock is adhered behind the die cut opening. The attached tag has a die cut hole for attaching the string, but I wanted to glue the string between two tags, so covered the hole with a die cut blossom and leaves.

Below you can find the products I used to create this project including some with compensated affiliate links to Scrapbook.com. These links are at absolutely no cost to you. When you shop through the links below, I receive a small commission from Scrapbook.com. These commissions help me cover the costs of my blog and other expenses, which allows me to continue to provide you with FREE inspiration along with Tips and Techniques provided for every project. Thank you so much for your love and support!

Supplies:

Accessories:
Paper:
  • Blue Fern Studios ~ Blush, Heartland Collections
  • Cardstock ~ Burgundy
  • Recollections ~ Thin Chipboard
Stamps:
  • Fiskars ~ Essential Sayings
Ink:

Embellishments:
  • Hemptique ~ Bamboo Cord - 20lb
  • Mini Prills ~ Lemon Chiffon
Adhesive:

Tools:

You can find more Pop Up 3D Vignette Coffee, Tea or Me Inspiration by visiting each Creative Team blog linked below for more creative paper crafting ideas using Pop Up 3D Vignette Coffee, Tea or Me, the Amazing Paper Grace January 2022 Die of the Month!

Visit Tracey Sabella <<You Are Here>>
Visit Robin Clendenning
Visit Joanna Wisniewska
Visit Patricia Manhire
Visit Agnieszka Posluszny
Visit Elena Olinevich
Visit Anita Kejriwal
Visit Katarzyna Bobrowska
Visit Becca Feeken at Amazing Paper Grace

The Amazing Paper Grace Die of the Month is available exclusively at Spellbinders Paper Arts during the month of January 2022, Pop Up 3D Vignette Coffee, Tea or Me along with other membership perks.

I hope you'll view this video with details on using this month’s Amazing Paper Grace Die of the Month! 


I would adore hearing from you! Please leave a comment below letting me know how you will use these gorgeous dies!


Thanks for stopping by! I treasure your comments.

~ Blessings ~
Tuesday, July 27, 2021

"Embrace the Journey" Summery Card for Little Birdie Crafts

 Welcome to my creative space!

I just adore the teals and blues in the gorgeous Little Birdie Crafts Song of the Sea collection along with the fabulous seaside images. I've featured this collection on this summery card. 

I'm recovering from the flu and wasn't able to complete a video for this project (It's not easy to do vocals for video when talking results in coughing. lol)  I do have a full photo tutorial over on the Little Birdie Blog. I hope you'll hop over there for the details and leave some love while you're there. You can view the post HERE.

If you would like to see a full supply list, please scroll down.
Little Birdie Crafts can be purchased at their online store.

Be sure to check out the current sales HERE.

Use code TRACEY05 for a 5% discount.

I receive a small commission at not cost to you.

Here are a few close-up photos:


Tim Holtz with Idea Iology ~ Small Talk
Starfish Beads
Distress Ink ~ Peacock Feathers; Salty Ocean; Faded Jeans; Speckled Egg
Tim Holtz with Ranger ~ Distress Glaze
Tim Holtz with Ranger ~ Distress Spray - Speckled Egg
Helmar ~ 450 Quick Dry Glue
Double Sided Tape
Tombo ~ Mono MULTI Liquid Glue


Thanks for stopping by! I treasure your comments.

~ Blessings ~
Tracey

Wednesday, March 3, 2021

Under the Sea Clean and Simple Birthday Card including DIY Video Tutorial for Little Birdie Crafts

Welcome to my creative space!

It's our grandson's birthday this month. He has an ocean themed room with a giant whale on his wall which he simply adores, so I couldn't resist using this whale image from the Little Birdie Crafts Songs of the Sea collection to create a fun and adorable card for him. I hope you'll watch my video to see how I transformed this mixed media paper collection into this cute clean and simple card.

Please hop on over to the Little Birdie Crafts blog HERE
for more close-up photos and leave a comment there to let me know what you think! 

Little Birdie Crafts can be purchased at their online store.

Be sure to check out the great sales they are currently running HERE.

Use code TRACEY05 for a 5% discount.

I receive a small commission at not cost to you.

In this DIY Under the Sea clean & simple card tutorial learn how to:
~ Color fun chipboard sea creatures with watercolor paint
~ Create hand drawn and painted balloons to embellish
~ Use circle dies and Distress Ink and to create a background ring
~ Arrange elements for a clean & simple card
~ Alter cardstock colors to coordinate with your focal paper
~ Add sparkling rhinestones

Enjoy!


Little Birdie Crafts Supplies
Premium Card Stock A4 - Bright White

Other Supplies
Iridescent Rhinestones
M. Graham Watercolors
Tim Holtz with Ranger ~ Distress Ink: Peacock Feathers; Old Paper; Hickory Smoke; Chipped Sapphire; Dusty Concord
Tim Holtz with Ranger ~ Distress Oxide Ink: Mermaid Lagoon; Dusty Concord
Tsukineko ~ Versafine Ink Pad - Onyx Black
Black Permanent Marker
Tim Holtz with Ranger ~ Micro Glaze
Tim Holtz with Sizzix ~ Thinlits: Alphanumeric Label
Quick Kutz ~ Ktfestyle Crafts - Nesting Circles Dies
Stampendous ~ Clear Stamps: Birthday Wish
Helmar ~ 450 Quick Dry Adhesive
Ranger Ink ~ Matter Multi Medium
Scrapbook Adhesives by 3L ~ EZ Dots Repositionable
iCraft ~ Removable Purple Tape: 1.5"
Lined Double Sided Tape


Thanks for stopping by! I treasure your comments.

~ Blessings ~

Friday, January 29, 2021

Industrial Steampunk Card and DIY Video Tutorial with Voice for Little Birdie Crafts


Welcome to my creative space!

I had so much fun working with Little Birdie's The Classic Gentleman collection to create this industrial steampunk card for our son-in-law who recently celebrated a birthday. I normally enjoy applying mixed media to the background in the form of stamping and stenciling, but the design was simply too fabulous to cover up. I've used the Little Birdie thincut Cogs and Wheels die set to create gears for my clusters. 

I created a DIY video tutorial with voice sharing the techniques used to create this card. I hope you will find inspiration and learn some new techniques.

In this DIY steampunk card tutorial learn how to:
~ Create a patina effect on metal objects with paints and waxes
~ Accentuate background colors
~ Diecut and shade gears from patterned paper
~ Learn my creative process for arranging embellishments
~ Add texture with metal microbeads and prills

Enjoy!


Please hop on over to the Little Birdie Crafts blog to view more close-up photos HERE.

Little Birdie Crafts can be purchased at their online store.
Be sure to check out the Dollar Deals sale they are currently running HERE.

Use code TRACEY05 for a 5% discount.

I receive a small commission at not cost to you.

Little Birdie Crafts Supplies
Premium Card Stock A4 - Bright White
Premium Card Stock A4 - Ebony Black 

Other Supplies
Tim Holtz with Idea-ology: Optical Lens; Foundry; Date Dials; Hardware Heads; Mini Gears; Philosophy Tags
Bead Landing ~ Found Objects
Spare Parts ~ Clocks & Time
Miscellaneous: gears; clock;, cotter pin; and other found items
USArtqust ~ Mini Prills - Express-O-Yourself
Martha Stewart Crafts ~ Microbeads - Copper
Tim Holtz with Ranger ~ Distress Ink: Black Soot; Hickory Smoke; Peacock Feathers
Tombo ~ Mono MULTI Liquid Glue
Helmar ~ 450 Quick Dry Adhesive
Imagine Crafts ~ Tear It Double Sided Tape
Bone Folder
EK Success ~ Tweezers


Thanks for stopping by!
I treasure your comments.