I had so much fun working with Little Birdie's The Classic Gentleman collection to create this industrial steampunk card for our son-in-law who recently celebrated a birthday. I normally enjoy applying mixed media to the background in the form of stamping and stenciling, but the design was simply too fabulous to cover up. I've used the Little Birdie thincut Cogs and Wheels die set to create gears for my clusters.
I created a DIY video tutorial with voice sharing the techniques used to create this card. I hope you will find inspiration and learn some new techniques.
In this DIY steampunk card tutorial learn how to:
~ Create a patina effect on metal objects with paints and waxes
~ Accentuate background colors
~ Diecut and shade gears from patterned paper
~ Learn my creative process for arranging embellishments
Today I have something just a little different for you. I created this card for our daughter who is an artist, so I wanted to give it an artsy feel. The background is created with watercolors on Little Birdie Crafts 100% Cotton Watercolour Paper. I did a wet on wet application to achieve this night sky/ocean look. And of course it is embellished with gorgeous Little Birdie Crafts flowers, chipboard, bling, and mixed media products.
I hope you'll hop on over to the Little Birdie Crafts blog for a full photo tutorial showing how I put this together and to leave a comment letting me know what you think. You can find that post HERE.
Little Birdie Crafts can be purchased at their US online store. For a limited time there is free worldwide shipping on all orders over $99.
My niece graduated from high school this month and I created this delightful card to celebrate her special achievement. It features the gorgeous Little Birdie Crafts Fairy Sparkle paper and flower collections along with their fabulous mixed media products. I just adore mixing elegant flowers with a grungy background. To see how I put this card together, please hop on over to the Little Birdie Crafts blog HERE where I have a full photo tutorial. I hope you'll leave some love while you're there.
Here's a supply list for all the products used on this lovely card:
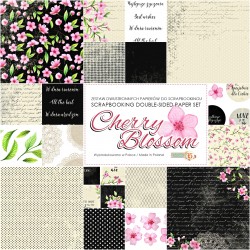
I'm up on the Studio75 blog with this floral mixed media card featuring the gorgeous Cherry Blossom Paper Set. I often use the grungy papers from this collection to create masculine cards and projects, but used one of the sweet, feminine papers for this card. Don't you just adore how the pink plays against the black in this gorgeous paper collection?
Tips and Techniques
There are several layers of papers from the Cherry Blossom Set on this sweet card. I've used a background sheet from the 6x6" pack, then cut out the floral print rectangle from the 05 sheet and finally fussy cut the flowers and leaves that I layered with dimensional flowers from the store. I'm often asked what scissors work well for fussy cutting. My favorite go to scissors for this purpose are the EK Success Small Precision Scissors.
The background is stenciled with Finnabair's Rose Gold Icing paste to coordinate perfectly with the cherry blossom pink on the papers.
This close-up of the cluster shows how beautiful the fussy cut leaves look tucked in amongst the flowers. The darling sentiment button is also part of the Cherry Blossom collection. The black wood circles are added as an accent and rubbed lightly with Finnabair's Sweet Rose metallic wax.
I created a secondary cluster here in the top corner with these gorgeous fussy cut flowers and leaves.
I added prills and microbeads around the cluster with Bambino Glue.
Studio75 Supplies
Other Supplies
Jillibean Soup ~ Wood Dots ~ Mushrooom Medley
US ArtQuest ~ Mini Prills - Hot Mama; Tu-Tu Pink
Prima ~ Finnabair - Art Basics: Gesso, Clear
Prima ~ Finnabair: Art ExtraVagance - Icing Paste: Rose Gold
Prima ~ Finnabair: Art Alchemy - Metallic Wax: Indian Pink; Sweet Rose; White Gold
Prima ~ Finnabair: Art ExtraVagance - Microbeads: White Gold
Tim Holtz with Stampers Anonymous ~ Flourish Layering Stencil
Helmar ~ 450 Quick Dry Adhesive
Tombo ~ Mono MULTI Liquid Glue
Imagine Crafts ~ Tear It!
EK Success ~ Small Precision Scissors
I have a new project to share today featuring wonderful products from the Scrap & Craft Store featuring the Craft O'Clock ~ Morning Dreams II paper collection which has such gorgeous colors and fabulous images that can be fussy cut to embellish your projects. I've also used chipboard, stamps, and organza trim from the store.
Most of the cards I create are made with a special person in mind, but I do like to keep a few on hand for those unexpected special occasions. With this encouraging sentiment, it could be used for a birthday or really any kind of celebration or milestone event.
Tips and Techniques
I selected delicate Prima flowers to go with the soft colors on the gorgeous background paper and fussy cut flowers, then tucked in a single blossom from the Organza Rose Trim. I just adore this versatile trim that can be used in a strip or cut apart for individual flowers.
I treasure texture, so used Bambino Glue to adhere metal objects, Prills, diecut leafy flourishes, chunky glass glitter, rhinestones, and Finnabair Microbeads and Mica Flakes, around the cluster and across the page. Do you have a stash of found items like I do? It's so lovely to tuck in an odd found item or two into mixed media projects for a unique touch. I brushed them with Finnabair's Sparks Paint and Art Alchemy Wax to fit in.
The background is stenciled with crackle paste, then spritzed with Lindy's Gang Tibetan Poppy Teal and Frozen Jack Frost Starburst mist. Once dry, white ink is spattered across for soft visual texture.
I combined the Agateria Grill 3 Stamp with a flourish stamp from my stash to edge the top and bottom of the card using permanent ink. I thought this sentiment was just perfect to go with the chipboard wings in the cluster.
I've had so much fun making these two different cards from the June Scraps of Elegance Stephanie's Treasure Kit!! There are lots of events to celebrate with cards in June. We have three birthdays and Father's day, so I was in need of both a masculine Father's Day card for my husband and a feminine birthday card for my mom. So I thought, why not attempt to create both from the same paper and kit elements?
I've created a process video to show you how I put them together. I share a variety of technique such as using alcohol ink a couple different ways, coloring chipboard, using Prills, and even a demo on how to tie a four loop bow with the lovely kit ribbon. I hope you enjoy!
Here are some close-ups to show the details.
"Moments in Time"
I created this card from my mom who just celebrated her birthday.
Purely shabby chic and feminine!
I demonstrate how to tie a four loop bow in my video.
I've added Prills to my flowers and background. The lovely Blue Fern Studios Chipboard has been stamped and colored with kit mixed media products.
"Wonderful Life"
I used the back side of this gorgeous Blue Fern Studios paper to go totally
masculine for a Father's Day card for my wonderful husband, Gary.
Tim Holtz Rub-ons, Blue Fern Studios Stamps and Prima Ceiling Bulbs are all included in the fabulous June Scraps of Elegance June Kit and work perfectly together to give a masculine touch.
The background is colored using kit alcohol inks.
I've added a few Prima trinkets from my stash.
I show how to color rhinestones with alcohol ink in my video.