Showing posts with label Patina. Show all posts

Monday, November 7, 2022

Amazing Paper Grace November Die of the Month: Pop Up 3D Vignette Alarm Clock

Welcome to my creative space!

As soon as I saw this fabulous Amazing Paper Grace Pop Up 3D Vignette Alarm Clock November Die of the Month, I just knew I wanted to create a patina finish to give a vintage feel to this amazing design.

These cards show patina two ways. The 3D vignette card uses mixed media products to create the patina. I explain this process below in the Tips and Techniques section. On the flat card I used patina printed paper to show you a quick and easy way to get this effect with just paper. While they look very similar in this photo, the metallic finishes truly look like old patina copper.

I'm always looking for ways to create masculine cards for the special men in my life and either of these cards could be used for a guy. The flat card even has a touch of steampunk with the black gears tucked behind the clock.

Please scroll down through the Tips and Techniques section to find close-ups and all the details on how to create these two vintage clock cards.

Many thanks to Amazing Paper Grace for providing the dies used in this project!

There are 21 cutting dies included in the Pop Up 3D Vignette Alarm Clock.

Pop Up 3D Vignette Alarm Clock

Flat Steampunk Card

Tips and Techniques
To create the patina effect, I started with a lightly patterned teal paper and rubbed Salvaged Patina Distress Oxide Ink randomly over the die cut paper, I went back and added a few touches of Uncharted Mariner Distress Oxide Ink. I then spritzed the inked paper with a fine mist of water to activate the oxide inks. Once dry to the touch, randomly rub Finnabair Copper Metallique Wax over the surface. Then go back and repeat the oxide ink process with the same colors so the oxide looks like it's coming out of the copper from years of oxidation.

Pieces that are "oxidized" include the scrolled clock frame, center decorative piece, ring with minute marks, alarm bells, hammers, sentiment strip and base.

The clock hands are cut from metallic copper cardstock and rubbed with the oxide inks. They are held in place with a mini brad which is colored with more of the copper wax. 

The number ring and backing for the center scrolled piece are cut from black metallic cardstock. The cream paper backing the entire design is a grungy masculine printed paper. This paper has touches of teal in it that works so perfectly with the patina finish.

This close-up of the bells shows the shimmering copper blended with the patina finish. It truly does look like old metal.  

The center scrolled piece backed in black is popped up with thin foam squares to give dimension and so that the clock hands will be raised up above the number ring. 

This fabulous 3D card folds flat for mailing. 
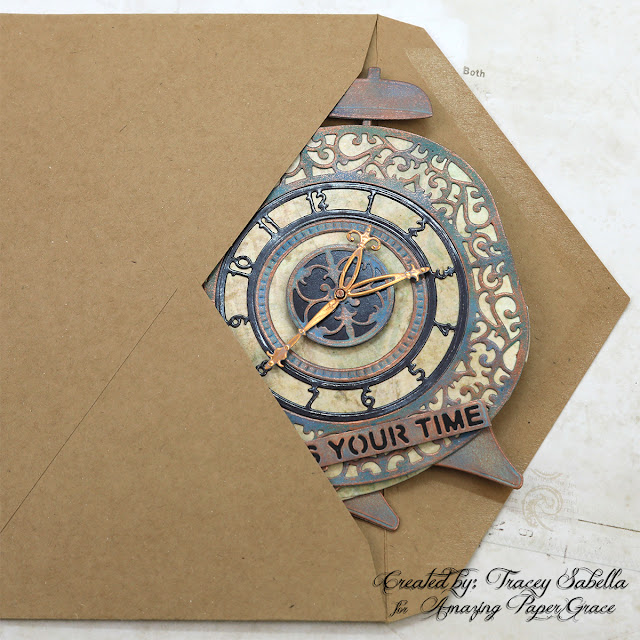
And tucks right into an envelope.

This card is cut from patina printed paper for a similar feel. If you don't have the mixed media products needed and want a quicker card, this is a great way to go. 

The background paper and gears give this card a more masculine industrial steampunk feel for that special guy in your life. The focal paper is inked with Pumice Stone Distress Ink to add to the vintage vibe. I wanted to keep this card simple, so didn't do any other inking. 

The card frame layer is cut from the same patina paper used to cut the clock design. 

The number circle and center background piece are cut from regular black cardstock and the clock hands from the same metallique copper paper used on the 3D card. I found this sentiment in the Idea-ology Small Talk pack that works so perfectly with the clock image. 

The cream clock base is the same paper used for the 3D clock card. 

These chipboard gears are heat embossed with black embossing powder for a rustic industrial feel. The clock image is popped up with foam tape so that the gears can be tucked underneath.

Below you can find the products I used to create this project including some with compensated affiliate links to Scrapbook.com and Spellbinders. These links are at absolutely no cost to you. When you shop through the links below, I receive a small commission from the companies.  These commissions help me cover the costs of my blog and other expenses, which allows me to continue to provide you with FREE inspiration along with detailed Tips and Techniques provided for every project. Thank you so much for your love and support!

Amazing Paper Grace Sets:

Paper:

Ink:

Mixed Media:

Embellishments:
  • Idea-ology - Tim Holtz - Mini Fasteners
  • Idea-ology - Tim Holtz - Small Talk
  • Stash - Chipboard Gears

Adhesives:

Tools:

The Amazing Paper Grace Die of the Month is available exclusively at Spellbinders Paper Arts during November 2022, Pop Up 3D Vignette Alarm Clock along with other membership perks.

View this month’s Amazing Paper Grace Die of the Month!

Thanks so much for stopping by to view this patina alarm clock ensemble. I hope you've been inspired.

Monday, June 6, 2022

Amazing Paper Grace June 2022 Die of the Month: Pop-Up 3D Vignette Road Trip

 
Welcome to my creative space!

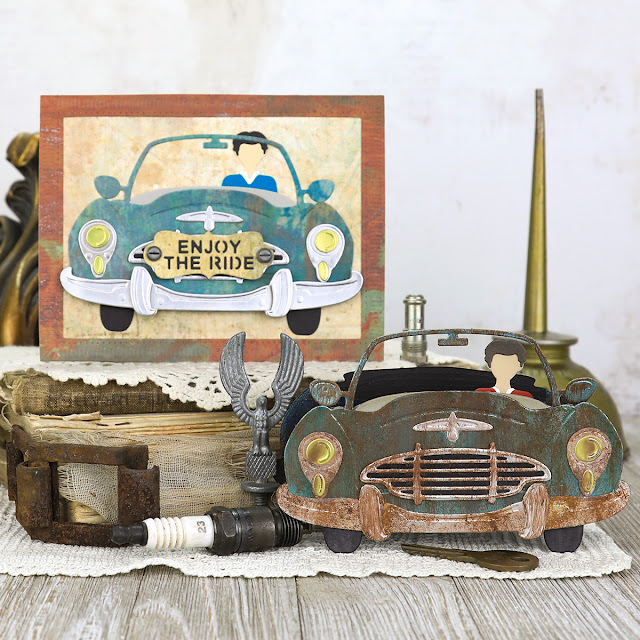
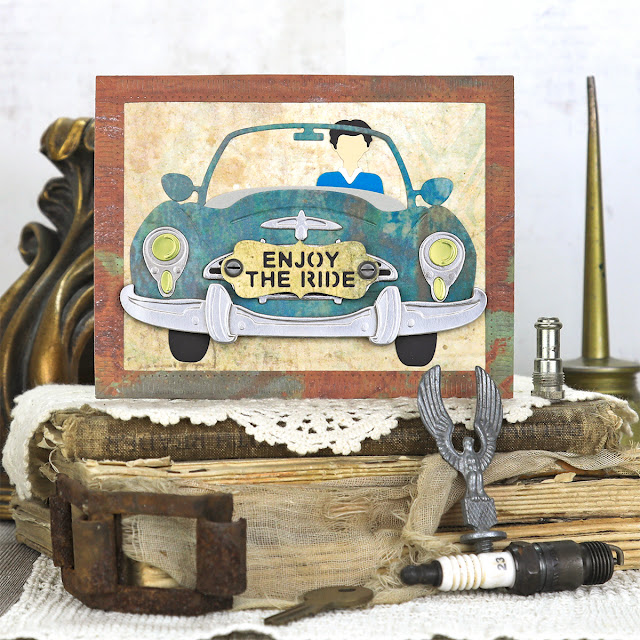
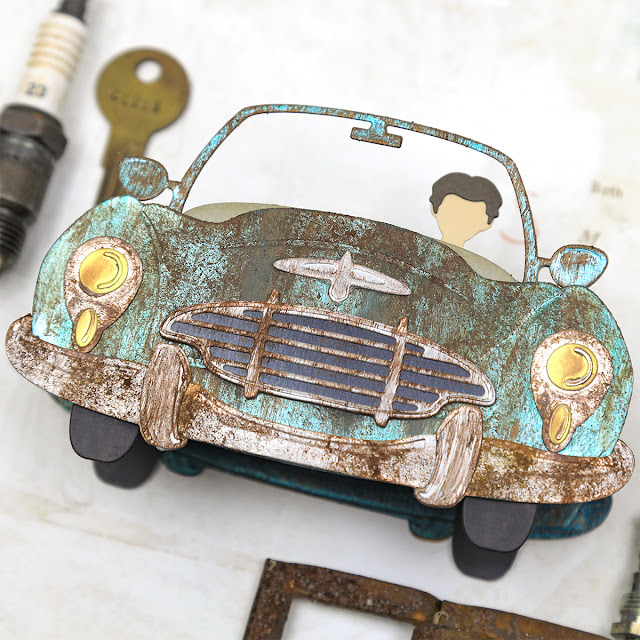
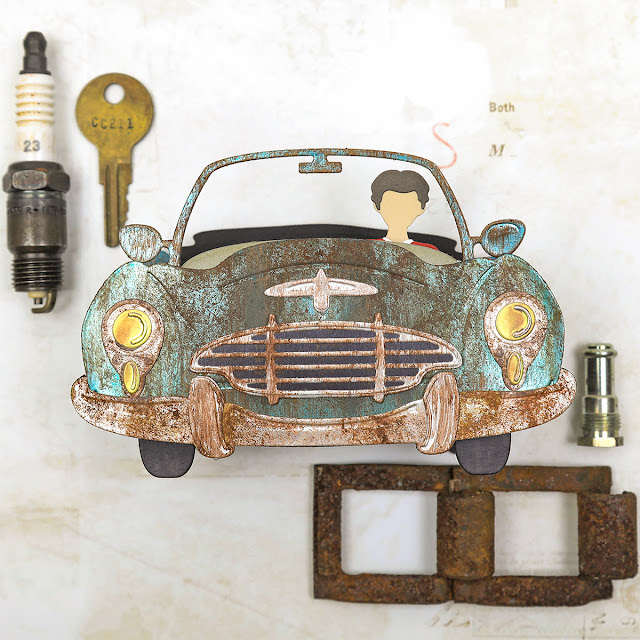
When I saw this fabulous Amazing Paper Grace June Die of the Month I thought what an adorable card it would make for my husband who's a car guy. He likes his cars shiny and clean, so that was the direction I planned to go with this 3D car die set. Then . . . . . . . the more I looked at the shape of this car, I started thinking of old barn find roadsters covered in rust and patina. I searched for images and there was no turning back. I had to transform this adorable car into a grungy "American Pickers" rusty classic. I'd adore hearing from you in the comments to let me know what you think! (Oh and by the way, that's my husband in the driver's seat. He adores taking his cars out for drives around the countryside.)

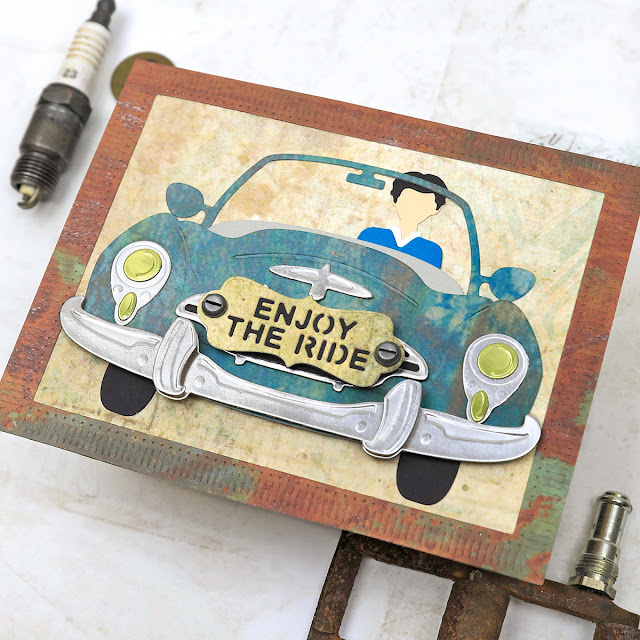
While it took some time and effort to achieve the rusty patina effect on this car, it was well worth it! I also wanted to show you something that still has that rusty patina effect, but is quick and easy to put together. On the flat card, the car is die cut from paper with a rusty patina print. It still has that grungy patina feel, but in a fraction of the time. With Father's Day just around the corner, these cards would be perfect for that special dad or father figure in your life. 

Be sure to scroll down through the Tips and Techniques section below for all the details on how I created these barn find roadster cards.

Many thanks to Amazing Paper Grace for providing the dies used in this project!

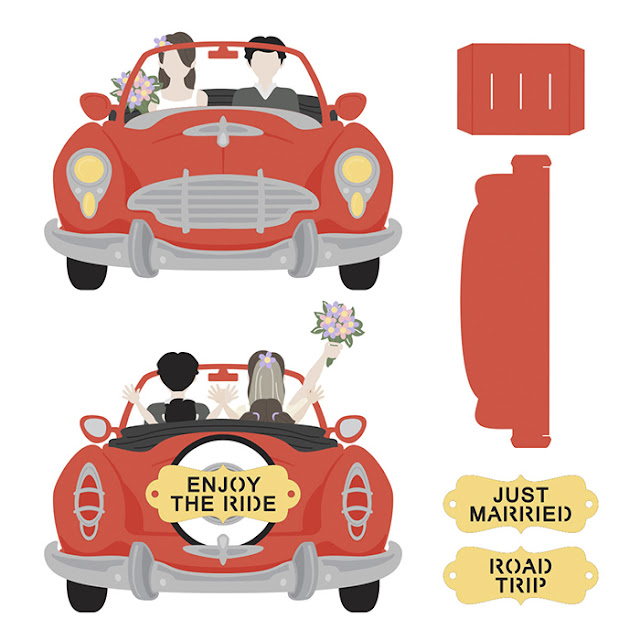
There are 26 cutting dies included in the Pop Up 3D Vignette Road Trip.

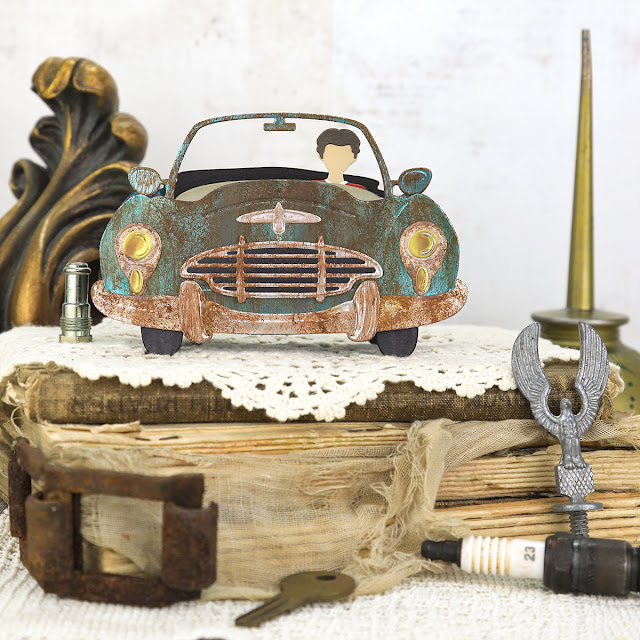
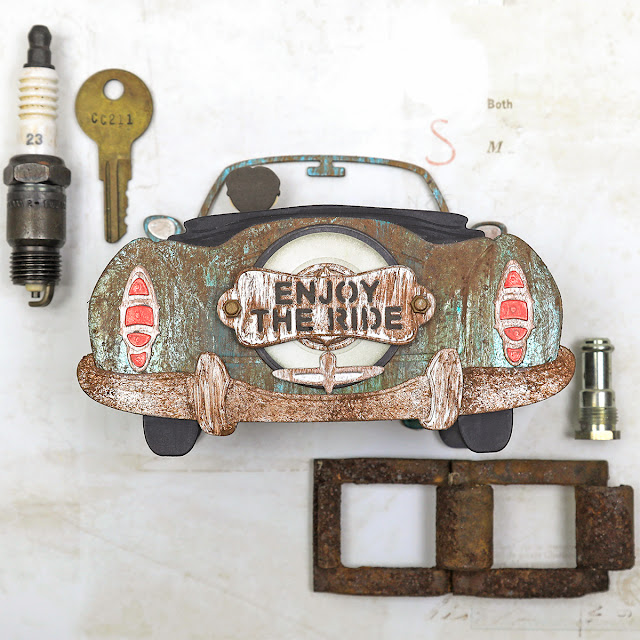
3D Roadster Card


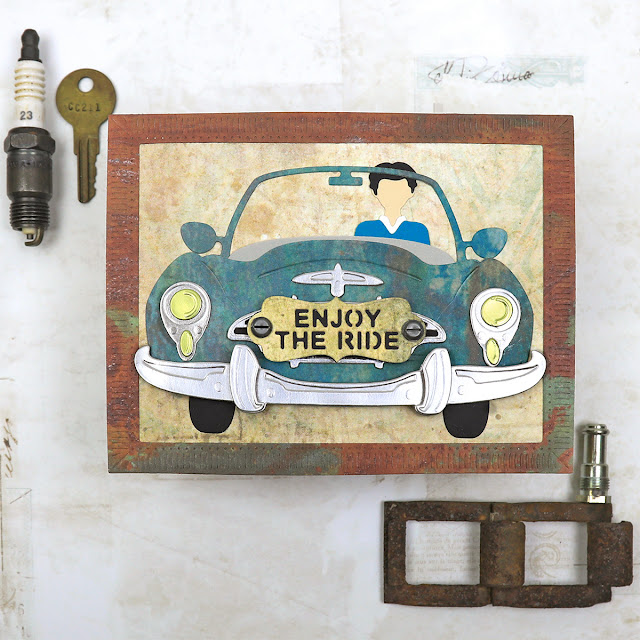
"Enjoy the Ride" Flat Roadster Card

Tips and Techniques
I used a combination of Rust Paste, which is basically rust and patina colored acrylic paints with grit added for rusty texture, metallic acrylic paint, liquid acrylic paint, and Artisan Powder to create this patina effect. You could really use whatever rusty paint colors you have in your stash to create a similar effect. 

I mixed the mediums on a palette, but left streaks of the various colors just like you would find in natural rust and patina. I used a dabbing motion to apply the paints, then lightly brushed over it while still wet in a downward motion to give the feel of rust that has happened over time dripping down over the car. The yellow headlights are rubbed with Rusty Brown Matte Wax to make them look a bit dirty.

The dash board is lightly rubbed with distress inks to add to the grungy feel.

***Tip*** When using paints containing any kind of grit, be sure to use an old or inexpensive brush, as the grit will fray the bristles and damage the brush. I have a couple brushes set aside just for this use.

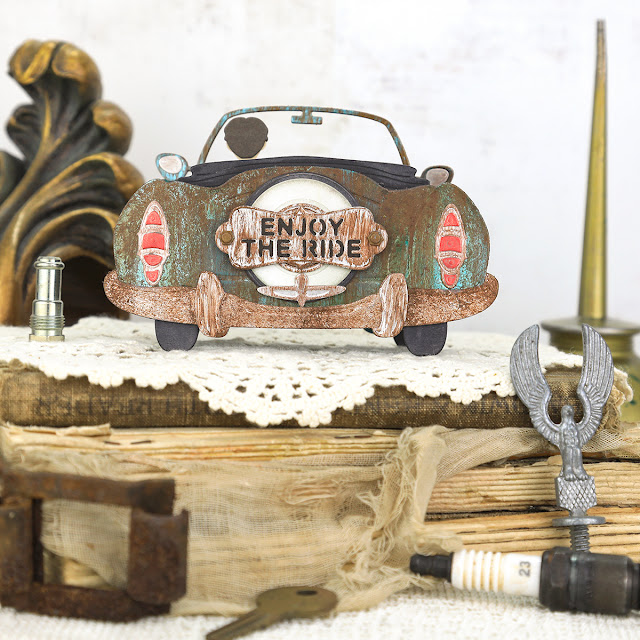
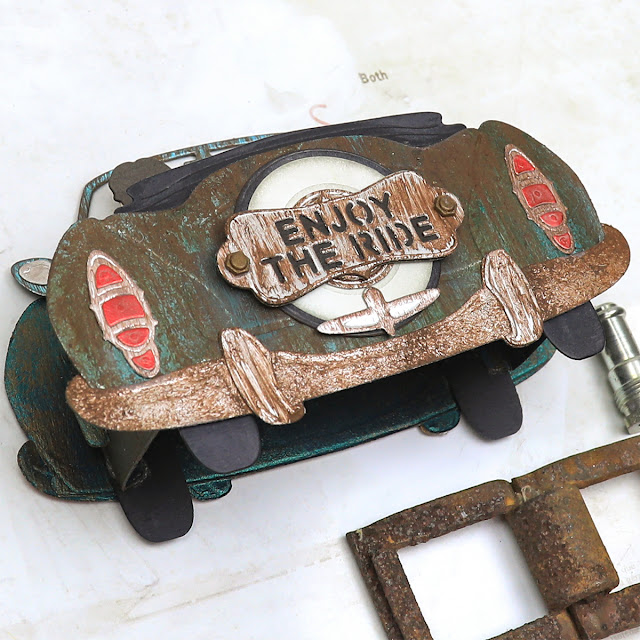
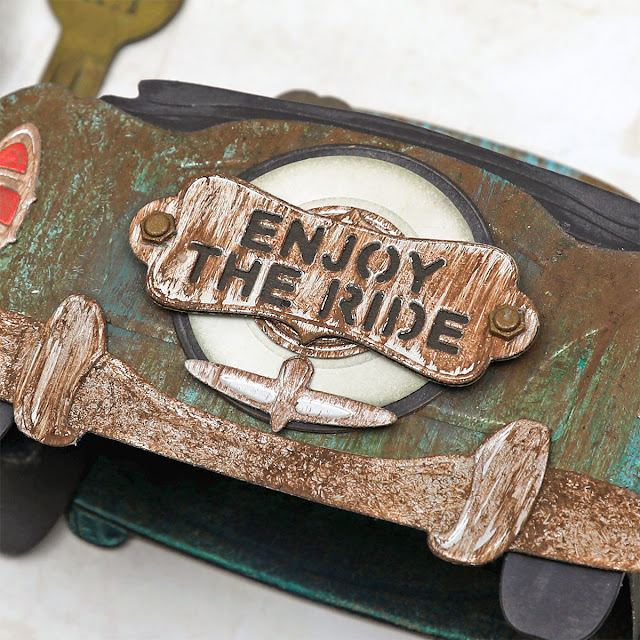
The back of this card is just as fun as the front with with the spare tire and fun sentiments to pick from. I used the same paint technique here on the back. I applied a little grungy ink to the white wall on the tire. The shiny red lights are toned down by rubbing with Rusty Brown Matte Wax, but no rust since glass doesn't rust.

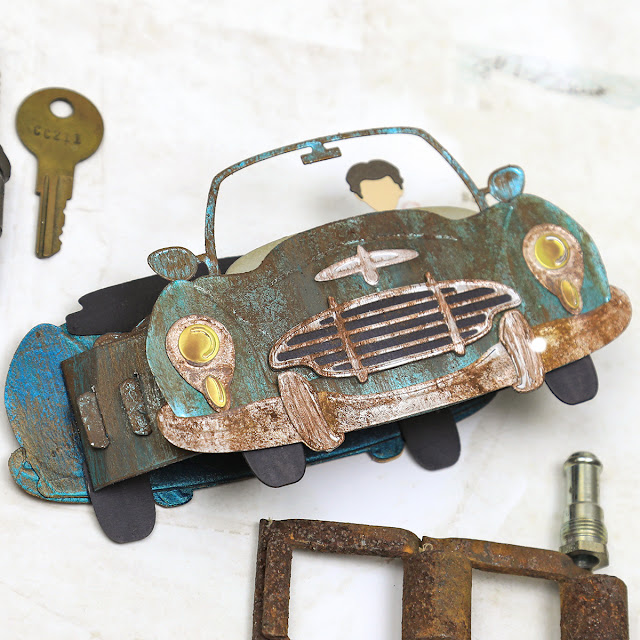
Don't you just adore how these 3D Vignette cards slide to lie flat for posting? I added the rusty patina effect to the hinges and slot pieces that make up the center of the card as well. 

Because this card has a front and a back, I needed to do something to the back of each piece. The metallic paper that I used has a kraft back, and would not have looked right if left as is. The solution was quite simple. I mixed up some emerald and deep blue metallic paints to brush over the back of each piece. Once dry, I lightly dry brushed the pieces with Hazelnut metallic paint in a downward motion to give a bit of that rusty feel. I didn't go all out with the patina mixture on the backs but this quick paint on the backs helps give a cohesive look to the card. 

***Tip*** The paint caused the pieces to curl, so once they were dry to the touch, I layered them in paper towels between two glass mats with a few heavy books on top and let them sit overnight. By the next day they were perfectly flat again. 

A close-up of this fun sentiment on the back. You can see that the mix of pouncing on the rusty color along with brushing over it gives a natural rusty feel. The shiny black tires and back seat are rubbed with a bit more of that rusty brown matte wax to grunge them up just a little. 

Here you get a perfectly grungy car just by die cutting it from paper with a rusty patina design. This car image fits perfectly into the largest Fluted Classics Rectangle. This fluted frame is cut from a different section of the same paper that has more of the rust color in it and is placed over a grungy printed paper in a lighter color so the car image will pop. The sentiment is cut from the lighter paper as well.

The metal accent pieces like the bumper and grille are cut from metallic silver cardstock. To keep it simple, I didn't add any inking or grungy mixed media affects to this card, but just adore the way it turned out. 

My husband wears a lot of red and blue, so I gave him a red shirt in the 3D car and blue here on the flat card.

A few final shots


Supplies:

Amazing Paper Grace Dies:

Paper:
  • Scrapbook.com ~ Christmas - Smooth Cardstock Paper Pad - Slimline
  • Tim Holtz with Idea-ology ~ 8 x 8 Kraft Stock - Metallic - Confections
  • Tim Holtz with Idea-ology ~ 8 x 8 Kraft Stock - Metallic - Jewels
  • Tim Holtz with Idea-ology ~ 8 x 8 Kraft Stock - Metallic
  • Craft Consortium ~ Patina, 12x12" Paper Pad
  • Prima ~ Timeless Memories, 12x12" Paper Pad
  • Concord & 9th ~ Dove 
  • Cardstock ~ Black, Red, Blue, White, Skin Tone

Ink:
  • Distress Ink ~ Frayed Burlap; Pumice Stone

Mixed Media:
  • Finnabair with Prima Marketing ~ Rust Effect Paste: Gold Rust; Red Rust; Turquoise
  • Finnabair with Prima Marketing ~ Liquid Acrylic: Burnt Sienna; Emerald
  • Finnabair with Prima Marketing ~ Matte Wax: Rusty Brown
  • Finnabair with Prima Marketing ~ Metallique Acrylic Paint: Hazelnut; Emerald Green; Deep Waters
  • Frank Garcia with Prima Marketing ~ Artisan Powder: Clay

Embellishments:
  • Tim Holtz with Idea-ology ~ Hardware Heads

Adhesives:
  • Scrapbook.com ~ Clear Double Sided Adhesive Roll - Permanent
  • Helmar ~ 450 Quick Dry Adhesive
  • Beacon ~ 3-IN-1 Advanced Craft Glue
  • Beacon ~ Fabri-Tac 
  • Tombow ~ Mono MULTI Liquid Glue
  • Foam Tape ~ 1"

Tools:
  • Spellbinders ~ Platinum 6
The Amazing Paper Grace Die of the Month is available exclusively at Spellbinders Paper Arts during June 2022, Pop Up 3D Vignette Road Trip along with other membership perks.

View this month’s Amazing Paper Grace Die of the Month! 

I would adore hearing from you! Please leave a comment below letting me know how you will use these fabulous dies!


Thanks for stopping by! I treasure your comments.

~ Blessings ~

Monday, May 9, 2022

"Live this Life" Industrial Steampunk Card for Amazing Paper Grace

Welcome to my creative space!

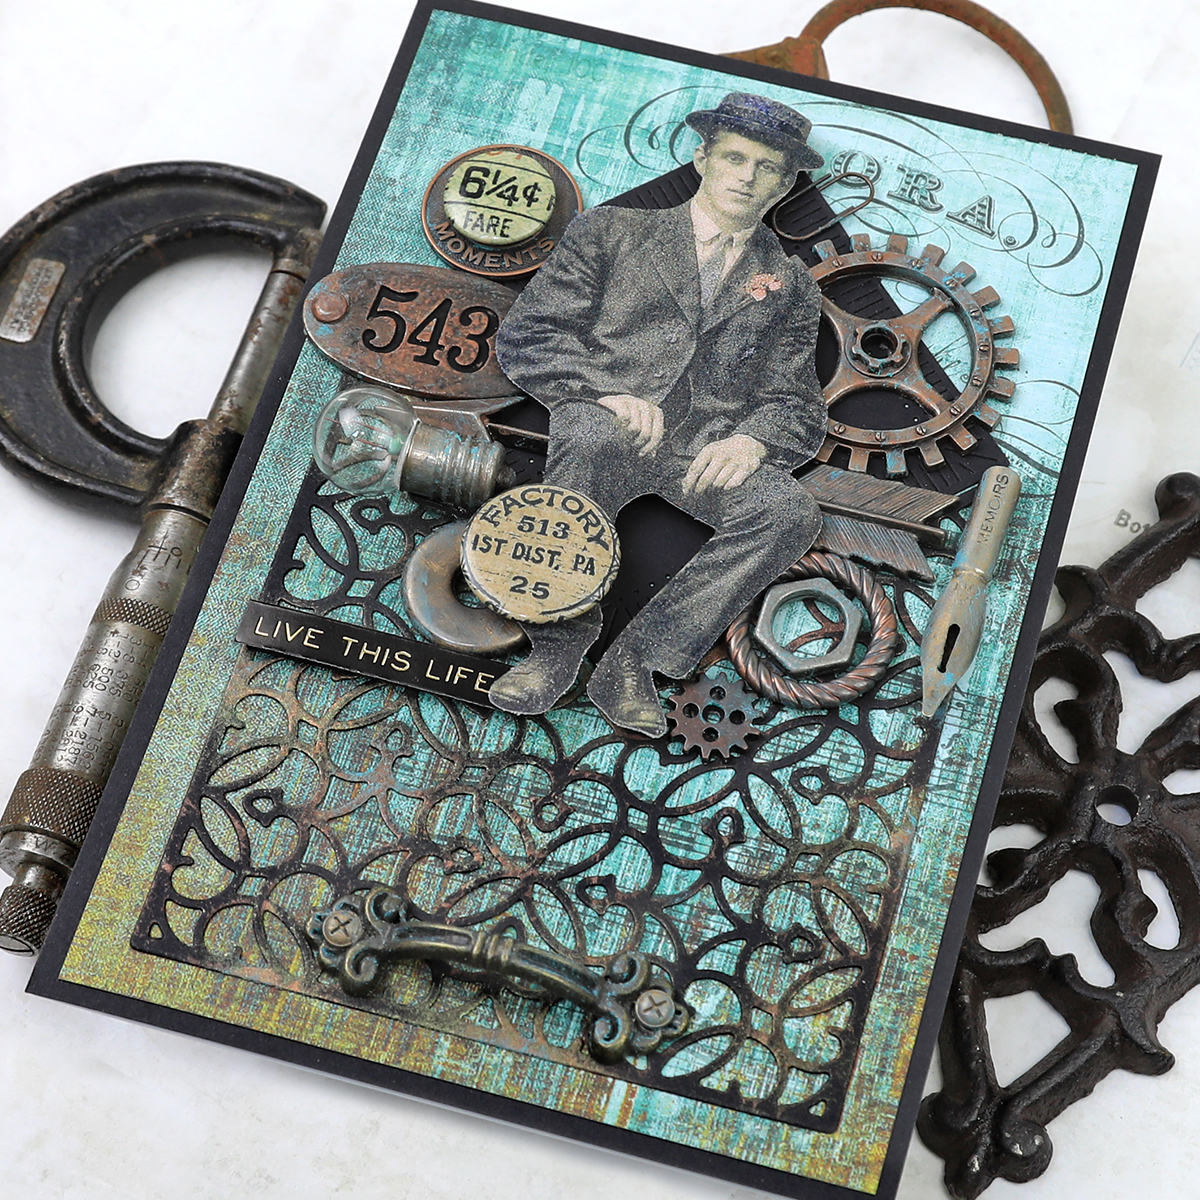
I just adore creating in the industrial steampunk style, and as soon as I laid eyes on the fabulous Amazing Paper Grace With Love Regalia Card Builder (S5-492) die set, I thought it looked like old wrought iron fencing that would be perfect to create a card in this style. As I looked through my stash of embellishments, I found this dapper gentleman from the Tim Holtz Paper Dolls set to perch perfectly atop the fence. Yes, this is another "who knew" Amazing Paper Grace could be fabulous for a masculine creation!

Since this die has a V shape at the top, I cut a square of black cardstock using the smallest dies in the Fluted Classics Squares set to provide a backdrop for my gentleman and industrial elements. This square fits the opening perfectly and those fluted edges add wonderful texture here.

The fence has been given a coppery patina finish in places using the new Tim Holtz Foundry Waxes along with classic Finnabair art waxes. These mediums are also used to add a grungy finish to the metal elements.

Be sure to scroll down through the "Tips and Techniques" section below for close-ups and all the details on how to create this industrial steampunk card.

Thank you Amazing Paper Grace for providing the dies used in this project.

Tips and Techniques
Here you can see just how gorgeous this die cut is as a wrought iron fence. It's cut from 120lb black cardstock. I randomly applied Mined Foundry Wax across the piece where you might see corrosion naturally appearing on an old weathered iron fence, then heat set the wax to bring out it's shiny luster. Green Patina Matte Wax is rubbed on around the copper for a grungy patina finish. I wanted a little something on the bottom of the card to help balance the detailed top, so found this ornate handle in my stash that's the perfect size to use here. 

The small square from the Fluted Classics Squares set fits into the "fence" opening perfectly and helps the man and embellishments stand out. I felt that he would have gotten a little "lost" against the colorful patterned paper.

This vintage gentleman is sitting atop the fence on a whimsical arrow. I applied and heated Mined and Statue Foundry Wax across many of these industrial elements to age them. I also applied Matte Patina Green, Bronze Age, and Rich Copper waxes around those areas to accentuate the aged patina look I wanted to achieve. Nearly all of these embellishments are from the Tim Holtz Idea-ology collection.

***Tip*** The engraved numbers on the 543 piece were colored with the waxes and no longer very visible. My solution to fix that problem was to rub black acrylic paint into the numbers, then gently use a soft cloth to remove most of the paint from the patina surface. Not all of the black paint came off, but that just adds to the grungy look and the numerals now pop!

One final look so you can see how all the grungy, aged elements come together so beautifully to create a wonderful masculine card. Don't you agree that this die is perfect to create a weathered wrought iron fence?

Amazing Paper Grace Dies:

Paper:
  • Tim Holtz with Idea-ology ~ Paper Stash: Abandoned
  • Cardstock ~ Black 120lb; White 120lb

Ink:
  • Tim Holtz with Ranger ~ Distress Ink: Chipped Sapphire
  • Tim Holtz with Ranger ~ Distress Ink: Saltwater Taffy

Mixed Media
  • Tim Holtz with Ranger ~ Foundry Wax: Mined
  • Tim Holtz with Ranger ~ Foundry Wax: Statue
  • Tim Holtz with Ranger ~ Distress Frosted Crystal 
  • Tim Holtz with Ranger ~ Distress Embossing Dabber
  • Tim Holtz with Ranger ~ Distress Paint: Black Soot
  • Finnabair with Prima ~ Metallique Wax: Bronze Age; Rich Copper
  • Finnabair with Prima ~ Matte Wax: Patina Green

Embellishments:
  • Tim Holtz with Idea-ology ~ Paper Dolls
  • Tim Holtz with Idea-ology ~ Industrial Gears
  • Tim Holtz with Idea-ology ~ Adornments: Arrows
  • Tim Holtz with Idea-ology ~ Adornments: Foundry
  • Tim Holtz with Idea-ology ~ Pen Nibs
  • Tim Holtz with Idea-ology ~ Muse Tokens
  • Tim Holtz with Idea-ology ~ Mini Paper Clips
  • Tim Holtz with Idea-ology ~ Mini Gears
  • Tim Holtz with Idea-ology ~ Hardware Heads
  • Tim Holtz with Idea-ology ~ Mini Flair
  • Spare Parts ~ Mini Light Bulbs
  • Spare Parts ~ Small Metal Handles
  • Washers ~ From my stash

Adhesives:
  • Tombow ~ Mono MULTI Liquid Glue
  • Helmar ~ 450 Quick Dry Adhesive
  • Beacon ~ 3-IN-1 Advanced Craft Glue
  • Scrapbook Adhesives by 3L ~ Thin 3D Foam Squares, Black
  • Scrapbook Adhesives by 3L ~ Crafty Foam Tape, Black
  • Helmar ~ ZapDots: 1/4" Black; 1/2" Black
  • Double Sided Tape ~ 1/4" 

Tools:
  • Spellbinders ~ Platinum 6


Thanks for stopping by! I treasure your comments.

~ Blessings ~

Saturday, July 10, 2021

Masculine Airplane Card with Faux Metal Gears with VIDEO TUTORIAL for Little Birdie Crafts

 Welcome to my creative space!

My dad served in the Air Force, so when I saw this fabulous vintage airplane in Little Birdie Crafts Classic Gentleman collection, I knew I would be creating a card for him featuring this amazing paper. I combined this gorgeous airplane image with industrial embellishments. Some are metal and some are diecut from chipboard with the Cogs and Wheels die set that have been transformed with metallic paints into grungy metallic beauties with a patina finish.

The metal embellishments are from Tim Holtz and the Dad sentiment is embossed with Tim's Typewriter 3-D Texture Fade which are so perfect for the industrial vibe I wanted to achieve. Distress Ink is used to enhance add patina to the background paper.

Close-up photos and more details can be found on the Little Birdie Crafts Blog HERE.
Thanks for stopping over there if you have a chance to leave a comment.

Little Birdie Crafts is having a huge sale at their online store with their best prices
of the year along with FREE worldwide shipping on orders over $99.
Check out the sale HERE.

Use code TRACEY05 for a 5% discount.

I receive a small commission at not cost to you.

I hope you'll join me to view this video tutorial and explore how to add thin borders to image blocks and backgrounds, create a grungy typeset title, use metallic paints to transform diecut chipboard gears into faux metal beauties and to create a patina finish then add grungy texture to take this masculine card to the next level.

Enjoy!


Little Birdie Crafts Supplies

Other Supplies
Thin Kraft Chipboard
Tim Holtz with Idea-ology ~ Metallic Kraft Stock: Champagne
Tim Holtz with Idea-ology ~ Sprocket Gears
Tim Holtz with Idea-ology ~  Mini Gears; Adornments - Stars
Tim Holtz with Idea-ology ~  Compass Coins
Tim Holtz with Ranger ~ Distress Ink: Salvaged Patina
Tim Holtz with Ranger ~  Peacock Feathers
Tim Holtz with Ranger ~  Pumice Stone
Tim Holtz with Sizzix ~ 3-D Texture Fades - Typewriter
US Artquest ~ Prills - Gilt Trip
Microbeads ~ Bronze
Helmar 450 Quick Dry Adhesive
Tombo ~ Mono MULTI Liquid Glue
X-Press It ~ High Tack Double Sided Tape
Wonder Tape - Foam Tape


Thanks for stopping by! I treasure your comments.

~ Blessings ~

Friday, January 29, 2021

Industrial Steampunk Card and DIY Video Tutorial with Voice for Little Birdie Crafts


Welcome to my creative space!

I had so much fun working with Little Birdie's The Classic Gentleman collection to create this industrial steampunk card for our son-in-law who recently celebrated a birthday. I normally enjoy applying mixed media to the background in the form of stamping and stenciling, but the design was simply too fabulous to cover up. I've used the Little Birdie thincut Cogs and Wheels die set to create gears for my clusters. 

I created a DIY video tutorial with voice sharing the techniques used to create this card. I hope you will find inspiration and learn some new techniques.

In this DIY steampunk card tutorial learn how to:
~ Create a patina effect on metal objects with paints and waxes
~ Accentuate background colors
~ Diecut and shade gears from patterned paper
~ Learn my creative process for arranging embellishments
~ Add texture with metal microbeads and prills

Enjoy!


Please hop on over to the Little Birdie Crafts blog to view more close-up photos HERE.

Little Birdie Crafts can be purchased at their online store.
Be sure to check out the Dollar Deals sale they are currently running HERE.

Use code TRACEY05 for a 5% discount.

I receive a small commission at not cost to you.

Little Birdie Crafts Supplies
Premium Card Stock A4 - Bright White
Premium Card Stock A4 - Ebony Black 

Other Supplies
Tim Holtz with Idea-ology: Optical Lens; Foundry; Date Dials; Hardware Heads; Mini Gears; Philosophy Tags
Bead Landing ~ Found Objects
Spare Parts ~ Clocks & Time
Miscellaneous: gears; clock;, cotter pin; and other found items
USArtqust ~ Mini Prills - Express-O-Yourself
Martha Stewart Crafts ~ Microbeads - Copper
Tim Holtz with Ranger ~ Distress Ink: Black Soot; Hickory Smoke; Peacock Feathers
Tombo ~ Mono MULTI Liquid Glue
Helmar ~ 450 Quick Dry Adhesive
Imagine Crafts ~ Tear It Double Sided Tape
Bone Folder
EK Success ~ Tweezers


Thanks for stopping by!
I treasure your comments.

Monday, August 26, 2019

"Journey" Hot Air Balloon for Studio75 with Woodouts! and Mitform Castings

"Journey" Industrial Steampunk Hot Air Balloon by Tracey Sabella for Studio75: #traceysabella #studio75 #woodouts #mitformcastings #scrapiniec #finnabair #primamarketing #snipart #lindysgang #timholtz #helmar #industrial #steampunk #rust #mixedmedia #masculine #hotairballoon #vintage #wings #fleamarketfinds
Welcome to my creative space!

As much as I enjoy making shabby mixed media cards and home decor, I also have a passion for creating industrial steampunk art. I had so much fun putting this beauty together with the Woodouts Balloon Base, chipboard and Mitform Castings pieces from the Studio75 Store along with vintage finds from my stash. I just have to say that this amazing Woodouts Balloon is a such a fun shape to work with and the details in the Mitform Castings pieces are so amazing. They really add such fabulous texture and design to the project don't they?

My sister lives in a community that has a community wide yard sale every year. It's a tradition for the two of us to go out every year and of course I'm always on the lookout for cool things to use in my art. Some of those finds include the pressure gauge (from a local oil field), vintage keys, metal key hole, spark plug, metal drawing compass and rusty washers along with a treasured machined metal piece from my dear friend Mandy's grandfather's workshop. I've also added some Finnabair Mechanicals and resin pieces I created with her moulds. She has such fantastic steampunk/industrial designs too! The base is colored with Lindy's Gang mists and the chipboard and resin pieces are colored with Finnabair paints and waxes. 

Tips and Techniques
To add texture to the background of the Woodouts Balloon Mixed Media Base, I applied Finnabair's Plaster Paste through the SnipArt Up In the Air Damask Stencil. I just adore this design, and it has become of my favorite go to stencils these days. Once dry, I spritzed with Lindy's Gang Hydrangea Blue Starburst mist then a small amount of Clamb Bake Beige and Incandescent Copper Moon Shadow Mist. I then misted with water to help the colors move and blend. This color combination gives a lovely patina effect.

"Journey" Industrial Steampunk Hot Air Balloon by Tracey Sabella for Studio75: #traceysabella #studio75 #woodouts #mitformcastings #scrapiniec #finnabair #primamarketing #snipart #lindysgang #timholtz #helmar #industrial #steampunk #rust #mixedmedia #masculine #hotairballoon #vintage #wings #fleamarketfinds 
I just adore these Mitform Casting pieces. The Steel Padlock piece on the left is from the Studio75 store. The fabulous metal pieces available in the store can be found HERE. Other Mitform casting pieces are purchased from My Rusty Crown. I rubbed the metal pieces with Brass Hardware, Bronze Age, and Stormy Ocean Finnabair metallic Waxes to age with a little patina.

"Journey" Industrial Steampunk Hot Air Balloon by Tracey Sabella for Studio75: #traceysabella #studio75 #woodouts #mitformcastings #scrapiniec #finnabair #primamarketing #snipart #lindysgang #timholtz #helmar #industrial #steampunk #rust #mixedmedia #masculine #hotairballoon #vintage #wings #fleamarketfinds
This cool spark plug is one of my yard sale finds. The other metal pieces in this close-up are a combination of Finnabair gears, and bolts along with pieces that I moulded, painted, and waxed to give this vintage patina effect. I also added Finnabair's wax to the metal parts of the spark plug. Finnabair's blue Sugar Art Pebbles add just the right touch of sparkle to this piece.

"Journey" Industrial Steampunk Hot Air Balloon by Tracey Sabella for Studio75: #traceysabella #studio75 #woodouts #mitformcastings #scrapiniec #finnabair #primamarketing #snipart #lindysgang #timholtz #helmar #industrial #steampunk #rust #mixedmedia #masculine #hotairballoon #vintage #wings #fleamarketfinds 
More rusty goodness including rusty washers I've picked up on when I find them laying on the ground when I'm out and about along with vintage keys - another yard sale find. The machined piece below the pressure gauge is from my friend's grandfather's workshop. I layered a Prima piece on top to add to the steampunk feel. I'm so grateful she gave me a few of these treasured pieces to include in my art!!! The fluttering steampunk butterfly is a Finnabair Mechanical.

"Journey" Industrial Steampunk Hot Air Balloon by Tracey Sabella for Studio75: #traceysabella #studio75 #woodouts #mitformcastings #scrapiniec #finnabair #primamarketing #snipart #lindysgang #timholtz #helmar #industrial #steampunk #rust #mixedmedia #masculine #hotairballoon #vintage #wings #fleamarketfinds 
This cool pressure gauge is also one of my finds. Doesn't it fit perfectly into the notch on the Mitform Castings Steel Padlock? A little Finnabair moulded sprocket on the gauge adds to the steampunk effect. 

"Journey" Industrial Steampunk Hot Air Balloon by Tracey Sabella for Studio75: #traceysabella #studio75 #woodouts #mitformcastings #scrapiniec #finnabair #primamarketing #snipart #lindysgang #timholtz #helmar #industrial #steampunk #rust #mixedmedia #masculine #hotairballoon #vintage #wings #fleamarketfinds 
 These fabulous Scrapiniec Chipboard Steampunk Flying Hearts XL Wings are a perfect fit across the Woodouts Balloon! I painted them with a mix of Finnabair's Brass Hardware and Stormy Ocean Metallique paints, then rubbed with her metallic waxes to add to the grungy aged metal effect.

The metal Journey piece is of course from Mitform Castings with so much depth and detail. I brushed it with Finnabair's waxes to highlight the texture.

"Journey" Industrial Steampunk Hot Air Balloon by Tracey Sabella for Studio75: #traceysabella #studio75 #woodouts #mitformcastings #scrapiniec #finnabair #primamarketing #snipart #lindysgang #timholtz #helmar #industrial #steampunk #rust #mixedmedia #masculine #hotairballoon #vintage #wings #fleamarketfinds 
The Scrapiniec Focus Small Arrows were a perfect fit around this vintage drawing compass, and I also added a few Scrapiniec Confetti Stars below the wings. These chipboard pieces were finished with the same products as the wings. I dyed some cheese cloth with the Lindy mists and tucked it in  behind the metal pieces for added texture. As I glued down the metal elements, the cheesecloth was secured in place. 

I brushed a mix of Finnabair's Rust Pastes around the metal objects and spritzed with water so that it looks like they have been there and weathered to rust in place.

"Journey" Industrial Steampunk Hot Air Balloon by Tracey Sabella for Studio75: #traceysabella #studio75 #woodouts #mitformcastings #scrapiniec #finnabair #primamarketing #snipart #lindysgang #timholtz #helmar #industrial #steampunk #rust #mixedmedia #masculine #hotairballoon #vintage #wings #fleamarketfinds
These faux metal chains are also from the Scrapiniec Steampunk Flying Hearts XL Elements set. Isn't it amazing how paint and waxes can make them look just like aged metal? I used a couple more Mitform Casting pieces to give definition to the balloon basked and added a vintage couple from the Tim Holtz Paper Dolls Set into the opening to enjoy the flight.

"Journey" Industrial Steampunk Hot Air Balloon by Tracey Sabella for Studio75: #traceysabella #studio75 #woodouts #mitformcastings #scrapiniec #finnabair #primamarketing #snipart #lindysgang #timholtz #helmar #industrial #steampunk #rust #mixedmedia #masculine #hotairballoon #vintage #wings #fleamarketfinds 
I used Bambino Glue to adhere prills and Finnabair Microbeads. Because it dries clear, it the perfect adhesive for these little bits of texture.

Studio75 Supplies
 https://studio75.pl/en/4372-22x30-cm-balloon-mixed-media-base.html  https://studio75.pl/en/5227-dziurka-mechanizm-45mm.html 

https://studio75.pl/en/3442-up-in-the-air-damask-stencil-15x15.html  https://studio75.pl/en/1979-focus-big-arrows-duze-strzalki.html 

https://studio75.pl/en/2077-steampunk-duza-ramka-z-sercem.html https://studio75.pl/en/2064-confetti-serduszka.html 

https://studio75.pl/en/2651-klej-magiczny-w-tubie-45g-bambino-stmajewski-5903235004070.html 

Other Products
Little Birdie Crafts ~ Cheese Cloth
Mitform Castings ~ Journey Frame
Mitform Castings ~ Side Corner 2
Mitform Castings ~ Top Corner 7
Prima ~ Finnabair: Mechanicals - Scrapyard Butterflies
Prima ~ Finnabair: Mechanicals - Mini Knobs
Prima ~ Finnabair: Mechanicals - Rustic Knobs
Prima ~ Finnabair: Mechanicals - Mini Stars
Prima ~ Finnabair: Mechanicals - Rustic Gears
Prima ~ Finnabair: Mechanicals - Hardware Accents
Prima ~ Finnabair: Mechanicals - Mini Hardware
Prima ~ Finnabair: Mechanicals - Vintage Trinkets Flowers
Prima ~ Finnabair: Art ExtraVagance - Microbeads: Bronze
Prima ~ Finnabair: Art Ingredients - Melange Art Pebbles - Sugar
Prima ~ Tiny Junkyard Findings - Nail Heads
Tim Holtz with Idea-ology ~ Paper Dolls
Machined Metal Piece ~ Mandy Morkel
Gauge ~ Flea Market Find
Vintage Drawing Compass ~ Flea Market Find
Spark Plug ~ Flea Market Find
Vintage Keys ~ Flea Market Find
Vintage Keyhole ~ Flea Market Find
Rusty Washers
US Artquest ~ Mini Prills - Gilt Trip
Martha Stewart ~ Microbeads - Apatite
Prima ~ Finnabair: Art Basics ~ Gesso - Clear
Prima ~ Finnabair: Art Basics ~ Soft Matte Gel
Prima ~ Finnabair: Art Basics ~ Plaster Paste
Prima ~ Finnabair - Art Alchemy - Metallic Wax: Peacock; Aged Brass; Bronze Age
Prima ~ Finnabair: Art Alchemy ~ Metallique Acrylic Paint: Brass Hardware; Stormy Ocean
Prima ~ Finnabair: Art ExtraVagance - Patina Effect Paste: Brass; Blue
Prima ~ Finnabair: Art ExtraVagance - Rust Effect Paste: Brown Rust
Liquitex ~ Gesso - White
Lindy's Gang ~ Starburst - Hydrangea Blue; Clamb Bake Beige
Lindy's Gang ~ Moon Shadow Mist - Incandescent Copper
Amazing Casting Resin ~ White
Prima ~ Finnabair: Moulds - Stars and Moons; Mechanica; Cogs and Wings
Helmar ~ 450 Quick Dry Adhesive
Tombo ~ Mono MULTI Liquid Glue

https://gracescraps.blogspot.com/


 Thanks so much for stopping by today! I treasure your comments

~ Blessings ~