Showing posts with label Prills. Show all posts

Saturday, December 31, 2022

Big Adventure Postage Edge Circle Card for Amazing Paper Grace

 
Welcome to my creative space!

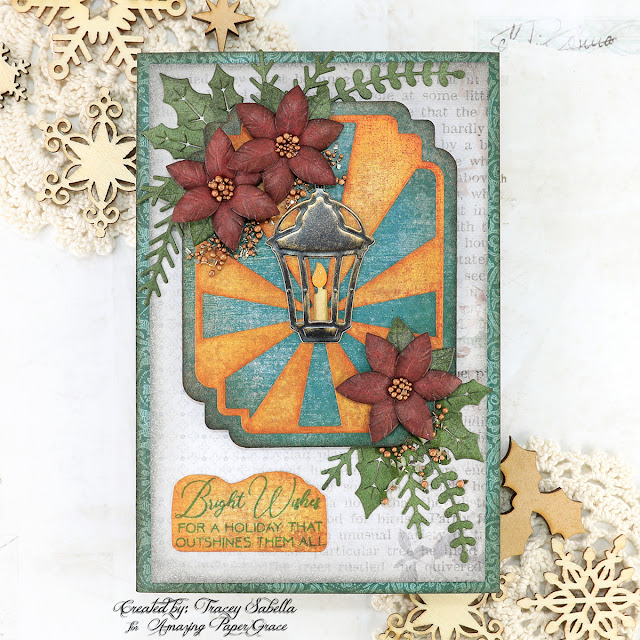
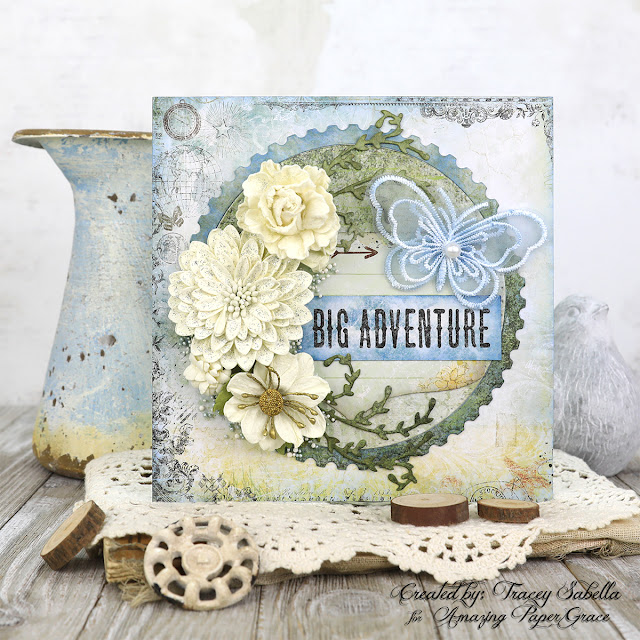
I thought it would be nice to bring a hint of summer warmth after the recent wintry weather we have experienced recently. This beautiful card features the Amazing Paper Grace Postage Edge Circles die set (S5-539). I just adore the versatility of this fabulous postage edge collection.

The postage edge and pierced inner circle were cut in one pass with the same section of patterned paper.  The outer postage ring is inked and turned to highlight and give definition. Premade flowers from Little Birdie Crafts are paired with gorgeous foliage die cut with fabulous leaf dies from the My Sweet Friend set (S5-512)

I enjoy creating versatile cards that can be used for a variety of occasions. This card could be a send off for someone taking an adventurous trip, a new job, graduation, or milestone birthday. 

For more close-ups and all the details on how to create this card, be sure to scroll down through the Tips and Techniques section below. 

Thank you Amazing Paper Grace for providing the dies used in this project.


Tips and Techniques
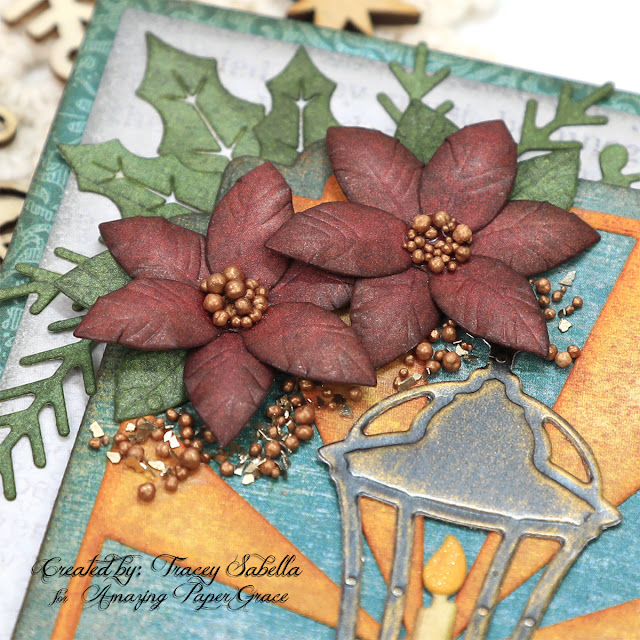
As mentioned earlier, I die cut the postage edge ring and inner pierced circle from the same patterned paper in one pass. I wanted the ring to have definition while coordinating with the inner circle so rubbed it randomly with Faded Jeans Distress Ink. The edges of the inner circle are inked with Pumice Stone Distress Ink to make the pierced design more visible and to add to the contrast between the two pieces. 

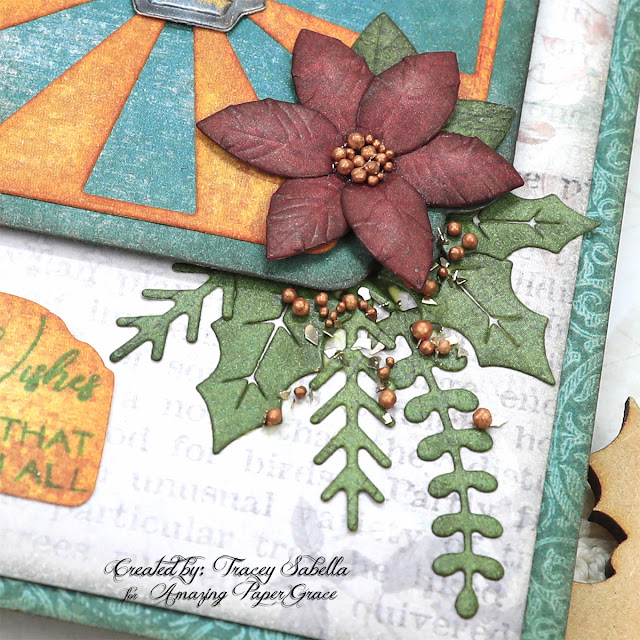
The white lace butterfly is also rubbed with the Faded Jeans ink to give it a soft blue hue.

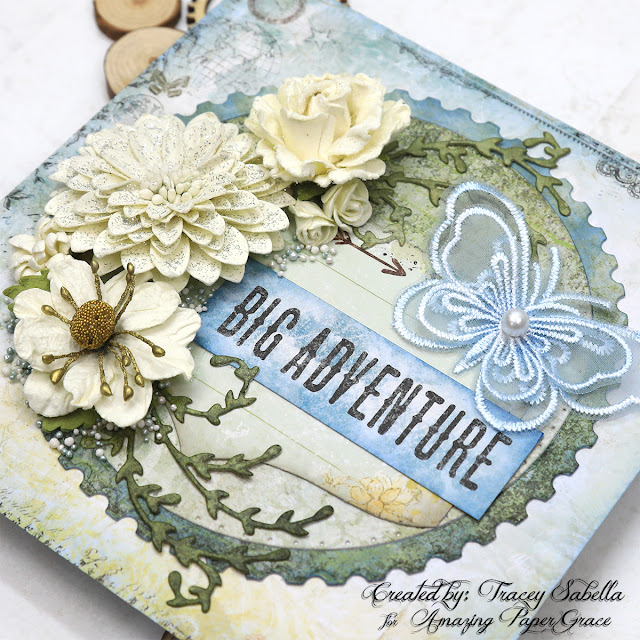
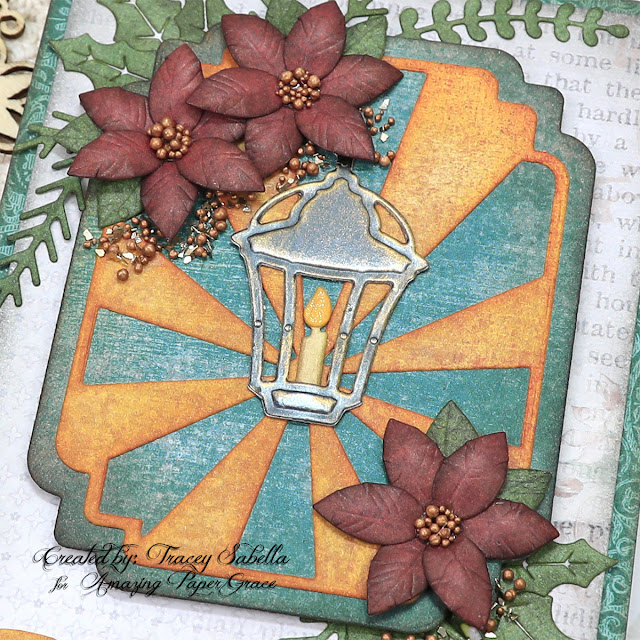
This circle design is perfect for arranging a flowing floral cluster along one side as I did here. I arranged pre-made Little Birdie flowers from the Shabby Chic collection, then to extend the design around the circle I die cut foliage with a soft curve from the My Sweet Friend die set (S5-512) from a darker green section of the same patterned paper. The leafy section is cut into two pieces to use on each end of the cluster and inked with Forest Moss Distress Ink to add contrast.

This close-up also shows how gorgeous this postage edge design is. You may notice that I also rotated the outer ring so that the darker part of the ring is against the lighter part of the circle. This adds more contrast to the design. By rotating and inking the postal edged ring, it looks like two different patterned paper were used. 

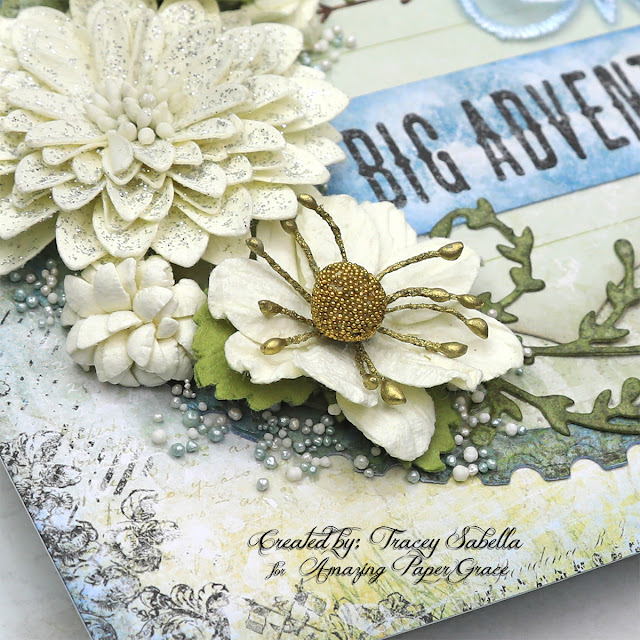
To add texture and fill in areas around the cluster I brushed matte gel medium around the edges and sprinkled with two colors of Prills. This is an easy way to add a bit of sparkling texture to your project.

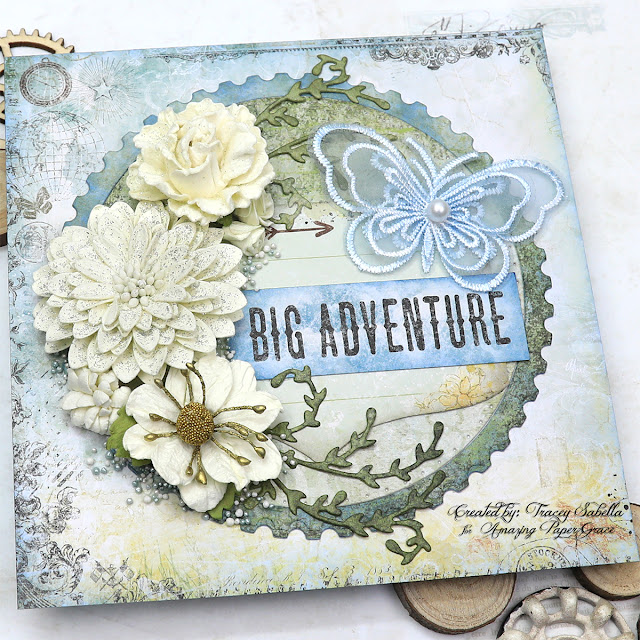
The Wanderlust paper collection included a page with 6x6" designs that could be cut for card bases. The background paper is one of those pieces and coordinates perfectly with the round postage designs. The edges look stamped, but this is part of the patterned paper. I did add a bit of light inking with Faded Jeans around the edges of the background and sentiment.

Below you can find the products I used to create this project including some with compensated affiliate links to Scrapbook.com and Spellbinders. These links are at absolutely no cost to you. When you shop through the links below, I receive a small commission from the companies.  These commissions help me cover the costs of my blog and other expenses, which allows me to continue to provide you with FREE inspiration along with detailed Tips and Techniques provided for every project. Thank you so much for your love and support!

Amazing Paper Grace Sets:

Paper:

Ink:

Mixed Media:
  • Prima - Finnabair - Soft Matte Gel

Embellishments:
  • Little Birdie Crafts - Shabby Chic Flowers: Wendy; Nancy; Bonita; Julita: Micro Roses
  • Prima - My Sweet Butterfly Lace
  • US ArtQuest - Mini Prills: Mint To Be; Minnie Pearls

Adhesives:

Tools:

Thank so much for stopping by to view this warm summery card.
I hope you've been inspired.

Monday, October 31, 2022

Bright Wishes Christmas Card for Amazing Paper Grace

 
Welcome to my creative space!

Christmas is such a heartwarming time of the year and this candlelit lantern in the Amazing Paper Grace Holiday Label Motifs die set represents this feeling so perfectly. Don't you just adore how the beautiful label looks like rays of warm candlelight radiating from the flame? The gorgeous poinsettias and foliage dies are included in this fabulous set.

Be sure to scroll down through my Tips and Techniques section for close-ups and all the details on how to create this cozy Christmas card.

If you would like to see more Christmas and cardmaking inspiration, please visit my Scrapbook.com gallery HERE.

Thank you Amazing Paper Grace for providing the dies used in this project.

13 dies are included in the Holiday Label Motifs Set.

Tips and Techniques
I selected Christmas paper from my stash to diecut for this card. The warm yellow gold is perfect to represent rays of light coming from the candle. It's paired with gorgeous teal to create the label design that pops against the light text background which is cut to 3 5/8 by 5 5/8 inches. A piece of pattered teal is cut slightly larger than the background to create the frame which is 4 x 6 inches. 

These gorgeous poinsettias are cut from a warm dark red and inked with Ground Espresso Distress Ink before shaping. Once shaped, I adhered two layers together offsetting the petals. The centers are filled with Third Place Prills for berries. 

***Tip*** I enjoy keeping my hands busy if I watch a bit of television in the evening, so cut and ink my petals in my studio, then shape and put them together while watching a show.

The holly leaves and foliage are cut from green patterned paper and inked with forrest moss. The foliage pieces are left flat. 

Texture is added by brushing soft gel medium over the foliage below the poinesttia blossoms and sprinkling on more of the prills and champagne colored chunky glass glitter. 

This gorgeous lantern is cut from black Metallic Kraft-stock and lightly dry brushed with Finnabair Vintage Gold Metallique Wax for a vintage feel.

The candle flame is cut from the same warm yellow paper then brushed with clear Wink of Stella to give a flickering effect. 

Inking paper edges gives a soft vintage shabby chic feel, so the yellow paper is inked with fossilized Amber and Rust Hinge, the teal with Ground Espresso, and the light text paper with Hickory Smoke. 

The sweet sentiment is from the Seasonal Motif Sentiments stamp set (STP-150) and stamped with Evergreen Bough Distress Archival Ink. I hand cut the sentiment. 

***Tip*** I attempted to stamp the sentiment directly to the light script background paper, but it wasn't quite straight. If this happens to you, there's no need to start over, simply stamp the sentiment onto a coordinating paper and adhere it over the "mistake."

How is your holiday card making coming along? I hope you've been inspired to create a homey Christmas card for someone special. 

Below you can find the products I used to create this project including some with compensated affiliate links to Scrapbook.com and Spellbinders. These links are at absolutely no cost to you. When you shop through the links below, I receive a small commission from the companies.  These commissions help me cover the costs of my blog and other expenses, which allows me to continue to provide you with FREE inspiration along with detailed Tips and Techniques provided for every project. Thank you so much for your love and support!

Amazing Paper Grace
Paper:

Ink:

Mixed Media:

Embellishments:
  • US Artiest - Mini Prills - Third Place
  • Stampendous - Chunky Glass Glitter - Champagne

Adhesives:

Tools:

Thanks so much for stopping by to view my card. I hope you've been inspired.

Monday, October 10, 2022

Sugarplum Tweets Merry Christmas Card for Amazing Paper Grace

Welcome to my creative space!

Who knew these darling birds from the sweet Amazing Paper Grace Sugarplum Tweets die set (S4-1244) could be the centerpiece of a shabby chic card? As I was going through my stash of Christmas paper I realized the design here would be a perfect backdrop for these sweet birds on a slimline card. What do you think?

The beautiful poinsettias were extras I created for this month's 3D Poinsettia Surprise Envelope (DOMAPG-OCT22). I had this card all ready to put together except for the flowers when I realized that these extras were a perfect match. Don't you just adore when everything comes together like that? The adorable hat is embossed with the Holly Flourish Embossing Folder (SES-146) and the glittering snowflakes are from the Winter Label Motifs (S4-1240) set.

Be sure to scroll down through the tips and techniques section below for close-ups and all the details on how to create this card.

Thank you Amazing Paper Grace for providing the dies used in this project.

Tips and Techniques
This darling bird is cut from 49 and Market papers with the Sugar Plum Tweets die set (S4-1244) from the Christmas Flourish Collection. I assembled the body, wings, and tail, then inked the edges with Pumice Stone and Gathered Twigs Distress ink before assembling these pieces together. The bird is popped up with foam squares for dimension over the flourish which is also inked with Gathered Twigs ink. 

The poinsettia is die cut using the flower dies from the 3D Poinsettia Surprise Envelope (DOMAPG-OCT22) die set. The edges of the petals are inked with Speckled Egg Distress Ink and the leaves with Peeled Paint. Prills are added to the holes in center of the blossoms to resemble berries. The tiny rose is a bought flower from my stash and the white blossom was spritzed with Salvaged Patina and Speckled Egg Distress Spray Stains to color it. The poinsettia is also popped up on a foam square while the rose is adhered directly to the paper and nestled next to the poinsettia.

Here's the other bird from the Sugarplum Tweets set amongst more of the flowers. The hat is die cut from cream paper embossed with the Holly Flourish Embossing Folder (SES-146) then inked to highlight the texture.

The sparkling snowflakes are cut from silver glitter paper using dies from the Winter Label Motifs set (S4-1240).

Shimmering, snowy texture is added beneath each of the bird clusters using Stampendous Shaved Ice adhered with soft gel medium.

The sentiment was part of the patterned paper collection used for the background. I also added a piece of washi tape above it to repeat the Merry Christmas wishes. The paper sentiment block is popped up with foam tape and holly leaves from the Sugar Plum Tweets set are tucked in around it. 

The focal background paper is cut to just under slimline size and the frame piece is cut from coordinating teal patterned paper to slimline size. The edges of both papers are inked to add to the shabby vintage feel.

Below you can find the products I used to create this project including some with compensated affiliate links to Scrapbook.com and Spellbinders. These links are at absolutely no cost to you. When you shop through the links below, I receive a small commission from the companies.  These commissions help me cover the costs of my blog and other expenses, which allows me to continue to provide you with FREE inspiration along with detailed Tips and Techniques provided for every project. Thank you so much for your love and support!

Amazing Paper Grace:

Paper:

Ink:

Embellishments:
  • Stampendous - Fran-tage - Shaved Ice 
  • US Artiest - Mini Prills - Pine by Me
  • Stash - Small White Roses
  • Stash - Washi Tape - Merry Christmas

Adhesives:

Tools:
Thanks so much for stopping by to view my card. I hope you've been inspired.

Monday, October 3, 2022

Amazing Paper Grace October 2022 Die of the Month: 3D Poinsettia Surprise Envelope

 
Welcome to my creative space!

When I think of Christmas flowers, poinsettias are the first thing that comes to mind. This fabulous Amazing Paper Grace October Die of the Month: 3D Poinsettia Surprise Envelope celebrates these blossoms with this fabulous 3D envelope box to fill with gorgeous Christmas poinsettias. 

What do you think of these non-traditional teals used for the envelope accented with purple and teal poinsettias to create this sweet card and coordinating gift card holder?

For lots of close-ups and to learn all the details on how to create this beautiful ensemble, including how to form and shade these gorgeous blossoms, be sure to scroll down through the Tips and Techniques section below.

Many thanks to Amazing Paper Grace for providing the dies used in this project!

There are 22 cutting dies included in the 3D Poinsettia Surprise Envelope.

3D Poinsettia Envelope

Gift Card Holder

Tips and Techniques
The poinsettia dies in this set create perfectly beautiful blossoms. There are three sizes of petals that can be combined in any configuration to give a variety of flower sizes that can be paired with two different sizes of leaves that come in sets of two leaves cut individually (One die that cuts two of the same size leaf.) Most of my blossoms combine two large petal sections with one small petal section or two medium sections paired with one small section. There are a couple that use a large, medium, and small section. 

The first thing I did after cutting them out of beautiful 49 and Market papers, is to ink the edges in coordinating Distress Inks using a small toothbrush style applicator brush. Once inked, I cupped each petal from the back using a stylus, then turned them over and used a small stylus to cup just the end of each petal so it turned upward, then pressed down on the center of the petal section to finish forming to give each petal section a beautiful organic shape.

The green leaves are colored and shaped the same way, but of course since they are cut individually, the last step is not needed. 

The center berry section of each blossom is cut from dark teal patterned paper. I didn't want the white core of the paper to show, so used a coordinating dark teal green marker to edge the die cut berry sections. This step would be optional if you use a solid core paper, or don't mind the white edges showing. I placed them on a foam pad with the teal side up and cupped them with a stylus.

To put them together, I adhered the three petal sections together, offsetting each section. Poinsettias petals are not evenly offset in nature, so if you look at my blossoms, you'll see that they are not even either to get that organic feel of a natural poinsettia blossom. I assembled all the blossoms, then went back and glued two leaves to the back of each one. Once that was done, I adhered the berry section to each flower. 

I wanted to add berries so filled each hole with a prill using lighter teal prills on the lighter colored blossoms, and darker teal prills on the purple blossoms. I have a needle tip glue bottle filled with Distress Collage medium that I used to add a drop of adhesive to each hole, then used tweezers to drop a prill into each hole. This takes extra time, but I think the results are definitely worth the effort. 

This merry Christmas sentiment is cut in the same teal patterned paper as the background and lighter poinsettias, then backed with the purple used for the blossoms. 

It just happened that the paper I used had sweet little stamps printed across the bottom. I couldn't resist using one of them on the corner of my envelope. The darling French horn charm is from my stash, but any little Christmas charm would look darling here.

This shot is taken from an angle so you can see the layers of dimension a little better. This envelope is a 3D box with two inserts that allow you to adhere the blossoms at different levels. To increase the dimension even more, I adhered some of the blossoms with foam squares and for some of the blossoms, I even layered two foam squares to give the flowers more height. 

Because I used the foam tape, this card does not slide over to be put into an envelope, so will need a box or gift bag to give it to the recipient. If you do not use the foam tape, this 3D envelope slides over beautifully to tuck into an envelope.

The beautiful scrolled pieces are cut from metallic purple paper to catch the light and add a bit of glimmering bling. The tiny berries centered on the holy design on the envelope are also cut from this metallic paper. 

For those of you who have this fabulous die set, you might be wondering where that metallic curl above the sentiment came from? It's one of the discarded pieces left when cutting the scrolls. I just couldn't resist tucking it in here. 

The base of this box and the gift card envelope are cut from a dark teal cardstock. Before adding the inserts, I inked all the edges with distress ink.

The scrolled holly envelope inserts are cut from dark teal patterned paper and backed with the lighter teal which is actually the back of the dark teal paper. One 12 x 12 inch sheet was perfect to cut all the inserts and poinsettias used for the envelope and gift card. 

The inserts are adhered to the backgrounds then adhered to the envelope before assembling the envelope following the instructions with the die set. 

The sentiment was adhered first so I was sure to make room for it when added the flowers 

I laid out the flowers and scrolls to know where I wanted to place them, then adhered the scrolls first, then the blossoms. 

This envelope is actually the perfect size for a gift card, so I trimmed off the side edges leaving about 1/4 inch margin on each panel to adhere them together.

The die cut holly panels are glued together then adhered to the envelope before assembling. I scored the envelope flap about 1/16 " from the fold line on the inside towards the triangular flap to help it lay flat since the dimension of the envelope would keep it from closing. 

I cut a length of 1/8 inch wide red line tape the width of the envelope and adhered it to the back bottom of the front piece leaving the liner on the tape. Adhere the side flaps with a strong liquid glue. This lets you line everything up perfectly. Once dry, remove the backing on the red line tape, and the bottom is secure for adding your gift card. One of the metal scroll pieces is cut in half and tucked behind the two poinsettias that were left from making the 3D envelope. 

Now you have a perfectly coordinated and gorgeous 3D Christmas card and gift card envelope.

Below you can find the products I used to create this project including some with compensated affiliate links to Scrapbook.com and Spellbinders. These links are at absolutely no cost to you. When you shop through the links below, I receive a small commission from the companies.  These commissions help me cover the costs of my blog and other expenses, which allows me to continue to provide you with FREE inspiration along with detailed Tips and Techniques provided for every project. Thank you so much for your love and support!

Amazing Paper Grace Sets:

Paper:

Ink:

Mixed Media:

Embellishments:
  • US Artiest - Mini Drills - Pine by Me
  • Stash - French Horn Charm

Adhesives:

Tools:

The Amazing Paper Grace Die of the Month is available exclusively at Spellbinders Paper Arts during October 2022, 3D Poinsettia Surprise Envelope along with other membership perks.

View this month’s Amazing Paper Grace Die of the Month!

Thanks so much for stopping by to view this sweet Christmas ensemble. I hope you've been inspired.