Wednesday, June 19, 2013

"Bree" details for ScrapThat!

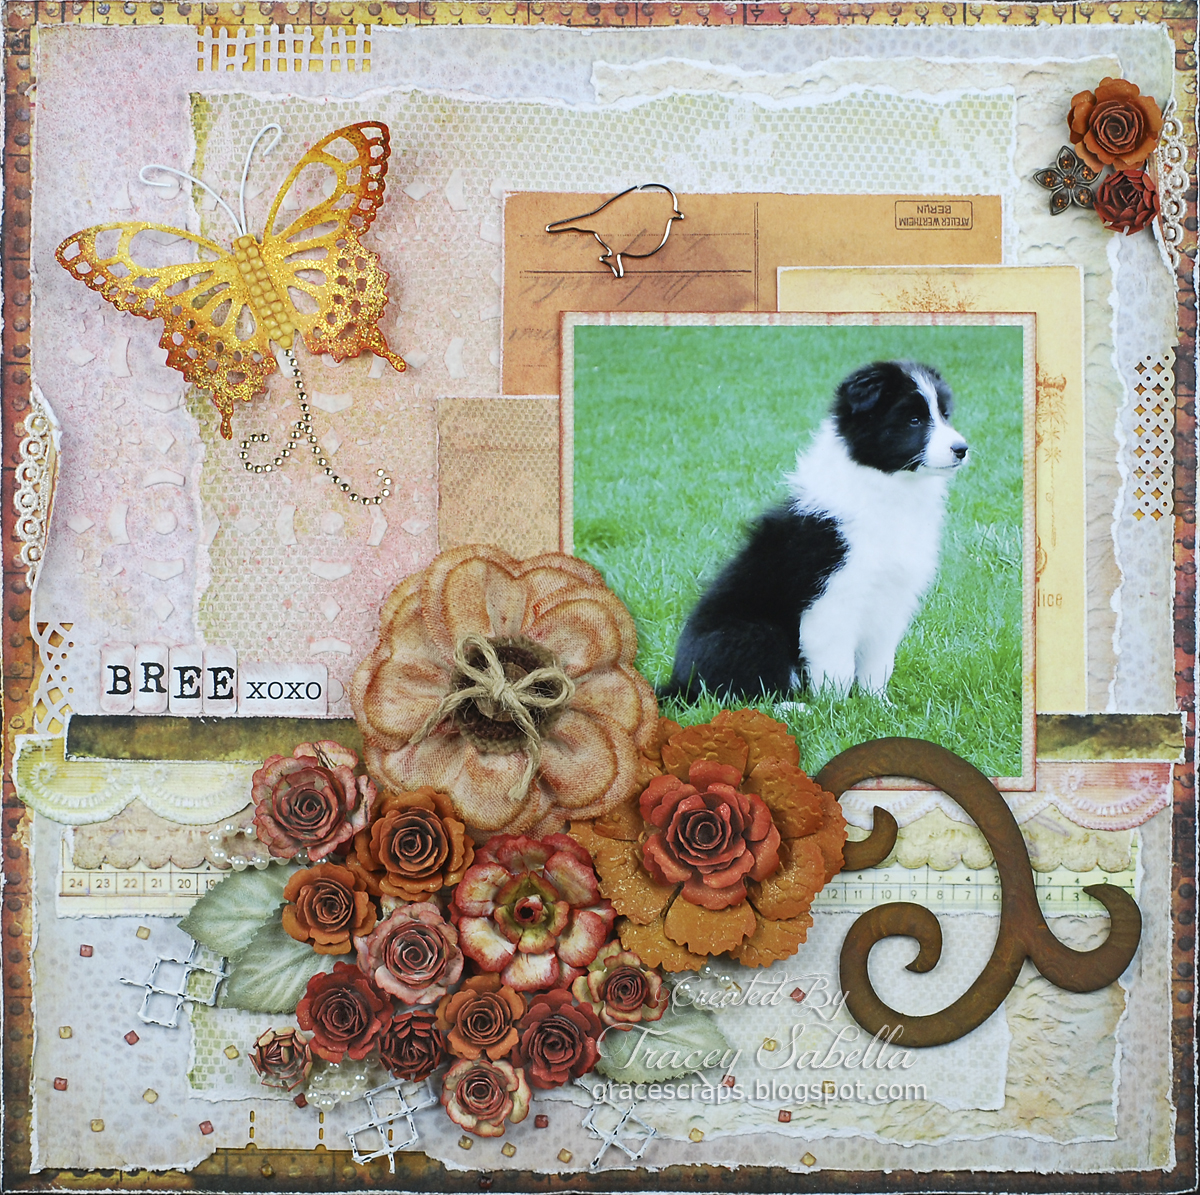
When we moved back to Ohio in 2000, dogs became an important part of our lives. My brother gave Grace 15 month old Ellie, a German shepherd/Belgian malinois mix so that she could take part in his 4-H dog club. After years of work and training, they ended up becoming one of the top United Kennel Club obedience teams in the country. Ellie is no longer with us, and it's time for a new dog. Bree is her new border collie pup. Isn't she adorable?? 

This page was created with the ScrapThat! June Kit using the Main Kit only and Amy's inspiring sketch. 

"Bree"
MK Only
Amy's June Sketch:

Stop by the ScrapThat! Forum to add your sketch based layout to Amy's Sketch Challenge.

Tips and Techniques:

Altered Canvas Flower ~ The Prima Canvas Flower from the MK was inked and a jute bow tied through the button. 

Handcrafted flowers ~ I created a bevy of flowers from kit paper and cardstock using Tattered Florals  dies and Donna Salazar's Grand Peony and Bitty Blossoms dies. I also did some embossing, inking, and spritzing to add texture, dimension, and sparkle. 

Leaves ~ I painted the kit flowers with a gesso wash to soften, but still let some of the green show. 

Black Mesh ~ Oh my, I just adore this black mesh!! I just snipped several strips, painted with gesso and when dry scratched off some of the paint to distress. 

Gems ~ The Prima Sunrise Sunset crystal sheet is one solid sheet of crystals, but I pulled some of them apart and scattered them below the cluster. 

Border Punching ~ I used several border punches to punch random places into the edges. 


More of my Bitty Blossoms flowers here with a bejeweled flower trinket from my stash. I also tucked some bits of lace into the distressed edges. 


Handcrafted Butterfly ~ I used Donna Salazar's Wonderful Wings Dies to cut this butterfly from kit paper, and pulled more gems to arrange for the body. The antenna are wires cut from the MK flowers, painted white, and bent to shape. I inked the wing edges and brushed with stickles. Just a snippet of a crystal flourish from my stash for the trail. 

Mixed Media ~ I used molding paste to stencil this background and once dry misted. I wiped the mist off of the molding paste to make it pop. 


Vintage Rusted Ironwork Chipboard ~ My tutorial can be found here

Fussy Cutting ~ I fussy cut lace strips from kit paper for the border strips below the photo. 

Distressed Edges ~ I used a mix of torn edges and my DSD Distrezz-It-All. 

We have 4 Design team challenges going on this month
in addition to our Sketch Challenge:


The ScrapThat! June kit is available in our store.

Follow on Bloglovin

Thanks for stopping by! I treasure your comments.

~ Blessings ~

Tuesday, June 18, 2013

"Abby" details for ScrapThat!

My parents' home is on a small lake and is a family gathering place. This fun photo is my niece showing off her dirty hands from her afternoon of fishing. As you can see by her captivating smile, she enjoys fishing!  I used the fabulous ScrapThat! June Kit featuring the Prima Sunrise Sunset Collection and pulled the blues from the lake to accent the page.

"Abby"
MK, EAO, FAO

I used the Dusty Attic May sketch for inspiration:

Tips and Techniques:

Zipper Flower ~ Isn't this Prima zipper flower from the Flower Add-On Kit just gorgeous.

Altered Flowers ~ I altered FAO Kit flowers to coordinate with this LO and to bring in the blues of the lake. The Petaloo mulberry paper flowers were brushed with teal and blue mists. The larger paper Petaloo flower was painted with Lumiere paints, while I highlighted the MK tissue paper flower and carnation with a touch of rust ink. 

Handcrafted flowers ~ The rust color flowers were created using kit cardstock. For the larger one ~ the outer petals are cut with Donna Salazar's Grand Peony Spellbinder dies then embossed with a brocade embossing folder and topped with a Donna Salazar Bitty Blossoms Spellbinder rolled flower. The smaller flowers are also cut with the Bitty Blossoms dies.


Twine Flowers ~ I used jute string and bamboo cording from Really Reasonable Ribbon to create the twine flowers and added EAO Kit buttons and gems for centers. My tutorial for the twine flowers can be found here

Stenciling ~ I added copper paint to ceramic stucco medium and used a stencil to add the quarter round floral design. 

Painted Chipboard ~ I used Lumiere metallic and pearlized paints on the Dusty Attic chipboard from my stash and inked the stems and leaf edges with a darker green.


Alcohol Inked Butterflies ~ You can just see the edge of the wings here, but these sweet Maya Road metal butterflies are in the EAO Kit. It is so easy to dab alcohol ink onto nonporous embellies to change up the color. 

Altered Kit Flowers ~ You can really see how I transformed these pale lavender flowers to teal/blue. To get the shaded blue accents, I spritzed some mist on my craft mat and used a paint brush to add the darker blue on just one side of each petal. 


Distressing ~ You know how much I enjoy using my Donna Salazar Distrezz-It-All to make fast work of these wonderful distressed edges. 


Layered Doilies ~ I inked the Main Kit doilies and die cut another using Spellbinders Ironwork Accents and layered them at the photo's corner to add a sunny day accent to the blues of the photo. 


Clip ~ The Idea-ology hinge clip from the MK is such a fun accent here. 


Painted Mesh ~ I just adore the black mesh included in the Main Kit. I used it on all of my pages. I painted it then scratched off bits of the paint to expose the black for a grungy look.

Corrugated Board ~ This corrugated photo mat was created with cardboard from a shipping box. I pulled the top layer off, roughly tore to size and painted with gesso. I then inked with blue and sprinkled on clear embossing powder to give the feel of the watery blue from the lake. 

Vintage Map Page ~ During my days of home educating, I collected scores of old (now outdated) books including one with gorgeous color maps which has now moved into my scrapbooking stash. I used a snippet under the photo. 


Title ~ The Prima Sunrise Sunset has to be my favorite Alpha set!! I love all the different shapes and sizes of little letters including these typeset letters used for my title.


The June Kit and Add-ons are currently available in the ScrapThat! Store.

Thanks for stopping by! I treasure your comments.

~ Blessings ~

Follow on Bloglovin

Thursday, June 13, 2013

Mixed Media Card for the Really Reasonable Ribbon June Blog Hop

Good morning and welcome to the Really Reasonable Ribbon June Blog Hop.


If you've just been inspired by Jeannie's fabulous work, you are in the right place. If not, you can join us for some summer inspiration with the gorgeous June RRR Ribbon Club Assortment by hopping on over to the RRR Blog to start at the beginning. There you will find all the blog hop and prize details.


Just look at the gorgeous ribbons in this month's RRR Ribbon Club Assortment! These sizzling summer colors are perfect to create projects for nearly any occasion. I've used them a little differently and will show how you can grunge up these ribbons to use in mixed media projects. First I'll share this birthday card I made for my sister followed by a wedding layout created earlier this month for Scrapping Everyday Miracles

Misted Floral Birthday Card

Tips and Techniques:

Grunged Ribbon ~ The green satin ribbon in the assortment is gorgeous, but not quite the look I was going for with this card, so I used several shades of glimmer mist to darken the color. I deliberately dabbed the ribbon into the excess mist on my craft mat so it would be mottled and distressed. I then dried it with my heat tool. Actually I overheated it, until it pulled and puckered adding another grungy element to my ribbon. Be aware that this does shrink the ribbon. I used an entire yard of ribbon and only had about a 5 to 6 inch piece left after tying this double loop bow. (Yep, it's in my stash to be used on a future project!!) For Ginny's double loop bow tutorial go here

Mixed Media Background ~ I spritzed and dripped several colors of mists and water, over this flower which was stenciled with white opaque flakes using a Prima stencil to create this lovely mixed media background. The base of this background is 140lb water color paper.

Sparkle ~ I dabbed the edges with Glue Gloss and sprinkled on Donna Salazar's Pralines and Cream Fairy Dust Glitter. It is so iridescent and sparkly. 

Distressing ~ done of course with my Donna Salazar Distrezz-It-All

~ ~ ~ ~ ~ ~ ~

The June RRR Club Assortment is so versatile and I also used the lighter blue satin with metallic silver edges for this wedding layout. 

"Love"


You might be asking yourself, "I don't see the blue ribbon here?" That's because I misted the ribbon to coordinate with my page. I first wove the ribbon into this beautiful plaited piece, then misted with teals and bronze mists. Don't you love how the silver metallic edges resist the mist and shimmer as they capture the light? I used the entire 2 yard length to create this piece, and it was well worth it for this dramatic sweeping ribbon braid across my page to anchor the banner. The video tutorial I used to learn this ribbon weaving technique by Christina Griffiths can be located here.

For close-ups and details of this layout please stop by my blog post

I hope you've been inspired to grab your June RRR Ribbon Club Assortment and start creating!

Your next stop on the RRR June Blog hop will take you to 
to some amazing inspiration from Cheryl

Thank you for following me and letting me know what you think of my projects!

Thanks for stopping by! I treasure your comments.

  ~ Blessings ~

Tuesday, June 11, 2013

Beautiful Giveaway to Share

I have a sweet on-line friend, Pam Ellis, who is having a Pay It Forward Giveaway. Just look at the amazing products she has collected to share. I hope you will hop over to Pam's blog, Lillybean, to check out the details and become a follower. Her work is gorgeous, and you will be blessed. 


~ Blessings ~

Monday, June 10, 2013

Girly Birthday Card for Really Reasonable Ribbon

June is a big month for birthday's in our family. I created this girly card for my niece featuring gorgeous Hand-dyed Silk and White Metallic String from the Really Reasonable Ribbon Store. Every girl loves glitter, butterflies and of course a pretty bow. 


Really Reasonable Ribbon Products


Tips and Techniques:

Wrapped Ribbon ~ This hand-dyed silk Bonnie carries in the RRR Store is just gorgeous and comes in a wide variety of colors. I wrapped it around the front of the card, then wrapped Iridescent Metallic White String over top, crossing as I wrapped, then finished by tying the string into a bow. This string is so sparkly and gorgeous. I've already had to order more!! 

Fussy Cutting ~ I fussy cut two flowers from the patterned paper and then cut in towards the center all around creating a fringe effect and layered the smaller flower over the larger. I also fussy cut the stem and leaves. 

Pearl Accents ~ . . . added for some girly bling. 


I also fussy cut the floral spray and this glittered butterfly. The silk ribbon and embellishments are adhered with Scor-Tape

I hope you are enjoying your summer and have time to create!!

I've entered this at:
Word Art Wednesday

Thanks for stopping by! I treasure your comments.

~ Blessings ~

Thursday, June 6, 2013

Vintage Rusted Ironwork Chipboard Tutorial

Summer is upon us with warmer days. I have a tutorial to share with you today for this rusted vintage ironwork chipboard created for my "Bree" layout featuring the ScrapThat! "From Sunrise to Sunset" June Kit and our daughter's new pup. 

Vintage Rusted Ironwork Chipboard Tutorial


This technique is quite easy and adds so much texture to a chipboard piece. There is some waiting time in the middle, so it's something you can start, put to the side and come back to later. 

Supply List:
Chipboard Piece (ScrapThat! May Kit)
Embossing Folder (Darice - Henna)
Die Cutting Machine (Big Shot)
Sophisticated Finishes Iron Metallic Surfacer
Sophisticated Finishes Rust Antiquing Solution
(Sophisticated Finishes products were purchased at Michaels)

Step 1. Select an embossing folder with a design that coordinates well with your project and run your chipboard flourish through your Big Shot or other die cut/embossing machine.


Step 2. Paint top of embossed chipboard with two coats of Sophisicated Finishes Iron Metallic Surfacer, allowing to dry between coats - about 30 minutes.


Step 3. Apply Sophisticated Finish Rust Antiquing Solution to dry chipboard. Allow 4 to 6 hours for the rust to develop. After the rust has fully developed, you can apply an additional coat or two of Rust Antiquing Solution for a deeper rust color if desired. I used three coats all together. 


Tip ~ This solution is corrosive to metals, so use an old paintbrush or foam brush than can be thrown away if needed.

I hope you'll try out this technique. Please let me know, and I'll stop by to see your project. 


Thanks for stopping by! I treasure your comments.

~ Blessings ~

Wednesday, June 5, 2013

Two Featured Publications in the June Issue of Scrapbooking.com Magazine

It is such a delight when my work gets published, and I'm so excited to share that two of my pages were selected as feature articles at Scrapbooking.com Magazine for their June Issue. I hope you'll head over there and take a look at all their amazing June projects.


You will find my projects featured for these categories:

"Summer Memories" featuring a photo of the Atlantic Ocean taken during the trip Gary and I took last summer for our 30th anniversary.

"Adventure" featuring a photo of our three beautiful dogs. 

Both projects are featured in the "Letter from the Editor Video"

You will also find my projects featured on the Scrapbooking.com Magazine Facebook Fan Club Page. Be sure to "Like" them when you stop by. 

I am always so humbled, amazed, and honored when my work is selected for publication. Many thanks to Stefan Harlan and the wonderful staff at Scrapbooking.com Magazine for featuring my work. 


Thanks for stopping by! I treasure your comments.

~ Blessings ~

Monday, June 3, 2013

Love ~ for the SEM June Challenge and Blue Fern June Sketch

June is traditionally the month for many weddings, and Love is in the air at Scrapping Everyday Miracles.

"Your challenge this month is to scrap about a husband and wife relationship and the love you see/experience because of it.  The scrap twist is that you can only use cardstock, NO PATTERNED PAPER!"

Go here for the challenge details and to link up your project. 

Our talented Jessica Shurts created this month's challenge, and I'll be sharing more about her thoughts on this challenge later in this post.

Marriage is a sacred covenant. Gary and I have been so blessed to see two of our children enter into relationships with Christ at the center. This photo of Elizabeth and Andrew praying during their marriage ceremony show their love for their Lord as well as for each other. It is our prayer for them that this trio of love will last a lifetime.

"Love"

I was inspired by the Blue Fern Studios June Sketch:

Tips and Techniques:

Chipboard Lock ~ I used several shades of Donna Salazar's Mix'd Media Inx on this gorgeous Blue Fern vintage lock piece. I added this vintage skeleton key from my stash and just adore the real patina and rust. 

Mixed Media Background ~ I used several layers of mist, several stencils, Mixed Media Inx, embossing powder, and crackle medium to create my background. The mat was white cardstock I misted and scrunched. I must admit, this cardstock only twist was a challenge for me, since I love my shabby chic patterned papers. Don't be afraid though - give making your own patterns a try!! Speaking of patterns ~ the "patterned" paper for the banners was more white cardstock I stamped, misted, and inked.


Woven Ribbon ~ I found this fabulous video tutorial by Christina Griffiths demonstrating how to create this wonderful woven ribbon piece. I used one of the ribbons from the June Ribbon Club Assortment at Really Reasonable Ribbon. The light blue color wasn't quite right for this page, so I misted it with several shades of mists to achieve this grungy aqua color. I love how the shimmery silver border resisted the mist.

Flowers ~ I pulled together flowers from a variety of manufactures for this page and misted the large Prima focal flower to tone down the bright yellow.

Butterflies ~ The two layered butterflies started out as one chipboard piece from the Blue Fern Studios Icon Set. I soaked it in water and it fell apart into two pieces giving me two butterflies to work with. I then soaked them more and pried the wing layers apart. I misted and they dried with beautiful shimmer and lovely dimension.


Bird Chippie ~ Isn't this little perched bird from the Blue Fern Icon Set so adorable? The perch is a piece of chipboard scrap I cut with my Spellbinders Iron Works Accents Dies. I ran it through my Big Shot several times to get a complete cut. I spread some blended fiber medium across the piece and once dry misted and inked it.


Title ~ More layered Mix'd Media CHOX Inx to color this Blue Fern chipboard title.

Punch Work ~ I randomly punched the distressed edges of my page.

Distressing ~ Of course with my DSD Distrezz-It-All by Zutter.

Here is what Jessica has to say about her challenge:

First, a little about me. My husband and I have been married for 9 years and we have 4 children, ages 6, 4, 2 1/2, and 5 months. I started scrapping when I was in high school and have been doing it ever since. I have been Catholic all of my life and have really come to understand and love my faith and God as an adult.

Since June is one of the most popular months to get married (my husband and my anniversary is the 19th), I decided to do a challenge on love. Your challenge this month is to scrap about a husband and wife relationship and the love you see/experience because of it.  The scrap twist is that you can only use cardstock, NO PATTERNED PAPER! The couple you choose can be you and your spouse, your parents, grandparents, or any other couple whose love for one another inspires you.

The bible has so much to say about love and marriage.  It starts at the beginning, in Genesis, when God creates Man and Woman:

Then the LORD God made a woman from the rib he had taken out of the man, and he brought her to the man.  The man said, "This is now bone of my bones and flesh of my flesh; she shall be called 'woman, ' for she was taken out of man."  For this reason a man will leave his father and mother and be united to his wife, and they will become one flesh.  Gn 2:22-24

These verses are revisited by Jesus in both Mark (10:6-9) and Matthew:

"Haven't you read," he replied, "that at the beginning the Creator 'made them male and female,'  and said, 'For this reason a man will leave his father and mother and be united to his wife, and the two will become one flesh' ?  So they are no longer two, but one. Therefore what God has joined together, let man not separate."  Mt 19:4-6

And then, of course, there is the description of love:

Love is patient, love is kind. It does not envy, it does not boast, it is not proud. It is not rude, it is not self-seeking, it is not easily angered, it keeps no record of wrongs. Love does not delight in evil but rejoices with the truth. It always protects, always trusts, always hopes, always perseveres. Love never fails. 

Our Scrapping Everyday Miracles sponsor this month is Citrus Twist.

Citrus Twist Kits grew out of one girl’s love of all things crafty, with just a little love of vintage thrown in. Here is the story: My mom and I shared a love of the art world. I grew up tagging along to Art in the Park shows, quilting fairs and more. Early in 2012 my mom passed away and as I was going through her lifetime of art and crafts supplies, the idea for Citrus Twist Kits was born. It was the vintage scraps that inspired the handcrafted item that goes into each main kit.
Citrus Twist Kits are color-based, inspired and great value for your money. A box arrives on your doorstep each month filled with scrapbooking gifts to keep you playing all month long. LINK: 

Trina has provided us not one, but TWO prizes to give away this month!
The first is the May Project Life Kit:

The second is the April main kit:

Awesome, right?!  You can win one of these fabulous kits by linking your project(s) to one of our June challenges. 

Subscriber special, for our site members, June only: Free alphabet set with 3- or 6-month sub. You will need to mention in the comments box at checkout that you are a member of our site and want the promo that will ship with your first kit.

You may submit the project you create for Scrapping Everyday Miracles to other challenge blogs but your project must be mainly created for the Scrapping Everyday Miracles challenge in order to win the sponsor prize and/or be one of Top 3** All entries must be linked by June 30th, 11:59pm PST. Make sure your link is to the blog post with your project & not just your blog in general...and be sure to remember the SCRAP TWIST!

Stop by the Scrapping EveryDay Miracles Blog to link up your special marriage layout.

I have entered this layout at:
Blue Fern Studios June Sketch Challenge: I've used Icon Set One, a vintage lock, and my love title from the Valentine Word Set.
Word Art Wednesday Challenge #82 Anything goes or Proverbs 14:26

Thanks for following me on Bloglovin:

Follow on Bloglovin

Thanks for stopping by! I treasure your comments.

~ Blessings ~

Saturday, June 1, 2013

"Men in Black" ~ Really Reasonable June 1 Challenge

If you are here for the ScrapThat! June Kit
Reveal and Blog Hop, please go here.

I enjoy creating grungy masculine pages, and the Really Reasonable Ribbon Challenge #73 gave me the opportunity to put one together. I just adore this photo of Andrew and his groomsmen enjoying those last final moments before the wedding. 

I ordered some of my favorite masculine jutes and burlaps from the
RRR store and the quality is so wonderful! 


To enter this challenge, create a card, layout, or any handcrafted project. Just be sure to follow the theme and use ribbon, lace, or trim somewhere on your project.

"Men in Black"


Really Reasonable Ribbon Products:

I'm also featuring some Donna Salazar Products on this layout which I will list at the end of my post. Donna's Girly Grunge style (emphasis on grunge) is just perfect for a masculine page. 

Tips and Techniques:

Jute Twine Flowers ~ I used Jute String to create the twine flowers and my tutorial can be viewed here.  I selected buttons from the Natural Button Grab Bag for my flower centers sized so that you can still see the woven stitching. Of course I tied the buttons with some of the Jute String

Rolled Burlap Flower ~ I used the Burlap Woven Ribbon to create the smaller burlap flower and some vintage washers and a screw for the center.

Chipboard Flourishes ~ I painted Donna Salazar's card size Hand Drawn Swirls chipboard, then stamped with her "Dear Sir" Stamp and edged with Chox Mix'd Media Inx. 

Textured Flower Background ~ I cut flower petal sections from black card stock using Donna Salazar's Grand Peony Dies just larger than each of the jute/burlap flowers. I then dry embossed using the Tim Holtz Burlap embossing folder. I rubbed the raised portion with a little Faber-Castell Gold Gelato. 

Textured Leaves ~ The leaves are also cut from black cardstock using the Grand Peony leaf dies. I hand creased the leaves where the natural veining would be and colored by dry rubbing with Gelatos. 

Stenciling ~ I used Donna's new Midnight Chox Inx over the TCW Diamond Stencil for a fabulous masculine design over the bricked background. 


Woven Gears ~ My friend, Mandy, gave me these vintage gears and machined pieces that her grandfather had stashed in his basement. I wove them together using Black Grosgrain Ribbon. Aren't they a delightful touch? I cut pieces of Score-Tape to adhere this piece to the page. This strong yet thin tape is perfect to adhere anything from delicate ribbon to heavier metal pieces. 

Layers ~ I love how the photo was taken at an angle. I turned it so the guys are straight and the photo angled. I layered lots of textured pieces at more angles under the photo - More embossed and Gelato'd card stock, grunged DSD Corrugated board, and this delightful Jute Ribbon


Gears ~ I used a mix of metal and die cut gears to tuck into the edges of my page and around the cluster. I die cut and embossed black card stock with Donna's Sprightly Sprockets dies and rubbed gold Viva Ink Gold to give the grungy metallic sheen. 

Distressing ~ I used the DSD Distrezz-It-All for all my distressing.


Arrows ~ I mixed black paint into Liquitex Blended Fibers and used Donna's new Want2Scrap Large Arrow Stencil to create these arrows.

You can see more of the grungy layers here and how gorgeous the Jute Ribbon is in the mix. 

Bonnie's natural fiber burlap and jute really take the show on this page. I hope you've been inspired to join us in creating a masculine project for Really Reasonable Ribbon Challenge #73


Be sure to check out the RRR Blog for all the details and prize information.

Donna Salazar Products Used:
Antiquities ~ Steampunk Gentleman; Tags Ribbons, and Mosaics by GCD 
13x13 Corrugated Board by Zutter
Hand Drawn Swirls Chipboard by Want2Scrap
Mix'd Media Inx ~ Truffle by Clearsnap
Mix'd Media Inx Chox ~ Sparrow, Midnight by Clearsnap
8x10 Large Arrows Stencil by Want2Scrap
Dear Sir Stamp by Art Gone Wild
Grand Peony Dies by Spellbinders
Sprightly Sprockets Dies by Spellbinders
Distrezz-It-All by Zutter

Other Products Used:
Black Cardstock
Basic Grey Alphabet Stickers ~ Lime Rickey
Kaisercraft Fonza Alphabet ~ Chocolate
Vintage washers, screw, and machined pieces
Tim Holtz - Mini Paper Clip
Spare Parts - Arrow Photo Turn
Bead Landing Found Parts ~ Gears
Bead Landing Bezels, Frames and Filigree ~ Gears
7Gypsies Vintage Clip ~ Antique Silver
Faber-Castell Gelatos ~ Pistachio, Gold, Black
Tattered Angels Glimmer Mist ~ Cork
Heidi Swapp Color Shine ~ Bronzer
Art@ Gltter Mist Copper
Deco Art Acrylic Paint ~ Black
Deco Art Americana ~ Driftwood
Liquitex Blended Fibers
Viva Inka Gold
Distress Ink ~ Pumice Stone
Tim Holtz Embossing Folders ~ Gridlock, Burlap
TCW 12x12 Diamond Stencil
Beacon Fabri-Tac
Beacon 3-in-1
Scotch ATG
Sizzix Big Shot
Ranger Heat-It Craft Tool
Basic Grey Craft Files

I have entered this project at:
Word Art Wednesday


Thanks for stopping by! I treasure your comments.

~ Blessings ~