Showing posts with label Rust. Show all posts

Monday, June 6, 2022

Amazing Paper Grace June 2022 Die of the Month: Pop-Up 3D Vignette Road Trip

 
Welcome to my creative space!

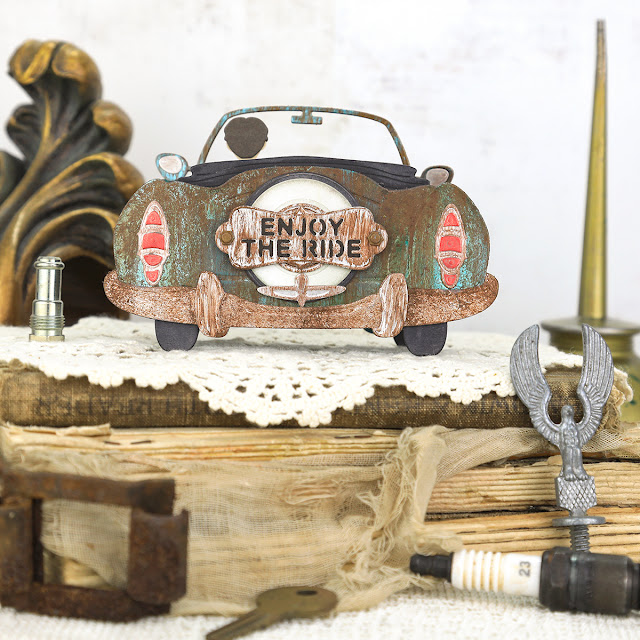
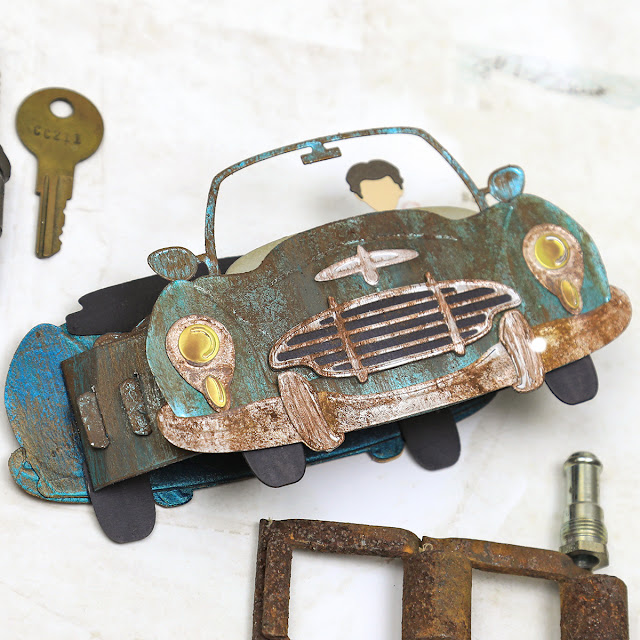
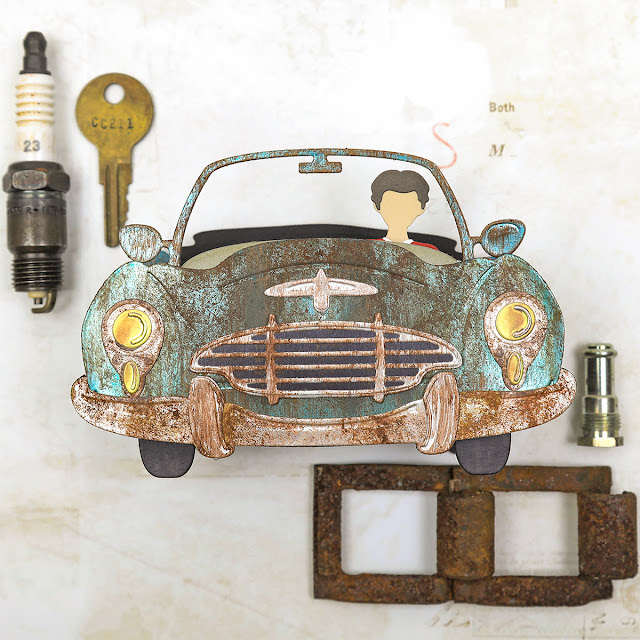
When I saw this fabulous Amazing Paper Grace June Die of the Month I thought what an adorable card it would make for my husband who's a car guy. He likes his cars shiny and clean, so that was the direction I planned to go with this 3D car die set. Then . . . . . . . the more I looked at the shape of this car, I started thinking of old barn find roadsters covered in rust and patina. I searched for images and there was no turning back. I had to transform this adorable car into a grungy "American Pickers" rusty classic. I'd adore hearing from you in the comments to let me know what you think! (Oh and by the way, that's my husband in the driver's seat. He adores taking his cars out for drives around the countryside.)

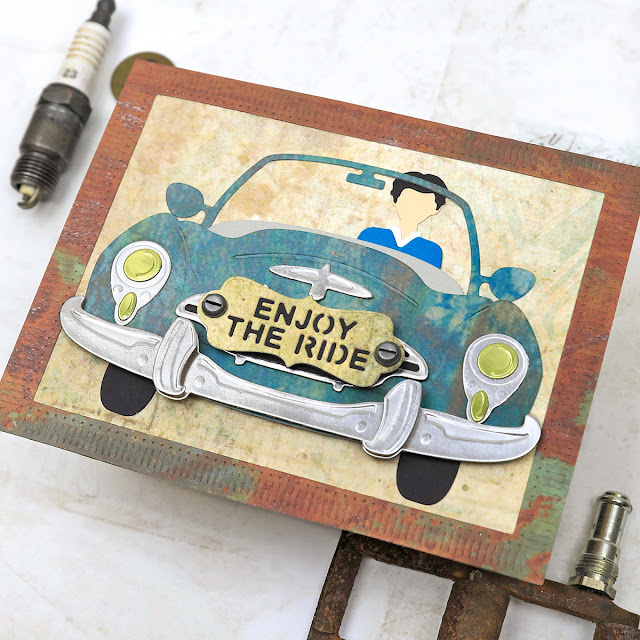
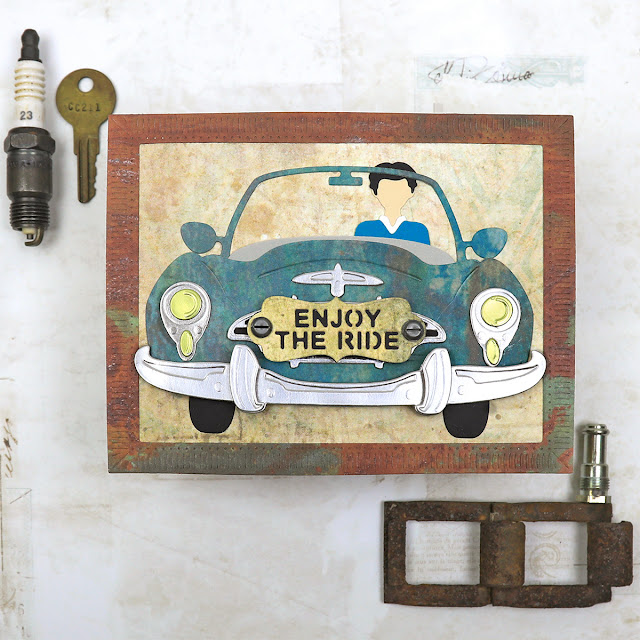
While it took some time and effort to achieve the rusty patina effect on this car, it was well worth it! I also wanted to show you something that still has that rusty patina effect, but is quick and easy to put together. On the flat card, the car is die cut from paper with a rusty patina print. It still has that grungy patina feel, but in a fraction of the time. With Father's Day just around the corner, these cards would be perfect for that special dad or father figure in your life. 

Be sure to scroll down through the Tips and Techniques section below for all the details on how I created these barn find roadster cards.

Many thanks to Amazing Paper Grace for providing the dies used in this project!

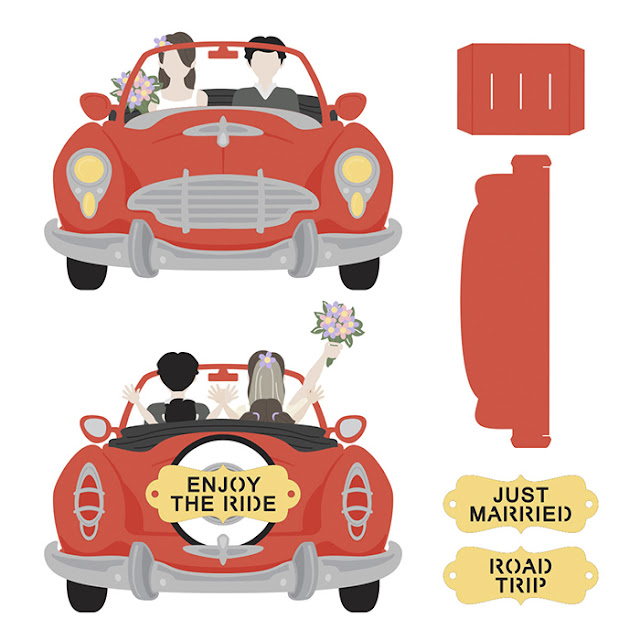
There are 26 cutting dies included in the Pop Up 3D Vignette Road Trip.
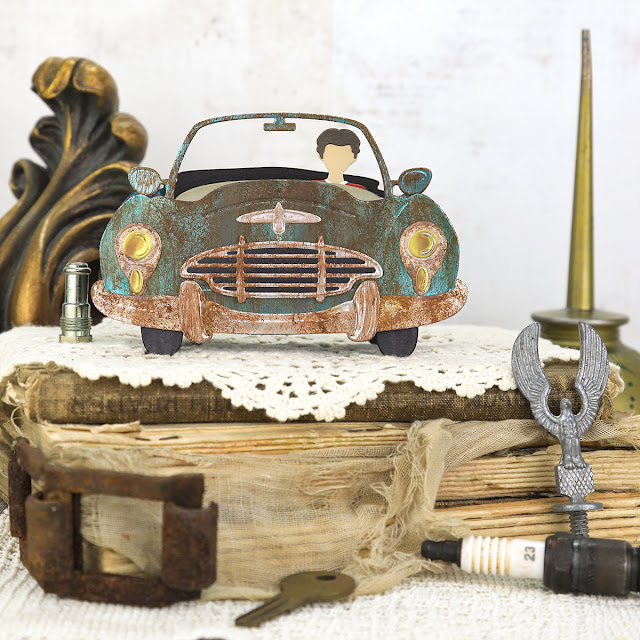
3D Roadster Card

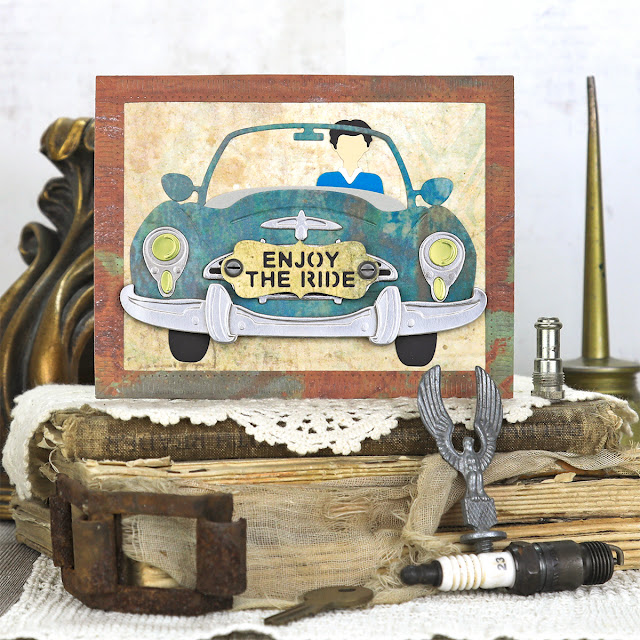
"Enjoy the Ride" Flat Roadster Card
Tips and Techniques
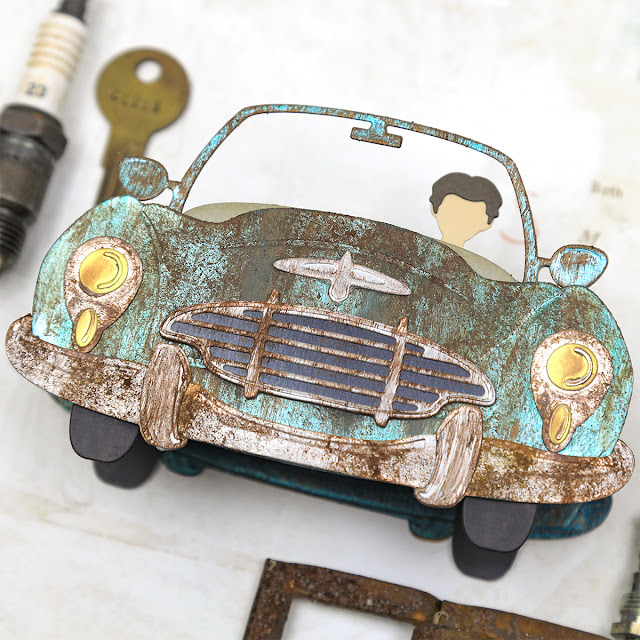
I used a combination of Rust Paste, which is basically rust and patina colored acrylic paints with grit added for rusty texture, metallic acrylic paint, liquid acrylic paint, and Artisan Powder to create this patina effect. You could really use whatever rusty paint colors you have in your stash to create a similar effect. 

I mixed the mediums on a palette, but left streaks of the various colors just like you would find in natural rust and patina. I used a dabbing motion to apply the paints, then lightly brushed over it while still wet in a downward motion to give the feel of rust that has happened over time dripping down over the car. The yellow headlights are rubbed with Rusty Brown Matte Wax to make them look a bit dirty.

The dash board is lightly rubbed with distress inks to add to the grungy feel.

***Tip*** When using paints containing any kind of grit, be sure to use an old or inexpensive brush, as the grit will fray the bristles and damage the brush. I have a couple brushes set aside just for this use.

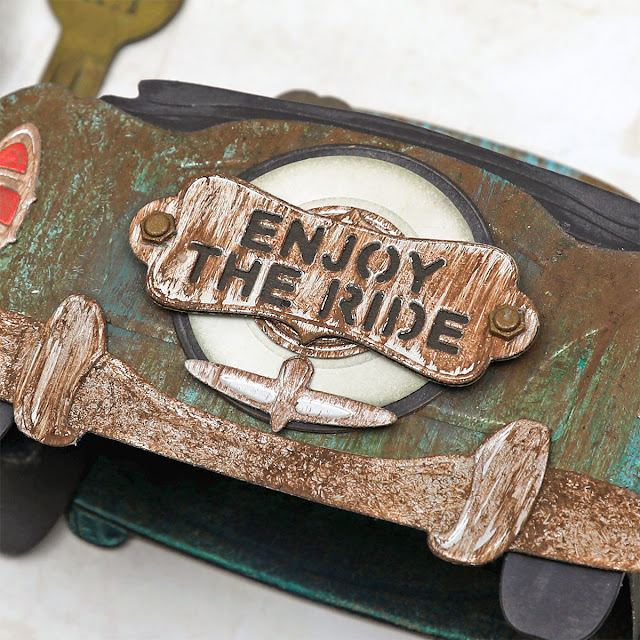
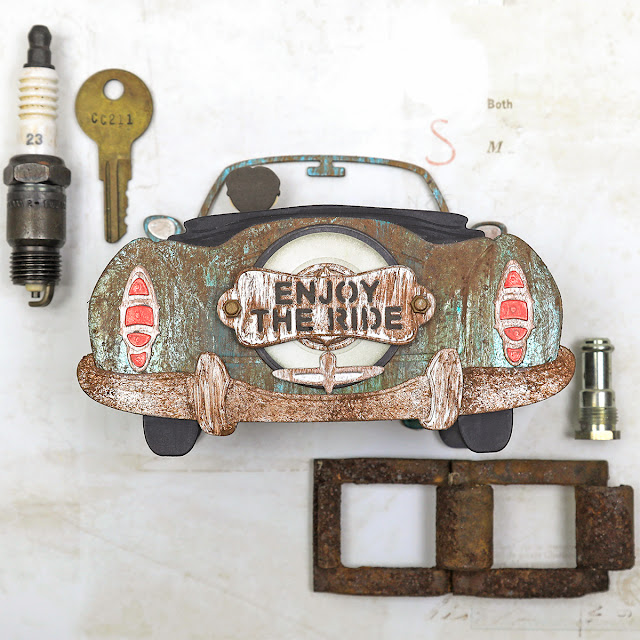
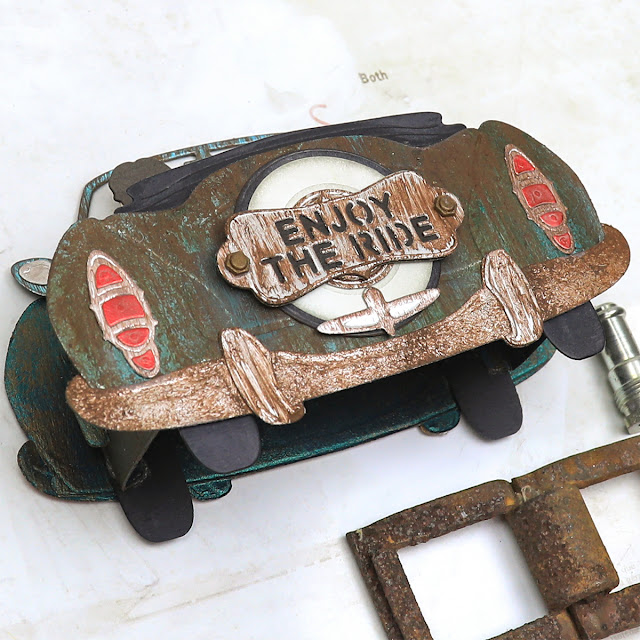
The back of this card is just as fun as the front with with the spare tire and fun sentiments to pick from. I used the same paint technique here on the back. I applied a little grungy ink to the white wall on the tire. The shiny red lights are toned down by rubbing with Rusty Brown Matte Wax, but no rust since glass doesn't rust.

Don't you just adore how these 3D Vignette cards slide to lie flat for posting? I added the rusty patina effect to the hinges and slot pieces that make up the center of the card as well. 

Because this card has a front and a back, I needed to do something to the back of each piece. The metallic paper that I used has a kraft back, and would not have looked right if left as is. The solution was quite simple. I mixed up some emerald and deep blue metallic paints to brush over the back of each piece. Once dry, I lightly dry brushed the pieces with Hazelnut metallic paint in a downward motion to give a bit of that rusty feel. I didn't go all out with the patina mixture on the backs but this quick paint on the backs helps give a cohesive look to the card. 

***Tip*** The paint caused the pieces to curl, so once they were dry to the touch, I layered them in paper towels between two glass mats with a few heavy books on top and let them sit overnight. By the next day they were perfectly flat again. 

A close-up of this fun sentiment on the back. You can see that the mix of pouncing on the rusty color along with brushing over it gives a natural rusty feel. The shiny black tires and back seat are rubbed with a bit more of that rusty brown matte wax to grunge them up just a little. 

Here you get a perfectly grungy car just by die cutting it from paper with a rusty patina design. This car image fits perfectly into the largest Fluted Classics Rectangle. This fluted frame is cut from a different section of the same paper that has more of the rust color in it and is placed over a grungy printed paper in a lighter color so the car image will pop. The sentiment is cut from the lighter paper as well.

The metal accent pieces like the bumper and grille are cut from metallic silver cardstock. To keep it simple, I didn't add any inking or grungy mixed media affects to this card, but just adore the way it turned out. 

My husband wears a lot of red and blue, so I gave him a red shirt in the 3D car and blue here on the flat card.

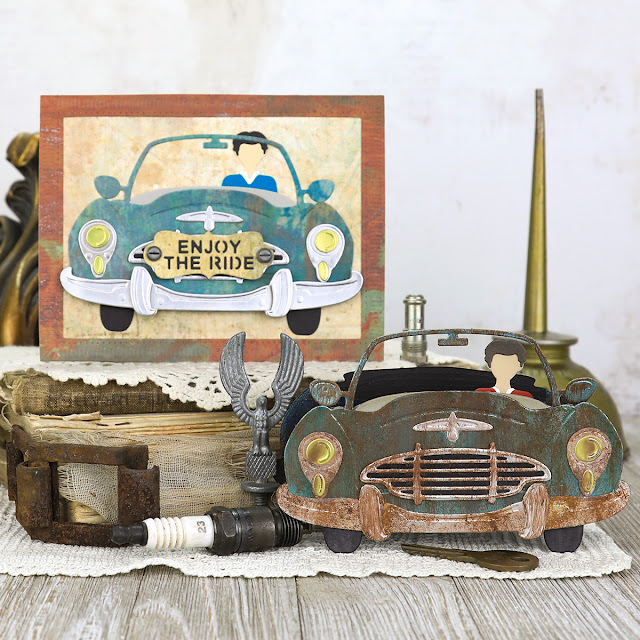
A few final shots


Supplies:

Amazing Paper Grace Dies:

Paper:
  • Scrapbook.com ~ Christmas - Smooth Cardstock Paper Pad - Slimline
  • Tim Holtz with Idea-ology ~ 8 x 8 Kraft Stock - Metallic - Confections
  • Tim Holtz with Idea-ology ~ 8 x 8 Kraft Stock - Metallic - Jewels
  • Tim Holtz with Idea-ology ~ 8 x 8 Kraft Stock - Metallic
  • Craft Consortium ~ Patina, 12x12" Paper Pad
  • Prima ~ Timeless Memories, 12x12" Paper Pad
  • Concord & 9th ~ Dove 
  • Cardstock ~ Black, Red, Blue, White, Skin Tone

Ink:
  • Distress Ink ~ Frayed Burlap; Pumice Stone

Mixed Media:
  • Finnabair with Prima Marketing ~ Rust Effect Paste: Gold Rust; Red Rust; Turquoise
  • Finnabair with Prima Marketing ~ Liquid Acrylic: Burnt Sienna; Emerald
  • Finnabair with Prima Marketing ~ Matte Wax: Rusty Brown
  • Finnabair with Prima Marketing ~ Metallique Acrylic Paint: Hazelnut; Emerald Green; Deep Waters
  • Frank Garcia with Prima Marketing ~ Artisan Powder: Clay

Embellishments:
  • Tim Holtz with Idea-ology ~ Hardware Heads

Adhesives:
  • Scrapbook.com ~ Clear Double Sided Adhesive Roll - Permanent
  • Helmar ~ 450 Quick Dry Adhesive
  • Beacon ~ 3-IN-1 Advanced Craft Glue
  • Beacon ~ Fabri-Tac 
  • Tombow ~ Mono MULTI Liquid Glue
  • Foam Tape ~ 1"

Tools:
  • Spellbinders ~ Platinum 6
The Amazing Paper Grace Die of the Month is available exclusively at Spellbinders Paper Arts during June 2022, Pop Up 3D Vignette Road Trip along with other membership perks.

View this month’s Amazing Paper Grace Die of the Month! 

I would adore hearing from you! Please leave a comment below letting me know how you will use these fabulous dies!


Thanks for stopping by! I treasure your comments.

~ Blessings ~

Monday, April 19, 2021

Rusty Journey Art Journal Panel with Video Tutorial for Little Birdie Crafts


Welcome to my creative space!

When I first laid eyes on Little Birdie's The Classic Gentleman collection, I knew I had to create a birthday card for my husband with this fabulous vintage car image. My design ended up being too heavy for a card, so I created this art panel instead. 

I was inspired by this amazing rusty brake pad piece to transform Little Birdie cogs with a grungy texture paste effect I created. Be sure to view my video to see this DIY transformation along with a full project tutorial.

All the close-ups and details can be found on the Little Birdie Crafts blog HERE.
It would be great if you could stop over there to leave a comment.

If you would like to see a full supply list, please scroll down.
Little Birdie Crafts can be purchased at their online store.
Be sure to check out the current sales HERE.

Use code TRACEY05 for a 5% discount.

I receive a small commission at not cost to you.

Here are a couple close-ups showing a little more detail:


I have created a full DIY video tutorial for you with voice instructions to share all the details on how to create this rusty industrial art panel including a technique to create grungy rusty gears and details on and industrial metal finish used on the diecut cogs and rotor blade seen above.. I hope you find inspiration and learn new techniques as you view it.

Enjoy!


Little Birdie Crafts Supplies
Texture Sand

Other Supplies
Thin Kraft Chipboard
Heavy Chipboard for base (Paper Pad Back)
Corrugated Packaging
Tim Holtz with Idea-ology ~ Paper Dolls
Tim Holtz with Idea-ology ~ Metallic Sticker Book
Tim Holtz with Sizzix ~ Thinlits - Stacked Deckle
Tim Holtz with Sizzix ~ Bigz - Steampunk Parts
Tim Holtz with Ranger ~ Distress Ink - Black Soot, Ground Espresso
DecoArt ~ Crafter's Acrylic: Bright Orange; Burnt Umber; Yellow
US Artquest ~ Prills - Express-O Yourself
Bronze Mini Microbeads
Silicone Glue
Wonder Tape ~ Foam Tape
EK Success ~ Craft Tweezers
Wagner ~ HT 400 Heat Gun


Thanks for stopping by! I treasure your comments.
~ Blessings ~

Monday, August 26, 2019

"Journey" Hot Air Balloon for Studio75 with Woodouts! and Mitform Castings

"Journey" Industrial Steampunk Hot Air Balloon by Tracey Sabella for Studio75: #traceysabella #studio75 #woodouts #mitformcastings #scrapiniec #finnabair #primamarketing #snipart #lindysgang #timholtz #helmar #industrial #steampunk #rust #mixedmedia #masculine #hotairballoon #vintage #wings #fleamarketfinds
Welcome to my creative space!

As much as I enjoy making shabby mixed media cards and home decor, I also have a passion for creating industrial steampunk art. I had so much fun putting this beauty together with the Woodouts Balloon Base, chipboard and Mitform Castings pieces from the Studio75 Store along with vintage finds from my stash. I just have to say that this amazing Woodouts Balloon is a such a fun shape to work with and the details in the Mitform Castings pieces are so amazing. They really add such fabulous texture and design to the project don't they?

My sister lives in a community that has a community wide yard sale every year. It's a tradition for the two of us to go out every year and of course I'm always on the lookout for cool things to use in my art. Some of those finds include the pressure gauge (from a local oil field), vintage keys, metal key hole, spark plug, metal drawing compass and rusty washers along with a treasured machined metal piece from my dear friend Mandy's grandfather's workshop. I've also added some Finnabair Mechanicals and resin pieces I created with her moulds. She has such fantastic steampunk/industrial designs too! The base is colored with Lindy's Gang mists and the chipboard and resin pieces are colored with Finnabair paints and waxes. 

Tips and Techniques
To add texture to the background of the Woodouts Balloon Mixed Media Base, I applied Finnabair's Plaster Paste through the SnipArt Up In the Air Damask Stencil. I just adore this design, and it has become of my favorite go to stencils these days. Once dry, I spritzed with Lindy's Gang Hydrangea Blue Starburst mist then a small amount of Clamb Bake Beige and Incandescent Copper Moon Shadow Mist. I then misted with water to help the colors move and blend. This color combination gives a lovely patina effect.

"Journey" Industrial Steampunk Hot Air Balloon by Tracey Sabella for Studio75: #traceysabella #studio75 #woodouts #mitformcastings #scrapiniec #finnabair #primamarketing #snipart #lindysgang #timholtz #helmar #industrial #steampunk #rust #mixedmedia #masculine #hotairballoon #vintage #wings #fleamarketfinds 
I just adore these Mitform Casting pieces. The Steel Padlock piece on the left is from the Studio75 store. The fabulous metal pieces available in the store can be found HERE. Other Mitform casting pieces are purchased from My Rusty Crown. I rubbed the metal pieces with Brass Hardware, Bronze Age, and Stormy Ocean Finnabair metallic Waxes to age with a little patina.

"Journey" Industrial Steampunk Hot Air Balloon by Tracey Sabella for Studio75: #traceysabella #studio75 #woodouts #mitformcastings #scrapiniec #finnabair #primamarketing #snipart #lindysgang #timholtz #helmar #industrial #steampunk #rust #mixedmedia #masculine #hotairballoon #vintage #wings #fleamarketfinds
This cool spark plug is one of my yard sale finds. The other metal pieces in this close-up are a combination of Finnabair gears, and bolts along with pieces that I moulded, painted, and waxed to give this vintage patina effect. I also added Finnabair's wax to the metal parts of the spark plug. Finnabair's blue Sugar Art Pebbles add just the right touch of sparkle to this piece.

"Journey" Industrial Steampunk Hot Air Balloon by Tracey Sabella for Studio75: #traceysabella #studio75 #woodouts #mitformcastings #scrapiniec #finnabair #primamarketing #snipart #lindysgang #timholtz #helmar #industrial #steampunk #rust #mixedmedia #masculine #hotairballoon #vintage #wings #fleamarketfinds 
More rusty goodness including rusty washers I've picked up on when I find them laying on the ground when I'm out and about along with vintage keys - another yard sale find. The machined piece below the pressure gauge is from my friend's grandfather's workshop. I layered a Prima piece on top to add to the steampunk feel. I'm so grateful she gave me a few of these treasured pieces to include in my art!!! The fluttering steampunk butterfly is a Finnabair Mechanical.

"Journey" Industrial Steampunk Hot Air Balloon by Tracey Sabella for Studio75: #traceysabella #studio75 #woodouts #mitformcastings #scrapiniec #finnabair #primamarketing #snipart #lindysgang #timholtz #helmar #industrial #steampunk #rust #mixedmedia #masculine #hotairballoon #vintage #wings #fleamarketfinds 
This cool pressure gauge is also one of my finds. Doesn't it fit perfectly into the notch on the Mitform Castings Steel Padlock? A little Finnabair moulded sprocket on the gauge adds to the steampunk effect. 

"Journey" Industrial Steampunk Hot Air Balloon by Tracey Sabella for Studio75: #traceysabella #studio75 #woodouts #mitformcastings #scrapiniec #finnabair #primamarketing #snipart #lindysgang #timholtz #helmar #industrial #steampunk #rust #mixedmedia #masculine #hotairballoon #vintage #wings #fleamarketfinds 
 These fabulous Scrapiniec Chipboard Steampunk Flying Hearts XL Wings are a perfect fit across the Woodouts Balloon! I painted them with a mix of Finnabair's Brass Hardware and Stormy Ocean Metallique paints, then rubbed with her metallic waxes to add to the grungy aged metal effect.

The metal Journey piece is of course from Mitform Castings with so much depth and detail. I brushed it with Finnabair's waxes to highlight the texture.

"Journey" Industrial Steampunk Hot Air Balloon by Tracey Sabella for Studio75: #traceysabella #studio75 #woodouts #mitformcastings #scrapiniec #finnabair #primamarketing #snipart #lindysgang #timholtz #helmar #industrial #steampunk #rust #mixedmedia #masculine #hotairballoon #vintage #wings #fleamarketfinds 
The Scrapiniec Focus Small Arrows were a perfect fit around this vintage drawing compass, and I also added a few Scrapiniec Confetti Stars below the wings. These chipboard pieces were finished with the same products as the wings. I dyed some cheese cloth with the Lindy mists and tucked it in  behind the metal pieces for added texture. As I glued down the metal elements, the cheesecloth was secured in place. 

I brushed a mix of Finnabair's Rust Pastes around the metal objects and spritzed with water so that it looks like they have been there and weathered to rust in place.

"Journey" Industrial Steampunk Hot Air Balloon by Tracey Sabella for Studio75: #traceysabella #studio75 #woodouts #mitformcastings #scrapiniec #finnabair #primamarketing #snipart #lindysgang #timholtz #helmar #industrial #steampunk #rust #mixedmedia #masculine #hotairballoon #vintage #wings #fleamarketfinds
These faux metal chains are also from the Scrapiniec Steampunk Flying Hearts XL Elements set. Isn't it amazing how paint and waxes can make them look just like aged metal? I used a couple more Mitform Casting pieces to give definition to the balloon basked and added a vintage couple from the Tim Holtz Paper Dolls Set into the opening to enjoy the flight.

"Journey" Industrial Steampunk Hot Air Balloon by Tracey Sabella for Studio75: #traceysabella #studio75 #woodouts #mitformcastings #scrapiniec #finnabair #primamarketing #snipart #lindysgang #timholtz #helmar #industrial #steampunk #rust #mixedmedia #masculine #hotairballoon #vintage #wings #fleamarketfinds 
I used Bambino Glue to adhere prills and Finnabair Microbeads. Because it dries clear, it the perfect adhesive for these little bits of texture.

Studio75 Supplies
 https://studio75.pl/en/4372-22x30-cm-balloon-mixed-media-base.html  https://studio75.pl/en/5227-dziurka-mechanizm-45mm.html 

https://studio75.pl/en/3442-up-in-the-air-damask-stencil-15x15.html  https://studio75.pl/en/1979-focus-big-arrows-duze-strzalki.html 

https://studio75.pl/en/2077-steampunk-duza-ramka-z-sercem.html https://studio75.pl/en/2064-confetti-serduszka.html 

https://studio75.pl/en/2651-klej-magiczny-w-tubie-45g-bambino-stmajewski-5903235004070.html 

Other Products
Little Birdie Crafts ~ Cheese Cloth
Mitform Castings ~ Journey Frame
Mitform Castings ~ Side Corner 2
Mitform Castings ~ Top Corner 7
Prima ~ Finnabair: Mechanicals - Scrapyard Butterflies
Prima ~ Finnabair: Mechanicals - Mini Knobs
Prima ~ Finnabair: Mechanicals - Rustic Knobs
Prima ~ Finnabair: Mechanicals - Mini Stars
Prima ~ Finnabair: Mechanicals - Rustic Gears
Prima ~ Finnabair: Mechanicals - Hardware Accents
Prima ~ Finnabair: Mechanicals - Mini Hardware
Prima ~ Finnabair: Mechanicals - Vintage Trinkets Flowers
Prima ~ Finnabair: Art ExtraVagance - Microbeads: Bronze
Prima ~ Finnabair: Art Ingredients - Melange Art Pebbles - Sugar
Prima ~ Tiny Junkyard Findings - Nail Heads
Tim Holtz with Idea-ology ~ Paper Dolls
Machined Metal Piece ~ Mandy Morkel
Gauge ~ Flea Market Find
Vintage Drawing Compass ~ Flea Market Find
Spark Plug ~ Flea Market Find
Vintage Keys ~ Flea Market Find
Vintage Keyhole ~ Flea Market Find
Rusty Washers
US Artquest ~ Mini Prills - Gilt Trip
Martha Stewart ~ Microbeads - Apatite
Prima ~ Finnabair: Art Basics ~ Gesso - Clear
Prima ~ Finnabair: Art Basics ~ Soft Matte Gel
Prima ~ Finnabair: Art Basics ~ Plaster Paste
Prima ~ Finnabair - Art Alchemy - Metallic Wax: Peacock; Aged Brass; Bronze Age
Prima ~ Finnabair: Art Alchemy ~ Metallique Acrylic Paint: Brass Hardware; Stormy Ocean
Prima ~ Finnabair: Art ExtraVagance - Patina Effect Paste: Brass; Blue
Prima ~ Finnabair: Art ExtraVagance - Rust Effect Paste: Brown Rust
Liquitex ~ Gesso - White
Lindy's Gang ~ Starburst - Hydrangea Blue; Clamb Bake Beige
Lindy's Gang ~ Moon Shadow Mist - Incandescent Copper
Amazing Casting Resin ~ White
Prima ~ Finnabair: Moulds - Stars and Moons; Mechanica; Cogs and Wings
Helmar ~ 450 Quick Dry Adhesive
Tombo ~ Mono MULTI Liquid Glue

https://gracescraps.blogspot.com/


 Thanks so much for stopping by today! I treasure your comments

~ Blessings ~

Monday, January 2, 2017

"Love Story" Grungy Masculine Card for ScrapBerry's


Love is the theme of the new challenge at ScrapBerry’s, and the design team
has been busy creating projects to inspire you as you join along. 

I’ve created this non-traditional grungy guy valentine card for my husband featuring ScrapBerry’s amazing Edge of Town Collection. Stop on over at the ScrapBerry's blog for all the challenge details and to be inspired by the rest of the design team creations HERE.

Close-Ups
I just adore creating grungy, masculine projects. This ScrapBerry's Edge of Town Collection is a dream to work with and gave me a chance to use some of the rusty finds I collect.

The solid heart is die cut from corrugated packaging. I hand cut around the negative to get the open heart. I have an amusing story to share. I was working on these hearts while out with a group of friends. One of the gals brought her two granddaughters. They kept staring at me, then eventually came over to see what I was doing. It turns out they thought I was a bit crazy to be painting hearts black. Of course they agreed that their brother wouldn't like to get pink hearts and that when I added the rust paste, they would actually be pretty cool. What do you think?

There's a snippet of rusty wire screen behind the hearts and clock parts on top.

The "Love Story" sentiment was fussy cut from the same sheet of paper I used for the card. I just adore these rusty letters used for the font!! I used more rust paste on the arrow and chipboard hearts. I popped up the base and sentiment pieces to tuck my rusty pieces under and added a snippet of black screening around the bottom and left edges of the base.

My dear friend Valerie, knows that I adore rusty metal, so her husband is always on the lookout for me. These amazing washers are one of his finds.

The ScrapBerry's Holiday Romance Chipboard Elements includes this arrow that I brushed with rust paste and paired with a rusty washer.

Don't forget to hop on over to the ScrapBerry's blog for the
challenge details and gorgeous inspiration HERE.

FTC Disclosure: I am currently working as a freelance designer for ScrapBerry's. While I am compensated in product, I maintain the freedom as an independent designer to say what I truly think of these products and will not recommend something that I don’t personally use and enjoy.


ScrapBerry’s Products
Edge of Town ~ Metal & Memory SCB220608303
Edge of Town ~ No Parking SCB220608302
Holiday Romance Chipboard Elements No. 3 SCB62000106B
Butterfly Wings Clear Stamp SCB4907003B

Other Products
Cardstock ~ Black - stash
Corrugated Board ~ From packing box
Prima ~ Tiny Junkyard Findings - Vintage Trinkets, Clock Parts #891664
UmWow Studio ~ Confetti Hearts Chipboard
The Paper Studio ~ Spare-Parts - Metal Charms (Cupid’s Bow)
Bead Landing ~ Found Objects - Clock Hands, Gears
Rusty Washers ~ Stash
Black Mesh ~ Stash
Rusty Wire Mesh ~ Stash
Prima ~ Art Extravagance - Rust Effect Paste
Liquitex ~ Gesso, Black
Ranger ~ Distress Ink - Black Soot, Hickory Smoke
Memento Dye Ink ~ Tuxedo Black
Sizzix ~ Tim Holtz ~ Mini Hearts Movers & Shapers Dies
Scrapbook Adhesives by 3L ~ Crafty Power Tape
Scrapbook Adhesives by 3L ~ Crafty Foam Tape - Black
Home & Hobby ~ Premium Double-Sided Tape - 1/2”
Helmar ~ 450 Quick Dry Adhesive
Tombow ~ MONO Multi Liquid Glue

Thursday, June 6, 2013

Vintage Rusted Ironwork Chipboard Tutorial

Summer is upon us with warmer days. I have a tutorial to share with you today for this rusted vintage ironwork chipboard created for my "Bree" layout featuring the ScrapThat! "From Sunrise to Sunset" June Kit and our daughter's new pup. 

Vintage Rusted Ironwork Chipboard Tutorial


This technique is quite easy and adds so much texture to a chipboard piece. There is some waiting time in the middle, so it's something you can start, put to the side and come back to later. 

Supply List:
Chipboard Piece (ScrapThat! May Kit)
Embossing Folder (Darice - Henna)
Die Cutting Machine (Big Shot)
Sophisticated Finishes Iron Metallic Surfacer
Sophisticated Finishes Rust Antiquing Solution
(Sophisticated Finishes products were purchased at Michaels)

Step 1. Select an embossing folder with a design that coordinates well with your project and run your chipboard flourish through your Big Shot or other die cut/embossing machine.


Step 2. Paint top of embossed chipboard with two coats of Sophisicated Finishes Iron Metallic Surfacer, allowing to dry between coats - about 30 minutes.


Step 3. Apply Sophisticated Finish Rust Antiquing Solution to dry chipboard. Allow 4 to 6 hours for the rust to develop. After the rust has fully developed, you can apply an additional coat or two of Rust Antiquing Solution for a deeper rust color if desired. I used three coats all together. 


Tip ~ This solution is corrosive to metals, so use an old paintbrush or foam brush than can be thrown away if needed.

I hope you'll try out this technique. Please let me know, and I'll stop by to see your project. 


Thanks for stopping by! I treasure your comments.

~ Blessings ~