Showing posts with label ScrapThat June 2013 Kit. Show all posts

Saturday, June 22, 2013

"Cousins" Details for ScrapThat!

Weddings are always such wonderful days, and the presence of a photo booth at the reception can add a little extra fun. Here I've scrapped a photo of our Daughter, Maria, with her younger cousin in whimsical attire at Elizabeth's wedding reception photo booth. 

The ScrapThat! June kit is just perfect to capture the
fun feel and colors in this photo. 

"Cousins"
MK, EAO, FAO

I used the May Prima BAP Sketch for inspiration:

This page is my sample for the ScrapThat! June DT Summer Stenciling Challenge.
I'd love for you to stop by the ScrapThat! Forum and add your project with stenciling. 

Tips and Techniques:

Prima Goodies ~ The ScrapThat! Kit included some fabulous Prima goodies including this amazing zipper flower and alpha set. My title is set on a chippie from my stash that I painted and inked. The spool was fussy cut from the Sunrise Sunset paper. The white Prima rose, was left from a previous kit. 

Distressed Mesh ~ The black mesh in the kit was so fun to work with and I used it on all three of my kit pages. I simply painted it with white gesso and when dry scraped off bits of the paint to distress. 


Vellum Flower ~ I was a little stumped at first as to how to used this vellum included in the main kit with the wonderful and vibrant chevrons. I wasn't sure how the linear design would work for a flower, but love the way this turned out. I cut the layers with my Sizzix Tattered Florals die, then crinkled the vellum offsetting the petals as I adhered. I tucked in a length of eyelash yard from my stash along with a large rhinestone. 

Doilies ~ I cut doilies from kit paper to layer behind the photo using my Cricut, Bigshot, and fussy cutting.

Distressing ~ is done with my favorite tool, my Donna Salazar Distrezz-It-All. 


Mixed Media ~ I used my Sunrise Sunset stencil first, then spritzed several shades of glimmery mist across the page. I wiped the mist off the stenciled molding paste to help it pop. 

Chipboard ~  I used several shades of mist on this DA chipboard piece from my stash.

Butterfly ~ Just a touch of rust ink on the edges of the wings makes this little beauty pop.

Gems ~ I pulled some of the gems off of the sheet in the main kit and scattered them across the bottom of the page. I used tweezers to dip them in glossy accents to adhere. 

Follow on Bloglovin

Thanks for stopping by! I treasure your comments.

~ Blessings ~

Wednesday, June 19, 2013

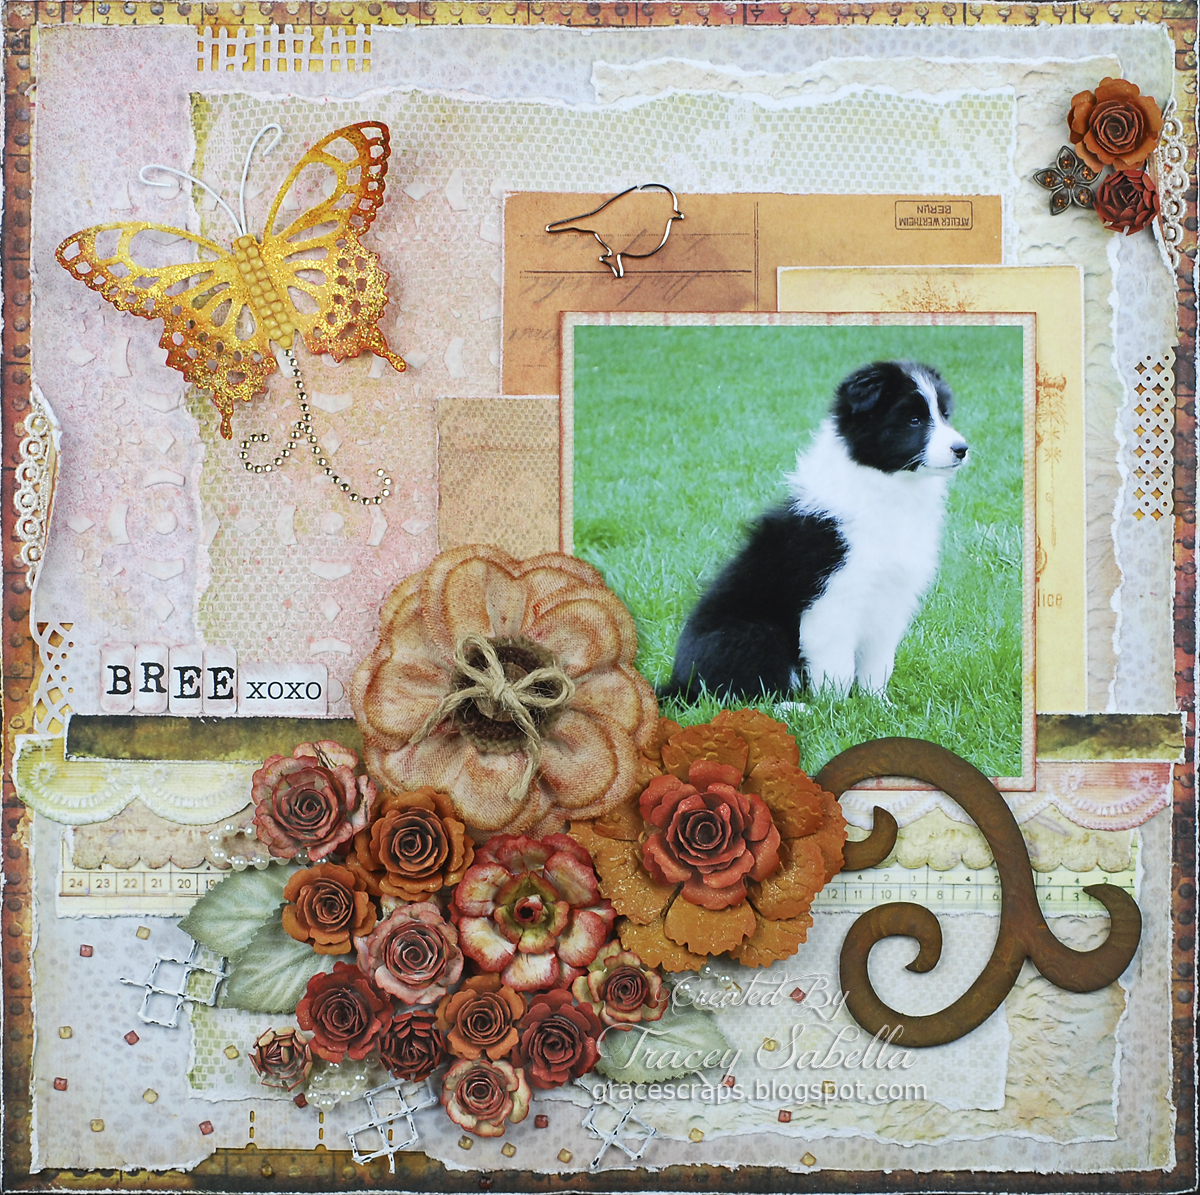
"Bree" details for ScrapThat!

When we moved back to Ohio in 2000, dogs became an important part of our lives. My brother gave Grace 15 month old Ellie, a German shepherd/Belgian malinois mix so that she could take part in his 4-H dog club. After years of work and training, they ended up becoming one of the top United Kennel Club obedience teams in the country. Ellie is no longer with us, and it's time for a new dog. Bree is her new border collie pup. Isn't she adorable?? 

This page was created with the ScrapThat! June Kit using the Main Kit only and Amy's inspiring sketch. 

"Bree"
MK Only

Amy's June Sketch:

Stop by the ScrapThat! Forum to add your sketch based layout to Amy's Sketch Challenge.

Tips and Techniques:

Altered Canvas Flower ~ The Prima Canvas Flower from the MK was inked and a jute bow tied through the button. 

Handcrafted flowers ~ I created a bevy of flowers from kit paper and cardstock using Tattered Florals  dies and Donna Salazar's Grand Peony and Bitty Blossoms dies. I also did some embossing, inking, and spritzing to add texture, dimension, and sparkle. 

Leaves ~ I painted the kit flowers with a gesso wash to soften, but still let some of the green show. 

Black Mesh ~ Oh my, I just adore this black mesh!! I just snipped several strips, painted with gesso and when dry scratched off some of the paint to distress. 

Gems ~ The Prima Sunrise Sunset crystal sheet is one solid sheet of crystals, but I pulled some of them apart and scattered them below the cluster. 

Border Punching ~ I used several border punches to punch random places into the edges. 


More of my Bitty Blossoms flowers here with a bejeweled flower trinket from my stash. I also tucked some bits of lace into the distressed edges. 


Handcrafted Butterfly ~ I used Donna Salazar's Wonderful Wings Dies to cut this butterfly from kit paper, and pulled more gems to arrange for the body. The antenna are wires cut from the MK flowers, painted white, and bent to shape. I inked the wing edges and brushed with stickles. Just a snippet of a crystal flourish from my stash for the trail. 

Mixed Media ~ I used molding paste to stencil this background and once dry misted. I wiped the mist off of the molding paste to make it pop. 


Vintage Rusted Ironwork Chipboard ~ My tutorial can be found here. 

Fussy Cutting ~ I fussy cut lace strips from kit paper for the border strips below the photo. 

Distressed Edges ~ I used a mix of torn edges and my DSD Distrezz-It-All. 

We have 4 Design team challenges going on this month
in addition to our Sketch Challenge:


The ScrapThat! June kit is available in our store.

Follow on Bloglovin

Thanks for stopping by! I treasure your comments.

~ Blessings ~
Tuesday, June 18, 2013

"Abby" details for ScrapThat!

My parents' home is on a small lake and is a family gathering place. This fun photo is my niece showing off her dirty hands from her afternoon of fishing. As you can see by her captivating smile, she enjoys fishing!  I used the fabulous ScrapThat! June Kit featuring the Prima Sunrise Sunset Collection and pulled the blues from the lake to accent the page.

"Abby"
MK, EAO, FAO

I used the Dusty Attic May sketch for inspiration:

Tips and Techniques:

Zipper Flower ~ Isn't this Prima zipper flower from the Flower Add-On Kit just gorgeous.

Altered Flowers ~ I altered FAO Kit flowers to coordinate with this LO and to bring in the blues of the lake. The Petaloo mulberry paper flowers were brushed with teal and blue mists. The larger paper Petaloo flower was painted with Lumiere paints, while I highlighted the MK tissue paper flower and carnation with a touch of rust ink. 

Handcrafted flowers ~ The rust color flowers were created using kit cardstock. For the larger one ~ the outer petals are cut with Donna Salazar's Grand Peony Spellbinder dies then embossed with a brocade embossing folder and topped with a Donna Salazar Bitty Blossoms Spellbinder rolled flower. The smaller flowers are also cut with the Bitty Blossoms dies.


Twine Flowers ~ I used jute string and bamboo cording from Really Reasonable Ribbon to create the twine flowers and added EAO Kit buttons and gems for centers. My tutorial for the twine flowers can be found here. 

Stenciling ~ I added copper paint to ceramic stucco medium and used a stencil to add the quarter round floral design. 

Painted Chipboard ~ I used Lumiere metallic and pearlized paints on the Dusty Attic chipboard from my stash and inked the stems and leaf edges with a darker green.


Alcohol Inked Butterflies ~ You can just see the edge of the wings here, but these sweet Maya Road metal butterflies are in the EAO Kit. It is so easy to dab alcohol ink onto nonporous embellies to change up the color. 

Altered Kit Flowers ~ You can really see how I transformed these pale lavender flowers to teal/blue. To get the shaded blue accents, I spritzed some mist on my craft mat and used a paint brush to add the darker blue on just one side of each petal. 


Distressing ~ You know how much I enjoy using my Donna Salazar Distrezz-It-All to make fast work of these wonderful distressed edges. 


Layered Doilies ~ I inked the Main Kit doilies and die cut another using Spellbinders Ironwork Accents and layered them at the photo's corner to add a sunny day accent to the blues of the photo. 


Clip ~ The Idea-ology hinge clip from the MK is such a fun accent here. 


Painted Mesh ~ I just adore the black mesh included in the Main Kit. I used it on all of my pages. I painted it then scratched off bits of the paint to expose the black for a grungy look.

Corrugated Board ~ This corrugated photo mat was created with cardboard from a shipping box. I pulled the top layer off, roughly tore to size and painted with gesso. I then inked with blue and sprinkled on clear embossing powder to give the feel of the watery blue from the lake. 

Vintage Map Page ~ During my days of home educating, I collected scores of old (now outdated) books including one with gorgeous color maps which has now moved into my scrapbooking stash. I used a snippet under the photo. 


Title ~ The Prima Sunrise Sunset has to be my favorite Alpha set!! I love all the different shapes and sizes of little letters including these typeset letters used for my title.


The June Kit and Add-ons are currently available in the ScrapThat! Store.

Thanks for stopping by! I treasure your comments.

~ Blessings ~

Follow on Bloglovin

Thursday, June 6, 2013

Vintage Rusted Ironwork Chipboard Tutorial

Summer is upon us with warmer days. I have a tutorial to share with you today for this rusted vintage ironwork chipboard created for my "Bree" layout featuring the ScrapThat! "From Sunrise to Sunset" June Kit and our daughter's new pup. 

Vintage Rusted Ironwork Chipboard Tutorial


This technique is quite easy and adds so much texture to a chipboard piece. There is some waiting time in the middle, so it's something you can start, put to the side and come back to later. 

Supply List:
Chipboard Piece (ScrapThat! May Kit)
Embossing Folder (Darice - Henna)
Die Cutting Machine (Big Shot)
Sophisticated Finishes Iron Metallic Surfacer
Sophisticated Finishes Rust Antiquing Solution
(Sophisticated Finishes products were purchased at Michaels)

Step 1. Select an embossing folder with a design that coordinates well with your project and run your chipboard flourish through your Big Shot or other die cut/embossing machine.


Step 2. Paint top of embossed chipboard with two coats of Sophisicated Finishes Iron Metallic Surfacer, allowing to dry between coats - about 30 minutes.


Step 3. Apply Sophisticated Finish Rust Antiquing Solution to dry chipboard. Allow 4 to 6 hours for the rust to develop. After the rust has fully developed, you can apply an additional coat or two of Rust Antiquing Solution for a deeper rust color if desired. I used three coats all together. 


Tip ~ This solution is corrosive to metals, so use an old paintbrush or foam brush than can be thrown away if needed.

I hope you'll try out this technique. Please let me know, and I'll stop by to see your project. 


Thanks for stopping by! I treasure your comments.

~ Blessings ~

Friday, May 31, 2013

ScrapThat! "Sunrise to Sunset" June Kit Reveal

Welcome to our ScrapThat!
 June Kit Reveal and Blog Hop!! 

We are so happy to see June after the long winter and excited to show you our creations with our beautiful Prima Collection!

Our Blog Hop features 9 fabulous hop sites including our Design Team blogs. 
We have been scrapping away and are so excited to show you our  creations! 

If you came here from:
you are on the right track!

If not, go back and start here: Scrap That!   
Then follow the rest of the order:
ScrapThat!
 
We are so happy to welcome the amazing 
Zoe Nemburt
as our June Guest Designer!!!


Hey, my name is Zoe Nemburt, and I am absolutely thrilled to be asked to design as a guest for ScrapThat! this month. I started scrapbooking in 2009 and seriously never looked back. I felt I had finally found my crafty passion!! Super Excited to be here for the month of June with the ScrapThat! team and I really hope to inspire you to create something fabulous.

Be sure to stop by Zoe's blog, Designs by Zoe, to be inspired by her gorgeous work! 

We are sad to say farewell to our talented DT Member, Sarah Routledge.
We have been inspired by your creativity and learned so much from your tutorials. 
With your optimism and talent, we are sure you will reach every dream.
You will be missed.
We wish you luck on your new endeavors! 

Now, without further ado....  

Introducing our June Kit,
 "From Sunrise to Sunset"

Featuring the designs of the fabulous Anna Dabrowska (a.k.a. Finnabair) we present a  collection of rich colors and designs that run from brights to neutrals. Whatever your scrapping style is, you will love this kit that is just chock-full of Prima goodies!

Take a look:

Main Kit


Paper Add-On

Flower Add-On

 Embellishment Add-On
More details on this collection can be found here:
We are currently accepting new
Kit Club Members. 

For more information,
complete the form on the link below: 
New Subscriber 

Look at the beautiful sketch Amarilys has created for June:

See details about the challenge here: Sketch Challenges 

We have something new for June!
In addition to Amy's sketch challenge,
other members of the DT will also be hosting challenges!
  • Tracey G.'s challenge: "Scrap out of your comfort zone"
  • Laura's Challenge: "Using a long title"
  • Sandi's Challenge: "Color Challenge"
  • Tracey S.'s Challenge: "Use a stencil"
Check them out here. 


Everyone is welcome to participate.

Entries for all challenges are due by Wednesday, June 26.
 All winners of our challenges, including Layout of the Week, are eligible to receive 10% off any 2012 Kits ~ including Add-ons!

Now for a little inspiration.
My first Layout is based on Amy's Gorgeous June Sketch.

"Bree"
MK Only

Our daughter, Grace, recently got Bree, a border collie pup. As you can see she is so adorable. Grace plans to train her to show competitively in obedience in the AKC and UKC. She earned every possible obedience title in the UKC with her previous dog, Ellie. 

I used kit cardstock and patterned paper to created these floral beauties to pair up with the gorgeous Prima canvas and burlap flower. Be sure to watch for my tutorial for this "rusted" chipboard flourish. The main kit includes such lovely scrappy treasures like the mesh I painted and distressed and a package of gorgeous Prima gems that can be used in pieces, strips like I used for my butterfly body, or pulled apart and scattered as I did across the bottom of the page. 

~ ~ ~ ~ ~ ~ ~

Next I scrapped this fun photo of my niece showing off her messy fishing hands. I accented with the blues from the lake behind her. 

"Abby"
MK, EAO, FAO

I used a new TCW stencil on the background and centered my cluster around the gorgeous FAO Prima Zipper flower. I inked the sweet MK Etsy flower and WOC carnation and used metallic paint to color the larger FAO Petaloo Flower. and mists for the smaller Petaloo flowers. I pulled apart a postal box for my corrugated board, painted it white and inked with Donna Salazar's Mix'd Media Inx. This ink works so well with embossing, so I sprinkled with clear embossing powder and heat set to give the corrugated a wavy, watery texture. I alcohol inked the FAO Maya Road butterflies, and the FAO Prima buttons were tied with a little twine before adhering. I used some Really Reasonable Ribbon twine to create the twine flowers and added some Dusty Attic chipboard leaves. The Layered doilies and clip are from the MK. You can find my twine flower tutorial here. 

I used the May Dusty Attic May Sketch for inspiration:

~ ~ ~ ~ ~ ~ ~

Finally, I've saved this mixed media page for last. The girls were having fun dressing up for the photo booth at Elizabeth's wedding, and the colors in Maria's feathered hat are just right for this Sunrise Sunset paper collection.

"Cousins"
MK, EAO, FAO

I wanted to play off this fun photo and colors with mixed media elements. I misted, stenciled, and scattered more of the lovely MK crystals. I also tucked a couple strips of the black crystals around the photo. I just loved using the Prima alpha set in the MK for all three of my pages. The chevron flower was created with the MK vellum and some eyelash yarn in my stash paired with more of the FAO Petaloo and Prima zipper flowers. I also pulled out a couple Prima flowers and a butterfly from previous kits to tuck in. I die cut doilies from kit paper and the orange piece on the left is the negative from a die cut on Abby's fishing page that I inked to brighten up. I used more of that amazing MK mesh and a dusty attic chippie from my stash. Can you spot the Prima packaging I tucked in? 

This lovely May Prima BAP Sketch was used for inspiration:

Now for the rest of the Blog Hop details: 

The June Blog Hop Prize is our "Life's Muse" Main Kit featuring Webster's Pages Everyday Poetry Collection (Webster's Poetry)


To qualify for this month's FABULOUS Prize, you must complete the following:
  • Visit each blog listed on the hop to see what each designer has created using this month's kit and sketch (comments are very much appreciated).
  • Each designer's blog hop post will feature a word or two that will make up a secret sentence, collect these words along the way.
  • You must become a FOLLOWER of each blog along the way and LIKE us on our Facebook Page!
  • Subscribe to Kelly's YouTube Channel at http://www.youtube.com/user/kellycreates
  • Post the ScrapThat! Blinkie on your blog.
  • For your last stop on our Blog Hop return here to the ScrapThat! Chat Blog. Leave a comment letting us know you have completed the hop.(Please do NOT include the secret sentence in your comments.)
  • Email the secret sentence to Tracey Sabella: tracey@scrapthat.ca
The Blog Hop ends Sunday, June 2 at Midnight EST.
The prize MUST be claimed within 3 days of the forum announcement which will also be made on the ScrapThat! Blog.
~ If left unclaimed a NEW winner will be chosen ~
**Winner will pay actual shipping costs for sending the kit from Canada.**
Shipping costs will be invoiced via PayPal unless you are a kit member,
 then your prize will be shipped with your monthly kit.
Prizes won during the month will be mailed out the first week of the following month.
Due to Customs clearance, International mailings sometimes take 30-75 days to receive.

My secret word is:
someone's

Next hop over to
For your final stop, return to the ScrapThat! Blog 
to let us know you have completed the hop.
Remember ~ only send the secret sentence to tracey@scrapthat.ca
Happy Hopping!

I hope you enjoyed my projects created with this gorgeous kit!! Thanks for leaving a note to let me know what you think. Enjoy the rest of your hop!!

~ Blessings~

Wednesday, May 29, 2013

ScrapThat! June Kit Sneak Peeks

The ScrapThat! Design Team has been hard at work to create some fabulous inspiration with the June Kit. Here are some sneak peeks. Be sure to come back Friday for our reveal and blog hop. 


A couple more sneaks from my projects:


I hope to see you hopping through on Friday!! 

Thanks for stopping by! I treasure your comments.

~ Blessings ~