Showing posts with label Dusty Attic Chipboard. Show all posts

Monday, June 13, 2022

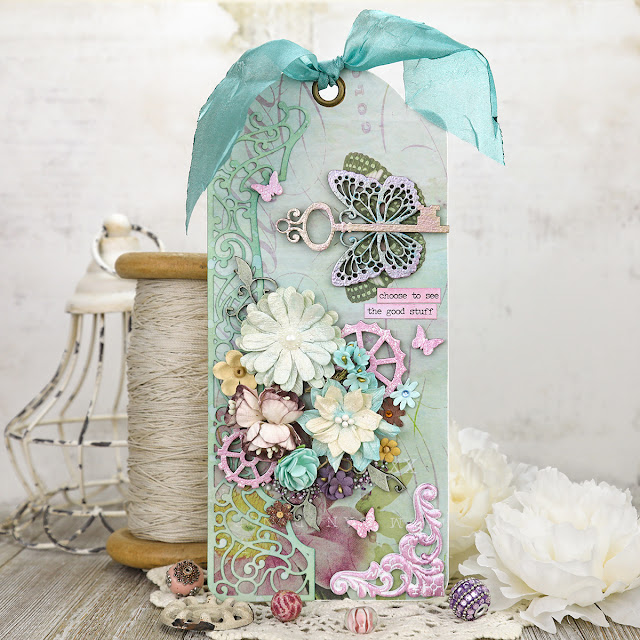
Shabby Mixed Media Tag For Amazing Paper Grace with Tutorial Link for Distress Oxide Ink Blending on Die Cuts

Welcome to my creative space!

A tag is a perfect way to share a small piece of art. With this encouraging sentiment and gorgeous embellishments, this tag is meant to be on display, rather than being a simple gift tag. This tag features the fabulous Amazing Paper Grace Half Slimline Bracket die set (S4-1199) from the Layered Fleur Bouquet Slimlines collection. I've framed half of this tag with this gorgeous die cut. I've created a video tutorial showing how to use Distress Oxide Ink blending on die cuts to create flowing organic color that coordinates perfectly with your patterned background paper.

You can find a full video tutorial explaining this technique exclusively in the Amazing Paper Grace Creative - Creative Encouragement Community Facebook Group.

This lovely group includes exclusive tutorial content. I share a mixed media tutorial there on the 13th of each month. If you're not a part of this fabulous and encouraging group you can join HERE.

Thank you Amazing Paper Grace for providing the dies used in this project.

Tips and Techniques
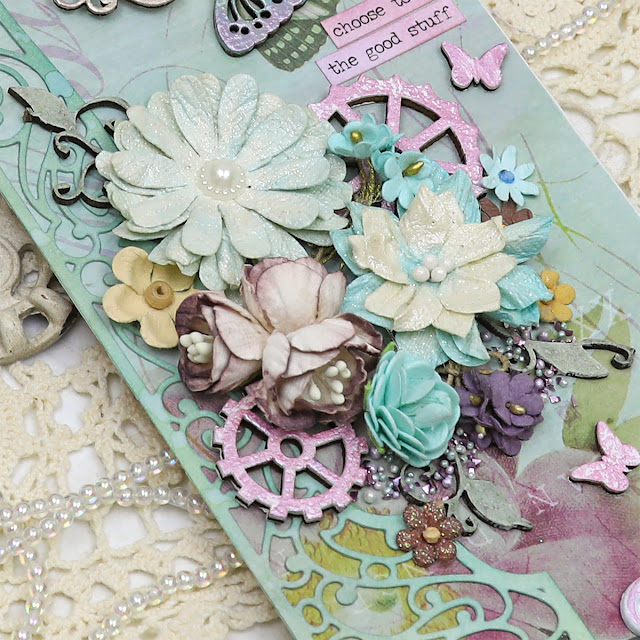
This gorgeous die cut on the left is cut using the Amazing Paper Grace Half Slimline Bracket die set (S4-1199) and is colored with Distress Oxide ink blending. A full video tutorial is available in the Amazing Paper Grace Creative - Creative Encouragement Community Facebook Group.
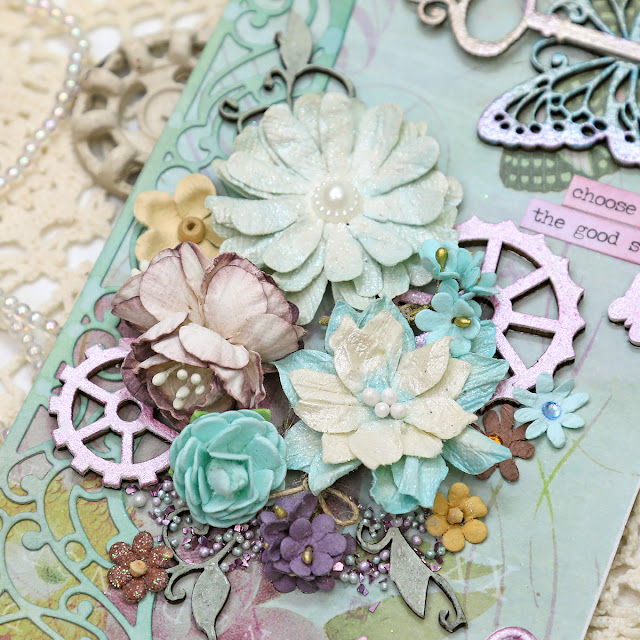
This lovely floral cluster is created with Little Birdie Crafts flowers, wood veneer gears and leafy chipboard vines. I've used metallic paints to color the gears.
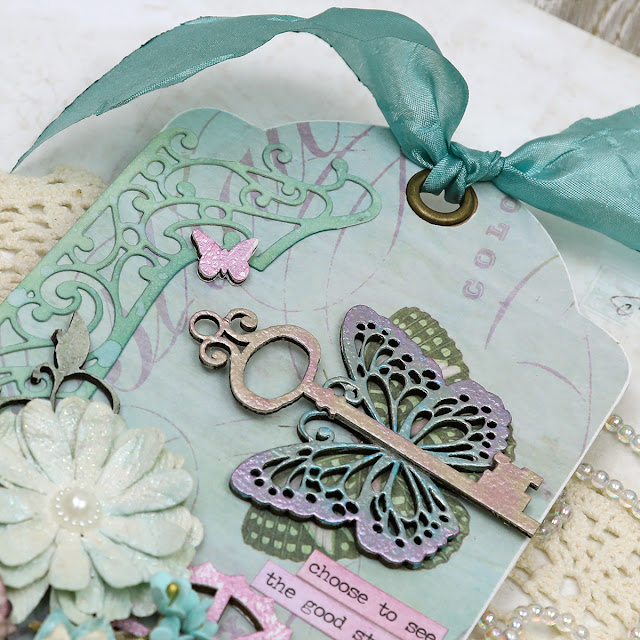
The top edge of this beautiful die cut is fussy cut to fit the tag and becomes such a beautiful design element!

I wanted to accent the sweet butterfly on the background paper, so layered this chipboard butterfly and key over the printed one. They're colored with a blend of metallic paints. The sweet and encouraging sentiment is inked to coordinate with the colors on the tag.

A piece of beautiful May Arts Silky Crush ribbon is tied on the top.

The bottom edge of the die cut is trimmed to curve with the edge of the tag. 

I've added texture around the bottom of the cluster using prills and glass glitter. The ornate corner on the right side is a metal piece from my stash. It's painted with white gesso then dry brushed with metallic paints to add a bit of color. 

One final look. Doesn't this gorgeous die cut add such amazing texture to this tag?

Amazing Paper Grace Dies:

Paper:
  • Scrap of patterned paper 
  • Scalloped Kraft Tag
  • Tim Holtz with Idea-ology ~ Small Talk

Ink:
  • Ranger ~ Distress Oxide Ink: Iced Spruce; Pine Needles; Forest Moss
  • Ranger ~ Distress Ink: Victorian Velvet; Seedless Preserves; Dusty Concord

Mixed Media:

Embellishments:

Adhesives:
  • Scrapbook.com ~ Clear Double Sided Adhesive Roll - Permanent
  • Helmar ~ 450 Quick Dry Adhesive
  • Beacon ~ 3-IN-1 Advanced Craft Glue
  • Beacon ~ Fabri-Tac 
  • Tombow ~ Mono MULTI Liquid Glue

Tools:
  • Spellbinders ~ Platinum 6


Thanks for stopping by! I treasure your comments.

~ Blessings ~

Monday, March 12, 2018

"Comfy with My Dad" Mixed Media Layout for More Than Words Challenge

"Comfy with My Daddy" mixed media layout by Tracey Sabella. Entered in the March More Than Words Main Challenge. #49andMarket  #49&Market  #DustyAttic #Finnabair #PrimaMarketing #mixedmedia #scrapbooklayout  #chipboard  #papercrafting #prills

When I saw the March Main Challenge at More Than Words, I knew it would be just perfect for this photo of our handsome son and adorable granddaughter! The Word Inspiration is "Comfortable." Doesn't Avery look perfectly comfortable and happy on her strong daddy's shoulders? 

The colors in this challenge board are so beautiful. I've used all five colors featuring
gorgeous 49 and Market flowers and Scents of Nature Clockworks Paper .

All of the challenge details can be found HERE.

Tips and Techniques
"Comfy with My Daddy" mixed media layout by Tracey Sabella. Entered in the March More Than Words Main Challenge. #49andMarket  #49&Market  #DustyAttic #Finnabair #PrimaMarketing #mixedmedia #scrapbooklayout  #chipboard  #papercrafting #prills #mtwchallenges
A cluster of gorgeous 49 and Market flowers. The leaves are created with 49 and Market Gabi’s Texture Stamp Set. I stamped and heat embossed the image, then watercolor painted the leaves to coordinate with the focal paper and color challenge. The delightful layered die cut butterflies are also from 49 and Market and fit the color challenge perfectly.

The Dusty Attic Vine Corner Chipboard was brushed with crackle medium and set aside to dry overnight. I find that crackle medium has a way of flaking off, so I thinned gel medium with a little water and brushed it over the crackle. This acts like a glue holding the crackle in place, but thin enough to maintain the crackle texture. Next I painted with metallic paint and rubbed with Finnabair waxes to highlight the texture.

I've been making paper clay shapes lately, and in the process have collected the broken bits and pieces. I painted a few of them to tuck into the clusters.

"Comfy with My Daddy" mixed media layout by Tracey Sabella. Entered in the March More Than Words Main Challenge. #49andMarket  #49&Market  #DustyAttic #Finnabair #PrimaMarketing #mixedmedia #scrapbooklayout  #chipboard  #papercrafting #prills #mtwchallenges
A close-up of the sweet side cluster. You can see that I lightly brushed the edges of these lovely flowers with Finnabair gold and white gold waxes. I have a drawer of jewelry pieces and findings that I have picked up on clearance at local craft stores over the years. A bit of Amethyst Magic Finnabair Wax and this one is perfect to tuck in amongst the flowers.

"Comfy with My Daddy" mixed media layout by Tracey Sabella. Entered in the March More Than Words Main Challenge. #49andMarket  #49&Market  #DustyAttic #Finnabair #PrimaMarketing #mixedmedia #scrapbooklayout  #chipboard  #papercrafting #prills #mtwchallenges
The photo is framed with corrugated cardboard with layers of color and shimmer with metallic paints and Finnabair waxes. I added texture by applying Prills, seed beads and Finnabair microbeads to the frame with gel medium and more of the jewelry pieces are tucked in as well.

I found a wonderful distressed typewriter font called Trixie to use for my title. I printed it on white cardstock and colored with distress ink to coordinate.

"Comfy with My Daddy" mixed media layout by Tracey Sabella. Entered in the March More Than Words Main Challenge. #49andMarket  #49&Market  #DustyAttic #Finnabair #PrimaMarketing #mixedmedia #scrapbooklayout  #chipboard  #papercrafting #prills #mtwchallenges
Texture is created around the frame with frayed cheesecloth dyed dark green with Lindy's Stamp Gang Frosty Forest Green Starburst mist. The frayed edges are adhered by brushing with Finnabair Soft Matte Gel Medium. Before attaching the frame and cheesecloth, I used light molding paste with Art Anthology's Lotus Stencil for background texture. Violet gold metallic paint is thinned with water and brushed around the frame. I spritzed with a little more water and patted the edges lightly with paper towels to blend the color into the background. 

"Comfy with My Daddy" mixed media layout by Tracey Sabella. Entered in the March More Than Words Main Challenge. #49andMarket  #49&Market  #DustyAttic #Finnabair #PrimaMarketing #mixedmedia #scrapbooklayout  #chipboard  #papercrafting #prills #mtwchallenges
I used more bits of dyed cheesecloth as well as mica flakes and an assortment of embellishments to add texture below the photo.

I enjoyed creating this page for the More Than Words March Main Challenge!

Product List
49 and Market ~ Scents of Nature - Clockworks
49 and Market ~ Vintage Shades - Orchid Blossoms
49 and Market ~ Shimmer & Shine - Lilac Jardin
49 and Market ~ Shimmer & Shine - Lilac Fleurs Des Champs
49 and Market ~ Roses – Aqua/Teal
49 and Market ~ Photopolymer Stamps - Gabi’s Texture Stamp Set
49 and Market ~ Layered Die Cut Embellishments - Butterfly Harvest
Dusty Attic ~ Vine Corner DA0753
Dusty Attic ~ Spider Chrysanthemum
Cardstock ~ White
Arches ~ Aquarelle Watercolour Paper - Cold Pressed 140lb
Darice ~ Designs By Me - Beads: Lavender Crystal Balls
Cheese Cloth
US ArtQuest ~ Prills - Lavender and Lace
Stampendous ~ Fragments - Pearlized Mica; Lavender 
Assorted rhinestones, beads and jewelry pieces
Prima ~ Pebbles - Music Note
Prima ~ Say It In Crystals #563639
Prima ~ Finnabair - Art Basics: Gesso - Clear, Black
Prima ~ Finnabair - Art Basics: Light Paste
Prima ~ Finnabair - Art Basics: Soft Matte Gel
Prima ~ Finnabair - Art Alchemy: Acrylic Paint - Metallique Soft Satin
Prima ~ Finnabair - Art Alchemy: Antique Brilliance Wax - Amethyst Magic; Mystic Turquoise
Prima ~ Finnabair - Art Alchemy: Metallique Wax - White Gold; Vintage Gold
Prima ~ Finnabair - Art Ingredients: Mica Powder - Gold Opal Magic 
Prima ~ Finnabair - Art Ingredients: Texture Powder
Prima ~ Finnabair - Art Ingredients: Micorbeads - Gold
Prima ~ Iron Orchid Designs - Paper Clay
Liquitex ~ Gesso - White
Ranger ~ Distress Ink - Weathered Wood; Bundled Sage; Hickory Smoke; Black Soot
Lindy’s Stamp Gang ~ Starburst - Frosty Forest Green; Creme Brûlée Cream; Cam Bake Beige; Magnolia Magenta Gold; Frolic in the Forest Black
Viva Decor ~ Croco Crackling Colour - Transparent
Jacquard ~ Lumiere Metallic Acrylic Paint - Halo Blue Gold; Halo Violet Gold
Folk Art ~ Acrylic Paint - Metallic Sequin Black
M Graham & Co. ~ Artist Watercolor - Phthalocyanine Green
Royal Talens ~ Ecoline Liquid Watercolor - Black 700
Art Anthology ~ 6x9 Stencil - Lotus
Prima ~ Iron Orchid Designs - Keyholes Vintage Art Decor Mould
Martha Stewart ~ Crafter's Clay Silicone Molds - Antique
Trixie Font
Helmar ~ 450 Quick Dry Adhesive
Tombow Mono Multi Liquid Glue

Thanks for stopping by! I treasure your comments.
~ Blessings ~

Wednesday, November 25, 2015

"Come Unto Me" Journal page for Donna Salazar Designs

I would like to wish all of my US followers a happy Thanksgiving as we celebrate this holiday tomorrow. A day to reflect on the many blessings that have come our way and to spend time with our loved ones over a special meal of turkey and all the fixings. Do you have a special holiday food? When we lived in North Carolina, I discovered a recipe for praline sweet potatoes. I grew up eating canned sweet potatoes and just a small spoonful was more than enough. When I tasted these, I actually liked them and had to have the recipe. They have become a family tradition and one of my favorite holiday foods. 

I'm up on Donna Salazar's blog today with a new entry for my Faith Art Journal created with Donna Salazar's fabulous products. This is a favorite verse of mine and always an encouragement when I'm weary or when troubles come my way. I wanted a serene background, so kept to a mostly monochromatic background with a subtle bit of color on the chipboard flower.

Here's a sneak peek:

Please stop by Donna's blog for all the details HERE.

~ Blessings ~


Donna Salazar Products


Donna Salazar Designs
Dear Sir ~ Rubber Stamp
Crackle ~ Rubber Stamp

Partner Products
Scrapbook Adhesives by 3L® ~ Crafty Foam Tape
Clearsnap®/Colorbox® ~ Foam Blending Tool
Clearsnap®/Colorbox® ~ Embossing Powder - Clear
Spellbinders®  ~ Radiant Rectangles

Other Products
13 Arts ~ Fly Away – Always Reach Higher
Dusty Attic ~ Spider Chrystanthemum DA10433
Liquitex ~ Gesso – clear, white
Liquitex ~ Matte Medium
Faber-Castell ~ Whipped Spackle
Close to My Heart ~ Everlasting Life – Holidays 

Wednesday, July 29, 2015

Wedding Card by Tracey Sabella for Helmar

Wedding card by Tracey Sabella for Helmar: Fabric Glue, Leaky Shed Studio Chipboard, Dusty Attic Chipboard, Mixed Media, Shabby Chic, Maja Summer Basics

Hi everyone!! I have a new project up on the Helmar blog today with a wedding card featuring Helmar Fabric Glue.

My dear scrapbooking friend, Mandy was married last month. We've been friends for many years and have spent many an hour creating together, so I wanted to create something extra special for her. The focal piece of my card is a chipboard mannequin I dressed up with eyelash yarn and feathers. Helmar Fabric Glue is the perfect adhesive for this task.

Tips and Techniques
Wedding card by Tracey Sabella for Helmar: Fabric Glue, Leaky Shed Studio Chipboard, Mixed Media, Shabby Chic, Maja Summer Basics
I started by painting the chipboard with a pearlescent medium. It's not shown here, but I precut the yarn pieces a little longer than the distance between the waist and the hem.

Wedding card by Tracey Sabella for Helmar: Fabric Glue, Leaky Shed Studio Chipboard, Mixed Media, Shabby Chic, Maja Summer Basics
I squeezed out a line of Helmar Fabric Glue across the waist,
and placed the yarn and feathers into this bead of glue.

Wedding card by Tracey Sabella for Helmar: Fabric Glue, Leaky Shed Studio Chipboard, Dusty Attic Chipboard, Mixed Media, Shabby Chic, Maja Summer Basics
I covered the glued area by adhering a strip of ribbon across the waist, over the edge of the yarn pieces. I finished it off with a strip of pearls and tiny rose buds. These are all adhered with Helmar Fabric Glue as well.

Wedding card by Tracey Sabella for Helmar: Fabric Glue, Leaky Shed Studio Chipboard, Dusty Attic Chipboard, Mixed Media, Shabby Chic, Maja Summer Basics
I painted this delightful chipboard corner flourish and added half pearls to embellish. Because the background is uneven from the stenciling, I needed a strong adhesive to hold it in place. Of course I grabbed my Helmar 450 Quick Dry Adhesive for this job.

Wedding card by Tracey Sabella for Helmar: Fabric Glue, Leaky Shed Studio Chipboard, Dusty Attic Chipboard, Mixed Media, Shabby Chic, Maja Summer Basics
I stamped the love sentiment on a scrap of cardstock. I wanted it to lay flat, so I used Helmar Clear Zapdots where there was no stenciling and a dab of Helmar 450 Quick Dry Adhesive
on the stenciled areas. Because the clear Zapdots are so thin, they gave just the right amount of dimension to help my sentiment to sit evenly on the card.

I brushed little dabs of Helmar Super-Tac EVA Glue below the
sentiment and sprinkle with iridescent shaved ice flakes. 

Wedding card by Tracey Sabella for Helmar: Fabric Glue, Leaky Shed Studio Chipboard, Dusty Attic Chipboard, Mixed Media, Shabby Chic, Maja Summer Basics
Here I used more Helmar Fabric Glue to adhere burlap and hand dyed lace to the bottom of the card.

I hope you've been inspired to grab your Helmar Fabric Glue to adhere
the fiber elements to your next shabby chic project.


Helmar Products

Other Products
Maja ~ Vintage Summer Basics 1934
White Cardstock ~ Stash
Dusty Attic ~ Corner Flourish #4 DA0873
Dusty Attic ~ Mini Vine DA0370
Leaky Shed Studio ~ Dress Form 
Wild Orchid Crafts ~ 4mm Rosebuds, Pastel Tone
Midwest Design ~ Touch of Nature - Feathers, white
Fused Pearls ~ iridescent - stash
Beaded Lace ~ Stash
Organza Ribbon ~ Stash
Adhesive Backed Half Pearls ~ Stash
Lion Brand Yarn ~ Romance, Silky White
Hug Snug ~ Seam Binding, white
Burlap - Stash
DecoArt ~ Texture Crackle
Clearsnap by Donna Salazar ~ Mix’d Media Inx ~ Chiffon, Patina, Pewter, Denim
Clearsnap ~ Top Boss - Embossing Powder, clear
Ranger ~ Archival Ink, Jet Black
Viva ~ Pearl Pen, cream
Liquitex ~ Gesso - clear, white
Caran D’ache ~ Neocolor II - Watersoluble Wax Pastels, turquoise blue, cobalt blue, prussian blue
Sparkle N Sprinkle ~ Embossing Powder - Opaline
Stampendous ~ Fran-tage - Shaved Ice
Tim Holtz ~ Stampers Anonymous - Vistual Artistry Clear Stamps, Urban Grunge
Inky Antics ~ Clear Sets - Guided Path
Stampendous ~ Rubber Stamps - Cling Dreams Come True
Tim Holtz ~ Stampers Anonymous - Flourish; Speckles
Darice ~ Heat Tool

Thanks for stopping by! I treasure your comments.

~ Blessing ~

Tuesday, January 13, 2015

Faith Art Journal with Wispy Burlap Flower Tutorial for Donna Salazar's CHA New Release

I'm so excited to share in the CHA excitement of creating with Donna's new Scrapbook Adhesives by 3L products.

You know how much I enjoy mixing delicate girlie elements with rugged grungy things, and that's exactly what I got to do with these amazing new products to create my Faith Art Journal cover. As much as I adore mixed media, I've never worked with an art journal, so when I saw Donna's new Denim Craft Book with yummy thick chipboard pages, I knew this was my chance to dig in and create my first art journal. I started with the cover.

Be sure to scroll down the post to check out my photo tutorial for my Wispy Burlap Flowers. They are so easy to create with Donna's new Burlap Ribbon!!

Faith Art Journal

In my typical fashion, I altered the denim cover dramatically. What I love is that you can still see the texture and bits of blue denim peeking through. You can literally let your imagination run wild with this fabulous Craft Book. It is a generous 8 x 10 inches and contains 6 thick chipboard pages, which means one side for every month of the year, so you could create a calendar, planner, mini album, mixed media art journal . . .  I plan to create art pages for some of my favorite Scripture verses, so stay tuned to see what I come up with. 

Tips and Techniques
I created the Wispy Burlap Flowers from Donna's new Burlap Ribbon. They are so easy to create!! I've included a step by step tutorial, so be sure to scroll down to check it out so you can make some of your own! I was inspired by burlap flowers created by Cool2Scrap found HERE.

I wanted to accent with denim elements, so used both of Donna's denim products by Scrapbook Adhesives by 3L to created these sweet flowers. Those products are her Denim Sheets (Packaged with Canvas Flags) and Denim Ribbon (packaged with Canvas Ribbon). They are different weights and colors so give a different feel even though they are the same size. I used the Clover 1 1/2" Kanzashi Flower Maker for a template. The finished flowers are dry brushed with gesso, and sprinkled with Twinkle Dust Glitter. I also tucked in a rhinestone broach from my jewelry findings collection.

Yes, Donna also designed adhesive products as well!! I used her Scrapbook Adhesives by 3L Foam Swirls to tuck in under each of my denim flowers. I sprinkled a combination of Clearsnap Mix'd Media Inx Embossing Powders in Honey and Denim across the adhesive surface and heat set. They paired beautifully with the chipboard piece I embossed similarly after inking with Mix'd Media Inx.

Here you can see the beautiful texture and bits of blue denim showing through. Donna has two cotton laces packaged together including this looped lace and the crocheted lace seen in the following photo. Like most lace, it's treated with sizing to keep it's lovely shape. The sizing needs to be removed for it to accept color. I rubbed the lace gently in warm water then pressed between two towels to remove most of the water then colored with diluted Pralines and Cream Smooch Spritz.

I dabbed the corner of the page, lace, and the trio of butterflies along the side with Glue Gloss and sprinkled with Twinkle Dust Glitter. 

My embossed chipboard letters are in the same color family as the background, so I used the gorgeous colored crochet lace to provide contrast. 

The Craft Book cover was painted with white gesso, leaving some areas of denim peeking through. I set this aside to dry while I created my flowers. Next I adhered pieces of printed tissue paper and dictionary paper from Donna's older Mix'd Media Stax 2 pad. (Can you find the denim definition??) Finally I stenciled with Mix'd Media Inx, then sprinkled lightly with coordinating Mix'd Media Inx Embossing Powders, then dry brushed lightly with more gesso. Around the cluster area I brushed on diluted Pralines and Cream Smooch Spritz.

Finally, I dabbed gel medium across the page then sprinkled with a mix of microbeads and chunky glass glitter. 

Wispy Burlap Flower Tutorial

Supply List
Donna Salazar ~ Scrapbook Adhesives by 3L - Burlap Ribbon
Scissors
Tacky quick drying glue of choice (I used Helmar 450)
Trinket for flower center.

Step 1. Cut an 8 1/2 inch length of Donna’s Burlap Ribbon. (no photo)

Step 2. Pull out the length wise threads of burlap, leaving the stitched edge threads in place. 

***Tip*** When you get to the threads near the edges, they may be caught at one end in the  edge stitching. Just snip off the thread being careful not to cut into the stitched edge and then pull the thread out.

Here's another close up of what it looks like as you pull this thread out.

Here's what it looks like with all the threads pulled out.

Step 3. Place a bead of quick drying tacky glue down one of the stitched edges. (My preference is Helmar 450 Quick Drying Adhesive.) 

Step 4. Fold the burlap in half lengthwise placing the other stitched edge over the glued edge as shown in the photo. 

***Tip*** It is inevitable that some of the cross threads on each end will come out. Once you glue the two sides together, you can trip off any excess stitched edge that extends out past the loops.

Step 5. Place another bead of glue down the stitched edge.

Step 6. Starting at one end, roll the glued edge to form your flower. I left a small opening (about 1/4 inch) in the center so it would be easier to add a button or gem. You wouldn’t need to leave an opening or could leave an even larger opening depending on the look you desire.

Bottom view of rolled up flower.

Top view of rolled up flower.

You can try different lengths of Burlap Ribbon to change the fullness of your flowers. For a more open flower, use your fingers to open up the flower pushing the loops from the center outward, then place a heavy book on the open flower, letting it sit over night

View after fluffing/pushing out loops.

Glittered with crystal bead center.

Thanks for stopping by today for CHA inspiration.
I hope you're as excited as I am about Donna's new
girlie grunge Scrapbooking Adhesives by 3L products!!


Donna Salazar Products
Scrapbook Adhesives by 3L
Craft Book, Denim Cover
Denim Ribbon
Denim Sheets
Burlap Ribbon
Foam Swirls
Lace Ribbons (Both types)
Clearsnap
Mix’d Media Inx – Denim, Truffle
Mix’d Media Inx Embossing Powder – Truffle, Denim, Honey
Smooch Spritz – Pralines and Cream
Twinkle Dust Glitter – Sugar Shimmer

Partner Products
Clearsnap ~ Glue Gloss
Clearsnap ~ Foam Applicators

Other Products
Idea-ology ~ Tissue Wrap Paper - Melange
Dusty Attic ~ Swirly Vines #3 DA0751; Mini ABC Set Upper #DA0861N
Momenta ~ Antique Silver Intricate Brad Top Metal Stickers #ST-5698; Antique Bronze Photo Corner Metal Stickers #17518
Styled by Tori Spelling  ~ Pendant #8466 201308 0101
Berry Cluster (Blue) ~ Spring Floral Pick, JoAnn’s
Smoky Crystal Beads ~ Stash
Golden ~ Soft Gel – Matte
Liquitex ~ Gesso – White
Stampendous ~ Fran-tage - Glass Glitter, Champagne; Royal Blue
Martha Stewart ~ Metallic Glass Microbeads – Fire Opal,  Lapis Lazuli
Stampers Anonymous ~ Stencil – Doily, Burlap
TCW ~ Zenspirations 6x6” Stencil ~ Mini Specimens 
Helmar ~ 450 Quick Dry Adhesive
Tombow ~ Multi Mono Liquid Glue
Clover ~ Kanzashi Flower Maker – 1 ½”/35mm #8493
Darice Heat Tool

Thanks for stopping by! I treasure your comments.
~ Blessings ~

Thursday, October 31, 2013

"Creativity" for Once Upon A...Sketch November Challenge featuring Really Reasonable Ribbon

Nadia has created another fabulous challenge for our November Once Upon A...Sketch Challenge. This month's theme is "My Happy Place." There are a number of happy places in my life that I share in my journaling. One of those special "places" is expressing my creativity. Creativity has always been an important part of my life. Even as a little girl, I could be found sewing up doll clothes, crocheting little book marks, crafting gifts for family and friends . . .  Paper crafting has been a fabulous creative outlet for me. This layout is about how creativity is my happy place and features ribbon, flowers, and adhesives from the Really Reasonable Ribbon Store

"Creativity"


Journaling Theme: "My Happy Place"
You are free to interpret our theme ANY WAY you like. It is for your inspiration and this theme word DOES NOT need to be part of your title or journaling. But please make sure your layout is based on the sketch below and includes journaling (hidden journaling is fine). Acceptable journaling is MORE than just a sentence, or generic writing such as date/place etc. It need to be present and at least 3 lines long. Remember, hidden journaling is perfectly fine but please DO let us know in your post where your journaling is!


Tips and Techniques:
Here you can see the cluster with the Grungy Wrinkled Ribbon bow. My tutorial for this ribbon technique can be found here. I started with White Seam Binding and used my Zutter Bow-it-All to tie the bow. This tool is quite handy and if you are interested in learning how to use it, the best videos I've seen are by RRR owner, Bonnie Garby. And you are in luck, Zutter has provided a Bow-it-All for her to give away. You can find links to her fabulous videos and enter the Bow-it-All giveaway drawing here

You can see my mixed media background where I've stenciled, misted, and brushed with gesso. The gorgeous Dusty Attic Ornate Gate chipboard is simply painted with white spray gesso. 

I used a mix of flowers from Really Reasonable Ribbon and my stash. Here you can see the 20mm White Open Rose and Chrysanthemum. I dry brushed most of my flowers and metal flourish with gesso. 
More Really Reasonable Ribbon Flowers ~ Chrysanthemum, Cottage Rose, and Open Rose. I've been trying to use up items from my stash and here you can see these sweet epoxy stickers that I tucked around this cluster. I tucked in some White Crochet Lace below and above my photo. Scor-Tape works beautifully for adhering lace and ribbon!!

I recently went to an auction with a friend. Oh my, there were rows and rows of odd lots and boxes of stuff. One of the things that caught my eye was this basket of old paint brushes. I've been seeing some pretty cool decor projects using old used up paint brushes and thought these would be perfect for decorating. They got grouped with some other odd boxes and I lost the bid, however, the woman who purchased the lot was delighted to sell them to me for a dollar. When I saw this month's OUAS challenge, I thought this rustic basket of brushes would be the perfect object to express the idea of creativity. The old weathered chair and gorgeous fall mums are a perfect backdrop for this charming basket. 

I painted this butterfly chipboard piece with metallic paints and dry brushed with gesso. The metal piece is also brushed with gesso. This cluster features WOC Chrysanthemums, Cherry Blossom, Cosmos, and a sweet Open Rose from Really Reasonable Ribbon.

Here is what my journaling says, "There are many things in my life that bring joy . . . my Lord, my family, the beauty of God's creation . . .  Something that has always been a happy place for me is creativity. Pulling out mixed media supplies to paper craft brings joy to my day."


Really Reasonable Ribbon Products:
Seam Binding ~ White 1/2"
White Crochet Lace ~ May Arts 3/8"
Wild Orchid Crafts Mulberry Flowers ~ 20mm Open Roses - White
Wild Orchid Crafts Mulberry Flowers ~ 25mm Cottage Rose - Mixed White/Cream
Wild Orchid Crafts Mulberry Flowers ~ Cherry Blossoms - White/Cream
Wild Orchid Crafts Mulberry Flowers ~ Chrysanthemums - Mixed Pink/White
Wild Orchid Crafts Mulberry Flowers ~ Cosmos Daisy Stem Flowers - Pink/White
Wild Orchid Crafts Mulberry Flowers ~ Sweetheart Blossoms - White
Wild Orchid Crafts Mulberry Flowers ~ Sweetheart Blossoms - 2-Tone Baby Pink
Zutter Bow-it-All
Scor-Tape 6" x 6"
Other Products:
7 Dots Studio ~ 9th Wave Collection
Prima flowers, stencils
Dusty Attic chipboard
Heidi Grace Epoxy word stickers
Momenta metal flourishes
Tattered Angels Glimmer Mist
Mister Huey Color Mist
Gesso
Light Molding Paste
Clear epoxy circles
Be sure to stop back by tomorrow (Friday) afternoon
for some exciting news I'll be sharing!!
Follow on Bloglovin

Thanks for stopping by! I treasure your comments.

~ Blessings ~