
Welcome to my creative space.
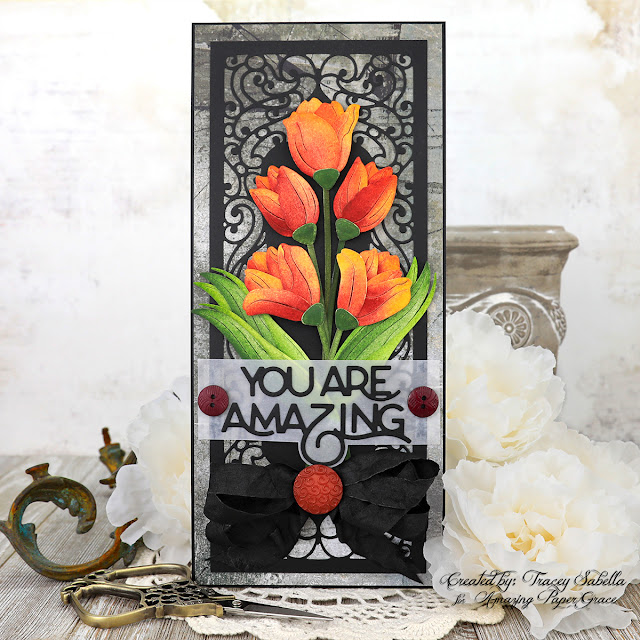
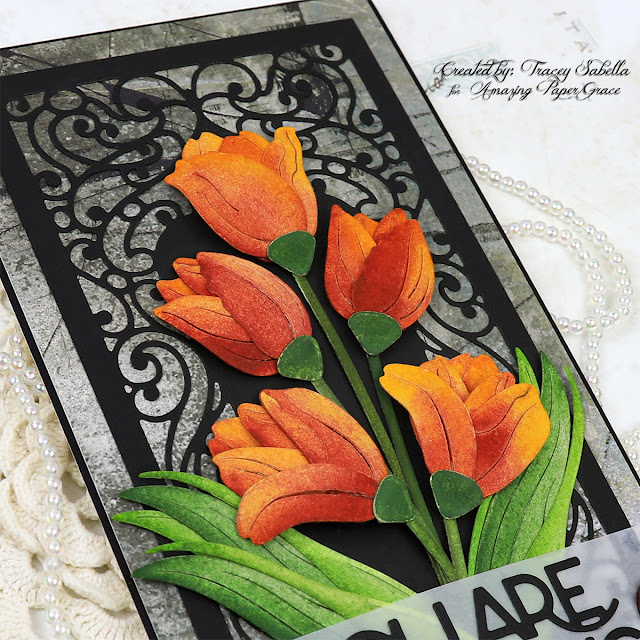
As soon as I saw this gorgeous Amazing Paper Grace Layered Tulips dies (S4-1195) I thought of the vibrant red and orange/yellow blossoms I grew up adoring. I've used a wet on wet watercolor technique for these tulips cut from watercolor paper.
I was inspired by this lovely photo.

The scrollwork layer is cut using the fabulous Half Slimline Bracket (S4-1199) with this fabulous sentiment cut from the newly released You're Amazing (S4-1203) set from The Right Words collection. I kept with darker grungy colors for my background to keep with my shabby aesthetic and to help the colors in these vibrant beauties to pop.
Be sure to scroll down through the "Tips and Techniques" section below for close-ups and all the details on how to create this beautiful card and gorgeous tulips.
Thank you Amazing Paper Grace for providing the dies used in this project.
Tips and Techniques
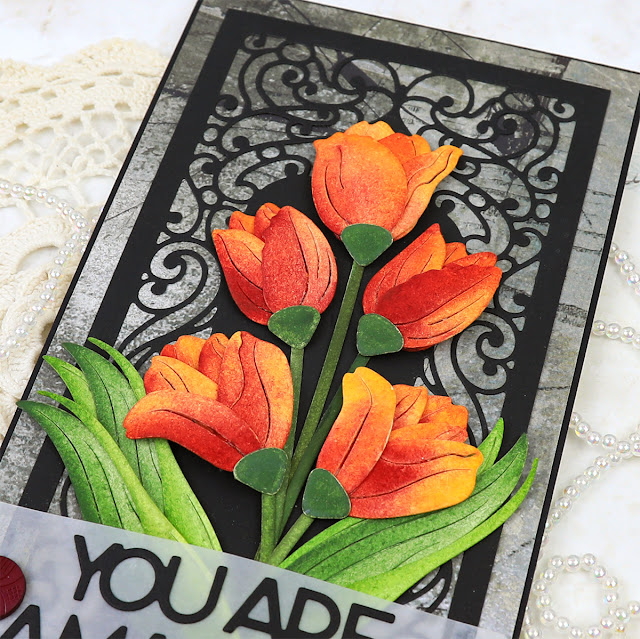
I used watercolor paper to cut these blossoms and foliage. I pulled out all the die cuts for one tulip blossom and used a wash brush to apply a generous layer of water across each petal and while wet brushed first with the yellow/orange color, then while wet came back in with the red and brushed down the left side of each petal and towards the bottom across the entire petal. At this point, I used a dry paper towel to pat off any of the red where I wanted more yellow to show through where needed.
I just adore how the colors bloomed into each other to create such an organic flow of color that looks so much like the real tulip flowers in the photo above. I repeated this process for each of the five blossoms.
I used the same watercolor technique on the beautiful leaves using greens. The green bases and stems are washed in a solid green color.
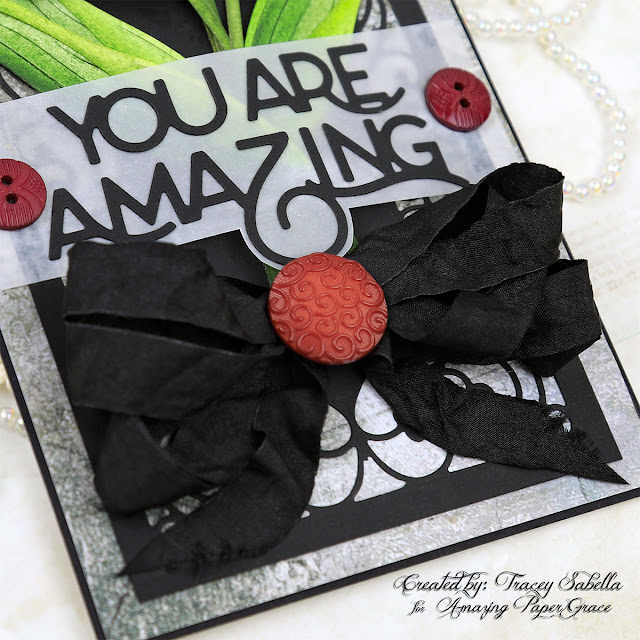
This fabulous sentiment is cut from black cardstock with the You're Amazing die set (S4-1203). I backed it with vellum that has a cloudy design in it. I trimmed around the bottom of the vellum to let more of the background show through and to add a lovely design element to the card.
I used black wrinkled ribbon to tie a three loop bow for a lovely embellishment and to help fill in this bottom area. I had laid everything out before gluing the blossoms down, but still ended up with more space on the bottom than I really wanted, so this bow was a perfect solution and really adds a gorgeous touch to this card.
I pulled in the colors of the tulips by adding a lovely swirled button to the center of the bow and a couple smaller buttons to each side of the sentiment.
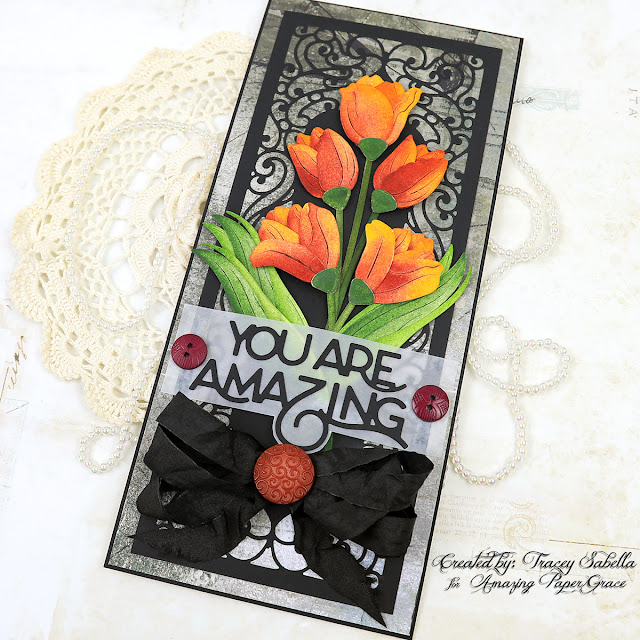
If the scrollwork design looks familiar, it's cut from the Half Slimline Bracket die set (S4-1199) which I used on my tag with Distress Oxide blending earlier this month. Wow, two strikingly different looks using the same die set. This time I cut the design directly into the paper without using the edge die, then flipped the die and matched up the design to die cut it a second time for the mirror image. The outside edge was then cut to allow a 1/4 inch border.
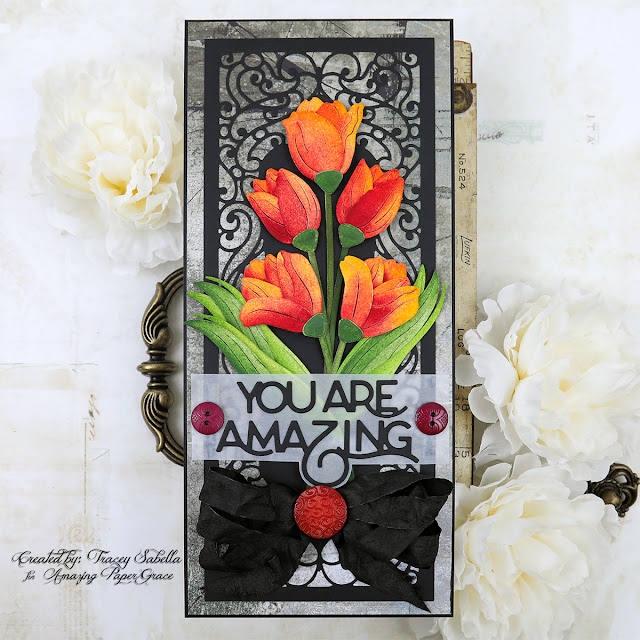
Once the black scrolled piece was cut, I laid the tulips on top and tried several patterned papers underneath to decide which one worked best. I like this grey grungy design which gave a nice contrast to the black die cut layer and helped the colors in the blossoms to pop so beautifully.
Amazing Paper Grace Dies:
Paper:
- Prima - Art Philosophy ~ 12 x 12 Watercolor Paper Pad
- Dress My Craft ~ A4 Cardstock - Black - 10 Pack
- Blue Fern Studios ~ Chesterville Collection
Mixed Media:
- M. Graham ~ Artists' Watercolors
Embellishments:
- May Arts ~ Wrinkled Ribbon - Black, 1/2"
- Dress It Up ~ Buttons
Adhesives:
- Scrapbook.com ~ Clear Double Sided Adhesive Roll, 1/4"
- Tombow ~ Mono MULTI Liquid Glue
- Helmar ~ 450 Quick Dry Adhesive
- Beacon ~ 3-IN-1 Advanced Craft Glue
- Beacon ~ Fabri-Tac
Tools:
- Spellbinders ~ Platinum 6

Thanks for stopping by! I treasure your comments.
~ Blessings ~
No comments:
Post a Comment
Thanks for taking the time to stop by and leave a message! I treasure your comments.