Sunday, December 9, 2012

ScrapThat! DT Call

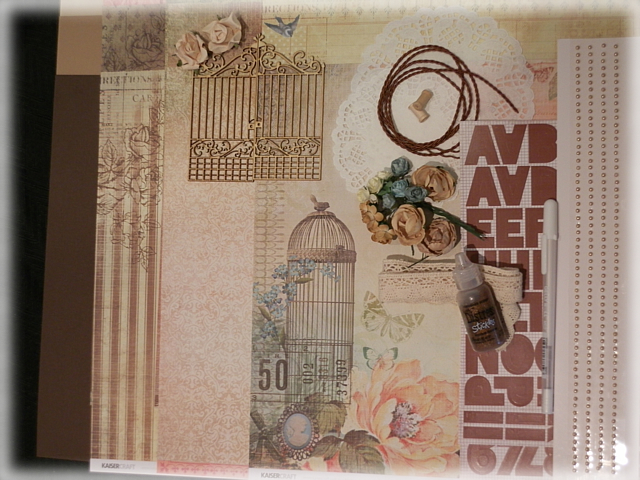
ScrapThat! is looking for a new design team member with Social Media Coordinator responsibilities. If you would enjoy designing with ScrapThat!'s beautiful shabby chic kits each month and have the skills to work with our Facebook and Pinterest accounts each month, check out our call for applicants:

ScrapThat! ~ Canada's Best Kit Club is looking for a Designer/Social Media Coordinator(must be able to maintain the ScrapThat! Facebook page and Pinterest Account) to join our Design Team!
Design Team members receive:
1. FREE PRODUCT - A full monthly kit plus the embellishment add-on kit, valued at well over $50 retail. 
2. GENEROUS DISCOUNT - A 30% discount on all product purchases that will fit in the box with your kit to ship free of charge!
3. FAME & GLORY - Your photo and bio on our Design Team page!

What we ask of you: 
  •  A 6-month term exclusive to ScrapThat! Product manufacturer sites are fine, but we must be the only online store/kit club that you design for.
  • Be responsible for taking good quality pictures of the monthly kits and add-ons.
  • Make regular posts to the ScrapThat! Facebook Page.
  •  Upload Monthly Kit Creations to Facebook and Pinterest.
  •  You must have a blog and Facebook account and update it regularly each week including posts about projects you’ve created from the kit, design tips etc. We ask that you also have links to our site on your blog and any other sites you are involved with where allowable 
  •   Minimum of 3 projects created every month with the kit.  90% of each project must contain kit contents. One layout must use the main kit contents only, (no items from the add on kits).
  •  Post your 3 kit designs plus an additional 2 projects of your choice (made with your stash) in our gallery every month as well as to one other large gallery site, either www.Scrapbook.com  or www.TwoPeasinaBucket.com.  Postings on these sites must include *ScrapThat! Kit* in the title line
  •  Projects must be well photographed, cropped and ready to be uploaded on our site (and your blog) the last Friday of the month.
  •  Participation in our monthly blog hops and contests is required
  •  Community forum and gallery participation. This is quite possibly the most important thing! We have a terrific online community and our members are of the utmost importance to us, so this is huge!
  •  Keep up-to-date on design and product trends in order to contribute product ideas to include in the monthly kit and ideas of how to generate more sales
  •  Submit your kit design work for publication when applicable to open calls. Where possible, credit must always be given for projects created using our kits
Please submit a link to your blog, along with three of your favorite recent layouts to: kaitlyn@scrapthat.ca by December 31, 2012.  This opportunity is open to applicants residing in North America.

Thursday, December 6, 2012

Ten Favorite Chipboard Projects

I enjoy the versatility of chipboard and have so much fun employing a variety of techniques including some that I've created with to go with my pages. Today I'm sharing ten of my favorite chipboard layouts. Click on the page title if you would like to go to the original post for more details and close-ups. For pages where I have a tutorial, the link is below the photo.

1) I love to play with chipboard and come up with new techniques that fit with my page design and theme. This grungy chipboard was treated with puffy paint and mist.

"Mom"
For my Misted Puffy Paint Tutorial, please see the original post.

2) I just adored the photo of the bronze statue and played to create a chipboard finish to look like the pounded bronze in the statue. I finished off the sign with some crackle for another lovely aged look. 

For my Bronzed and Crackled Chipboard Tutorial, please see my original post. 

3) To get a steampunk feel on these chipboard gears, I blistered some metallic paint with my heat tool then layered on patina ink.

"Dick"

4) This chipboard door is full out altered with mist, rock salt, crackle, and distressing, while a couple coats of metallic paint gave the holly leaves all the shimmer they needed.


5) I used a number of techniques on these sweet angels: paint, crackle, metallic paint, and glitter. I hope you will come back tomorrow (Friday) for my tutorial.

Crackled, Glittered Angel Tutorial

6) This simple little chipboard tag was painted and the edges softened with distress ink. It may be simple, but adds such charm to this page. 

"Our Future Forever Linked"

7) The title tag was quickly painted, then when dry stamped with a crackle image. The lavender floral flourish was covered with crinkled tissue paper and misted (Yes I like texture on top of texture!) 


8) The chipboard here provides such a pretty border for the smaller photo and elements in this "white space" layout. 

"Beautiful Life"

9) I recently discovered Sophisticated Finishes products. The copper and patina green are perfect to give some authentic looking age to these bells. The ribbon and poinsettia are painted with Copic's glittery Spica markers.

"Mother"

10) And finally for the pure fun factor I've included this page with the distressed flourish and arrows. 


I'm sure you've been seeing a number of top 10 favorite chipboard posts. So if you are thinking that I'm submitting an application to Imaginarium Designs for their design team, you are right on the mark. Their products are beyond amazing, and it would be a dream to work with their fabulous chipboard designs.

Thanks for stopping by! I treasure your comments
~ Blessings ~

Friday, November 30, 2012

ScrapThat! "Memories . . ." December Kit Reveal and Blog Hop

Welcome to the ScrapThat!
December Kit Reveal and Blog Hop!!


If you came here from
Sarah Routledge
then you are on the right track!
 
We are so excited to show you our wonderfully Christmas themed December kit
featuring the beautiful "Turtle Dove" Collection by Kaisercraft..

We are so thrilled to have the amazing Robin Shakoor

join us as our December Guest Designer!

We have more exciting news as we welcome 
Tracey Gregory, our
November Guest Designer, to the ScrapThat! family as an official DT member!!

So, without further ado . . .introducing our
~ December Kit Reveal ~ "Memories. . ."

Featuring Kaisercraft's "Turtle Dove" line, this kit combines elegant vintage images with classic Christmas colors, so whether you prefer shabby, classic or vintage style pages ~ you can do it all with this kit!


Included are poinsettias and holiday leaves from WOC and Green Tara, multiple ribbons from May Arts, Christmas chippies from Fabscraps and more! The Prima flowers in the add-on are such a great mix of textures from neutral to blingy!

December Main Kit:

Flower Add-On

Embellishment Add-On


Paper Add-On

More details on this breathtaking Christmas Collection can be seen here: 
ScrapThat! Store

We are currently accepting new Kit Club Members.
For more information, complete the form on the link below:
New Subscriber

Look what Amarilys created for December's sketch challenge!
See details about the challenge here: Sketch Challenges
Everyone is welcome to participate, all entries due by December 15.

My first layout is based on Amy's amazing sketch:

"Mother"
Using the MK only.

During Joseph and Rachel's wedding ceremony, they came down to greet and honor each mother with a rose. This photo is of us embracing during that moment. 

This kit is so full of amazing embellishments from the gorgeous red ribbon and gold bow to the fabulous poinsettia's and large red flower and so much more. The roses were created with cardstock included in the kit. The only thing I added was mixed media products, cardboard packaging and a length of webbed ribbon. Everything else is from the main kit. 

"Sledding"
Using the December MK, EAO, and FAO Kits.

An older photo of our son sledding. We lived in North Carolina back then, and it was a real treat to come to Ohio for Christmas and get to go sledding. 

Tip ~ Three of these gorgeous snowflake brads are silver, which didn't show up quite as well as I would have liked on this background, so just a touch of white paint, and they were perfect. 

I used the Once Upon a Sketch November Challenge for inspiration. My journaling is on the tag tucked behind the photo and says, "Each year we traveled to Ohio to be with family for Christmas. You always hoped it would snow so Grandpa Sabella would take you sledding at the East Canton driving range."


"Sweet Angel"
Using the MK, EOA, and FAO kits.

Another older photo of our daughter, Elizabeth. Our children were in a Christmas play, and she was one of the littlest and sweetest angels there. 

Tip ~ I often cut out the paper behind my larger layers to use on other parts of my layout. One of my flags and the leaves were cut from the background paper taken from behind the large center paper strip. 

I will be posting a tutorial on how I created these angels with the Fabscrap chipboard included in the EAO kit, so if you would like to learn how to create some of your own, be sure to come back in December for my tutorial.

I selected the title "Sweet Angel" for the Bird is the Word "Sweet" Challenge. All of the gorgeous papers and pearl "berries" are from Kaisercraft, and I was inspired by the November #1 Sketch at Kaisercraft for this page:


I hope you've been inspired by all the DT Blogs and our Guest Designer, Robin Shakoor. 

If you would like to be entered in our blog hop for a chance to receive one of our amazing April Main Kits,  read the rules below and hop back over to the ScrapThat! Blog for your final stop.

Our Blog Hop features 6 fantastic blogs from our Design Team.
We have been scrapping away and are so excited to show you our creations!

Our SPECTACULAR December Blog Hop Prize is a ScrapThat! April "Serendipity" Main Kit featuring the amazing Sweet Nothings Collection from Kaisercraft.

To qualify for this month's FABULOUS Prize you must complete the following:
* Visit each blog listed on the hop to see what each designer has created using this month's kit and sketch (comments are very much appreciated).
* Each designer's blog hop post will feature a word to make up a secret sentence, collect these words along the way.
* You must become a FOLLOWER of each blog along the way and LIKE us on our Facebook Page!
* Post the ScrapThat! Blinkie on your blog.
* Your final stop will be back at the ScrapThat! Chat Blog to leave a comment letting us know how much you enjoyed the hop.

*Email the secret sentence to Tracey Sabella: tracey@scrapthat.ca
(Please do NOT include the secret sentence in your comments.)

The Blog Hop ends Sunday, Dec 2 at Midnight EST

My secret word is: **Long.**

Your next and final stop on the hop is:

Should you lose your way, here is the Blog Hop sequence:

For your final stop to the ScrapThat! Blog please let us know how much fun you had hopping!
Remember ~ only send the secret sentence to tracey@scrapthat.ca


I've entered these projects in Word Art Wednesday Challenge #56.

Thanks for stopping by! I treasure your comments.

~ Blessings ~

Thursday, November 29, 2012

Thank You Card and Christmas Tag

I finished up my ScrapThat! projects earlier this week and had some time to work on a couple other projects. The first is a thank you card I created for the Donna Salazar November Challenge to create a 'Thank You' card including the color BROWN, using a tag, and at least one Donna Salazar Designs product. If you've followed me for a while, you know I'll be using way more than one of her amazing products!! 

I've also created this card with Mona Pendelton's CR84FN Card Challenge #68 to focus on the beautiful color pallet of burgundy, gray, and cream. This is my first time to enter one of her lovely challenges. If you are not familiar with Mona's gorgeous work, you will want to stop by her blog, Cupcake's Creations. You are in for a treat!! 

"Thank You Card"

Here is the lovely color pallet photo from the CR84FN challenge:

Tips and Techniques:

Flower/Leaves ~ I used Donna's Rose Creations Die Set by Spellbinders to create this gorgeous rose and leaves. I recently placed an order with Natasha and she added a little baggie of MoJo Dust (glitter) to my order that I just had to try out here. I used my finger to spread some glue on the edges and dusted with Mojo for lots of sparkle!! The leaves were cut from the grey print paper, then inked this lovely color for my required "brown" element. 

Chipboard ~ I painted this Want2Scrap Chippie with burgundy paint, then when dry with some cream. When the top coat of paint was still tacky, I rubbed it off in places to distress and reveal the burgundy beneath. 

Fussy Cutting ~ I keep a baggie of fussy cut pieces from my Donna Salazar paper scraps. The corner piece and butterfly came from my bag of goodness! 

Distressing ~ I distressed the straight edges with my DSD Distrezz-It-All by Zutter. I just can't say enough about how much I enjoy using this sweet machine!! 

Machine Stitching ~ I added a straight stitch around the border of the grey print mat. 

Tag ~ I used a scrap of Donna's Artistic Paper for my tag. I printed "Thanks" using Marcelle Script font which I found on the internet, then used a Martha Stewart tag punch to cut it out. I added a little Frayed Burlap Distress Ink on the edges. 

DSD Products Used:
Botanique ~ Family Portraits 
Botanique ~ Cards
Antiquities ~ Harmony
Artistic Paper ~ Journal Cards
Spellbinder Rose Creations Dies
Zutter Distrezz-It-All

My second project of the day is this sweet Christmas tag I created for the Bo Bunny November Card challenge to create a tag. I used a mix of Bo Bunny Christmas lines. 

"Christmas Wishes"

Tips and Techniques:


Handcrafted Flower/Leaves ~ This flower may look familiar since it is the same as the once on my  thank you card, but without the Mojo Dust. The edging here is translucent medium I applied with a fine paint brush. I created these flowers last December for Joseph and Rachel's wedding card box. They didn't have room to keep the box, so I am reusing the flowers here. The leaves are cut from the Spellbinder Foliage Die set and then pinched and inked for dimension. 


Crinkle Ribbon ~ I dyed some rayon crinkle ribbon with distress ink to match the color in the image of the girl and scrunched it up to dry. I topped the bow with a button from the Snowfall collection. 

Fussy Cutting ~ When I saw this sweet image on Bo Bunny's Noel Cheer paper, I knew it would be perfect cut out for this tag. 

Distressing ~ This time I hand distressed the edges along with some inking. The doily and lace were also lightly inked to age them a bit. 

Bo Bunny Products:
Noel ~ Stripe
Noel ~ Cheer
Father Christmas
Snowfall ~ Buttons

Both of these projects have been entered at Word Art Wednesday Challenge #56.

Thanks for stopping by! I treasure your comments.

~ Blessings ~

Wednesday, November 28, 2012

ScrapThat! December Kit Sneak Peeks & New DT Introduction

November is drawing to a close, so be sure to stop back on Friday for the ScrapThat! December Kit Reveal and blog hop where I'll be sharing the projects I've created with this amazing kit. Here's a sneak peek of the gorgeous projects our talented design team has put together to inspire you:


We are thrilled to announced the newest member of our ScrapThat! Design Team.
Our talented November Guest Designer
~ Tracey Gregory ~
will now be joining us each month with her amazing work!!


We are delighted that Tracey will be inspiring you each month with her amazing ScrapThat! kit creations. She resides in the mountains of the Berkshires of Western Massachusetts with her husband and children. More of Tracey's gorgeous work can be found on her blog, A Lifetime of Pages.

"I am so excited to be a part of the ScrapThat! family! I am a Christian, happily married mom of 4 children, ages ranging from 12-21, and my spoiled yorkie. I work as a RN in a long term care center which often blesses me with the gift of hearing the stories and seeing the photos of my geriatric residents as they share their histories with me. When not working or scrapping, I can be found at my daughter’s drama activities, the church nursery or working with my church’s drama team. 

I would say my style is definitely shabby. I love layers of distressing and lots of flowers! Mixed media is where I am eager to learn and play. I am inspired by music and color and always have scraps of paper or napkins with layout ideas scribbled on them! I am currently on DTs for Scrapping Everyday Miracles and a Stuck on U Sketches, a sketch challenge blog. I am so looking forward to getting to know you all better!"

Thanks for stopping by! I treasure your comments.
~ Blessings ~ 

Tuesday, November 27, 2012

Beautiful ~ ScrapThat! November Kit

This morning's snowfall has melted away, but left a hint of the winter to come. I have one final layout from the gorgeous November ScrapThat! Kit to share with you today. It was really a joy to work with this amazing kit featuring Bo Bunny Serenade and full of so many wonderful embellishments.

This photo of Rachel and her bridesmaids taken before the wedding is one that really caught my eye. I talked with her about it over Thanksgiving and found out that it is a shot that Rachel suggested to the photographer. I love how the girls look like they are having so much fun peaking out from behind the columns. 

"Beautiful" 
~Using the MK, EAO, & FAO Kits ~

I used Amy's gorgeous November Sketch:

Tips and Techniques:


Corrugated Board ~ You can see the corrugated board layered behind my photo. I have so much fun with this household item. Whenever I get some packaging that has the narrow little corrugation, it goes into my stash. Here I used a foam brush to lightly apply some black paint to the top ridges of the corrugation and edges. When dry, I applied some Ranger Rock Candy Crackle Paint for some great texture. 

Hand Stitching ~ After the paint was dry on the corrugated board, I used my handy piercing tool to create stitching holes around the curved edge along with some x's.

Misted Rock Salt Chipboard ~ My tutorial for the grungy finish on the chipboard door can be found here.

Curled Vine ~ The jeweled Prima leaves came with brown wire stems, which I pulled off to create the vines in my cluster. I wrapped the wire around a narrow metal bar for making wire coils, but anything like  a knitting needle, or paint brush would work. 


Flowers ~ The November ScrapThat! main kit included this gorgeous WOC poppy and the sweet little white poppies. The Flower Add-On Kit included the amazing Prima Gracie vine and lovely Cabaletta blossoms in white, black, and Grey. I layered some of the black tulle under the red poppy.

Punched Frame ~ I needed a different size frame than my punch set would allow, so I punched it larger, trimmed the ends and overlapped the ends resulting in the lovely corner.

Chipboard ~ I simply used some metallic paint on this Dusty Attic Holly piece to tuck under the flower cluster.

Distressing ~ Of course I used my Distrezz-It-All to distress all the straight edges.

My sweet friend, Helen Tilbury, is having an amazing give-away on her blog, Scrap Addict. It is international and open to everyone. You just need to be one of her followers. Her work is amazing, and you will enjoy following her gorgeous work!! Look what all she is including in her package:


Thanks for stopping by! I treasure your comments.

~ Blessings ~ 

Saturday, November 24, 2012

Christmas Morning - The Scrapping Stamper/Bo Bunny

Today, I'm sharing a Christmas layout with photos going back about 15 years. At that time we lived in North Carolina and made a trip Ohio to spend the holidays with our families. This is Elizabeth who was married in October and Maria who just turned 18 yesterday. Happy birthday, Maria!! I created this page with inspiration from Shannon, The Scrapping Stamper's, beautiful November sketch. If you are in the mood for Christmas and winter layouts be sure to return Friday for the ScrapThat! December Reveal and Blog Hop. 

"Christmas Morning"

Shannon's delightful November Sketch:

Stop by The Scrapping Stamper to see the other inspiring pages created by Shannon's Design Team. 

I won the Mistletoe Collection from Bo Bunny last month. Such sweet cheerful paper, but not my normal style/color pallet. I was determined to created a layout featuring this fun line and combined some inking, punching and fussy cutting to create this page. I couldn't resist cutting out the oh so sweet little quirky, crooked tree and presents which were so perfect for these Christmas morning shots of our girls. I'm entering this page in the November Bo Bunny Layout Challenge to use two separate clusters, each containing a photo. If you aren't familiar with the fun Mistletoe line, here is a shot of the collection pack:
Tips and Techniques:


Layering ~ I fussy cut strips of the green hexagon print, and punched strips of blue and red to layer with doilies and lace to create the background. 

Hand Crafted Fabric Flowers ~ I made the cream fabric flowers a while back when our local craft store demoed the Clover Kanzashi Flower Maker Templates. I spend some crop time creating them, and they've been sitting in my stash until now. I played with several of the templates, but the Pointed Flower template seemed the the best suited for scrapbook flowers. They were quite quick and easy to create. 

Found Objects ~ I recently found a bag of vintage buttons at a thrift store for a mere $2. Most of the buttons you see tucked into my clusters came from that bag of goodness. Don't you just adore the blue flower button next to the cream flower? 

Transparencies ~ I fussy cut my photos to fit the transparencies and hid little bits of red-lined tape under the printed edge to adhere the photos to the transparencies. 

Fussy Cutting ~ I fussy cut the Christmas tree and presents. The gifts were raised with different thicknesses of pop dots and strips for dimension, and I added the Bo Bunny rhinestones to decorate the tree. 

Bo Bunny Products Used:
Mistletoe ~ Mistletoe
Mistletoe ~ Boxes
Mistletoe ~ Greetings
Mistletoe ~ Pucker Up
Mistletoe ~ Santa's List
Mistletoe ~ Twas the Night
Jewels ~ Mistletoe
Buttons ~ Mistletoe

Other Products Used:
Peltaloo Canterbury Magnolia Blossoms ~ Burgandy
Heidi Grace Rhinestone Flourish ~ Aqua
Darice Acrylic Teardrop Ornament
Darice Tonal Duets Chandelier Earring
Prima Alphabet Stickers ~ Craftsman
Basic Grey Pins and Tags ~ MET-3685
Color Bok Transparency Overlays - Flea Market
Jolee's Botique ~ Pearl and Gem Clusters
Darice ~ Gold Wire
Spare Parts ~ Gemstone Antique Buttons
Clover Pointed Flower Template
Distress Ink ~ Frayed Burlap
Keren Tamar ~ Red Lace Flowers
EK Success Scallop Diamond Border Punch
Martha Stewart ~ Doily Lace Border Punch
Scrap Locker Handcrafted goodies:
Bead Cluster
Red flowers
Stash:
Vintage Buttons
Fabric
Paper Doilies
Lace
Adhesives:
Hemar 450 Quick Dry Adhesive
Helmar Zap Dots Clear 1/4" Square
Scotch ATG
Red-lined Tape ~ Hercules
Darice Foam Dots and Lines

I have entered this at:
Word Art Wednesday ~ Challenge #55 Anything Goes

Thanks for stopping by! I treasure your comments.
~ Blessings ~