
I hope you are having a lovely week! This Thursday is Thanksgiving here in the US, so I've been busy preparing for my part our Thanksgiving meal and reflecting on all I have to be thankful for. We will be going to celebrate the day with my husband's family. He's Italian, so it's a tradition to have ravioli along with the traditional turkey and fixings.
If you're a regular follower, you know I enjoy doing fun things with chipboard. I altered a technique by Michelle Grant to suit the Maya Road Doors in the ScrapThat! November Kit.


Spread out:

When dry:


Now here is what it looks like when dry:
If you're a regular follower, you know I enjoy doing fun things with chipboard. I altered a technique by Michelle Grant to suit the Maya Road Doors in the ScrapThat! November Kit.


I've recreated this technique for you using a chipboard gear from my stash.
Misted Rock Salt Chipboard Tutorial
Supplies:
Chipboard
White gesso or acrylic paint
Tattered Angels Glimmer Mist ~ Almost Black
Rock Salt **
Ranger Crackle Accents
Mod Podge - Glossy
Mod Podge - Glossy
Prima Distress tool, or other wire brush.
Paint brush
Craft Mat (Optional)
Heat tool (optional)
**I have been asked what kind of rock salt to use. There are a number of options, but any pure salt that is chunky like in the photos will work. That includes rock salt for ice cream makers (What I used), Rock salt for deicing your sidewalks and driveways (Make sure it is pure salt with no chemical additives), kosher salt, or the chunky salt that goes into salt grinders. Regular table salt is too fine to work properly for this techniques.

**I have been asked what kind of rock salt to use. There are a number of options, but any pure salt that is chunky like in the photos will work. That includes rock salt for ice cream makers (What I used), Rock salt for deicing your sidewalks and driveways (Make sure it is pure salt with no chemical additives), kosher salt, or the chunky salt that goes into salt grinders. Regular table salt is too fine to work properly for this techniques.

Step 1: Paint chipboard piece with white gesso or acrylic paint. Allow to dry or use a heat tool to speed things up. If you use a heat tool, don’t hold it too close to the painted chipboard and keep it moving or your wet gesso can overheat and form bubbles.


Step 2: Mist with a dark mist. I used Tattered Angels Almost Black mist, but you could use any non-paint based brand or color that is translucent or even make your own from re-inker.

Step 3: Immediately cover the chipboard with rock salt. The salt draws the wet mist on the surface and leaves a beautifully splotchy and distressed surface as it dries. If you have a more solid chipboard piece, you could use less rock salt and spread it out some. With the door in the kit and this gear shape, the chipboard is narrow so I used a heavy coverage of rock salt. You can let this sit overnight, or give it 10 minutes or so for the rock salt to draw up the ink, then use your heat tool to speed the drying time.

Step 4: Once the rock salt is sprinkled/piled on, mist again.

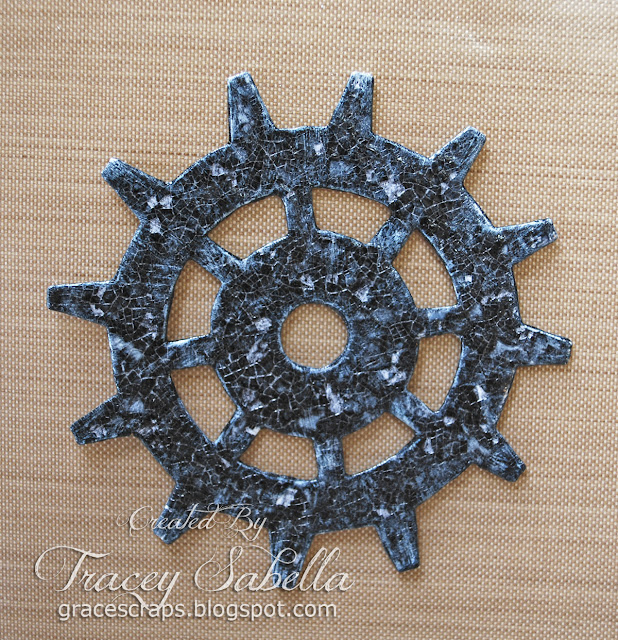
Step 5: Once the mist is completely dry, brush off the rock salt. This really has some nice distressing. I could have easily stopped here but wanted even more dimension and kept on going.

Step 6: Use a stiff wire brush to remove some of the mist, leaving scratch marks.

Step 7: Squeeze some Crackle Accents across the piece, then spread it out with your finger. Set aside to dry. Do NOT use the heat tool. (You could also use Ranger’s Clear Rock Candy Crackle paint for a similar effect.)

Spread out:

When dry:

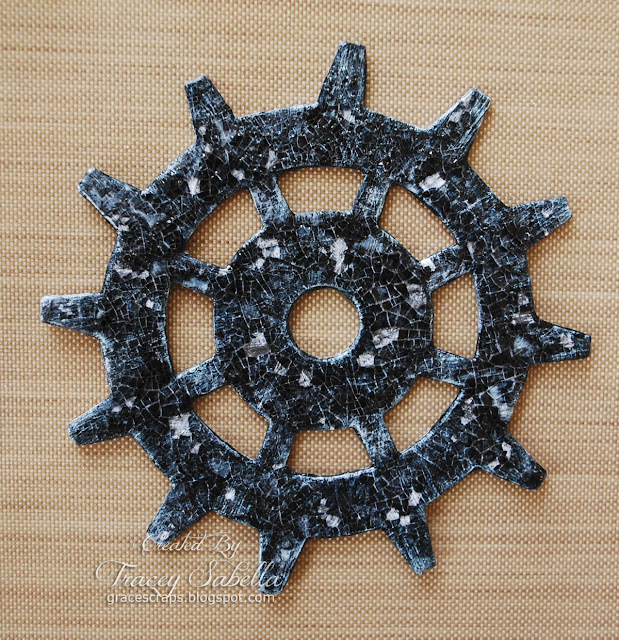
Step 8: When the crackle is completely dry, it will be loose in spots and flakes off easily. I decided to go with this and chipped off some of the crackle here and there for a more weathered, distressed look.

Step 9: Using a paint brush, apply a sealant so the crackle will stay in place. I used glossy Mod Podge. If you don’t have a sealant product, you can thin down regular white glue that dries clear. (Elmers or similar product).

Now here is what it looks like when dry:

I hope you have learned something new, and will have fun playing with this technique. You can stop at nearly any point along the way if you like what you see or experiment with different colors and products.
If you give this a try, be sure to share your finished product in our ScrapThat! Gallery.
More of our Design Team's tutorials can be located in our ScrapThat! Forum.
Thanks for stopping by! I treasure your comments.
~ Blessings~
More of our Design Team's tutorials can be located in our ScrapThat! Forum.
Thanks for stopping by! I treasure your comments.
~ Blessings~
The end result looks amazing Tracey, thanks for sharing these wonderful tips!
ReplyDeleteAbsolutely gorgeous and thank you for the tutorial you did a great job tfs!!!
ReplyDeleteWowwwwwwwwwwwww!! That is just AMAZING!!! TFS!!!!!!!
ReplyDeletePS ... I forgot to mention that I hope you have a wonderful Thanksgiving!! We have lasagna with our Turkey meal too!! LOL!!!
ReplyDeleteWow, just amazing, Tracey! Thanks for the great tutorial! Hugs
ReplyDeleteYou do the most interesting techniques! That is so gorgeous! Your layout is so beautiful. Thanks for the tutorial! Have a wonderful Thanksgiving Tracey!
ReplyDeleteTracey this is beautiful. Love the colours and design. Great tutorial as well. Wishing you a wonderful Tuesday.
ReplyDeleteHugs
Desíre
{Doing Life – my personal blog}
This is gorgeous Tracey...I love what it looks like even before you took the wire brush to it...awesome.
ReplyDeleteWow Tracey that's one of the best techniques I've seen in a while using chipboard!! amazing results. I gotta try it!!
ReplyDeleteAmazing technique! Love the results!
ReplyDeleteI absolutely love your layout. What beautiful details. Now..your tutorial! Fabulous!!! I will definitely have to try this. I have a mini album cover I couldn't figure out what to do with..and I think I now have my answer..now just to find rock salt!! Have an awesome day!
ReplyDeleteThis looks amazing!! I never would have thought of using rock salt!! Thanks for the awesome tutorial...I will definitely give this a try!! Have a great day :)
ReplyDeleteLisa
A Mermaid's Crafts
What a fun technique! TFS! And I just love the grid design of your beautiful layout! Fantastic!
ReplyDeleteyour tut is amazing!!! LOVE LOVE the details you added and that piece looks stunning!!!! you are sooo amazing!!!!
ReplyDeleteLovely LO and awesome tutorial, Tracey. Hope you and your family have a great Thanksgiving.
ReplyDeleteVery cool! Happy Thanksgiving.
ReplyDeleteOh wow! I love the incredible texture! Thanks for sharing the tutorial! :)
ReplyDeleteThis technique is nothing short of amazing!!! I am so impressed. Thanks bunches for sharing!
ReplyDeleteA Fabulous LO Tracey!! The sprinkle of flowers and the dragonfly look beautiful with all the little pics. I love the tutorial, have to get some rock salt to try it :) Hope your Thanksgiving is blessed!
ReplyDeleteWhat a gorgeous layout! Loving all of the little pictures!! And fabulous tutorial! Thanks for sharing!!
ReplyDeleteIncredible technique Tracey! You always put your best into your work~I love the details. In case I haven't told you yet...have a blessed Thanksgiving!
ReplyDeleteSoooo inspiring! Thanks so much for sharing this!
ReplyDeleteSuch a pretty layout Tracey! Love all the little blossoms and rock salt technique! Thanks for sharing! Hope you and your family have a Happy Thanksgiving!
ReplyDeleteGorgeous!!
ReplyDeleteLove those pretty flowers on this layout, and great tutorial too!
Have a happy thanksgiving!!!!!
Just stunning!!! You have done a wonderful job explaining it!
ReplyDeleteWhat a great tutorial Tracey! Thanks for taking the time to share!!
ReplyDeleteThis is just fantastic!! Thanks for sharing...will definitely give this a try over the weekend :) It looks beautiful!!
ReplyDeleteWow! I am loving this technique Tracey! I must try this!!!!
ReplyDeleteWonderful layout and thanks for this tutorial. Great technique!
ReplyDeleteHow cool is this technique! TFS, Tracey.
ReplyDeleteWow such a beautiful layout. I love the different frames and I like the tutorial you shared. HUGS AJ-
ReplyDeleteWow- such a cool technique! I used rock salt way back in my watercolor days and I never thought to use it with mists, but it totally makes sense.
ReplyDeleteWOW! Thanks Tracey, I am so glad you liked that tutorial! I love the affect you have achieved here! Looks fabulous!!!! :)
ReplyDeleteCheers
Michelle x
Linked your tute on my blog today along with my Creative Embellishments project. Many thanks!
ReplyDelete