

Welcome to my creative space!
Christmas is in the air, and I just couldn't resist combining mixed media touches with wintry blues, and festive reds to create this cheery gingerbread house card featuring the All Hearts Come Home A2 Card Front die set (S5-534). I treasure spending time with family over the holidays, so this sentiment adds a warm personal touch.
I hope you enjoy this deconstructed version of this die set showing you another way it can be used. Instead of the card frame with trees, gifts, and Santa's sled with reindeer, I've die cut bits and pieces from this frame using different papers to create the elements for this card.
The card edges may look familiar since they are from the Postage Edge Rectangles set (S5-540), part of the Postage Edge Shapes Collection released earlier this month. These sweet heartfelt images pair so perfectly with the postal edges! The snowflakes are cut from white glitter paper using the Let it Snowman set (S5-533), also from the Christmas Flourishes Collection.
I hope you'll scroll down through the Tips and Techniques section for more close-ups and all the details on how to create this sweet card including how I added the music score to the background along with snowy glittered texture.
Thank you Amazing Paper Grace for providing the dies used in this project.


This sweet house is cut from gingerbread color paper filled with darling snowflakes and backed with a lighter patterned paper to brighten it up and of course a sweet red heart. The edges of the house are inked with Ground Espresso Distress Ink.
As you can see in the die set image above, the packages and trees are part of a card frame. I decided to cut them out and use them individually instead of using the entire frame. When die cutting the packages, I placed some washi tape on the back of the red patterned paper to help hold the inserts in place. I popped out the spaces in the ribbons and between the packages, then added more washi tape to the back to keep the textured inserts in place. The package edges are inked with more of the Ground Espresso ink.
The house and gifts are popped up with foam tape to add dimension.
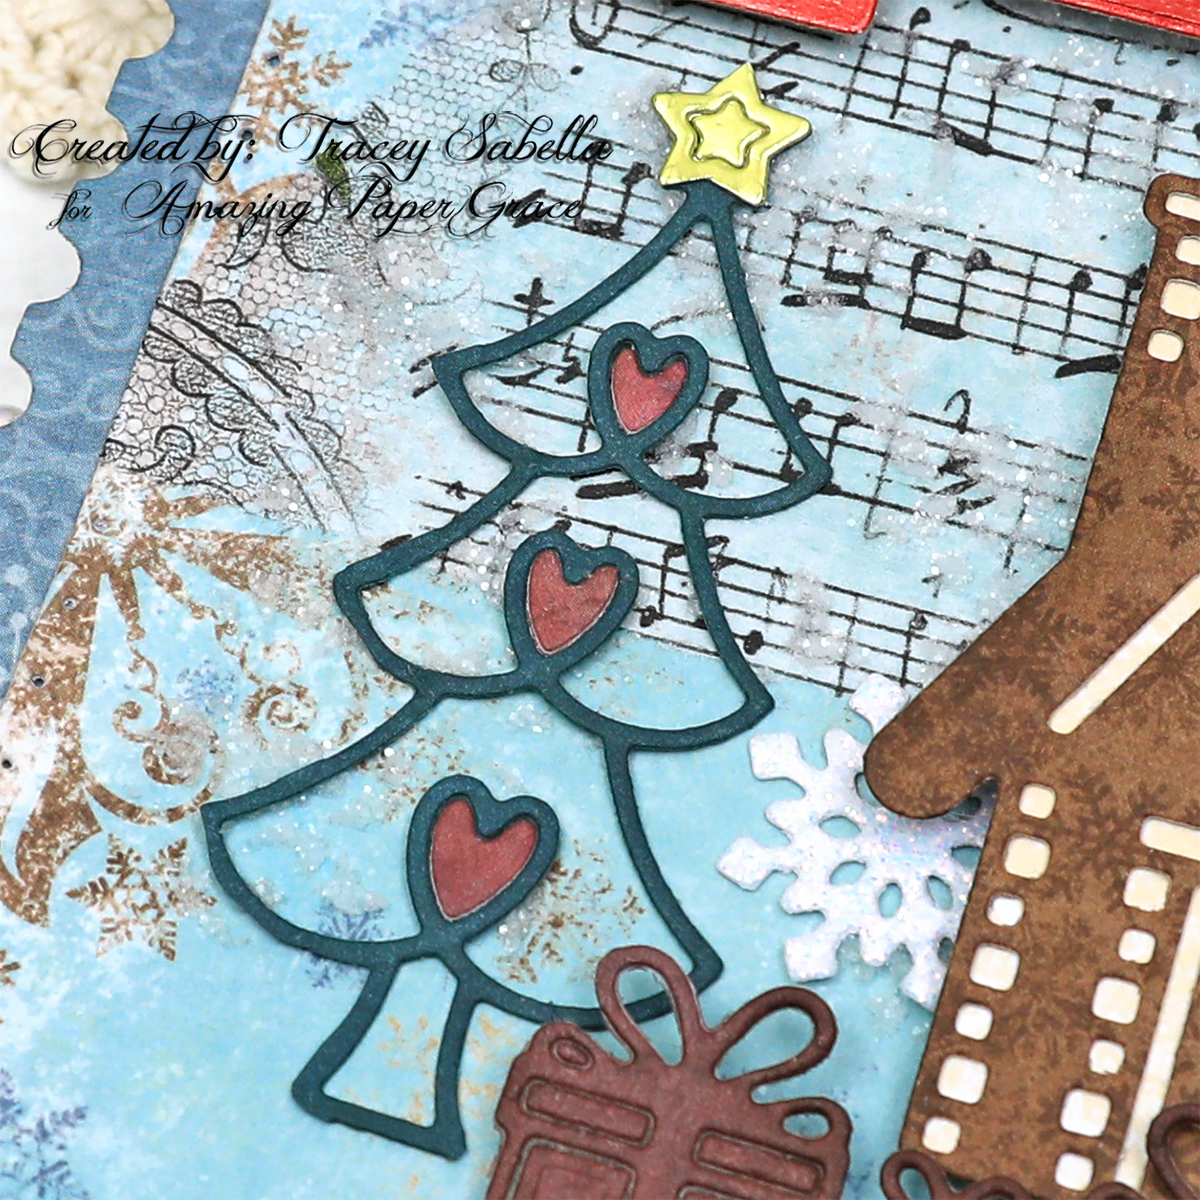
These delightful tree silhouettes are cut from green patterned paper. I just cut pieces of paper a little larger than the trees and used the frame die to cut them out, then trimmed off the excess paper with scissors. The centers of the trees are die cut with the same paper used for the packages to get the small hearts to insert into the trees. The stars are cut with the frame die using yellow metallic paper. Every Christmas tree needs a shining star topper, right?
The green tree frames are rubbed with Pine Needles Distress Ink.

Several frosty snowflakes are die cut from glitter paper using dies from the Let it Snowman set (S5-533).
For a bit of whimsy I added a torn bit of a music score. I had recently purchases a roll of Tim Holtz Halloween Collage Paper on clearance and hadn't put it away yet. The music notes just called out Christmas to me, so I tore them off the role to use here. It's adhered with collage medium, and I simply adore how the blue background shows through this thin paper.
The base paper was brushed with clear gesso and allowed to dry before adding the collage paper and stenciling. This helps reduce warping.
***Designer Tip***
Don't hesitate to think outside of the box and use supplies that are designed for a specific holiday all year long. Sure, you may not want to use snowflakes on a spring card, but this "halloween" music score could be used for any occasion.
I stenciled randomly over the background using Snowfall Grit Paste randomly through a damask stencil. The design on this stencil is small so it looks rather snowy. To add even more sparkle, I sprinkled Distress Rock Candy Glitter over the paste while it was still wet. The glitter stuck nicely to the paste.
***Designer Tip***
When adding texture paste that you know you'll be glittering, be sure to make sure the rest of your background is completely dry first. The collage medium I used to adhere the music paper was dry to the touch, but still seemed a bit damp. I thought it was dry enough, but was wrong. The glitter stuck to the damp collage medium. Fortunately, I was able to remove most of the errant glitter by brushing it with a dry paintbrush, but it would have save time and trouble if I had set it aside until it was completely dry.

When composing a card, I like to start in the center and work my way out. Here the house and presents are the focal point in the center, framed by the darling trees. To add to the design, I decided to add the music notes, snowflakes and glittered snowy texture. And of course the metallic red sentiment anchors the card by framing the top and bottom. The postal edges are a charming frame for the outer edges of the card.

The sentiment pieces are cut from red metallic cardstock and the top is backed with the same yellow metallic paper as the stars. Like the house and gifts, the top sentiment is popped up with foam tape.
Below you can find the products I used to create this project including some with compensated affiliate links to Scrapbook.com and Spellbinders. These links are at absolutely no cost to you. When you shop through the links below, I receive a small commission from the companies. These commissions help me cover the costs of my blog and other expenses, which allows me to continue to provide you with FREE inspiration along with detailed Tips and Techniques provided for every project. Thank you so much for your love and support!
Amazing Paper Grace Sets:
Paper:
Stash - Patterned Paper
Ink:
Mixed Media:
Stencil:
SnipArt - Stencil - Up in the Air Damask 15x15 cm
Adhesives:
Beacon - 3-IN-1
Tools:
Thank so much for stopping by to view this sweet cheery Christmas card.
I hope you've been inspired.

No comments:
Post a Comment
Thanks for taking the time to stop by and leave a message! I treasure your comments.