Saturday, June 30, 2012

Love ~ Donna Salazar June Sketch Challenge

I hope you are having a wonderful weekend!! I've taken some stuff to a friend's home for a garage sale and have been blessed to stay cool enough in this hot weather. I actually took my scrappy stuff with me today to work on this layout for a challenge over at Donna Salazar's blog. I just adore working with Donna's amazing products so this was a fun layout to create. I'm a Girlie Grunge gal at heart!

Our daughter, Elizabeth was recently engaged to Andrew, and we are looking forward to adding our new son to the family in October. Here is one of the engagement shots I took on Memorial Day.


Here is the sketch by Mistra for Donna's June Challenge:

Techniques:

Focal Flower ~ This was created with one of my hand loomed twine flowers and you can find my tutorial for them here. I popped an adhesive backed pearl by Want2Scrap in the center. The background petals were created with Donna's amazing dies - Grand Peony and Carnation Creations. I used muslin, tulle, and coordinating paper. To cut tulle and fabric, cut a piece of scrap cardstock a little larger than the die. Layer the fabric between the paper and the die, and it will cut right through the fabric. When I cut the fabric without the cardstock, there were quite a few uncut sections. This was corrected when I cut it with the cardstock. 

Distressing ~ I recently purchased Donna's Distrezz-It-All. This is an amazing tool and has already saved me hours of hand distressing in the couple weeks I've been using it. All the the straight edges and my photo here were distrezzed. The circles were hand distressed and then inked. 

Ruffled Circle Edge ~ I punched strips of coordinating paper and trimmed them to 1 inch wide. I dampened the paper and put a small pleat at each design repeat, creating curved strips that easily edged my circles. I added a bit of Distress Ink on the edges.

Lace Slots ~ I saw this technique done on one of Mistra's projects and knew it would be perfect here. Simply fold your paper and distress on the fold creating a wonderful little opening to tuck some lace into. 

Hand Stitching ~ I drew curvy looped lines around the edges of my large mats, used my hole piercer to pierce evenly spaced holes, then used a back stitch with two strands of embroidery floss. 


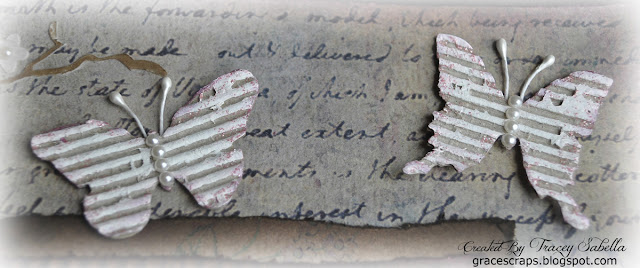
Corrugated Butterflies ~ I used Donna's Corrugated Board by Zutter for my butterflies. I've had a lot of comments about my butterfies, so be watching for a tutorial for them to be posted soon. 

Stamping ~ I used Donna's Crackle and Lace Corner stamps on the mat behind the photo. I first used the crackle with Seedless Preserves Distress Ink and then used brown Archival ink for the Lace Corner. I distrezzed the edge after stamping.

Chicken Wire and Burlap ~ I love the contrast of girlie and grungy elements, so the real chicken wire and loose weave burlap were used to give that grungy feel. 

Donna Salazar Products Used:
Botanique Paper Stack
Grand Peony Die
Carnation Creations Die
Distrezz-It-All
Zutter Corrugated Board

This has been entered at:
The Happy Scrapper - Challenge #2 The Great Outdoors - photo take by the lake at my parents' home **

Thanks for stopping by. I treasure your comments.

~ Blessings ~

Friday, June 22, 2012

Thank You Card

I hope you have had a wonderful week. I've had a very nice one. Two of our daughters have moved into a new apartment. A very happy event for me - a much safer location and only 30 minutes away instead of an hour. DH and I went out to welcome them to their new place today and got them a new gas grill. I hope they have many lovely times gathered with friends to use it. 

Now I have a card creation to share with you:


I created this thank you note using some yummy Donna Salazar Artistic Papers. They are printed on water color paper and hold up so well to mixed media techniques like water color pencils used here. 

Techniques:
Color Work ~ The flowers and leaves were colored using Prismacolor Watercolor Pencils, then blended with water. Once dry, I used a fine tip paint brush to lightly apply stickles to highlight areas on the flowers. 

Tag - This Tag was fussy cut from one of Donna's Art Paper sheets. I used Archival ink to stamp the sentiment image, then rubbed several colors of Distress Ink over top. 

I used the Tim Holtz Distress tool and Distress Ink on the edges. The lace is some I had purchased at JoAnn's and rubbed some Distress ink over it to soften the bright white. 


I used the Alterations Movers and Shapers Mini Butterfly die along with paint, distress ink, rhinestones, and covered wire to create this sweet butterfly. 

I have entered this at:
Stampin' Sisters in Christ: Something that reflects me - My favorite flowers **
Simon Says Stamp and Show: A Bit of Brown **
Word Art Wednesday: Encouraging Sentiment **
Hotshot Craft: Challenge #9 Use Distress Ink - used on thank you tag, butterfly, and card edges **
DL.Art: Thankful Thursday Challenge - Use thank you on card **
The Cheerful Stamp Pad Mixed Media Art: In the Garden **
Paper Playtime: Use a sentiment **

Just a reminder that Camp-Friendzy is in full swing right now at Scrap-Friendzy, and it's not too late to join us for some fun summer challenges. I posted a challenge there today to use the lyrics from "Thank You for Being a Friend" to create a paper craft project.

Thanks for stopping by! I treasure your comments.

~ Blessings ~

Saturday, June 16, 2012

Tybee Beach ~ The Scrapping Stamper June Sketch Reveal

This is an older photo of our daughter, Maria, playing with a friend in the sand at Tybee Beach, Georgia. I enjoy the contrast of grunge and bling as you can see in this summertime layout using 100 Days of Summer paper and stickers by Simple Stories. 


Be sure to stop by Shannon's blog to see what her talented design team put together for this sketch. 

The Simple Stories paper and stickers along with Petaloo flowers really made this page come together rather quickly for me. Other than distressing, I cut the two pieces of loosely woven burlap and dabbed some random spots of gesso to place behind the photo and journal blocks. I found the burlap at Michael's in the floral department as a burlap garland, so it's only about 8 or 10 inches wide ~ perfect for cutting up for my scrapbook pages. 

This photo reminds me of one of my favorited Bible verses which I penned along the flourishes printed along the bottom of the page. "Psalm 139: 17-18 ~ How precious also are Your thoughts to me, O God! How vast is the sum of them! If I should count them, they would outnumber the sand." 

I have entered this in:
ScrapFIT Weekend Warm-up: Sticker challenge (just for fun) **
Word Art Wednesday: Use an encouraging or uplifting sentiment on your project. **
Simple Stories: Create a project using Simple Stories Simple Basics Papers - Used 100 Days of Summer **

Thanks for dropping by! I treasure your comments.

~ Blessings ~ 

Friday, June 15, 2012

Happy Birthday Joseph ~ ScrapFIT Workout #70 - Polaroids


This is our son Joseph at his 5th birthday party nearly 20 years ago. Yes, as the journaling says, I baked and decorated the cake. What a fun challenge at ScrapFIT to create your own polaroids. 


Do you remember when Polaroid photos were the hot new way to take photos! Well, this workout is a tribute to the Polaroid! We want to see a  layout with a Polaroid photo. Don't have a Polaroid photo, don't worry you can create a fake Polaroid just like in my layout below. 


The winner of this Workout will receive a $25.00 Gift Certificate from 


My Favorite Things

Be sure to head on over to ScrapFIT to see the rest of the fab Polaroid projects posted by our talented DT, and to link up your very own Polaroid project by June 30.

Techniques:

1. Focal paper ~ I used this gorgeous paper from the Pink Paisley Mistables Pack. I tore about 1/4 inch off all around the edge and then used random punches, tearing between the punched areas. I used a corner punch in each corner. I didn't have quite the right color of mist, so I mixed some acrylic paint with water to mist. It was the perfect color, but kind of an oops. The paint didn't resist, so I ended up scraping the thin layer of paint off of the resist sections. A bit tedious, but it sure looks pretty. Regular glimmer mist, or home mist with a water soluble product like distress reinkers would have worked fine and wiped right off the shiny resist areas. Don't you just love how hind sight is 20/20!! 

The rest of the papers are Authetique blue/cream Journey Fold Over Solids and white cardstock colored with Distress Ink. I used gesso to soften the darker blue paper behind the photos and the Donna Salazar Distrezz-It-All to distress all the edges. The ironwork shapes are cut from my CTMH Art Philosophy Cricut Cartridge. I won a Cricut last fall and this is the only cartridge I have bought. It has some amazing images, and if you are looking for a CTMH consultant, Mandy will be glad to help you. 


2. Flower Cluster ~ The flowers were created by layering, inking and adding gesso to several different Prima flowers. I wanted to stay with a blue/white color scheme, so I die cut the leaves using my Spellbinder Foliage and Donna Salazar Rose Creations dies. I then creased/shaped, then inked and painted with spots of gesso. A little note here. I blended on two colors of Distress Ink - broken china and stormy sky. Both here and on the flowers, the color was a bit bolder and brighter than I wanted, so I spritzed with water and that blended and softened the color quite nicely. I dried using a heat tool before adding the gesso. I finished up by added a couple Zva pearl flourishes which I cut apart. as well as placing some on the bottoms of my faux Polaroids. 

3. Polaroids ~ I found the dimensions of a Polaroid and cut some glossy paper that I had laying around to size. I actually cut it twice as long plus an extra half inch on the bottom front and used my Martha Stewart Cutting Board to score the fold lines so I could tuck my photo in like a real Polaroid. So there are three layers, The front with the cutout, the photo, and a solid back. 

4. Flags ~ I used a set of CTMH stamps for "Happy" and "Birthday" using the same colors of distress inks, then hand cut the flags, distressing the edges. I painted two toothpicks white for the flag "poles."

I am entering this layout at:
Once Upon A Sketch ~ Using the June sketch, Birthday Theme, with journaling **
Scrapbook Sisters ~ Use three colors - Blue, white, cream (pearls). **
SJ Crafts ~ Challenge #5 "All About the Boy" and something old from my stash. Glossy paper used for Polaroids - 4 years old. **

Thanks for stopping by! I treasure your comments.

~ Blessings ~ 

Monday, June 11, 2012

Camp-Friendzy Blog Hike RAK Winner

First I want to thank you for stopping by my blog during your hike this weekend!! I so appreciate all of your sweet comments. 

Now for my RAK winner selected by Random.Org:


The winner is Chris who said: This is a fabulous LO!!  

It just so happens that Chris has been a long time follower, and I have to tell you a little about her. She is an amazing scrapbook and card artist!! She creates cards that she sells at her veterinarian's office with the proceeds going to her local animal shelter. In 2011 she was able to donate over $800. It's amazing what one sweet gal with a vision can accomplish!! If you have a few extra minutes today, you'll want to stop by her blog and see her amazing work. 

Thanks for stopping by!

~ Blessings ~ 

Friday, June 8, 2012

Camp-Friendzy Blog Hike

Welcome to stop #8 on your Camp-Friendzy Blog Hike. I'm so glad you decided to join us. If you've just wandered by my blog for a visit and would like to join in on the fun, head over to the Scrap-Friendzy Blog to start at the beginning of the hike.

For those of you who plan to attend Camp-Friendzy, you can earn your Blog Hike Badge by following and commenting on each blog you come across on your nature hike. Once you've finished your hike through each of our design team's blogs, let us know in the "Badge Me Baby!" section of our forum and we'll add this badge to your signature. Even if you are not a Scrap-Friendzy camper, you'll want to be sure to take the hike for the RAK opportunities many of the DT are offering and to see the fabulous projects and inspiration you'll find along the way. 

If you are new to Scrap-Friendzy, we'd love to have you join us this summer for Camp-Friendzy, beginning June 11. There will be three challenges a week with lots of badges to earn and a RAK put together by one of our DT's each week. We will even have a Camper of the Year Award at the end of camp. If you would like more information about this fun event at Scrap-Friendzy, click HERE.

Whenever I go on a hike, I like to take time to explore the flora and fauna. On this stop in your journey, you will be seeing some of the things you might find on a hike in the embellishments of my layout ~ a butterfly, flowers, and leaves:


Here is a close-up of the larger flowers:

I used Donna Salazar's Antiquities paper, along with her Rose Creations,
Grand Peonie, and Carnation Creations dies to create the flowers and
long leaves, and the Distrezz-It-All to create the distressed edges.
I was so excited to learn that my layout won Donna's
May Girlie Grunge Sketch Challenge.

I hope this inspires you to grab your scrapping supplies and come join the fun this summer at Camp-Friendzy!!

Your next stop on the hike is #9 Tracy

Just in case you have gotten lost along the way, here is a map of all the Blog Hike stops:

Stop #1: SCRAP-FRIENDZY BLOG

Stop # 2: AMY'S BLOG

Stop # 3: CHERYL'S BLOG

Stop # 4: ROCHELLE'S BLOG

Stop # 5: SANDY'S BLOG

Stop # 6: TABITHA'S BLOG

Stop # 7: TAMMY'S BLOG

Stop #8 : TRACEY'S BLOG ~ You are here

Stop # 9: TRACY'S BLOG

Stop # 10: SCRAP-FRIENDZY

I'm offering a RAK during the Blog Hike. To get your name in the hat for my prize you just need to do two simple things by Sunday, June 10, midnight CST:

1. Comment on this post.
2. Follow this blog. If you are already a follower, let me know in your comments.

I be posting my winner on Monday, selected by Random.org. Be sure to stop back by to see if you are a winner. Good luck!!

Thanks for stopping by! I treasure your comments.

~ Blessings ~ 

Thursday, June 7, 2012

Sneak Peak for Camp-Friendzy's Blog Hike

Don't forget, Scrap-Friendzy's Blog Hike starts tomorrow (Friday) at 6 pm CST. You won't want to miss the campy inspiration by our talented design team. 

Here is just a little sneak peak of the layout I'll be posting for your inspiration tomorrow:


I'll be offering a RAK to those who comment and follow, so be sure to come back this weekend.

Thanks for dropping by! I treasure your comments.

~ Blessings ~ 

Saturday, June 2, 2012

Thank You!

I've been blessed to win several things this week and wanted to express my thanks.

Donna Salazar ~ If you haven't watched her live Tuesday Tutorials, I recommend that you check them out to learn some amazing techniques. During the course of the show, her DT, Natasha, asks a few questions and if you are the first to answer you win a prize. I was fortunate to be the first time viewer to get that question correct, so I won some Smooch Spritz there. Smooch is sooo amazing if you want deep vibrant color in your mist. A little spritz goes a long way to add bold color and sparkle.

Zva Creative ~ I spent some time earlier this week going to the talented and inspiring Design Team blogs for Zva's monthly blog hop and was selected to receive a Zva gift package. Woot, lets just say I enjoy using their product.

Tim Holtz ~ I've been posting projects each month for the 12 Tags of 2012 and my name was drawn yesterday for the May entries to receive some Ranger product. I've enjoyed learning new techniques from his tags each month, and anyone who follows me knows I use Ranger stuff all the time, especially the Distress Ink!!

Use It Tuesday  ~ Earlier this month I had the honor of being selected in the top two with my Mom layout over at Use It Tuesday. What a pleasure to get to display their badge on my sidebar! Such a great challenge site to use up our stashes! (I've got plenty of that!!)


Thanks for stopping by! I treasure your comments.

~ Blessings ~


Friday, June 1, 2012

Cherry Trees ~ ScrapFIT Reveal for Workout #69

Each spring I anticipate the blooming of the cherry trees at the edge of our woods. This year I took some photos, and now I'll get to see them all year long in my scrapbook! I looked at close-up photos and created the cherry blossoms on the branch from coffee filters. The Cherry Blossom Tutorial can be found below.

Diana, our Creative Trainer, is back with another one of her training sessions! This session is sure to give you a boost in your FITness level! What she has laid out for you may seem hard but give it your best to stay ScrapFIT!


Here is Diana's amazing sketch:


is this month's amazing sponsor! Fabric embellishments are always a great addition to any layout and Holly Craft Originals has a ton to choose from! The winner of this Workout will receive a $20 Gift Certificate! 


Holly is a stay at home mom who loves to craft. she makes fabric embellishments or appliques mostly from upcycled fabrics along with fabric leftover from larger projects .  .  .   All of her embellishments are her designs, hand cut, then sewn by hand with their own unique personalities! 

Be sure to hop on over to ScrapFIT to see the amazing inspiration by our talented DT. I hope you are inspired to join us for this sketch Workout. You have until June 30 to link up your paper craft project. 

Here are some close-ups:

Butterflies

Masked Modeling Paste and Inked Cherry Blossom Branch

Coffee Filter Cherry Blossoms

Coffee Filter Cherry Blossom Tutorial

Supplies:

Coffee Filter
5 Petal Punch
Scrap of Cardstock
Tiny Stamins from floral department
Scissors (EK Success Honey Bees are my personal favorite!!)
Distress Ink ~ Worn Lipstick
Piercing Tool (toothpick would work if you don't have one)
Glossy Accents

Not Pictured
Heat Tool - optional
Spray Bottle with water

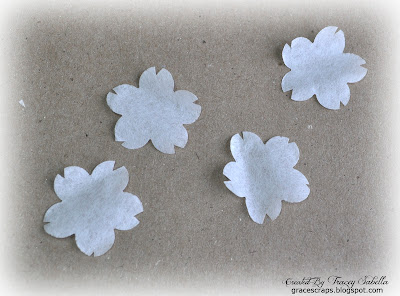
Step 1. You might be wondering how I punched a coffee filter. I experimented and tried layering the coffee filter over top of a piece of card stock and it punched perfectly. Don't worry that the coffee filter is wavy. We will be misting and scrunching, so that doesn't matter. If you don't have this particular punch, most any little round tipped 5 petal flower punch should work.

Step 2. I use two punched flowers per blossom. Once you get all of your blossoms punched, stack them in groups of 6 or 8. With your scissors, take a small v shaped snip out of each petal. Don't worry if they are exactly centered or exactly the same on each petal. In nature, they are varied and different, besides we are going to scrunch these up. 

Here they are with the snips cut out:

Step 3. Lightly spritz with water. Place the piercing tool in the center of a blossom and crinkle the blossom around the tool as shown. I don't pierce a hole at this point, but if it does pierce, that's OK since we're going to pierce a hole later for the stamins. Do this to each of your blossoms. 

Step 4. Take each bunched and crinkled blossom and swipe the cut edges against the top of the Worn Lipstick (or color of your choice) ink pad. Be sure to get some ink on all of the petal edges, but just a little. It doesn't matter if your petals are dry or still damp. 

Step 5. Lightly spritz each blossom. This will lighten and spread the ink. The misting may kind of flatten your blossom out, so crinkle it back up like before. You probably don't need to use the piercing tool this time. Set aside to dry or if you are impatient like me, place back on the piercing tool and use your heat tool to dry, being careful not to singe or burn. Here is what the petals will look like after misting, drying and carefully opening. See how the color softens and spreads!

Step 6. Add Stamins. Place two blossoms on top of each other and adjust so you can see both sets of petals. (not stacked directly on top of each other). Use a piercing tool or other sharp pointed object to pierce a small hole in the center of each blossom. Stamins generally come with a ball on each end of a cord. Snip these in half. You will need 6 pieces for each flower (or whatever looks good to you). Put the stem ends through the center of the flower like this. 

Now turn the flower over and put a dot of glossy accents or other quick drying glue in the center on the back side. Once dry you can clip off the excess stems. 

Step 7. Curl your petals. I used a piercing tool and curled the center petals a little tighter than the back ones.

Here is one all finished:

If you have any questions, please leave a comment and I will be glad to answer them.

I have entered this layout at:
Word Art Wednesday ~ Use Scripture - I hand journaled Isaiah 35:2 around the flourish and photo mat, then highlighted with aged mahogany Distress ink. It will blossom profusely . . .  They will see the glory of the LORD, The majesty of our God. **
Crafty Cardmakers ~ Challenge 69 - Distress it: I distressed the cardboard and mats. I also used Distress embossing powder on the chipboard pieces. **

Thanks for dropping by! I treasure your comments.

~ Blessings ~