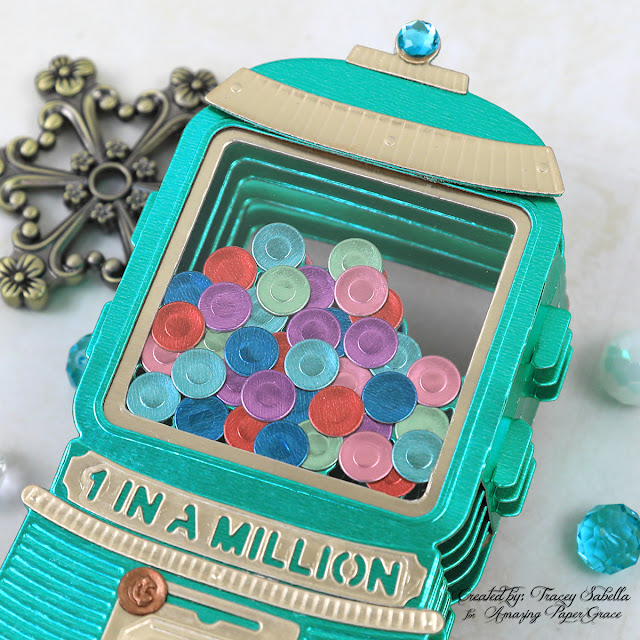
The Amazing Paper Grace September Die of the Month: Pop Up 3D Vignette Bubble Gum Machine is such a sweet die set. For my main project card I selected a teal metallic paper and used gold paper for the accents to give it a fun retro feel. What a fun card for a child or someone who adores nostalgic retro machines.
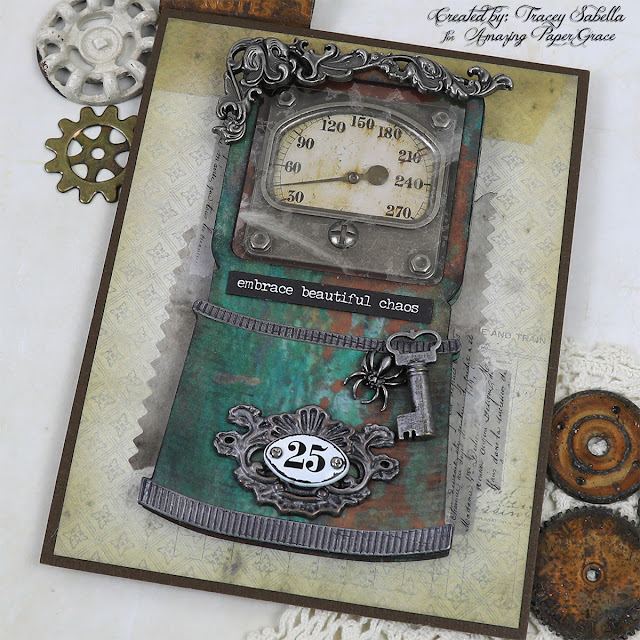
My second card is a nod to my passion for industrial rust and patina. I had been stumped on what to do for my accessory project until I walked through my studio and spied a recent vintage purchase, a rusty steam gauge piece. A light went off in my head and I wondered . . . "what if I transform the bubble gum machine into an industrial steam gauge machine?" I had just the right pieces to fit perfectly to make the transformation. I hope you adore it as much as I do.
Be sure to check out my Tips and Techniques section below for more close-ups and all the details on how I created these wonderful cards including the cracked vintage glass over the industrial steam gauge.
Many thanks to Amazing Paper Grace for providing the dies used in this project!
There are 26 cutting dies included in the Pop Up 3D Vignette Bubble Gum Machine.
Pop Up 3D Bubble Gum Machine Card
Vintage Steam Gauge Machine Card
I kept this card pretty straight forward by keeping with the beautiful die cut design. The fun and whimsical retro design comes from the teal metallic and gold papers that are die cut and embossed. This just looks so much like the gumball machines I grew up with. I pulled out my metallic paper scraps to cut the gumballs, so they also have the shiny gumball appeal.
I adhered one gumball to each of the spots on the die cut, then filled in and added more to make it full. On the inner layers, I just adhered gumballs across the top of each layer, since the lower portion of these layers isn't seen.
The trim pieces are cut and embossed in metallic gold cardstock. The layers of the mechanism are popped up with thin foam squares for added dimension and a more realistic feel. I even added a few gumballs falling out of the opening.
The penny is cut from copper cardstock, but was too shiny and bright for my taste, so I brushed a little Worn Penny metallic paint to add the patina found on a well used penny.
I just adore how these 3D Vignette cards fold over so that they can be tucked into an envelope to hand deliver or as suggested a padded envelope for mailing. The card pops right back into place after being folded and stands on its own to be displayed.
Of course a vintage bubble gum machine needs a little bling, so a rhinestone is added to the top and onto the money mechanism. There are three fun sentiments included in this die set.
It's hard to tell in the photos, but there is a piece of clear acetate cut to fit the window of the front piece so it looks like the gumballs are behind glass.
I just can't express how happy I was to find that this gauge frame and dial from Tim Holtz fit the opening so perfectly. To create the bubbled and cracked glass front, I used a mica tile. Mica is slightly yellowed with beautiful natural imperfections and easy to cut, so was a great choice for the glass front here. I bent the mica in a couple places just enough to get a cracked look.
The machine is cut three times using the insert so that the gumballs are not diecut into the piece. Once with a lighter rusty patina paper for the top layer. Once from a darker rusty paper for the bottom piece that shows behind the gauge. And one more time from light weight chipboard. The top piece is adhered to the chipboard piece for more stability. The bottom layer is adhered directly to the card. I brushed black paint on the edges of the chipboard layer for a more finished look.
I popped up the top layer with a couple layers of thicker cardboard placed under this lower section. I also adhered two stacks of thin black chipboard cut into narrow strips that are the same height as this cardboard shim. Each one is abut 3/4 inch long. These were adhered under the top corners of the upper frame to keep the machine the same height and to add stability. The shims are high enough that the mica window sits slightly above the gauge so they are not touching.
The trim pieces are cut from black metallic cardstock and rubbed with silver wax to give a vintage feel. Most of the metal embellishments were already a tarnished silver color, but a couple were copper, so I rubbed those pieces with more of the silver wax for a cohesive look.
Decorative tape is placed on both sides of the machine. It's easiest to add this tape before adhering the bottom machine layer to the card. To keep things more simple, I used patterned paper printed with a rusty patina design to die cut the machine layers. I rubbed the edges of the top layer with a little black soon Distress Ink to age it a little more.
I cut a panel from brown cardstock just a little larger than the printed paper base to frame the card. The edges of the printed paper are inked with pumice stone Distress Ink.
I hope you agree that this bubble gum machine is the perfect base for a vintage industrial steam gauge!
Below you can find the products I used to create this project including some with compensated affiliate links to Scrapbook.com. These links are at absolutely no cost to you. When you shop through the links below, I receive a small commission from Scrapbook.com. These commissions help me cover the costs of my blog and other expenses, which allows me to continue to provide you with FREE inspiration along with Tips and Techniques provided for every project. Thank you so much for your love and support!
Supplies:
Amazing Paper Grace:
- Amazing Paper Grace September 2022 Die of the Month – Pop Up 3D Vignette Bubble Gum Machine.
Paper:
- Idea-ology - Tim Holtz - 8 x 8 Kraft Stock - Metallic - Jewels
- Idea-ology - Tim Holtz - 8 x 8 Kraft Stock - Metallic - Confections
- Idea-ology - Tim Holtz - 8 x 8 Kraft Stock - Metallic - 2
- Idea-ology - Tim Holtz - 12 x 12 Paper Stash - Memoranda
- Core'dinations - 8.5 x 11 Cardstock - Value Pack: White, 110lb
- Craft Consortium - Patina - 12x12" Paper Pad
- Thin Chipboard - Black
- Chipboard Scraps
Ink:
Mixed Media:
- Ranger Ink - Tim Holtz - Distress Collage Medium Matte
- Prima - Finnabair Collection - Art Alchemy - Metallique Wax - Old Silver
- Prima - Finnabair Collection - Art Alchemy - Metallique Wax - Brushed Iron
- Prima - Finnabair Collection - Art Alchemy - Matte Wax Paste - Charcoal Black
- DecoArt - Dazzling Metallics Paint - Worn Penny
- Brush Marker - Black
Embellishments:
- Idea-ology - Tim Holtz - Gauge Frames
- Idea-ology - Tim Holtz - Gauge Dials
- Idea-ology - Tim Holtz - Locket Keys
- Idea-ology - Tim Holtz - Wicked
- Idea-ology - Tim Holtz - Mini Plaquettes
- Idea-ology - Tim Holtz - Vignette Accents - Halloween
- US Artquest - Mica Tiles - Medium
Adhesives:
- Scrapbook.com - Clear Double Sided Adhesive Roll - 1/4 Inch - Permanent
- Tombow - Mono Multi Liquid Glue
- Crafter's Companion - Red Liner Double Sided Tape - Small
- 3L - Thin 3D Foam Squares - Black
- Beacon - 3-IN-1
- Beacon - Fabri-Tac
- Helmar - 450
Tools:
The Amazing Paper Grace Die of the Month is available exclusively at Spellbinders Paper Arts during September 2022, Pop Up 3D Vignette Bubble Gum Machine along with other membership perks.
View this month’s Amazing Paper Grace Die of the Month!
Thanks for stopping by! I treasure your comments.
~ Blessings ~


Tracey, what a gift you are!!! This is majestic and sublime! I adore how you are able to take every piece and make it your own. I am speechless!!
ReplyDeleteBoth projects are wonderful, but I love, Love, LOVE the Steampunk piece. Thanks so much for the clear instructions, step-out-photos, and tips.
ReplyDelete