Sunday, August 31, 2014

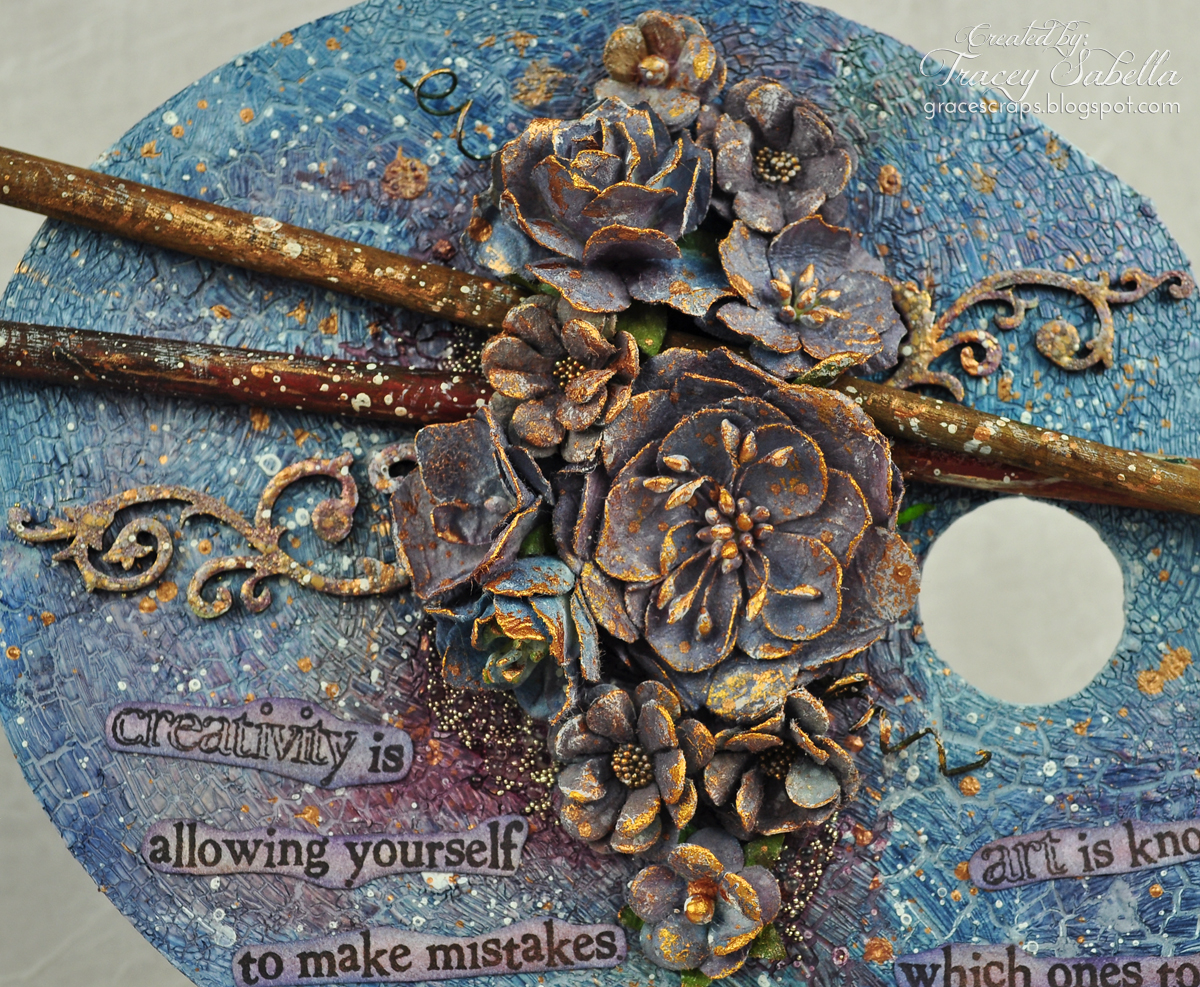
Art Is . . . Paint Palette for Leaky Shed Studio

Today I'm sharing an art piece I created using a page from the Leaky Shed Studio Artist's Palette Album. Last summer I purchased a basket of worthless old paintbrushes at an auction for a dollar with a vision of using them in some of my projects. So when I saw this Artist's Palette, I knew it would be perfect for a couple of the brushes. If you follow my work, you know that I enjoy thinking outside the box, using items differently than they were originally intended.

"Art Is . . ."

Tips and Techniques
The first thing I did was to adhere a piece of cardstock over the binder ring hole. I then painted the entire palette with a couple coats of white gesso. I was inspired by vintage wooden paint palettes. One of my favorites was so full of old paint, that it was crackled and worn. To achieve that effect, I have used a thick coat of white Viva Crackle Paint. Once dry, I used a variety of mists to color. 

I also used the Leaky Shed Small Flower Corner. I cut it in half for each side of the flower cluster. I painted it with metallic paint. I misted the flowers to color and then adhered the flowers, paint brushes, and chipboard in place. Then I splattered with white gesso and gold paint.

Once the splatters were dry, I dry brushed gold paint over the flowers and chipboard pieces. I also added microbeads and mini marbles at the edges of the flowers. 

The final step was to stamp the sentiment, cut it apart and color with Pan Pastels before adhering to the palette. 


Leaky Shed Studio Products

Other Products
Cardstock ~ White
Flowers ~ Petaloo and Wild Orchid Crafts
Beadies ~ Mini Marbles; Microbeads
Tattered Angels ~ Glimmer Mist - Dreamsicle; Garden Fairy; Hydrangea; Huckleberry; Cinnamon; Wild Current; Dragonfly; Blackberry Cordial; Sapphire; Moonlight
Lindy's Stamp Gang ~ Flat Fabio - Aloha Avacado
Liquitex ~ Super Heavy Gesso
Liquitex ~ Gesso, white
Viva ~ Crackle Paint, white
Lumiere Paint ~ True Gold
Pan Pastels
Ranger ~ Glossy Accents
Helmar ~ Crystal Kote Fixative Spray
Helmar ~ 450 Quick Dry Adhesive
Helmar ~ Liquid Scrap Dots
Darice ~ Heat Tool

Thanks for stopping by today! I treasure your comments.
~ Blessings ~

Friday, August 29, 2014

Leaky Shed Studio Sneak Peek

Hi everyone, I'm up on the Leaky Shed Studio blog today with an altered chipboard art piece.

Here's a sneak peek:

For all the details, please hop on over to the Leaky Shed Studio Blog, HERE.

~ Blessings ~

Monday, August 25, 2014

Juliana Michaels new 17turtles Digital Cut File Etsy Shop

I have some great news to share. 

My good friend and talented designer, Juliana Michaels, creates amazing digital cut file designs. She has announced the opening of her new digital file Etsy Shop, 17turtles


Here are some examples of the designs that can be found in her store:

There are more designs available and Juliana will be adding files as she create them, so be sure to stop by often to see what's new.

Here are links where you can find more information about
17turtles Digital Cut Files by Juliana Michaels

BLOG: 17turtles - http://www.17turtles.com/
FACEBOOK: Juliana Michaels Designs - https://www.facebook.com/JulianaMichaelsDesigns
TWITTER: julianamichaels - https://twitter.com/17turtles
INSTAGRAM: julianamichaels - http://instagram.com/julianamichaels/

~ Blessings ~

Friday, August 22, 2014

"Love this Moment" for Donna Salazar

Hi everyone. I have another wedding layout to share with your today featuring lots of Donna Salazar products. This is one of my favorite photos from Elizabeth and Andrew's wedding with a cloud of bubbles surrounding them. I adore how they are leaning in towards each other as they walk together for the first time as husband and wife.

"Love this Moment"
I used Mistra's gorgeous August colors and sketch. 

August Sketch-n-Color by Mistra Hoolahan

Tips and Techniques
I created this focal flower from white cardstock using Donna's Spellbinders Rose Creations and Carnation Creations Die sets. I used Mix'd Media Inx like water colors to tint the centers of the petals. To do this I rubbed the stamp pad onto a craft mat and spritzed on a light mist of water to dilute.

I rubbed Peridot, Patina, and Stormy Mix'd Media Inx around the page edge and then stamped lightly with Donna's Crackle stamp using more Stormy Inx.

I surrounded the focal flower with Bitty Blossoms Flowers created from patterned paper scraps and Mix'd Media Stax 2 Mulberry paper. These flowers were dabbed with Peridot and Patina Mix'd Media Inx, then brushed with gesso. A tutorial for my Bitty Bossoms Flowers can be found HERE. In keeping with the bubbles in the photo, I stenciled circles across this corner using light molding paste. I dabbed the circles with a toothbrush for added texture.

The feathers came from my sweet friend, Jesse. She collected them as her wee chicks shed them.

A close-up of my title area. More (bubble) circles. This time in crystal and acrylic. Here you can see that I used Donna's Zutter Distrezz-it-All to distress around the photo mat.

I cut this Leaky Shed Swirl Vine Corner into two pieces for either side of my cluster. I left it bare with some gesso dry brushed across. It's quite subtle but I created gesso rings seen here above the flourish and again in the opposite corner. Another reference to the bubbles. :-) 

One final shot.


Donna Salazar Products
GCD Studios ~ Natural Beauty 12 x 12" pad
GCD Studios ~ Botanique 12 x 12" pad
GCD Studios ~ Spring in Bloom 12 x 12" pad
GCD Studios ~ Mix'd Media Stax 2 - Mulberry Paper
Clearsnap ~ Mix'd Media Inx - Peridot; Pewter; Stormy; Patina
Spellbinders Dies ~ Rose Creations
Spellbinders Dies ~ Carnation Creations
Spellbinders Dies ~ Bitty Blossoms
Art Gone Wild ~ Crackle Stamp
Zutter ~ Distrezz-it-All

Other Products
My Mind's Eye ~ Lost & Found Record It! Antique Alpha & Word Stickers
Pan Pastels
Leaky Shed Studio ~ Swirl Vine Corner
Prima ~ IOD Everyday Vintage Paintables
Prima ~ Engraver Brads; SIIC Circles; Glitter Hearts; Clear Pebbles; Wood Buttons - Lyric
Idea-ology ~ Industrious Stickers, Borders
Golden ~ Light Molding Paste
Liquitex ~ Gesso - clear, white
Prima 6 x 6" Stencil - Doily
TCW ~ Circle Explosion 12" Stencil
Helmar ~ Premium Craft Glue
Helmar ~ 450 Quick Dry Adhesive
Helmar ~ Zapdots - 1/2" round, black
Darice ~ Heat Tool
Spellbinders ~ Artisan X-plorer

Thanks for stopping by today! I treasure your comments.
~ Blessings ~

Thursday, August 21, 2014

Shabby Bird House for Helmar with Crackle Paint Tutorial

Hi, it's Tracey here to share a shabby bird house I decorated featuring a crackle paint technique using Helmar Craft & Hobby PVA Glue. You might be surprised that I haven't used paper on this project! I've gone back to my roots as a crafter. I've been wanting to try this technique out for some time now and am delighted with the results. Of course this technique would work on chipboard or heavy weight paper as well.

Shabby Bird House
Shabby Chic Bird House by Tracey Sabella for Helmar Crackle Paint, Mixed Media

Tips and Techniqes

First I painted and crackled the house. Instructions are included below in my tutorial.

Next, I adhered tree bark to the roof using Helmar 450 Quick dry Adhesive. I cut it a little larger than needed, then trimmed after it was adhered to the roof. The bark came on a roll in the floral department of our craft store.

Finally, adhere Spanish moss and flowers around the base of the bird house, then a tiny bird on the perch using Helmar 450 Quick Dry Adhesive.

Helmar Craft & Hobby PVA Glue Crackle Paint Tutorial

Supplies
Two colors of contrasting craft paint
An object to paint
Heat Tool

Step 1
Paint your object with a base color. I've cut pieces of chipboard to demonstrate. The chipboard only required one coat of paint to cover, but the wood bird house needed two coats to cover since it had not been primed. You can paint the base coat on the entire project before beginning the crackle process.

Shabby Chic Bird House by Tracey Sabella for Helmar Crackle Paint Tutorial with Helmar PVA Glue

Step 2
Brush a medium layer of Helmar Craft & Hobby PVA Glue across the painted area. Work in small areas at a time. I worked with one wall of the bird house at a time, then went back and crackled the roof and base details a bit at a time. 

I kept all my brush strokes going in the same direction resulting in a linear crackle pattern. If you swirl on the glue, it would change the pattern of the top coat crackle.

Shabby Chic Bird House by Tracey Sabella for Helmar Crackle Paint Tutorial with Helmar PVA Glue

Step 3
Allow the glue to dry a little. It should still be white, but should lose the shiny, wet look. You can let it sit about 8 to 10 minutes, or use your heat tool briefly. If using a heat tool, heat just until the glue loses it's shine.

Brush a thin layer of contrasting color of paint across the tacky Helmar Craft & Hobby PVA Glue. Be careful not to brush over an area a second time as that portion will not crackle. It's OK if you don't get complete coverage as you are looking for a distressed crackled look. I brushed on the paint with strokes going in the same direction as the glue strokes.

Shabby Chic Bird House by Tracey Sabella for Helmar Crackle Paint Tutorial with Helmar PVA Glue

Step 4
Allow to dry or speed up the drying process with a heat tool. The paint will crackle as it dries.

If you use a heat tool, keep it moving and don't put too close to the surface as this will cause the paint to bubble.

Shabby Chic Bird House by Tracey Sabella for Helmar Crackle Paint Tutorial with Helmar PVA Glue

You can see where the paint is thinner, there is more of a crackle effect than where it went on thicker.After the paint is completely dry and set, you can sand the edges lightly to further distress if desired.

You could even paint projects like furniture with this technique if you finish with a coat or two of sealant.

Here's one more view from another angle.
Shabby Chic Bird House by Tracey Sabella for Helmar Crackle Paint, Mixed Media


Helmar Products

Other Products
Unfinished Wood Birdhouse ~ JoAnn's
Darice ~ Nature's Friends - Mini Mushroom Bird
Spanish Moss ~ Stash (Floral dept. of craft store)
Home Inspirations ~ Bark Roll
Wild Orchid Crafts ~ 20mm Open Rosed - Ivory/Pale Pink
Wild Orchid Crafts ~ 10 mm Open Roses - White
Wild Orchid Crafts ~ Sweetheart Blossoms - White
Petaloo ~ Penny Lange Garden Collection - Forget Me Nots - Slate Blue
Rustoleum ~ American Accents Craft Enamel - Tranquil Blue Semi-gloss
Rustoleum ~ American Accents Craft Enamel - Heirloom White Satin

Thanks for stopping by today! I treasure your comments.
~ Blessings ~
Wednesday, August 20, 2014

Shabby Bird House Sneak Peek for Helmar

Hi everyone!! I'm up on the Helmar blog today with a surprise off the page project. . . What's the surprise, you ask? I didn't use one bit of paper!! I was a life long crafter before I started paper crafting and went back to those roots for this project. 

Here's a sneak peek of my Shabby Bird House.

If you'd like to check out my tutorial for the crackle paint technique using
Helmar Craft & Hobby PVA glue, stop by the Helmar Blog HERE.


~ Blessings ~

Tracey

Monday, August 18, 2014

Helmar Design Team Call

Here's some great news for my US, Canadian, and Australian friends!!
I truly feel that Helmar creates the best adhesives in the paper crafting market.
Here's your chance to join their creative team.


Helmar Design Team Call 2014/15

Helmar is a recognized leader of adhesives and aerosols in the Arts and Crafts industry and we are looking for new design team members to promote our amazing products. If you’d like to be a part of one of the most creative and easy going design teams out there, while showcasing Helmar products and your talent, this call is for you!!!

We are looking for dedicated creative design team members who work well with deadlines and guidelines. Designer positions on the Helmar Design Team are for a 6 month term beginning October 1st, 2014.

As a member of the Helmar Design Team you will…

1)      Receive a generous amount of Helmar products

2)      Endorsement fees for published layouts and tradeshow projects (subject to terms and conditions)

3)      The possibility of a selection of products from our generous Preferred Partners throughout your term.

Now what does it take to be a part of the Helmar Team? Here are your responsibilities

1)      1-2 projects per month consisting of posts on the Helmar blog, your personal blog and sharing on Facebook.

2)      Keeping your personal blog and Facebook page up to date and linking and promoting Helmar products at every opportunity.

If you are interested in being part of the Helmar Design team,
please email the following information to khitchen@helmar.com.au

1)      Name, address, daytime/evening phone number and email address.

2)      Short biography

3)      Links to your online galleries, blogs, Facebook and Twitter pages.

4)      A List other design teams you are now on or have previously been on.

5)      A brief paragraph letting us know why you would like to be a part of the Helmar Design Team.

6)      Two examples that will best showcase your work. Please ensure file sizes are not overly large or small, nothing over 1mb. Examples could be your Papercrafts, altered art, mixed media, craft projects, kid’s projects, home décor, etc.) Make sure to list any special techniques you’ve used using adhesives.

Please submit your application to khitchen@helmar.com.au by Friday 12th September 2014.

No late submissions will be accepted.
The new Helmar Design Team will be announced by the 26th of September, 2014
** At this time we are only accepting applications from Australia, Canada and United States.

The Helmar Blog can be found HERE.

Published at Scrapbooking.com

It's always so amazing to have my work published,
and I'm thrilled to share that two of my layouts are in the

Please click on the links to view the articles:

Beautiful Reef ~ Vacation Department

Summer Sunset ~ Paint Department

Be sure to check out the entire August Issue of Scrapbooking.com Magazine.
You are sure to be inspired and best of all it's free!

~ Blessings ~

Monday, August 11, 2014

Creative Blog Hop

I was invited to participate in the "Creative Blog Hop" by my sweet friend, Vicki Robertson. We will continue this progressive blog hop while meeting and greeting new bloggers, sharing our creative inspiration, and learning more about ourselves and the craft we love!

Here's a little about Vicki. . .

I've gotten to know Vicki through our mutual love of paper crafting and appreciation for each other's work. Vicki is amazingly talented and enjoys spreading her creativity across the gamut of papercrafting from layouts to cards and off the page projects. She currently shares her talents designing for Craft-Dee BowZ, Dies R Us, Rogue Redhead Designs and Blog Coordinator for CropStop.

Be sure to stop by Vicki's blog, He"artful" Validation to see her amazing projects.

~ ~ ~ ~ ~ ~ ~ ~ ~ ~ ~ ~ ~ ~ ~ ~ ~ ~ ~ ~ ~ ~ ~ ~ ~ ~ ~

I started my journey into paper crafting strictly as a scrapbooker, but over time have expanded to include cards and off the page projects. I'm a life-long crafter, and enjoy employing those skills into my projects. As you will see below, I enjoy a wide range of color palettes.

Here are some of my favorites:

"Caboose Light"

"Together"

"Together"
Created for our 32 year anniversary!!

Wedding Card

"Memories"

Candle Holder

"Bless the Lord"
"

1. What I am working on?
I love to get my fingers into paint, ink, and all sorts of mixed media goodness. I just finished a paint palette wall hanging and am getting ready to play around with a new glue technique tomorrow for one my upcoming projects. You'll have to stop by my blog later this month to see how they turned out.

2. How does my work differ from others in my genre?
My style has varied over the years, but my current style is Shabby Mixed Media. I love to combine pretty and elegant items with grungy, rough edged things. I also enjoy finding and using non-traditional items on my layouts and papercrafted projects like jewelry, and guy junk like washers and gears. The most unusual item I've ever used? Probably the metal eyelets I cut off of an old pair of discarded tennis shoes. I know our daughter thought I was a bit crazy when I asked her if she was throwing those shoes away for good. I just couldn't let those cool triangular eyelets go to waste!!

As much as I adore my amazing husband and sweet children, my faith is the most important thing in my life and is often reflected in my work.

3.   Why do I write/create what I do?
I started scrapbooking to archive our family history in 2007. It soon became clear that for me  papercrafting is more about the creative process than documentation. That realization gave be the freedom to take as long as necessary to create. Yes, sometimes it takes me several days and many hours to create a layout or project, but that's just fine since I enjoy the process so much. I love to learn and try out new things.

4    How does my writing/creative process work?
Each piece I create is a work of art, so I start with the photo and go through a process of selecting papers and other elements that support the feel I'm trying to achieve for that layout. If it's a wedding layout, I'll tuck in symbols of love like hearts, and keys, and my stamping may be bits of random script from I Corinthians 13 - the love chapter in Scripture.

I don't always know where the creative process will take me. Often the finish project looks quite different than what I envisioned when I started. I never know what might happen with mixed media, but glitches can be easily covered and often morph into what I call happy mistakes when the result is better than what I had originally intended.

Now, I'm "passing the torch" to my Leaky Shed Studio Teammate, Veronica Johnson, also known as Kits N Bits. Veronica is a talented paper artist and such a lovely person. I adore her work and want to share more about her. 

I have a passion for creating and sharing my love of crafting, whether it’s cards, layouts, albums, altered and mixed media; I love doing it all. I also enjoy bringing new tidbits and techniques to inspire as many crafters as I can through color.  If I had to name my style I would say “Shabby Whimsy” because I always start projects with lots of color then depending on my mood I will shabby it down with browns, texture and layers.  Each day is a new adventure and every day I try and learn something new.

Please visit Veronica's blog, Kits N Bit Scraps, HERE.

Thanks for stopping by! I treasure your comments.

~ Blessings ~

Sunday, August 10, 2014

"The Journey" Grungy Mixed Media Steampunk Card for Donna Salazar

I have another totally masculine card for you with a steampunk vibe featuring Donna Salazar products. Our son's birthday is later this month, so I've created a card for his special day. He asked in jest, a while back if I was able to create a layout without flowers on it. I have met that challenge and thought I'd follow through and create a totally grungy guy card for him (no flowers at all). While Donna's products are totally "Girlie Grunge", they also create gorgeous grungy guy things!!

"The Journey"
Grungy mixed media card by Tracey Sabella for Donna Salazar; Sprightly Sprockets

Tips and Techniques
Grungy mixed media card by Tracey Sabella for Donna Salazar; Sprightly Sprockets
I've cut and embossed black cardstock using Donna's Spellbinders Sprightly Sprockets Dies, then rubbed several colors of metallic paint over them to look like aged patina. Metal gears can get pricey, but these are quick and easy, and you can create bunches of them from a single sheet of paper.

The sentiment is stamped with Donna's Clearsnap Mix'd Media Inx. I fussy cut around the sentiment and layered over a torn strip of Donna's Zutter Corrugated board that I colored with Mix'd Media Inx.

Grungy mixed media card by Tracey Sabella for Donna Salazar; Sprightly Sprockets
Here you can see the layers and dimension.

Grungy mixed media card by Tracey Sabella for Donna Salazar; Sprightly Sprockets
I've used some of Donna's older paper from the Antiquities collection. I just adore this steampunk winged image. I spread Clear Rock Candy Distress Crackle Paint over the wings and allowed to dry. Then I went back and used a paint brush to apply Donna's Clearsnap Smooch Spritz in Wood Stain to highlight the crackle. I finished off the image with one of my "metallic" gears.

Grungy mixed media card by Tracey Sabella for Donna Salazar; Sprightly Sprockets
A close-up of the sprocket section. The ruler is fussy cut from another page from the Antiquities collection and the Want2Scrap Key was painted, then heated with my heat tool while wet until it bubbled to get this great texture.

Grungy mixed media card by Tracey Sabella for Donna Salazar; Sprightly Sprockets
More stamping with Mix'd Media Inx. To color the hot air balloon image, I dabbed a paint brush into the Mix'd Media Inx pad then brushed the ink across the image. I've also rubbed Mix'd Media Inx around the edge of the paper.


Donna Salazar Products
GCD Studio ~ Antiquities Collection 12x12" pad
Zutter ~ Corrugated Board
Clearsnap ~ Smooch Spritz ~ Wood Stain
Clearsnap ~ Mix'd Media Inx - Truffle; Schoolhouse; Adobe; Leather; Black; Peridot; Patina
Clearsnap ~ Mix'd Media Inx CHOX - Butternut
Clearsnap ~ Mix'd Media Inx Embossing Powder - Leather
Spellbinders ~ Sprightly Sprockets

Other Products
Want2Scrap ~ Antique Keys w/Hardware - Chipboard, Card Size
Lumiere Paint ~ Pearlescent Blue; Metallic Bronze; Halo Blue Gold
Liquitex ~ Gesso - Clear; White
Ranger ~ Distress Crackle Paint - Clear Rock Candy
Stampers Anonymous ~ Lost and Found
Stampabilities ~ May Your Birthday Be Filled . . . 
Hampton Art ~ Danelle Johnson - Hot Air Balloons
Helmar ~ 450 Quick Dry Adhesive
Darice ~ Heat Tool
Spellbinders Artisan X-plorer

Thanks for stopping by! I treasure your comments.


~ Blessings ~

Saturday, August 9, 2014

"Never Let Me Go" Mixed Media Engagement Layout for Leaky Shed Studio

Here are the details on the layout I shared the sneak peek of yesterday. If you missed yesterday's post, this is a sweet couple from our church. They were married last weekend. Their mom snuck their favorite engagement photo to me and I created this layout and framed it for them as a wedding gift. I've featured gorgeous Leaky Shed Studio chipboard around the page.

"Never Let Me Go"

Tips and Techniques
Mixed Media Wedding Layout by Tracey Sabella for Leaky Shed Studio - Embossed Chipboard
As you look at the three gorgeous Leaky Shed Studio Chipboard pieces I've used on this layout, you'll see three different looks. Here are the details.

To achieve this shabby look on the Leaky Shed Studio Harja Flourish - Two chipboard, I first adhered mica pieces randomly here and there with glue. I then applied Perfect Medium (Any embossing pad should work) and sprinkled on Fran-tage Shabby White Embossing Enamel. I left some of the areas only lightly covered so the chipboard and mica chips would show through, then heated the powder to melt.

It's the perfect leafy corner to this flower cluster.

Mixed Media Wedding Layout by Tracey Sabella for Leaky Shed Studio - Embossed Chipboard
Here's another view. You can see how I've gessoed the flowers to soften them.

Mixed Media Wedding Layout by Tracey Sabella for Leaky Shed Studio - Embossed Chipboard
Here's a close-up of the Leaky Shed Studio Double Heart. I've colored it with Blackberry Cordial Glimmer mist, then when dry dabbed lightly with Perfect Medium and lightly sprinkled with Fran-tage Shabby White Embossing Enamel before heat setting. I just used a very small amount of embossing enamel so the purple would remain the main color. 

I've stamped flourishes at the corner before topping with a BoBunny Flourish.

Mixed Media Wedding Layout by Tracey Sabella for Leaky Shed Studio - Embossed Chipboard
Leaky Shed Studio has some of the most beautiful and intricate clocks. This is the Small Clock #2. I've simply misted it to color and then topped with an opaline embossing powder for a pearlescent shimmer. 

I've splattered purple and gold across the page for shabby texture.

Mixed Media Wedding Layout by Tracey Sabella for Leaky Shed Studio - Embossed Chipboard
I've tucked the clock amongst the layers above the photo.


Other Products
Riddersholm Design ~ Fall Flea Market - Attic Junk
Riddersholm Design ~ Fall Flea Market - Future Key
Riddersholm Design ~ Dog Infograms
7 Dots Studio ~ Cold Country - Word Stickers
BoBunny ~ Jewels - Chocolate
Petaloo ~ Fabric Flowers - Camel
Petaloo ~ FloraDoodles - Beaded Peonies, Cream
Petaloo ~ Penny Lane Garden Collection - Teal
Petaloo ~ Textured Elements - Burlap Blossoms, Natural
Wild Orchid Crafts ~ 15mm Open Roses, Deep Ivory
Clearsnap by Donna Salazar ~ Mix'd Media Inx - Leather, Wisteria
Tattered Angels ~ Glimmer Mist - Blackberry Cordial
Sparkle N Sprinkle ~ Opaline
Fran-tage ~ Embossing Enamel - Shabby White; Aged Gold
Fran-tage ~ Mica Flakes
Viva ~ Ferry Special Effects Paste - Graphite; Amber Gold
Liquitex ~ Gesso - Clear; White
Ranger ~ Perfect Medium
Prima ~ Stencil - Flourish, 12x12"
BoBunny ~ Stamps - Flourishes & Such
Recollections ~ Script Stamp
Glitz ~ Distressing Clear Stamps D2343
Spellbinders ~ Labels Eight
Tim Holtz ~ Layering Stencil - Splatters
Helmar ~ Tape Runner
Helmar ~ 450 Quick Dry Adhesive
Darice ~ Heat Tool
Tim Holtz ~ Grid Blocks

Thanks for stopping by today! I treasure your comments.

~ Blessings ~

Friday, August 8, 2014

Layout for Leaky Shed Studio

I'm up on the Leaky Shed Studio blog with a Mixed Media layout.

Here's a sneak peek:

For details and close-ups please stop by the Leaky Shed Studio blog HERE.

Thanks for leaving a comment while you're there!!

~ Blessings ~

Saturday, August 2, 2014

"Your Paths" for OUAS featuring Leaky Shed Studio Chipboard

The Once Upon A...Sketch August Challenge is up and live. Our August journaling theme is, "The Men in Our Lives."

When Elizabeth married Andrew, we were so delighted to add another son to our family. In this fun photo, the groomsmen are "kicking off" Andrew into his new life with Elizabeth. I thought this Scripture sentiment tied in perfectly - we pray that our Lord with direct Andrew's paths as he and Elizabeth look forward to a future together. 

"Your Paths"
(Journaling on Back)


Journaling Theme: The Men in Our Lives

You are free to interpret our theme ANY WAY you like. It is for your inspiration and this theme word DOES NOT need to be part of your title or journaling. But please make sure your layout is based on the sketch below and includes journaling (hidden journaling is fine). Acceptable journaling is MORE than just a sentence, or generic writing such as date/place etc. It needs to be present and at least 3 lines long. Remember, hidden journaling (under a photo/tag or behind your page) is perfectly fine but please DO let us know in your post where your journaling is! 

August Sketch

I've flipped and rotated the sketch.

For challenge details, more design team inspiration, and to link your project go HERE.

My journaling is on the back of the page and says, "Andrew, your groomsmen are kicking you off into a new life with Elizabeth. It’s my prayer that our Lord with be the center of your relationship and direct your paths together. I hope you have many happy years together."


Tips and Techniques
Lots of mixed media techniques to share. This Leaky Shed Studio Bird Branch was painted with blue metallic paint and dry brushed with white gesso. 

Normally I grunge up my Leaky Shed Studio Gears and Watch Parts more, but I likd the natural chipboard color with this gorgeous 7 Dots Studio paper, so I just lightly inked the edges before adhering, then they also picked up some of the ink I splattered across the page. The two Watch Parts I layered over the larger gears were painted with black gesso for contrast. 

There's lots of layered dimension. The washer strip was cut from brown cardstock and dry brushed with gesso. The frame around my sentiment is a blast from the past. It's an old filmstrip piece with a wood grain finish. I swirled paint across it to freshen up the look. The chipboard heart is covered with aluminum tape and embossed. There are also a couple strips of punchinella with a grid - torn and painted. To keep with the masculine, grungy theme, I've dry brushed the photo edges with gesso. This was actually two separate photos taken by the wedding photographer.

The blue and orange color on the background is added with paint thinned with water and Neocolor II watercolor crayons. The silver frame behind the photo was a scrap piece that held wooden cut-outs used on another project. Yes, I tend to hold onto those odd and end pieces. lol I've also added stamping around the page edges and around the photo cluster. 

Stop by the OUAS blog to link your project HERE.


Leaky Shed Studio Products

Other Products
7 Dots Studio ~ Nature Walk, Songbird
Cardstock ~ Brown
Wood Frame ~ Scrap
Filmstrip Frame ~ Stash
Want2Scrap ~ 1/8 cup of Bling - Blue Pearls
Punchinella - Square Mesh - Stash
Thread, black, gold - stash
Caran D'Ache ~ Neocolor II
Jacquard ~ Lumiere Metallic and Pearlescent Paints
DecoArt ~ Paint
Folk Art ~ Paint
Making Memories ~ Glaze Paint
Liquitex ~ Gesso, white, clear, black
Clearsnap by Donna Salazar ~ Mixed Media Inx CHOX - Midnight
Ranger ~ Distress Ink - Vintage Photo
Sizzix by Tim Holtz ~ Sizzlets Decorative Strip Die - Washer Border
Sizzix by Tim Holtz ~ Embossing Fade - Riveted Metal
Heartfelt Creations ~ Large Elegant Words Stamp
7Gypsies ~ Steampunk Clear Stamps
Hampton Art ~ Diffusion Stamp
Tim Holtz ~ Seamless Experience Stamp Set
Inky Antics ~ Guided Path Stamp Set
Helmar ~ Liquid Scrap Dots
Helmar ~ Premium Craft Glue
Helmar ~ Zapdots, black 1/2" round
Helmar ~ 450 Quick Dry Adhesive
Darice ~ Heat Tool
Ranger ~ Craft It 
Sizzix ~ Big Shot
Tim Holtz ~ Grid Blocks

Thanks for stopping by! I treasure your comments.

~ Blessings ~