Showing posts with label Metal Work. Show all posts

Saturday, March 31, 2012

You'll Be My Friend Forever ~ Reveal for The Stamping Scrapper

It's reveal day for the Shannon's gorgeous sketch at the Scrapping Stamper.

This photo of Elizabeth and Maria hugging is so precious on a beautiful spring day back when we lived in North Carolina. The Bo Bunny Country Garden collection was perfect to scrap this photo. 


 Here is Shannon's fabulous sketch:


Be sure to head on over to The Scrapping Stamper to see what her design team did with this fab sketch. 

Here are some technique details:

Layered Twine Flower ~ You can find the tutorial for my twine flower here. Underneath the twine flower, I used the tattered floral die to cut fabric and netting. I also used a daisy die to cut a paper flower from blue paper which I inked the edges. The fabric was cut from a white shear fabric which I dabbed with blue distress ink to color. I topped it off with an adhesive flower center by Petaloo. 

Crocheted Flowers - I crocheted the little white flowers, inked the edges and added a rhinestone to the center of each. 

Leaves ~ I used the Spellbinder Foliage Shapeablilities Die to cut the leaves, then folded and crimped the leaves and inked for added dimension. 

Prima Build-a-Frame Stamps ~ My friend, Mandy, helped me locate these fabulous stamps that I used to frame the corners of this layout. The image in the bottom corner includes the words that I used for my journaling. "I love you and I like you and you'll be my friend forever."

Banners ~ I was thinking about buying the Tim Holtz Banner strip, but when I looked at it, I realized it was just paper strips with cut ends and I figured it wouldn't take any longer to fussy cut them with my Honey Bee Scissors (the best scissors I've found for fussy cutting) than running the die through my Bigshot. So, cut I did. I then folded and inked to get the shabby banner effect. 

Bead Dangles ~ I found this fabulous earring finding on clearance at my favorite craft store, Pat Catan's, and added the yellow shaped beads to the ends of the chain and if you look closely - very closely indeed, you'll see a tiny yellow bead in the bottom loop of each as well. 

Stick Pin ~ I created this stick pin from a pearl topped floral pin and some beads left over from my jewelry making days. I simply placed the beads on the pin and glued the bottom bead to hold it in place. 

If you keep looking, you'll see other techniques I've done before like the dictionary page ~ of course with the word sister, painted metal, stitched and distressed photo edges, real chicken wire, fussy cut and stickled butterflies, lace, painted resin, inked paper edges . . .

I'm entering this layout in:

City Crafter Challenge Blog CCCB#102 ~ use the spring color pallet Pinks, Yellow, Blue, Green (April 2)


Thanks for stopping by! I treasure your comments.

~ Blessings ~

Thursday, March 15, 2012

Love Letter and Twine Flower Tutorial

Update March 2016: I now have a video tutorial for Girlie Grunge Twine Flowers showing how to create the loom and twine flower using Donna Salazar's new bakers twine for Scrapbook Adhesives by 3L. The process is exactly the same for jute twine or hemp cording. Only the size of the loom you use would change. A chart for suggested loom sizes and twine lengths can be found HERE. (scroll to the bottom of that post for the chart) My VIDEO TUTORIAL can be viewed HERE.

Our son, Joseph, wrote a love letter to his bride, Rachel, and sent it to her with a rose while she was waiting for the wedding ceremony to start. This photo is of her reading his letter. The list are some of her responses to his love letter.


I have seen some fabulous twine flowers on Pinterest, but have not been able to locate a detailed tutorial to create them. After some experimenting, I've come up with these lovely gems and have written a step by step tutorial for you to recreate them as well. 


Twine Flower Tutorial

*** A video tutorial for my twine flowers can be viewed HERE.***

***An updated version of my tutorial can be found HERE.***

Now I'd like to share a tutorial on how to make these beautiful twine flowers. I got the idea from a tutorial at The Bug Bytes. I made several changes to her flowers, so I'm posting a tutorial here for my version of her twine flowers. 

Please don't be intimidated by the number of steps. I wanted to make sure the directions are clear, so I would rather err on the side of giving you more information than you might need. The tutorial I learned from had fewer steps, and I found myself doing some trial and error, that hopefully will be avoided for you. 

Once you have made your loom and have a couple flowers under your belt, these little beauties only take about 10 to 15 minutes each to create.
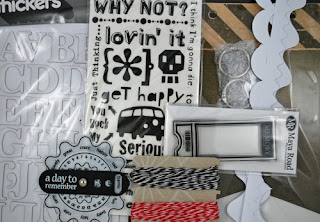


*** A video tutorial for my twine flowers can be viewed HERE.***

SUPPLIES:

a) Twine - any kind of thin hemp, jute, or baker's twine will work nicely ~ about 7 feet of twine for a 2 inch loom.
b) Two same size chipboard circles ~ I used 2 inch circles. 
c) Glue ~ any kind of glue that will hold the two chipboard circles together will work. I used Scotch Quick Dry Adhesive. 
d) 12 Straight pins ~ Mine have plastic balls on the ends, but any pins you have will work or even small finishing nails if you don't have straight pins. 
e) Large eye tapestry or yarn needle The needle doesn't have to be flat on the end with a curve like mine, as long as the eye is large enough to thread the twine and a rounded rather than sharp pointed end, it will work. 
f) A pencil or pen and ruler (not pictured) are needed to draw lines on the top circle. 


MAKING THE LOOM:

Step 1. Cut two identical chipboard circles ~ I used 2 inch circles cut on the AccuCut machine at my LSS. They could also be traced and cut with scissors. Don't worry if your circles aren't exactly perfect. The petals aren't going to be exactly the same even with perfect circles. St

Step 2. Draw 6 lines evenly spaced on the front of one circle ~ This will give spacing like the numbers on a clock. 


Step 3. Spread glue on the back of the circle you drew lines on and adhere to the other chipboard circle. 

Step 4. Once the glue is dry, push your pins between the cardboard pieces in line with your pencil lines. If you don't let your glue dry first, a pair of pliers will be needed to pull your pins out the first time. (Go ahead, ask me how I know!!)


If you turn the chipboard on its side, it will look like this:


***Note*** My loom has held up well. I've made over 20 flowers, and the pins are still nice and tight. 

MAKING THE TWINE FLOWERS:

*** A video tutorial for my twine flowers can be viewed HERE.***

Step 1. At first you will be working from your spool of twine. Don't cut anything yet. Think of your loom like a clock. Leaving about a 4 inch tail, hold the twine at 7:00. Wrap the twine up to the left side of the pin at 12:00 and wrap over and behind the 12:00 pin, moving from left to right, then wrap straight down to the right side of the pin at 6:00. Wrap the twine behind the 6:00 pin from right to left. 


Step 2. Now wrap your twine back up to the left side of the 11:00 pin, wrapping over/behind the pin from left to right and straight down to the right side of the 5:00 pin, wrapping behind the 5:00 pin from right to left.


Step 3. Continue this pattern until you have one loop around each pin. 


Step 4. Continue wrapping around the pins in the same pattern until you have two loops around each pin. 


Step 5. This was the confusing part for me, so I changed out the twine to a contrasting color to help illustrate the remaining steps. Your final wrap will be back around the 7:00 pin where you started. My loom is rotated in the photo, so it is no longer in the 7:00 position, but this last wrap goes around the pin that was in the 7:00 position when you started wrapping.

You will leave the starting tail at the 7:00 pin. On the working end of your twine, cut about a 20 inch length of twine. That's 20 inches from the last wrap on the loom. The amount of twine needed will depend on the thickness of the twine you are using. A thicker twine will require more and a thinner twine would require less. The twine I used is about the thickness of bakers twine. I also made a flower with a thicker jute which you can see in the photo at the end of this tutorial. That twine required about 24 inches to do the center weaving in the flower. When it doubt, cut a longer piece that you think you might need and then you will know how much to cut for your next flower. 

Thread the twine onto your large needle. 


Step 6. Now you are going to start weaving around the center of the flower. This will secure the flower petals in place and give the decorative stitching around the flower center. You are working from the back of the flower, so you won't see the pretty decorative stitching until the end when you remove your flower from the loom and turn it over. 

Move your 7:00 pin so it is now at 12:00. You will start weaving behing the "petal" to the right of your final wrap. So, take your needle and go underneath the 4 strands of twine wrapped around the 1:00 pin and push the needle all the way behind the 5 strands at the 12:00 pin, (the 4 petal strands and your starting strand of twine - this is the only place there will be 5 strands of twine.)  As you can see on the photo, your needle will be under a total of 9 strands of twine. 


Step 7. Pull your needle through. For this weaving stitch only leave a little slack in the end of your twine. Notice what the yellow twine is doing. 

The last wrap around the pin is now at the 12:00 position only goes to the center of the flower, so when you take your next weaving stitch with your needle you will secure that half thread in place. Moving to your left, push the needle under all 4 strands of the 12:00 petal plus starting tail and keep pushing it under the 4 strands of the 11:00 petal.


Step 8. Pull your woven stitches tight, pushing them towards the center of the flower with the tip of your needle. This is the only place where you may need to work with your stitches a little bit to get them nice and tight. Sometimes after I pull the stitches tight, the first stitch is too loose, if that is the case, I use my fingers to pull on the second stitch to take the slack out of the first stitch. Your stitching  should look like the stitches in the photo below. 


Step 9. Continue weaving by stitching under the petals, moving to the left in a counter clockwise direction. Please note, now that you are past the starting tail at the 12:00 petal, you will continue going behind two petals each time, but now for a total of 8 strands of twine. 


Step 10. Continue this pattern until you have 2 stitches around each petal, coming back around to where you started. Your last weaving stitch will still go behind 2 petals ~ 8 strands of twine. Pull the working twine on your needle down between the petals and between the stitches to the center of the flower. 

Notice how the yellow twine in the photo is pulled to the center of the flower between the 12:00 and
1:00 pins.


Step 11. Use your needle to weave the end of the thread under the top layer on the center stitches until it seems secure. I take two to three stitches to secure, usually going under about 10 or so threads all together. I start the needle under a thread that is right where I am pulling the thread between the petals and stitching so I don't distort the woven design on the back side of the stitching, which will actually be the front of the flower. After weaving the end of the twine to secure, cut it close to where it is exiting the flower center. 


Step 12. Pull the starting twine to the center and secure it in the same way.


Step 13. To release the flower from the loom, pull the pins out one at a time to release each petal, then put the pin back in place to be ready to create your next flower.

Turn your flower over to admire the beautifully stitched border around your center. 


I created a 2-inch loom. You can change the size of your flowers by using different size circles, but keep in mind that the center of your flower will be determined by the thickness of your twine, and will stay the same regardless of what size circle you use. You can see that my jute flower has a much larger center than the twine flowers. If I make another jute flower, I will probably use a larger loom so it will look more daisy-like. Because this jute was thicker than the twine, the center turned out larger, giving more of a sunflower appearance. 

You can also dress your flowers up with a button or other bling like I did for my layout or even layer them with other flowers. 

*** A video tutorial for my twine flowers can be viewed HERE.***

I hope you give these flowers a try.

Here are a few more examples of how I've used these flowers in my projects: 


Thanks for stopping by! I treasure your comments. 

~ Blessings ~

Saturday, February 25, 2012

Journey ~ Bird is the Word using The Stamping Scrapper Sketch

I was so delighted to find this old photo of my husband's father when he was only 15 with his younger sister and a cousin. The guitars and accordion help make this an even more precious photo. This paper by g.c.d. studios couldn't have been more perfect with the vintage design and music borders.

The challenge at Bird is the Word to use "Journey" on a layout was just perfect because in a few short years each of these young men and woman would be taking a journey to live in a different part of the country. Journey is the title, in the quote printed next to the title, and on the Muse Token in my embellishment cluster. 


I was inspired by this creative sketch, by The Scrapping Stamper:


I enjoy doing subtle things on my pages to support the photo(s). It's hard to see here, but the pen nib has the word notes on it. I'm sure it was meant for written notes, but works perfectly to reflect the musical notes that would have been played on the instruments. I created the flowers using my Donna Salazer Spellbinders Rose Creations die set and more of the gorgeous g.c.d. studios paper from the Antiquities line. One of those g.c.d. papers I used for the flowers was sheet music, again to give that subtle music touch.


I cut my gears from a couple different SVG file sets that I converted with Inkscape to files I could cut on my Gazelle. Here are links to the files: Gear set 1Gear set 2Gear 3. There are a number of free gear svg files out there, so if you don't like what you see here, you can try doing a Google search.

I cut the gears from a dark brown - nearly black paper, then painted with a brown metalic paint mixed with black. When that was dry I used a nearly dry brush with antique white acrylic to add a little distressing to the gears. Since I didn't have any chipboard gears, I made due with what I had on hand. I also added a couple of the Tim Holtz metal gears ~ treated with black alcohol ink to mix things up a little.


I wanted to embellish with some of the rich yellow color from the gorgeous compass in the border of the background paper. I alcohol inked some clear gem brads for my flower centers and included some yellow trinkets in my bottle cap. 

My friend, Kelly, gave me the mini bottle cap. This is such a fun embellishment to create. Simply take a bottle cap (bought or found), set it with the edges turned up (preferably on some cardboard or a few layers of newspaper so you don't damage your table) and use a rubber mallet to pound the edges down. (Who said scrapbooking is a passive art??) If you want to distress/antique it ~ paint some alcohol ink on the edges. You could also use Copic markers for this as well. I put a pool of E6000 adhesive in the bottom and placed little trinkets into the thick glue. You can adhere it to the page right away, but remember to keep it flat over night so the glue has a chance to dry before you put it in your album. If you want to be on the safe side, just wait until the E6000 is dry before adhering to your page.

Some of my other embellishments include buttons and trinkets from my collection of vintage items, a metal flower that I alcohol inked from Hobby Lobby, and a few Tim Holtz goodies including the "journey" muse token. Most of my metal items were alcohol inked and then sanded to distress and to make certain features more visible like the numbers on the clock.


I cut the letters from some craft aluminum using the Tim Holtz Typeset die strip, then dabbed on a mixture of espresso and black alcohol inks using a felt applicator.

I'm participating in Friendship Friday at Create with Joy - I started using blogger because that seemed to be the platform that most scrapbook artists were using. I has worked well for me so far. 

Be sure to drop by Shannon's sketch blog to see the amazing LO's created by her design team, and if you haven't tried one of the Bird is the Word Challenges, stop over there and give one a try. 

Thanks for dropping by. I treasure your comments!

~ Blessings ~ 

Saturday, February 11, 2012

Remember Grandpa ~ Bird is the Word using The Stamping Scrapper Sketch

When I found this older photo of Joseph and his Grandpa Sabella, I knew I wanted to do a special layout for it. The challenge over at Bird is the Word to use "Remember" gave me the perfect title for this page. Grandpa Sabella was a very special man and we miss him a lot. 


I used this January Sketch by Shannon ~ The Stamping Scrapper:


Be sure to stop by Shannon's blog to see what her talented DT created with this fab sketch and let her know what you think. She'd enjoy hearing from you if you decide to use it. 

Techniques:

Masking ~ I cut letters on my Gazelle for the word remember and backed them with Xyron adhesive. I placed them down the side of the layout and inked over top of them, then carefully removed them with Un-Du, leaving a masked image for my title. 

Postage Stamp Border ~ A 3/4 inch circle punch would have made this task so much easier, but since I didn't have one, I cut a 3/4 inch circle and used it as a template to place my half circles around these two blocks, then fussy cut the circles out of the borders. Since I was going to distress the edges, they didn't have to be perfect.

Tag ~ I cut the tag from chipboard at Scrapbooking By Lisa - our local scrapbooking store on their AccuCut machine. I then ran it through the Tim Holtz snowflake embossing folder so the the snowflakes would be raised. I painted the entire tag with crafter's acrylic paint in several shades of blue - letting portions show through as I layered the coats of paint. I then applied an antique white to the raised snowflakes. Once this was dry I decorated it with the hand written and hand stitched tag, lace, and other embellishments. 

Cutting and Inking ~ I used my Cricut and Gazelle to cut out the mats and corner feature. I inked the edges and to the corner I brushed on some stickles for some shimmer. 

Lacing ~ I placed eyelets on both sides of the postage blocks and then laced between - I was inspired by Gabrielle Pollacco's gorgeous work for the lacing and postage stamp blocks. 

Paint ~ to age the metal embellishments, I dabbed on antique white paint, and rubbed most of it off to leaving paint in the cracks and crevices, which not only gave the metals some age. It also made the lettering easier to read on the key and tags. 

I entered this at:
Scrapbook Sisters Challenge #8 ~ Snow (Feb 29)

Thanks for dropping by. I treasure your comments!

~ Blessings ~

Friday, February 3, 2012

Scrap-Friendzy's Get Your Game On Blog Hop

Welcome to Scrap-Friendzy's "Get Your Game On" Blog Hop! Our DT has come up with an exciting game plan that'll get you scrappin' this weekend! Our hop runs from now until February 5 at Midnight CST. (That's 1 am - Feb 6 for my fellow EST scrappers!)

If you're blog hopping along, you should have arrived from Amy's blog. If you just happened by and would like to join in on the fun, go to the Scrap-Frienzy blog to start at the beginning.

But this is not your average Blog Hop! We've got some extra fun with a Touchdown Challenge! At every stop on your hop, you'll find a special "ingredient" from each DT Member. Your challenge is to take any 6 of the "ingredients" and use all 6 to complete a single project. If you're brave and daring, you can make a field goal for the extra point by using 7 of the listed "ingredients" to get your name in the hat a second time for our blog hop grand prize. All you have to do is upload your project in the Gallery and link it back to the "Get Your Game On" blog hop thread in the Scrap-Friendzy forum to be eligible for the Grand Prize and earn 25 bonus Friendz Pointz for February Girlfriend of the Month!!

Don't forget ~ This BLOG HOP is just the beginning and there will be challenges all through the month of February to earn poinz for your chance to be featured as Girlfriend of the Month!

Since this is a Superbowl weekend blog hop, I have a football rivalry layout to share with you. This is a layout of our son, a Cleveland Browns fan bantering with Rachel, now his wife and an avid Pittsburgh Steelers fan. Anyone from this part of the country knows what huge rivals these two teams are.


For details on this LO see my Love is a Battlefield post.

As you can see I used plenty of metal on this layout. So the "ingredient" I have for you to use is metal - anything metal ~ it might be wire, a brad, eyelets, a button or even a key ~ you get the idea. 

Don't forget, once you create your project with 6 or 7 design team "ingredients," link your layout at Scrap-Friendzy in two places - the gallery and in the forum. I can't wait to see what you create.

What's a blog hop without prizes. If you're one of my followers (new or a regular) and leave a comment here on this post by the February 5th deadline, you're name will go in the hat for a set of hand crocheted flowers - created by me. Several each in sparkly black and sequined beige. Sorry I'm away for the day and didn't have a chance to post a photo for you.

You're next hop is our talented Amanda.

Just in case you've gotten lost along the way here's a list of hops by our Scrap-Friendzy design team.

Tracey You're Here now.

Thanks for hopping by!!

~ Blessings ~

Sunday, January 1, 2012

Love Never Fails ~ ScrapFIT Workout #59 - Inspired by the Music!

I have to admit, I was a little stumped when I saw this challenge, but then I remembered Joseph and Rachel's engagement photos included some of Joseph in his Cleveland Browns jersey and Rachel in rival Steelers jersey "battling" it out.

ScrapFIT Workout #59 ~ Inspired by the Music!
 - Love is a Battlefield

I love 80's music and we are working out with Pat Benatar this week! Her song "Love Is A Battlefield" is your inspiration for this workout! I can't wait to see how this makes you move! Your can find the lyrics here.


I hope you are inspired to put your scrapping to the music and join us for this fun Workout. Be sure to hop on over to ScrapFIT to see the inspiration by our fabulous DT!!

The winner of this Workout will receive this amazing collection of goodies
sponsored by Boys Rule Scrapbook Kits


Boys Rule is a monthy scrapbook kit club for those who love to paper craft boy subjects. Cool embellies are paired with handsome papers each month that you will love to play with and includes exclusive embellies with each kit . . . all different and very unique. It's fun to create when you have a complete kit that is designed for the memories of dirt, grunge, and smelly things!


Techniques:


My metal, eyelet, and wire work was inspired by Misty at Perfectly Imperfect - Thanks for the inspiration, Misty!!

Metal Work ~ The metal work was created with aluminum tape from the hardware store - in the piping section. I adhered it to a piece of cardstock then placed it over foam. With craft metal working tools, I doodled random images into the metal then ran a couple different metal roller tools over it to give the dots and lines. Once it was sufficiently distressed, I used Ranger alcohol inks with the felt tool to apply rust, terra cotta, caramel, and espresso to the metal strips. (If you have crafting metal in your stash that is large enough - that would work as well. Of course with this distressed look - pieced together metal strips would work just as well.)

Eyelets and Wire ~ I randomly set eyelets into the outer and inner papers - 9 on each outside edge and 8 on the inside edges so the wire would share an inside eyelet at each corner. I had this old rusty scrapbook wire in my stash and knew it would be perfect here. I cut each wire a little longer than the span between the eyelets and bent each end underneath to hold it in place. I wanted a random grungy look, so I also bent most of the wires a bit to avoid a stiff look. 


Punchenella ~ I like to use what I have on hand, and a friend had given me this length of iridescent punchenella with square holes. The design was perfect, but the color not so much, so I ripped the punchenella to give rough edges and then painted it black with craft acrylic paint, Voila - transformed into the perfect grungy accent. 

Altered Flowers ~ I had these wonderful charcoal Petaloo Flowers, but they weren't quite dark enough, so I inked two of them up with my pumice stone Distress Ink, to get the color I was looking for and removed the bright green leaves from the bottom. 

Layered Vintage Buttons ~ I have a collection of vintage buttons  inherited from my mother-in-law and picked up at yard sales. I applied black alcohol ink to a couple silver filigree buttons and  then sanded for the raised details to stand out. I used glue dots to adhere them over larger black buttons. The black buttons were old and used with wonderful wear marks/patina on them - if they were new, you could sand them randomly to give then some "age." I also included one large black button with wonderful detail without the layered metal button. If you don't have vintage buttons in your stash, fabric stores like Joanns hae a nice collection of buttons that should work with a bit of distressing. 


Dictionary Page ~ Take a look at the upper left corner of the layered dictionary page and you will see the word "battlefield" ~ a nice little tie-in for this fun Workout. I have an old unabridged dictionary that lost its cover, so I can find just the right page for my projects. I inked the page to age it and rubbed the torn edges with some black soot Distress Ink. If you don't have an old dictionary laying around (one of the benefits of being a home educator - LOL!) you can do a Google image search for dictionary pages and print one up to use on your layout. 

Misting/Stamping ~ Although my background paper has a grungy feel, I wanted even more, so I misted and then stamped with several grungy background stamps using pumice stone distress ink. Then, with the darker black soot, stamped my focal images of 1 Corinthians 13 and the grungy heart image to which I added in my handwriting "Love Never Fails" to finish out that verse and bring home the focus of this page. 

Paper
Authentique ~ Glowing - Music Notes
Idea-ology ~ 12 x 12 Paper Stack - Lost and Found

Embellishments
Around the Block ~ Flair - Big Metal Brads
Pixie Press ~ Antique Charm Collection - Rusty Metal Wire
Idea-ology ~ Keyholes, Gears, Word Sticks
Petaloo ~ Canterbury Rose - Charcoal, Canterbury Collection - Holiday Leaves, Gilded
Punchenella ~ Thanks Mandy!
Black Lace x 2 ~ Stash

Technique Products
Aluminum Tape ~ Shurtape AF912 (from hardware store)
Stripped Cardboard ~ Found Objects Stash
Glitz ~ Clear Stamps - Distressings
Recollections Rubber/Wood Stamp - Script
Prima ~ Clear Acrylic Stamp - Brick 3
Visual Artistry ~ Clear Stamps - City Central
Cloud 9 Design ~ Rubber Cling Stamps - 8 x 6 Love Phrase
Ranger Distress Inks ~ Pumice Stone, Black Soot, Rusty Hinge, Walnut Stain
Ranger Alcohol Ink ~ Ruse, Caramel, Terra Cotta, Espresso
Smooch Spritz ~ Log Cabin
Zig ~ Writer - Pure Black
Eyelets ~ Stash

My journaling was inspired by the Bird is the Word Challenge to use the word Wonder. "It's a wonder they found love despite the Browns ~ Steelers rivalry."

One more important reminder. The Scrap-Friendzy Sketch-A-Thon starts today. If you're looking to get a jump start on your 2012 scrapping, come on over and join us for a sketch every day in January along with RAK's, and games. The girlfriend with the most pointz at the end of the month gets a prize package and will be featured as the "Girlfriend of the Month" during the month of February with the opportunity to create a challenge for our February theme. I hope you'll come on over and join us!!

Thanks for dropping by! I treasure your comments.

~ Blessings ~