Tuesday, January 25, 2011

Justin ~ Family and Birthday Card

I enjoyed working with this wonderful photo of Justin and his family for the Reeds (for more layouts celebrating Justin's life go HERE):


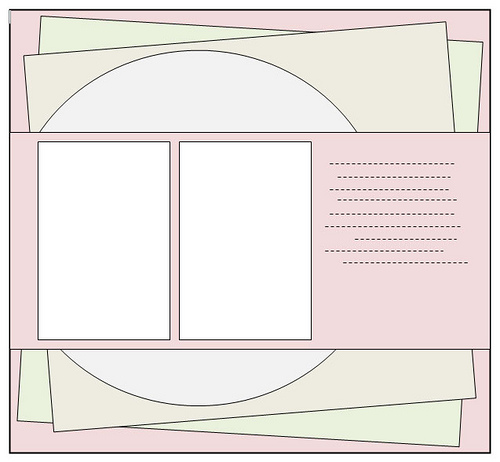
I used Ingeborg Dijkstra-Verbeek's wonderful January sketch:


Paper, letters, remember ~ K and Company
Stamens ~ McGill Starburst Punch
Flowers ~ EK Success Retro Flower Punch
Ranger Stickles ~ Crystal
Sizzix Sizzlits die ~ Scribbles Swirls

Once punched, I water distressed the flowers and added stickles to the edges, stamens, swirls, and circle edges along with a rhinestone in the center of each flower:


I created this card for our daughter, Grace's birthday coming up next month.  Shhhh ~ don't let her know.


I used the 1-19-11 Let's Scrap Card Sketch by the talented Cheri O'Neill:


Paper ~ Bo Bunny Winter Joy Line
Ribbon ~ from my stash
Rubber Stamp Sentiment ~ Stampin' Up
Embossing Powder ~ White
Border Punch ~ EK Success - Double Crochet Lace
Glass Pebbles ~ floral department
Ranger Alcohol Ink ~ to color pebbles

I also entered this card in the Flourishes Boutique Timeless Tuesday Challenge 102 to use hardware on a card - my hardware is the alcohol inked glass pebbles.

Thanks for stopping by!

~ Blessings ~

Wednesday, January 19, 2011

Remembering 9-11

These photos were taken the spring following the 9-11 attacks on our nation.  Although we didn't go into NY City, we drove to the Jersey side and took the ferry across NY Harbor.  The hands of the clock are positioned to 8:46 ~ when the first tower was hit.  


This layout is based on the beautiful sketch from the MCS Dec. Big Sketch Contest:


Items used in the creation of this page:
Basic Grey paper
Tim holtz clock face and hands
Deer hide strips from my friend, Brenda (her husband, Damen, is a hunter and the entire deer gets used.)
EK Success Border Punch
My trusty Husqvarna sewing machine
Metal word embellishments and chain from my stash
Chalk ink - to modify the color of the deer hide
Black marker to distress the metal embellishments
Title and journal font ~ Papyrus

I also entered this in the Creative Cowgirls Challenge #5 to use turquoise and brown.

Thanks for stopping by.

~ Blessings ~

Saturday, January 15, 2011

Florida Aquarium ~ Shannon's Sketch Challenge

I've been wanting to scrap our visit to The Florida Aquarium since our February 2001 vacation.  When I saw Shannon's gorgeous sketch, I knew it was perfect for these photos.

Here is my take:

On Shannon's gorgeous sketch:
I cut a piece of 16 gauge aluminum sheet metal, glued round chipboard pieces on the bottom and embossed around them.  I then used Ranger Alcohol Inks to add the water-like color.  The glass pebbles were also alcohol inked and adhered with Glossy Accents.  The chipboard letters were painted a sandy color, brushed with Mod Podge and sprinkled with craft stand.  Once dry I sprayed them with a fixative so I won't have sand migrating through my scrapbook.


Be sure to stop by Shannon's blog to see all the beautiful entries.

Thanks for stopping by!

~ Blessings ~


Friday, January 14, 2011

Petting Zoo ~ ScrapFIT Workout #35

Maria is feeding a goat at the Cabarrus Count Fair.  Aren't they cute?

I was so excited to see the challenge over at ScrapFIT to create a layout using a sheet of card stock and scraps.  I save my scraps and go to them frequently when I need a bit of paper.  I used five different scraps on this page.


Yes, my background paper is a sheet of plain Jane light gray card stock.  I used clear embossing powder to rubber stamp the image randomly across the paper, then rubbed two colors of Distress Ink over the page - more heavily at the edges.  The embossed areas don't take the ink, so the background paper shows through.  I watched a video earlier this week about inking on the Pink Paislee resist paper and thought to myself, why can't I do my own embossing?  This was my first attempt, and I am so happy with the way it turned out. 


The larger flowers were cut on my Gazelle from scraps, shaped and chalk inked.  The stamens were punched from another scrap with my new McGill starburst punch.  I was thrilled to find this gem of a punch on my last trip to Archivers.  I put a dot of Distress Stickles on the end of each stamen, and had just enough of these pearls left to put in the center of each flower.  The smaller flowers were left-over from a previous page and started out white.  I spritzed them with left-over home made glimmer mist then chalked the edges to coordinate with the page.


I rarely use stick-on letters, so I didn't have any in my stash that would remotely work, so I cut the title from a scrap using two different fonts.  The blue paper started out white and is something that I had inked and had left-over from another layout.  The doily was a summer garage sale find that I landed for a nickel. 


I used sketch #10 from Scrap-Friendzy's January Sketch-a-thon for my inspiration.


The something new is the embossed and inked background paper and use of my new punch to create the stamens for the larger flowers.

Thanks for stopping by to take a look.
~ Blessings ~

Thursday, January 13, 2011

Elizabeth Smile and prize from ScrapFIT Workout 34 arrived

I am playing along over at Scrap-Friendzy's January Sketch-a-Thon and created this layout of Elizabeth from one of their gorgeous sketches.  When Elizabeth was younger she enjoyed being in front of the camera, and the expression on her face in this photo is so sweet.


The flower border is a Martha Stewart border punch
Dragonfly - a die from my LSS (Scrapbooking By Lisa)
Stamp - from my LCS (Pat Catan's)
Paper - Basic Grey
Tag - made by me
Fiber - stash scrap
Stitching

Bonus Sketch #2 ~ Scrap-Friendzy Scrap-a-thon

I was so thrilled when this package arrived at my door this week:

My Christmas Stocking layout was selected as the winner of ScrapFIT Workout 34.  ScrapFit is such a great site.  They offer two challenges a month, sometimes a sketch and sometimes another type of challenge.  Workout 35 has been posted, and you can enter through Jan 14th.  Go check it out.

This gorgeous collection of scrapping goodies came from their sponsor, Tidbitz in Time, a monthly scrapbook kit club.  If you like kits, you'll love their offerings!  I can't wait to use all the gorgeous stuff that came in this kit!

Thanks for stopping by!

~ Blessings~

Monday, January 10, 2011

A New Beginning

I would like to start off by welcoming all my new followers, and thank you Feline Playful for the fun hop through all those wonderful blogs.  Can't wait to see what everyone does this year!

It's the first of the year and resolution time.  My goal this year is to copy at least 10 verses a day into my Scripture journal and to memorize at least one verse a week.  I have gotten out of the habit of doing this on a regular basis, so I really want to start over doing things right this year, and please ask me how I am doing.  The accountability would be fantastic!

I was inspired to create this page by the All New Things Challenge at My Paper Treehouse.

My layout is about my commitments for 2011.  Isn't it wonderful that we have a God of mercy and Grace who takes us as we are and where we are?  The verse in the corner is 2 Corinthians 5:17.  When I read this verse it reminds me of the caterpillar metamorphosis into a beautiful butterfly, so I chose this wonderful paper from K and Company with the butterfly theme.


The clock clip is on my hidden journal block that is tucked into the pocket I created under the butterfly.  I wrote out my commitment/goals and can pull them out for a reminder.  Also written there is what I hope to happen as a result - a life walked more in tune with God's plan for me hopefully resulting in being a better wife, mom, and friend.  The key is an antique from my wonderful friend, Kelly!  "Dream" is alcohol inked and then the raised portions wiped off with a bit of alcohol.  Ditto for the little metal flowers and butterflies on the other side of the page.


The letters were cut on my Gazelle and then cut again in the shadow mode.  I ran them through my Xyron to adhere them together and then on the page.  To get the lined up nicely, I used the paper I cut them out of as a template to place the letters on my page.  I found just the right spot for this Tim Holtz clock piece.


I used this gorgeous sketch by Cheri O'Neill inspired by a layout by my scrap-friend Michelle.  It is the 1-5-11 left-side sketch from Let's Scrap:


Thanks for stopping by to take a look!

~ Blessings ~

Wednesday, January 5, 2011

Snow Tower and Great Start to 2011

2011 is off to a great start.  

My Christmas Stocking LO was selected for ScrapFIT Challenge #34 to scrap a tradition.  They have Challenge #35 up to scrap your scraps.  You can enter any kind of paper craft, not just layouts, so head on over and join this fun challenge.

I also won the drawing for Bette Ann's fabulous blog candy.  We play together over at Let's Scrap.  Come join us for their fabulous layout and card sketches.  Thanks Bette Anne!! Here is what I won:


Now for my latest layout.  Scrap-Friendzy is having their January Sketch-a-thon with a layout a day including a card layout each Sunday.  Even if you aren't planning to do a sketch every day, you should stop by and try one of their fabulous sketches.  Here is my take on sketch #1 by Susan Stringfellow.

Joseph spent most of his growing up years in North Carolina, so the snow was a lot of fun for him when we moved to Ohio.  He decided to build a snow tower that was taller than he was that first winter in the snow.  These Basic Grey papers were so fun to work with for this layout.


I tried some new techniques on this one.  I cut the snowflakes on my Gazelle and then heat embossed them with holographic embossing powder.  They really sparkle.  The fabulous snowflake files came from Monica Björk.

 Then to give the letters a shiny, snowy feel, I heat embossed them with white embossing powder.


I stitched around the photo and papers, then used the edge of my scissors to distress them.

I also entered this layout over at Creative Cowgirls Challenge #4 - Something New.

Thanks for stopping by to take a look!

~ Blessings ~

Saturday, January 1, 2011

Window to the World

Happy New Year to all my dear friends.  May the Lord bless your 2011!

I went out of my comfort zone on this layout.  You know I just love to fill up a page with all kinds of goodies.  When I found this photo of Joseph from 1998 looking out the the window we put in during our attic renovations in North Carolina, I knew it would be perfect for this kind of page.

 
I was inspired to keep it simple with Scrap-Friendzy's Scrap UR Stash Challenge #6 to start with a sheet of cardstock and for the rest of the page use paper from the scrap pile.  I had this wonderful little scrap that gave just the pop of color I was looking for.  The photo mat paper was sitting in my scraps already crimped.  I just had to trim and ink.  (Of course I had spent all kinds of time exploring how I could frame that little photo, when it hit me to just use this crimped scrap - oh the time I could save if I just saw these things right away - lol!)  I used home made glimmer mist left over from another project on the Kraft paper.  (Alcohol ink, Perfect Pearls, and water in a Mini Mister)  I received the stamps from my scrappy friend, Lisa, a few months back.  I am so blessed to have a large format printer, so I was able to print the journal/title right on the Kraft paper.

Here's a scrappy hint for you.  When using glimmer mist, use a repositional adhesive spray to attach your paper to a 12 x12 piece of chipboard or cardboard before misting.  This will help keep your paper from warping.  Mine still warped a little bit, so next time I am going to try drying the glimmer mist between color applications. 

I am also entering this at a new site for me - Southern Girls ~ Challenge #9 - Anything goes

Don't forget to head on over to Scrap-Friendzy to check out their January Sketch-a thon.  They are giving a sketch a day this month and prizes too!  The first one is up and it is gorgeous.

Thanks for stopping by to take a look!

~ Blessings ~

Friday, December 31, 2010

One Small Miracle

This is a precious photo of Justin with his dad.  When I saw the photo I knew right away that these K and Company papers would be perfect for it.


I used this wonderful Let's Scrap 12-29-10 Sketch by Cheri O'Neil as inspiration.  This paper has the linear lines in the sketch and I used a scalloped oval around the photo:


Justin had a close relationship with his dad and I had to include the quote by Jim Volvano.

To meet Scrap UR Stash Challenge #4 to use 3 pieces of naked chipboard (I used 6 pieces to make these), I created these lovely sunflowers from chipboard coated with Ranger Perfect Pearls, and Ranger Ultra Thick Embossing Enamel.  The shiny texture goes with the embossing on the paper.


Thanks for stopping by to take a look!

~ BLESSINGS ~

Saturday, December 25, 2010

Merry Christmas

Wishing each of you a blessed and joy-filled Christmas celebrating the birth of our Lord and Savior.

Thursday, December 23, 2010

Christmas Stockings ~ ScrapFit Christmas Tradition Challenge and Bo Bunny Layout Challenge Friday

I was so excited to see the ScrapFit challenge to create a layout about a Christmas Tradition. Our family has hung and filled stockings every Christmas for 28 years and counting. My family didn't do stockings growing up, but it was an important tradition in my DH's family. So important that my MIL, Vicky, hand crafted these gorgeous stockings for each of us.  Gary really likes this page!  If you would like to see some of the details more closely, just click on the photo and click again to get a nice close-up look.


I used these gorgeous Bo Bunny papers from the Noel collection using the Bo Bunny Layout Friday Challenge Sketch:

Noel Cheer - Red patterned background block and frame around photo - both stitched and distressed
Noel Joy - Green patterned circle - edges punched with Martha Stewart Rain Drops  Corner Punch and glittered
Noel Ornaments - Fussy cut around ornaments and pine boughs and used gold Stickles on the bulbs with edges stitched and distressed.
Noel Rejoice - Background paper and fussy cut Twas the Night Before Christmas and added green pearl accents.  Title lettering cut from back of this paper on my Gazelle and inked with white ink, then topped with Star Dust Stickles.

I used walnut ink to stain some lace from my stash to go below the photo.

Thanks to the ScrapURStash Challenge #12 at Scrap-Friendzy - I used the punch and my Gazelle in creating this LO.

The technique to use a corner punch around a cut out circle came from one of my favorite scrap artists, Lisa Nazario-Gregory.  Here is her video tutorial.  What a fabulous and gorgeous way to get extra miles out of those corner punches.

Thanks so much for stopping by to take a look.

Wishing each of you a blessed and joyful Christmas.

~ BLESSINGS ~

Friday, December 17, 2010

Justin at the Canfield Fair ~ Let's Scrap DT Challenge #80

I just love how Justin has his arms outstretched, embracing life, in so many of the photographs of him.  This one was taken at the Canfield Fair. 

The DT Challenge at Let's Scrap was to used stamps in the layout, and I also had a challenge over at Scrap-Friendzy for Scrap UR Stash #10 to use foam stamps with paint, so this is for both challenges. 

Here is the wonderful Let's Scrap Sketch from Sept. 9, 2009 that I used for inspiration:

The foam stamps came from a drawing at a crop I attended a couple years back.  I embellished the stamped flowers with some stick-on pearls I just happened to have in my stash that matched the paint. 
  
I used a Bazill In Stitch'z template for my stitching. I traced the large scallop edge and cut it out by hand.  I keep a variety of papers with designed edges that I can trace and cut on whatever paper matches the layout I am doing.  The circle border was cut with a file from the fabulous designs created by Monica Björk.  She has a ton of gorgeous free cutting files in a variety of file types.  I placed the circle scallop on a neutral cardstock and cut around the edge with my scissors.
Thanks so much for stopping by to look.
~ Blessings ~

Flurrious Fun ~ MCS December Big Sketch Submission

Here are Joseph and Grace sledding on the huge hill at the East Canton Driving Range the first winter we moved back to Ohio.  There wasn't much snow when we lived in North Carolina, so this was a real treat for them - back then. 


Here is the sketch for the
My Creative Scrapbook December challenge:

I had fun learning some new techniques to put this layout together. 

The Scrap-Friendzy - Scrap UR Stash Challenge #3 was to use plain white cardstock on a layout.  I used Distress Ink with Tim Holtz techniques to create the textured blue paper from good old white cardstock, and topped it with a background stamp and white ink to look like falling snow.  I then scalloped, distressed, and inked the edges, as well as machine stitched around the border.  I also used my trial scrap piece to cut the title letters on my Gazelle. It's great to use up those scraps!

Thanks Cheryl for choosing this layout as the Scrap-Friendzy Pick of the Day! 

To keep with the winter theme, I found a photo of winter berries covered in ice.  I sketched the berries onto red cardstock, inked in some details, covered them with glossy accents and microbeads.  I also used the sketch as a guide to sketch out the thorned stem to place the berries on.  I also used some of the berries right on my photos below the jute bows. 


The poinsettia flowers started out white.  To add dimension I brushed them with red and black chalk, inked the edges in a darker shade of red, then topped the brads with some burgundy Stickles.  The green on the leaves was too light, so I chalked them as well.

The "stitching" around the red square is actually hand drawn and accented with holes punched with a pin.  Here is a tutorial on the Bo Bunny site by the talented Romy, their December guest design team member.

Thanks for stopping by!
~ Blessings ~

Monday, December 13, 2010

Cool 16 - ScrapFit #33 Challenge

Maria has decided that she doesn't like to have her picture taken, so this was the best that I had from her 16th birthday party.  It is actually quite a fun photo that shows her quirky personality.  


ScrapFit Challenge #33 is to find inspiration in this wonderful retro Slinky ad:


My inspiration is the fabulous retro feel.  With the photo I was scrapping, I decided to go with a 60's retro feel, and notice the "Slinky" effect I got by coiling teal wire and putting the "cool" "16" on either end of it like the toys in the Slinky ad.  I also enjoyed using the vintage buttons from my MIL's button stash that are from the 60's era as flower centers.  These great 60's rub-ons were also lurking in my stash.  This was a great challenge that got me out of my box to try a different style than I typically use.   

 Here's a close up of the "Slinky" feature"

And of the journal box and rub-ons:


I was also thrilled to find a great 60's dingbat file to cut the journal boxes on my Gazelle and used Bell Bottom Laser for my font.  Here's a hint if you use dingbats for cutting files.  I have created a Word file with every letter, upper and lower, and every key stroke.  I highlight it all then select the dingbat as the font, and put it in a large font size to be able to see all the options.  When I see a ding image I want to use, I highlight it then select a normal font.  That will tell me what letter I need to use to get the  desired image.  I copy and paste that word document for each of my ding files which I keep organized in folders.

Scrap-Friendzy's Scrap UR Stash Challenge #9 is my inspiration to use the great vintage buttons.
My sketch inspiration came from the talented sketch artist, Ingeborg Dijkstra-Verbeek:
~ BLESSINGS ~


Friday, December 3, 2010

Zoo-Gether for Challenge #78 at Let's Scrap

This layout is done around a precious older photo of Gary holding up Elizabeth to see animals at the zoo.

I also entered this in the gallery at Scrap-Friendzy for a Scraplift challenge and it was selected as the Pick of the Day. 

The challenge at Let's Scrap was to create home made flowers.  I made these flowers based on a tutorial from one of my favorite scrap artists - Gabrielle Pollacco

I used the Let's Scrap 5-5-10 left side sketch for my inspiration.

Here is a close up of the larger flowers in top corner of the layout.  The leaves were cut on my Gazelle from a dingbat file, then inked. 

 These are the smaller flowers from the bottom corner.

And this is a close up of the title and circle of rhinestones.  I made a template for the rhinestone circle on my Gazelle and adhered them with my i-rock stetting tool.

Thanks for stopping by to take a look.  Please leave a comment to let me know what you think.

~ BLESSINGS ~