
Welcome to my creative space!

When I think of Christmas flowers, poinsettias are the first thing that comes to mind. This fabulous Amazing Paper Grace October Die of the Month: 3D Poinsettia Surprise Envelope celebrates these blossoms with this fabulous 3D envelope box to fill with gorgeous Christmas poinsettias.
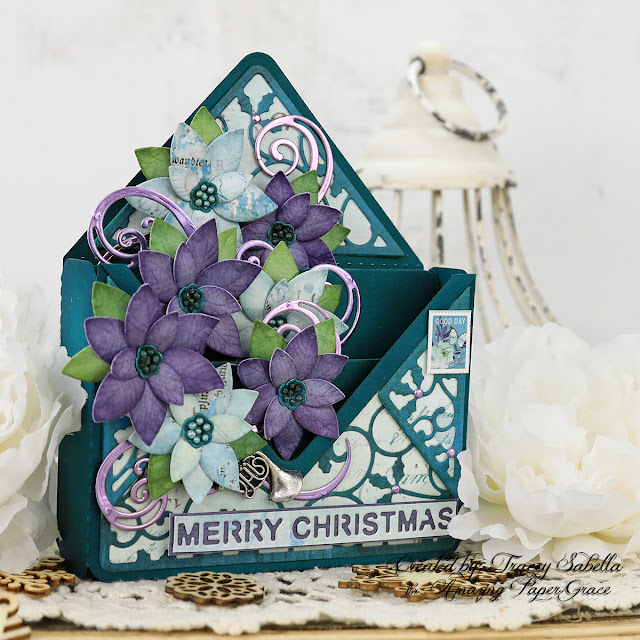
What do you think of these non-traditional teals used for the envelope accented with purple and teal poinsettias to create this sweet card and coordinating gift card holder?
For lots of close-ups and to learn all the details on how to create this beautiful ensemble, including how to form and shade these gorgeous blossoms, be sure to scroll down through the Tips and Techniques section below.
Many thanks to Amazing Paper Grace for providing the dies used in this project!
There are 22 cutting dies included in the 3D Poinsettia Surprise Envelope.

3D Poinsettia Envelope
Gift Card Holder

Tips and Techniques

The poinsettia dies in this set create perfectly beautiful blossoms. There are three sizes of petals that can be combined in any configuration to give a variety of flower sizes that can be paired with two different sizes of leaves that come in sets of two leaves cut individually (One die that cuts two of the same size leaf.) Most of my blossoms combine two large petal sections with one small petal section or two medium sections paired with one small section. There are a couple that use a large, medium, and small section.
The first thing I did after cutting them out of beautiful 49 and Market papers, is to ink the edges in coordinating Distress Inks using a small toothbrush style applicator brush. Once inked, I cupped each petal from the back using a stylus, then turned them over and used a small stylus to cup just the end of each petal so it turned upward, then pressed down on the center of the petal section to finish forming to give each petal section a beautiful organic shape.
The green leaves are colored and shaped the same way, but of course since they are cut individually, the last step is not needed.
The center berry section of each blossom is cut from dark teal patterned paper. I didn't want the white core of the paper to show, so used a coordinating dark teal green marker to edge the die cut berry sections. This step would be optional if you use a solid core paper, or don't mind the white edges showing. I placed them on a foam pad with the teal side up and cupped them with a stylus.
To put them together, I adhered the three petal sections together, offsetting each section. Poinsettias petals are not evenly offset in nature, so if you look at my blossoms, you'll see that they are not even either to get that organic feel of a natural poinsettia blossom. I assembled all the blossoms, then went back and glued two leaves to the back of each one. Once that was done, I adhered the berry section to each flower.
I wanted to add berries so filled each hole with a prill using lighter teal prills on the lighter colored blossoms, and darker teal prills on the purple blossoms. I have a needle tip glue bottle filled with Distress Collage medium that I used to add a drop of adhesive to each hole, then used tweezers to drop a prill into each hole. This takes extra time, but I think the results are definitely worth the effort.

This merry Christmas sentiment is cut in the same teal patterned paper as the background and lighter poinsettias, then backed with the purple used for the blossoms.
It just happened that the paper I used had sweet little stamps printed across the bottom. I couldn't resist using one of them on the corner of my envelope. The darling French horn charm is from my stash, but any little Christmas charm would look darling here.

This shot is taken from an angle so you can see the layers of dimension a little better. This envelope is a 3D box with two inserts that allow you to adhere the blossoms at different levels. To increase the dimension even more, I adhered some of the blossoms with foam squares and for some of the blossoms, I even layered two foam squares to give the flowers more height.
Because I used the foam tape, this card does not slide over to be put into an envelope, so will need a box or gift bag to give it to the recipient. If you do not use the foam tape, this 3D envelope slides over beautifully to tuck into an envelope.
The beautiful scrolled pieces are cut from metallic purple paper to catch the light and add a bit of glimmering bling. The tiny berries centered on the holy design on the envelope are also cut from this metallic paper.
For those of you who have this fabulous die set, you might be wondering where that metallic curl above the sentiment came from? It's one of the discarded pieces left when cutting the scrolls. I just couldn't resist tucking it in here.

The base of this box and the gift card envelope are cut from a dark teal cardstock. Before adding the inserts, I inked all the edges with distress ink.

The scrolled holly envelope inserts are cut from dark teal patterned paper and backed with the lighter teal which is actually the back of the dark teal paper. One 12 x 12 inch sheet was perfect to cut all the inserts and poinsettias used for the envelope and gift card.

The inserts are adhered to the backgrounds then adhered to the envelope before assembling the envelope following the instructions with the die set.
The sentiment was adhered first so I was sure to make room for it when added the flowers
I laid out the flowers and scrolls to know where I wanted to place them, then adhered the scrolls first, then the blossoms.

This envelope is actually the perfect size for a gift card, so I trimmed off the side edges leaving about 1/4 inch margin on each panel to adhere them together.
The die cut holly panels are glued together then adhered to the envelope before assembling. I scored the envelope flap about 1/16 " from the fold line on the inside towards the triangular flap to help it lay flat since the dimension of the envelope would keep it from closing.

I cut a length of 1/8 inch wide red line tape the width of the envelope and adhered it to the back bottom of the front piece leaving the liner on the tape. Adhere the side flaps with a strong liquid glue. This lets you line everything up perfectly. Once dry, remove the backing on the red line tape, and the bottom is secure for adding your gift card. One of the metal scroll pieces is cut in half and tucked behind the two poinsettias that were left from making the 3D envelope.
Now you have a perfectly coordinated and gorgeous 3D Christmas card and gift card envelope.
Below you can find the products I used to create this project including some with compensated affiliate links to Scrapbook.com and Spellbinders. These links are at absolutely no cost to you. When you shop through the links below, I receive a small commission from the companies. These commissions help me cover the costs of my blog and other expenses, which allows me to continue to provide you with FREE inspiration along with detailed Tips and Techniques provided for every project. Thank you so much for your love and support!
Amazing Paper Grace Sets:
- Amazing Paper Grace October 2022 Die of the Month – 3D Poinsettia Surprise Envelope.
Paper:
- 49 and Market - ARToptions Viken Collection - 12 x 12 Double Sided Paper - Temptation
- 49 and Market - ARToptions Viken Collection - 12 x 12 Double Sided Paper - Enchanted Fields
- 49 and Market - ARToptions Viken Collection - 12 x 12 Double Sided Paper - Endearing
- Bazzill Basics - 12 x 12 Cardstock - Smooth Texture - Jawbreaker
- Idea-ology - Tim Holtz - 8 x 8 Kraft Stock - Metallic - Confections
Ink:
Mixed Media:
- Ranger Ink - Tim Holtz - Distress Collage Medium Matte
- Faber-Castell - Pitt Artist Pen - Big Brush - Dark Phthalo Green
Embellishments:
- US Artiest - Mini Drills - Pine by Me
- Stash - French Horn Charm
Adhesives:
Tools:
- New & Improved Platinum Six Machine with Universal Plate System - Spellbinders
- Spellbinders - Platinum 6 - Die Cutting and Embossing Machine with Universal Plate System - New and Improved - Scrapbook.com
- Sizzix - Tim Holtz - Making Tool - Shaping Kit - Black
- EK Success - EK Tools - Craft Tweezers
- Tonic Studios - Tim Holtz - 12.25 Inch Maxi Guillotine Trimmer
- Sizzix - Tim Holtz - Alterations Collection - Sidekick - Starter Kit - Black
The Amazing Paper Grace Die of the Month is available exclusively at Spellbinders Paper Arts during October 2022, 3D Poinsettia Surprise Envelope along with other membership perks.
View this month’s Amazing Paper Grace Die of the Month!
Thanks so much for stopping by to view this sweet Christmas ensemble. I hope you've been inspired.

No comments:
Post a Comment
Thanks for taking the time to stop by and leave a message! I treasure your comments.