Showing posts with label DSD Wonderful Wings. Show all posts

Thursday, August 1, 2013

Shabby Happy Birthday for RRR Challenge #77

We're enjoying some lovely cooler than usual weather for late July in Ohio. I just love the cool evenings and warm days. When I look out at my flowers this time of year, inevitably I spy some gorgeous butterflies. That goes right along with the theme for our next RRR Challenge:

And of course include some ribbon, lace or cording on that project!! 

Here's my example for you:

To enter this challenge, create a card, layout, or any handcrafted project. Just be sure to follow the theme and use ribbon, lace, or trim somewhere on your project.

Really Reasonable Ribbon Products
August Ribbon Club Assortment (Cream Ribbon and Lace)
20# Metallic Hemp Cord Assortment ~ Classic
Tombow 3D Foam Tabs
Scor-Tape 6" x 6"


I used the August ScrapThat! Kit along with Really Reasonable Ribbon for this card.

Tips and Techniques:
The Really Reasonable Ribbons from Bonnie's store are so lovely to layer into a card. Here I tucked the cream satin with grosgrain edges from the August Ribbon Club Assortment under the doily and wrapped Classic Metallic Hemp Cord over top of both. I used more of the Metallic Hemp Cord to create the flowing bow. Tombow 3D Foam Tabs were perfect to pop up my hand stitching edged stamped sentiment. 

I inked the doily edges and added Want2Scrap lavender pearls from the ScrapThat! Kit and W2S teardrop pearls from my stash. 

The sweet delicate natural lace is included in the RRR August Ribbon Club Assortment

I cut the canvas butterfly with Donna Salazar Wonderful Wings Spellbinder Dies, adding Want2Scrap Coordinating bling. The chicken wire chipboard is also from Want2Scrap. 

Lovely flowers from the August and previous ScrapThat! Kits.

I hope you've been inspired to create a project for

Really Reasonable Ribbon Challenge #77 ~ Things with Wings

Be sure to stop by the RRR Blog for all the details and prize information.

I have to ask ~ What is your favorite type of winged creature to use on your projects?
You've probably guessed, mine is the beautiful butterfly!!

I've entered this card at:
Word Art Wednesday Challenge #91 Anything Goes. Their special Word Art this week is Psalm 124:8.

Follow on Bloglovin

Thanks for stopping by! I treasure your comments.

~ Blessings ~

Wednesday, June 19, 2013

"Bree" details for ScrapThat!

When we moved back to Ohio in 2000, dogs became an important part of our lives. My brother gave Grace 15 month old Ellie, a German shepherd/Belgian malinois mix so that she could take part in his 4-H dog club. After years of work and training, they ended up becoming one of the top United Kennel Club obedience teams in the country. Ellie is no longer with us, and it's time for a new dog. Bree is her new border collie pup. Isn't she adorable?? 

This page was created with the ScrapThat! June Kit using the Main Kit only and Amy's inspiring sketch. 

"Bree"
MK Only

Amy's June Sketch:

Stop by the ScrapThat! Forum to add your sketch based layout to Amy's Sketch Challenge.

Tips and Techniques:

Altered Canvas Flower ~ The Prima Canvas Flower from the MK was inked and a jute bow tied through the button. 

Handcrafted flowers ~ I created a bevy of flowers from kit paper and cardstock using Tattered Florals  dies and Donna Salazar's Grand Peony and Bitty Blossoms dies. I also did some embossing, inking, and spritzing to add texture, dimension, and sparkle. 

Leaves ~ I painted the kit flowers with a gesso wash to soften, but still let some of the green show. 

Black Mesh ~ Oh my, I just adore this black mesh!! I just snipped several strips, painted with gesso and when dry scratched off some of the paint to distress. 

Gems ~ The Prima Sunrise Sunset crystal sheet is one solid sheet of crystals, but I pulled some of them apart and scattered them below the cluster. 

Border Punching ~ I used several border punches to punch random places into the edges. 


More of my Bitty Blossoms flowers here with a bejeweled flower trinket from my stash. I also tucked some bits of lace into the distressed edges. 


Handcrafted Butterfly ~ I used Donna Salazar's Wonderful Wings Dies to cut this butterfly from kit paper, and pulled more gems to arrange for the body. The antenna are wires cut from the MK flowers, painted white, and bent to shape. I inked the wing edges and brushed with stickles. Just a snippet of a crystal flourish from my stash for the trail. 

Mixed Media ~ I used molding paste to stencil this background and once dry misted. I wiped the mist off of the molding paste to make it pop. 


Vintage Rusted Ironwork Chipboard ~ My tutorial can be found here

Fussy Cutting ~ I fussy cut lace strips from kit paper for the border strips below the photo. 

Distressed Edges ~ I used a mix of torn edges and my DSD Distrezz-It-All. 

We have 4 Design team challenges going on this month
in addition to our Sketch Challenge:


The ScrapThat! June kit is available in our store.

Follow on Bloglovin

Thanks for stopping by! I treasure your comments.

~ Blessings ~

Sunday, February 17, 2013

"Dreams" ~ SEM Sketch Challenge - Guest Designer

Today I'm so excited to share my second guest designer project for Scrapping Everyday Miracles. Today is their sketch challenge reveal. This gorgeous sketch was created by the talented Tracey Gregory, and there is a twist - you will need to use distressing on your page. 

I shared a little yesterday how Elizabeth had determined that she wanted to save her heart and affections for her one true love. I remember when she was an early teen, a conversation where she told me if God could bring all those animals to the ark, certainly He could bring the one guy He meant for her to marry into her life. She kept a list of all the qualities that special guy would have. Although she didn't date, she dreamed about that special guy. When she met Andrew at church, she found someone who met all those dreams and more. Her heart was set a flutter. The great thing is that our Lord drew Andrew's heart to her as well. Elizabeth's dreamy expression in this photo says it all. Those dreams she had of her one true love were about to all come true in a few short moments. 

"Dreams"

Tracey Gregory's gorgeous SEM February Sketch:

To join the SEM Challenge. Create a page inspired by this gorgeous sketch and include some distressing. Then hop over to Scrapping Everyday Miracles to link up your project by February 28 at 11:59 pm. The challenge winner selected by Random.org will receive a February Kit donated by My Creative Scrapbook.

There is no challenge up at Donna Salazar this month, but when I was pulling papers for this page, I was drawn to her fabulous products, so you'll be seeing them featured on this page. 

Tips and Techniques:

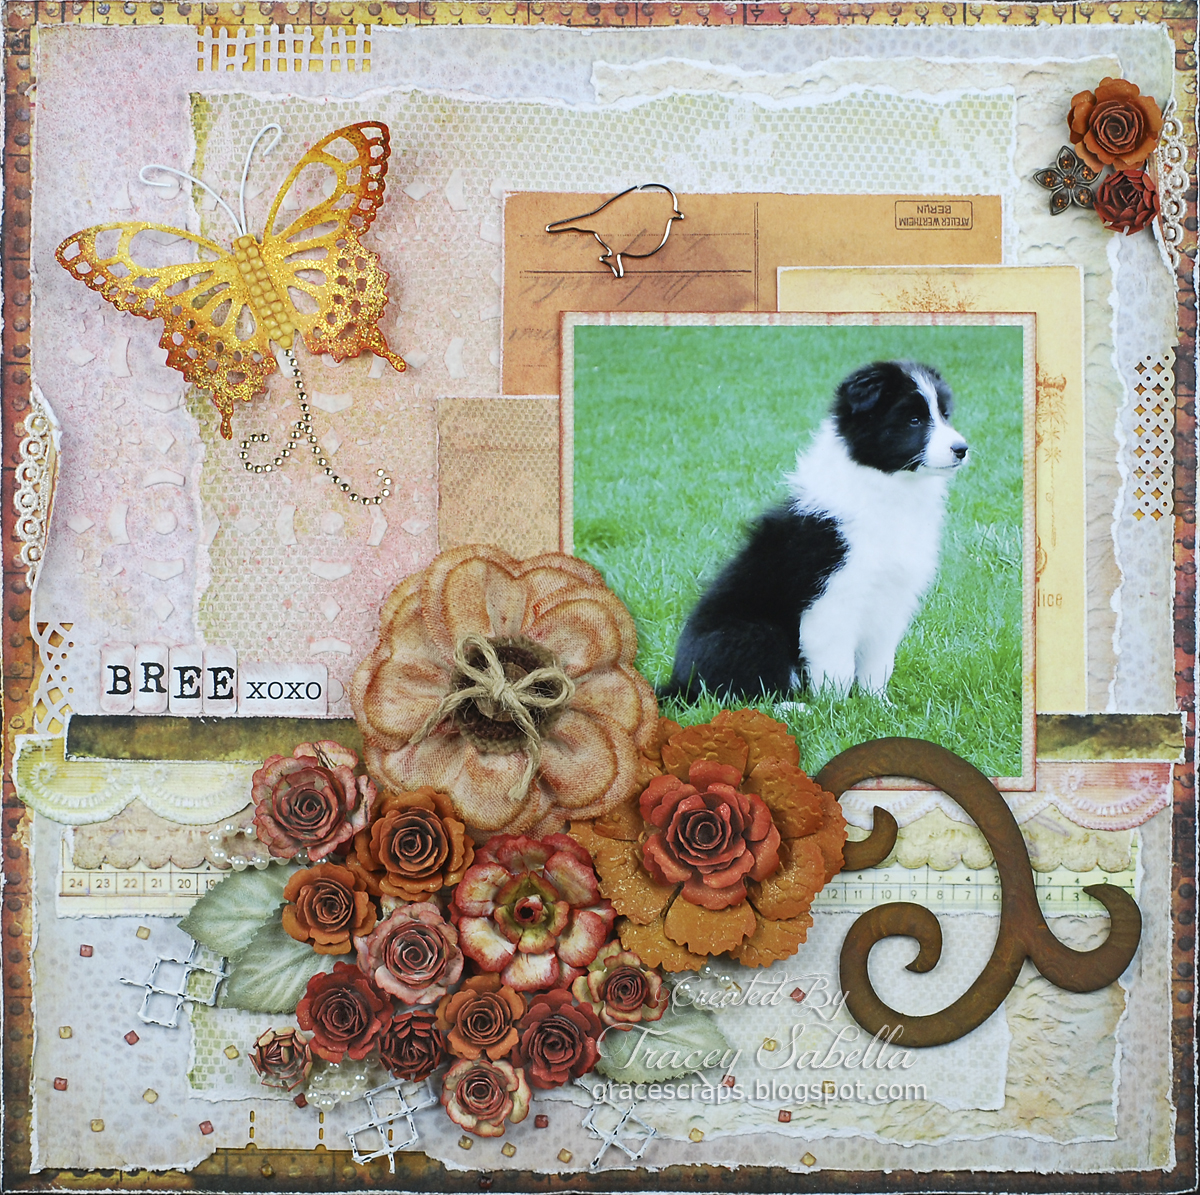
Distressing ~ I'll start with the technique "twist." I distressed all the border edges with my Donna Salazar Distrezz-It-All. I also distressed the background paper with Donna's Smooch Spritz. I misted where I had planned this cluster, used a dropper with some watered down mist to add some drips. I spritzed some mist on my craft mat and then misted over top with an equal amount of water. The mist beaded up and I was able to easily pull it up with a dropper so I could create these fun drips.

Stick Pin ~ I used some beads from my stash to create this stick pin pulling the colors from the pink flowers in the page border.

Focal Flowers ~ I've been wanting to try cutting fabric flowers using my Donna Salazar Grand Peony Spellbinder dies. When I saw the large focal flowers in Tracey's sketch I knew the time had arrived to give it a try. I used two layers each cut from 4 sizes of this die set. I melted the edges on a tea light candle flame, which cups the petals. A cluster of stamen in the center finished them off. 

Paper Flowers ~ The paper flowers were created with my Donna Salazar Bitty Blossoms Spellbinder Dies. These flowers are so quick and easy to create using the scraps of paper from this Botanique sheet used as one of my distressed edge layers. The paper I cut out of the center of this layer created all these gorgeous blossoms.

Pearlized Chipboard ~ I pulled some Want2Scrap chipboard flourishes from my stash and to keep my dreamy theme going, used a Viva Pearl Pen to create the pearlescent sheen on my chipboard. Normally these pens are used to create pearl shaped embellishments, but I squeezed the pearl medium across the entire chipboard pieces in a swirled motion.

Leaves ~ These leaves were so easy to create with my Donna Salazar Bitty Blossoms Dies. I cut and embossed them. While still in the dies, I inked with Donna's Jasmine Mix'd Media Inx, then removed from the die, sprinkled with a pearlescent embossing powder and heat set. Easy peasy and so pretty. 

Rhinestone Piece ~ I collect jewelry findings when I see them on clearance. This rhinestone piece fit so perfectly into this cluster.


Jeweled Butterfly ~ I cut this butterfly from Donna Salazar's Wonderful Wings Spellbinder dies, and topped it with this gem sticker from Want2Scrap. 

Butterfly Trail ~ I drew the trail in pencil, pierced holes along it. I erased the line, then stitched,  attaching seed beads randomly along the way.


Stamped Title ~ I used the Donna Salazar Banner and Words stamp set with her Pewter Mix'd Media Inx to stamp my title, then sprinkled with Ranger Super Fine Silver Embossing powder and heat set. When cool, it was fussy cut for my title.

Embellishments ~ I glued on silver lined clear seed beads from my stash with Glossy Accents. The pearl/rhinestone strip below the photo is from Want2Scrap and the lace tucked into the tear is from my stash. The crystal flowers tucked in throughout the page are by Bazzill.

I hope you have been inspired to create a page with Tracey's fabulous sketch. Once you have finished it, head on over to Scrapping Everyday Miracles to link up your project.

Donna Salazar Products Used:
Bontanique ~ Bliss
Grandma's Garden ~ English Roses
Grandma's Garden ~ Garden Journal Cards
DSD/Spellbinders ~ Grand Peony
DSD/Spellbinders ~ Bitty Blossoms
DSD/Spellbinders ~ Wonderful Wings
DSD/Want2Scrap ~ Wonderful Wings Bling
DSD/Clearsnap ~ Smooch Spritz - Evergreen
DSD/Clearsnap ~ Mix'd Media Inx ~ Jasmine
DSD/Clearsnap ~ Mix'd Media Inx ~ Pewter
DSD/Stampers Anonymous ~ Banner and Words Stamp
DSD/Zutter ~ Distrezz-It-All

Other Products Used:
Want2Scrap ~ Chipboard Embellishments Style A
Want2Scrap ~ Chipboard Embellishments Style C
Want2Scrap ~ Beautiful Bling Strip Pearl/Crystal Wave
art.i.cake by Amy Labbe - Charms with Glass Accents #AL29287
Darice ~ Silver lined clear seed beads
Martha Stewart Punch Around the Page ~ French Scroll
DMC Embroidery Floss ~ White
Bazzill ~ Worth Remembering Resin Flowers #303894
Viva ~ Pearl Pen - Cream
Sparkle N' Sprinkle ~ Opaline Embossing Powder
Ranger Super Fine Detail Embossing Powder ~ Silver
Stash ~ Doily
Stash ~ Lace
Stash ~ Stamen
Stash ~ Beads for stick pin

Adhesives:
Helmar 450 Quick Dry Adhesive
Scotch ATG
Ranger Glossy Accents
Scrapbook Adhesives ~ Crafty Power Tape

I have entered this at:
Word Art Wednesday ~ Challenge #68 Love/Anything Goes**
Anything Goes Challenge Blog ~ Challenge 86 Vintage/Shabby Chic**

Thanks for stopping by! I treasure your comments.

~ Blessings ~ 

Wednesday, January 30, 2013

"True Love Stories" ScrapThat! Details & Prima BAP

Hi everyone. We are having a couple rare warm January days here in Ohio. It reached the low 60's yesterday and is expected to reach those temps again today before dropping back to normal freezing temps tomorrow. I don't even mind the accompanying rain.

I wanted to share some of the details from my "True Love Stories" page from the February ScrapThat! kit. I have to admit, as much as I enjoyed creating each of my pages, this was my favorite this month. I was so happy with the dreamy effect of the mixed media background. Originally I was going to do some more textured stenciling over the misted gesso, but in a rare move for me decided less was more this time. ;-)

"True Love Stories"
MK, EAO, FAO

I turned the Prima BAP Sketch for my design inspiration:

Tips and Techniques:

Resin Cherub ~ Aren't the Prima Cherubs in the EAO kit darling? I rubbed distress ink onto the bird, robe, and cheeks to add just a tiny bit of color, then rubbed the wings and hair with some Viva Inka gold rubbing compound. 

Chipboard ~ I painted the leafy chipboard flourish, then inked the edges before using a permanent marker to doodle the leaf veins. 

Fiber ~ I colored a narrow gauze strip from my stash and tucked it around the cluster. 

Prima Darlings ~ The FAO kit contained these gorgeous Prima flowers and I added the sweet glass heart charm from my stash. The centers of my hand crafted roses are also Prima crystals from my stash. 


Butterfly ~ I used the Donna Salazar/Spellbinders Wonderful Wings die to cut this sweet butterfly from a scrap of paper. I lightly inked the edges and added this charm from a package in inexpensive clearanced heart charms I picked up a while back. 

Mixed Media Background ~ This was actually quite easy to accomplish. I spread a thin layer of gesso over the center of the page with a credit card, leaving some grooves and texture. When dry, I came back and misted with Tattered Angels Cork, in some places a bit heavier and in others with a lighter misting. In the heavier areas I also spritzed on just a little water so that when I tapped the page, I got the beautiful little drips. Next to the photos I stamped the vines with a retired Prima Build a Frame stamp. I wanted the vine strips to blend into the background, so used Distress ink, which gives a somewhat distressed and mottled image when used on clear stamps. Hint ~ once the mixed media work is done, the page can be somewhat warped. I find that if I very lightly mist the back with water, place beween paper towels, then lay a large glass mat on top stacked with a pile of heavy books and let it sit over night, it is much flatter the next morning. Also use thin layers of media and dry completely before adding the next layer or you can get major warping that no amount of "pressing" can flatten. 

Extending Your Paper ~ I've mentioned it before, but you can get so much mileage from one sheet of paper. After distressing, I trimmed out only about an inch around the page for the border and used the inside for all my die cut embellishments and handcrafted flowers/leaves. It is much easier to distress the edge of an intact sheet of paper, than trying to distress after it has been trimmed down. (Ask me how I know!!) ;-)


Heart Die Cut ~ This heart piece was trimmed out of one of the hangers from my Spellbinders Elegant Posts Dies. 

Sweet Open Roses ~ The tutorial for these sweet little roses can be found here. I used the crystals rather than the stamen and no gesso. 

Leaves ~ One of my favorite ways to add texture to my clusters is to cut leaves from my paper scraps, fold them down the center and pinch creases where natural veins would lie on them. Then a bit of inking highlights that texture. 

Distressing ~ The mat and photo as well as page edges were distressed with my Donna Salazar/Zutter Distrezz-It-All. You really can use any distressing tool or even the sharp edges of your scissors, but this handy tool gives the thick edges so quickly. 


Heart Flourish ~ These KaiserCraft wood heart flourishes in the EAO kit are so sweet and can be added to a cluster or as photo corners. I painted this one with gesso, stamped with a script image, then lightly inked. 

Title ~ I have a set of love stamps by Cloud 9 that I have used over and over with the wedding and engagement photos I've been scrapping. A simple paper scrap is easily transformed to a beautiful title/sentiment with some embossing powder and a heat tool. The gold embossing really has so much dimension that doesn't quite show up in the photo.

Prima products used to create this page:
Prima Romance Novel ~ Messenger
Prima Romance Novel ~ Harlequin
Prima Shabby Chic Treasures Resin Cherubs #891404
Prima Say it in Crystals #551452
Prima Vintage Trinkets #930042
Prima Flowers Kennedy Vintage #558406
Prima Stamps Build a Frame Collection #1
Prima Stamps Build a Frame Collection #2

Thanks for stopping by! I treasure your comments.
~ Blessings ~