Pages

Monday, December 31, 2012

Christmas Memories ~ DT for The Scrapping Stamper

Christmas is always a very special time of the year!! This layout is of a photo taken when our children were much younger. Our three oldest and a cousin gathered around my husband at his parents' home. He's reading the Christmas story to them, explaining how Jesus' birth is the reason for our celebration. It has been such a joy over the years for us to share our love of the Lord with our children and to see them grow to love Him as well. 

I hope you and your families have a wonderful and blessed 2013!!
Enjoy your New Year celebrations!

I created this page for the December Scrapping Stamper sketch by Shannon White.

"Christmas Memories"

Shannon's Gorgeous December Sketch:

It is such a blessing to be on Shannon's Design team and work with her lovely sketches each month! I used Donna Salazar Products for this page to enter into her December Challenge to create a holiday themed project using ribbon and at least one Donna Salazar product. 

Tips and Techniques:


Hand Crafted Flower ~ I used a combination of DSD Spellbinder Bitty Blossoms and Grand Peony dies to create this lovely rose with one of my twine flowers underneath made in jute. My tutorial on creating the twine flowers can be found here


Ribbon and Pearls ~ This is an older technique that I revived for this project. I punched a small hole on both sides of a corrugated ridge, leaving two ridges without holes to space. On each end I just punched one hole on the side where the ribbon would end. I laced my sheer, iridescent ribbon onto a yarn needle and laced it through the holes, but not pulling tight, so there would be a puff of ribbon between each set of holes. To hide the holes, I placed a red pearl between each puff.

Corrugated Board Mat ~ I love the grungy look of Donna's corrugated board by Zutter. I use a foam brush to apply paint to the ridges and leave the valleys the natural kraft color. When I try using a bristle brush the paint tends to go down into the valleys as well. I went back and lightly rubbed the torn edges with some distress ink.

Distrezzing ~ I distressed all the straight edges including my photo with my handy DSD Distrezz-It-All by Zutter to get the heavily distressed edges in a flash.


Hanging Christmas Ornaments ~ I didn't have any punches or dies for ornaments, so I traced an ornament and hand cut them. I used my finger to apply a little glue and some Mojo Dust that Natasha sneaked into my last order. If you are looking for Donna Salazar products, be sure to check out Natasha's Store. To achieve the hanging effect, I hand stitched from the ornaments to the top of the page. 

Crackled Border ~ I applied a nice thick coat of white DecoArt Texture Crackle to the top edges of my page. It cracks as it dries. It takes a while to dry so some patience is required. ;-) When dry, I used my finger to apply some gold Rub and Buff. 

Antiqued Doily ~ Several colors of Distress Ink rubbed over the doily gives the nice antiqued look and brings out the design. 

DSD Products used:
Antiquities ~ Vintage Gears
Antiquities ~ Die Cut Ribbons
Antiquities ~ Harmony
Antiquities ~ Queen Bees
Antiquities ~ Time for Tea
Stamp ~ A-Note-Ation
Spellbinder Grand Peony Dies
Spellbinder Bitty Blossoms Dies
Zutter Corrugated Board 
Zutter Distrezz-It-All

Other Products Used:
Tim Holtz Typeset Alphabet Decorative Strip Die
Sizzlets ~ Branch w/Leaves
Martha Stewart Punch Around the Page ~ Swirling Lace
Want2Scrap ~ Self Adhesive Pearls, red
DMC Embroidery Floss
Doily ~ My Stash
Ranger Distress Markers ~ Fired Brick, Aged Mahogany, Vintage Photo
Ranger Distress Ink ~ multiple colors
DecoArt ~ White Texture Crackle

Adhesives:
Beacon ~ 3 in 1 Advanced Craft Glue
Scothc ATG
Crafty Power Tape
Designer Dries Clear Glue
Xyron Permanent
Krylon Spray Adhesive

I've also entered this at:
Word Art Wednesday Challenge #60 Faith; Anything Goes
Scrapping Every Day Miracles December Main Challenge ~ Scrap where you find joy during the  Christmas Holidays with a twist - include glimmer and/or sparkle. Gary and I find great joy in sharing our love for Christ with our family during the holidays. This photo is Gary sharing the Christmas story with our children when they were younger. The sparkle is the glittery dust on the ornaments and bright shiny pearls with iridescent sheer lace. 

Thanks for stopping by! I treasure your comments.

~ Blessings ~

Friday, December 28, 2012

ScrapThat! January "Flakes of Snow" Kit Reveal and Blog Hop

Welcome to the ScrapThat!
January Kit Reveal and Blog Hop!! 

If you came here from Sarah Routledge, then you are on the right track!

If you want to start at the beginning, here is the order:

We are so excited to show you our frosty wonderland themed January kit.
Not only does it feature the beautiful "Powder Mountain" line by BoBunny,
but BoBunny is also joining us on our blog hop this month!!
Leave a comment on their blog post for a chance to win a
BoBunny prize package!

We are so thrilled to have the amazing Kelly Klapstein
join us as our January Guest Designer!


Kelly is a contributing writer for Canadian Scrapbooker magazine. Not only does she create amazing pages, but she also loves to share her passion through teaching. She was a Featured Instructor at the 2012 Great Canadian Scrapbook Carnival.

So, without further ado . . . introducing our
~ January Kit Reveal ~ "Flakes of Snow"

Featuring BoBunny's "Powder Mountain" line, this kit matches crisp whites and blues with the earthiness of warm browns. When you open the box, the sparkles and textures just long to be played with!

Included are flowers from Prima and leaves from WOC, jewels and buttons from BoBunny, multiple ribbons from May Arts and more! Don't just think winter, as our DT will show you, this kit offers myriad layout possibilities!

Main Kit

Embellishment Add-On

Flower Add-On


Paper Add-On

More details on this sparkling Collection can be seen here:
ScrapThat! Store

We are currently accepting new
Kit Club Members.
For more information,
complete the form on the link below:

Look what Amarilys created for January's sketch challenge!
See details about the challenge here: Sketch Challenges

Everyone is welcome to participate, all entries due by January 15th

My first layout to share with you today was created with Amy's amazing sketch!

"Frosty"
Main, EOA, & FAO Kits

When we lived in North Carolina, snowy days were unusual and a snow deep enough to build a snowman was rare indeed. We built our snowman in the front yard to the delight of passersby who honked and gave us thumbs up. What a fun day!

I had so much fun working with this amazing kit! The gorgeous focal flower and blue Prima flowers are in the FAO kit, while the small white organza flowers, buttons, and gems are from the EAO kit. I crocheted the snowflakes and created the medium white flowers with main kit stamins and fabric from my stash. 

Hint: Paper flowers can be easily altered to a darker color with mist. The blue Prima flowers were aqua before misting with sapphire Glimmer Mist.

"Westville Lake"
Main, EOA, & FAO Kits

This lovely photo of Westville Lake with geese abounding was taken from my parents' home. 

The amazing focal flower is in the main kit along with the corrugated board used for my snowflakes and beneath the window. The white Prima kit ink added just the right touch to the corrugated flakes which I layered with more of my crocheted snowflakes, handcrafted flowers, and a bit of bling from the EAO kit. And, isn't the FAO kit vine gorgeous? I cut it apart to flow around the window. If you come back in January for my page feature, I'll be giving away the cut file I created for my paned window cut from a scrap of packaging chipboard.

I entered my "Westville Lake" page in the BoBunny December LO Challenge to find inspiration in this image:


My inspiration was to used the paned window over my photo.

"Carolina Snow" 
Main Kit Only

I saved my favorite layout for last. Another rare, snowy day in North Carolina! We lived in this home for 15 years. 

The BoBunny Powder Mountain and Double Dot papers are so gorgeous!! They really stand up to mixed meda and create amazing flowers. I used a scrap of white cardstock (We all have those page protector inserts!!) to try my hand at quilling. My first attempt is this snowflake.

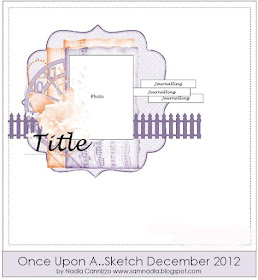
I am entering this page at Once Upon a Sketch. The journaling prompt is "It's December . . ." using this gorgeous sketch:


Here is the journaling I wrote on the back of my page: "Growing up in Ohio, Gary and I always looked forward to snow in December for a white Christmas. When we moved to North Carolina we really missed those Decembers snows. There were many years when we not only didn’t snow in December, but also didn’t get enough snow to cover the ground the entire winter. This is our Carolina home during one of those rare snows. Those infrequent snows brought so much fun for our family. We had a small hill in the backyard that attracted all the children for several blocks. Since there weren’t a lot of sleds, they came up with some unusual vehicles like cookie sheets to navigate the slippery slope. We always built a snowman with a carrot nose, rock eyes, hat and scarf, usually in our front yard to the delight of passersby. Those snowy days brought many sweet memories!"

I've entered these projects at:
Word Art Wednesday Challenge #60 Anything Goes

I hope you've enjoyed my projects. Now for the blog hop details:

Our Blog Hop features 11 fantastic blogs including our Design Team.

We have been scrapping away and are so excited to show you our  creations!

Our SPECTACULAR January Blog Hop Prize
is a ScrapThat! July Main Kit,
 "Summer in My Garden", featuring Fabscrap's Organic Collection:
To qualify for this month's FABULOUS Prize you must complete the following:

* Visit each blog listed on the hop to see what each designer has created using this month's kit and sketch (comments are very much appreciated).
* Each designer's blog hop post will feature a word to make up a secret sentence, collect these
words along the way.
* You must become a FOLLOWER of each blog along the way and LIKE us on our Facebook Page!
* Post the ScrapThat! Blinkie on your blog.
* For you last stop on our Blog Hop return here to the ScrapThat! Chat Blog.
Leave a comment letting us know you have
completed the hop.
(Please do NOT include the secret sentence in your comments.)

*Email the secret sentence to Tracey Sabella: tracey@scrapthat.ca
The Blog Hop ends Sunday, December 30 at Midnight EST

The prize MUST be claimed within 3 days of the forum announcement which will also be made on the ScrapThat! Blog.
~ If left unclaimed a NEW winner will be chosen ~
**Winner will pay actual shipping costs for sending the kit from Canada.**
Shipping costs will be invoiced via PayPal unless you are a kit member, then your prize will be shipped with your monthly kit.
Prizes won during the month will be mailed out the first week of the following month.
Due to Customs clearance, International mailings sometimes take 30-75 days to receive.

My secret word is: 
Powder

Next hop over to
Sandi Smith

For your final stop, return to the ScrapThat! Blog
to let us know you have completed the hop.

Remember ~ only send the secret sentence to
tracey@scrapthat.ca

All of us at ScrapThat! wish you and your families a Happy New Year!

We are looking forward to seeing a whole host of new layouts!

Let the scrapping begin!

We can't wait to see what you create!

Thanks for stopping by! I treasure your comments.

~ Blessings ~

Thursday, December 27, 2012

ScrapThat! January Featured Guest Designer ~ Kelly Klapstein


ScrapThat! is delighted to introduce our
January Featured Guest Designer
The Extraordinarily Talented
Kelly is a contributing writer for Canadian Scrapbooker magazine. Not only does she create amazing pages, but she also loves to share her passion through teaching. She was a Featured Instructor at the 2012 Great Canadian Scrapbook Carnival.
To view Kelly's biography, please visit the ScrapThat! Blog.

Kelly's gorgeous work can be found on her blog:
www.kellycreates.blogspot.com 

I hope to see you tomorrow for our Reveal and Blog Hop!

Until then, here are some sneak peeks from my pages:


~ Blessings ~

Wednesday, December 26, 2012

ScrapThat! January Sneak Peeks

I hope you have had a lovely Christmas! We spent a wonderful day with our family gathered together.

The ScrapThat! team has been busy creating projects from our January Kit ~ Flakes of Snow. This kit is perfect for scrapping those snowy photos and more with gorgeous blues, grays and browns. Here are some gorgeous Sneak Peeks. Be sure to come back to join us on Friday for our kit reveal and blog hop. We have a special stop on our hop this month offering a second prize that you won't want to miss. Now for our peeks:


Thanks for stopping by! I look forward to sharing my projects with you on reveal day!! 

~ Blessings ~

Tuesday, December 25, 2012

Merry Christmas

Wishing each of you a wonderful and blessed Christmas!! As you celebrate with family and friends, I pray that you will take a moment to reflect on the awesome gift of our Lord Jesus Christ, humbling Himself to be born a man so that we could have a Savior.


~ Blessings ~

Sunday, December 23, 2012

"Sledding" ~ ScrapThat! Dec. Kit ~

When you live in North Carolina and come to Ohio for the holidays, your children are dreaming of a white Christmas. Joseph got his wishes with a big snow fitting for an afternoon of sledding on one of those trips. The driving range near my husband's parents home has this large hill that brings out many of the small town's children to enjoy the slippery snow. Yes, this is the same son featured in yesterdays wedding post, so you know this was taken just a few years ago. 

Today I would like to share the details of my layout using the

"Sledding"
Main, EAO, and FAO kits

 Tips and Techniques


Flower Cluster ~ I used these gorgeous flowers from the main and FAO kits to create a cluster. The twine flower was created with the kit's red baker's twin using my twine flower tutorial, which can be found here.  I also curled some of the paper ribbon to tuck in among the flowers.

Found Objects ~ I have a stash of chicken wire from my friends, Barb and Mandy. It's authentic - straight from the barn and had actually been used in a chicken coop. This summer, my mom raided her jewelry box for items she no longer wears. This dangle earring was one of those items. 

Paper Snowflakes ~ The snowflakes were cut from white cardstock using my Gazelle and Martha Stewart punches borrowed from a friend. I then heat embossed three layers of holographic embossing powder to give them the glittery sparkle. 

Metal Snowflakes ~ The main kit contains these sweet metal snowflakes - three white, and three silver. The silver got lost on my background paper, so a quick coat of white acrylic made them pop like the others. 


Chipboard Horn ~ I used a more simple technique here - a couple coats of metallic paint - gold for the horn and red for the bow. 

Fussy Cutting ~ The berry sprigs and pine tree were cut from the gorgeous Kaisercaft Turtle Dove papers. 

Buckle Frame ~ I thought the main kit Santa Buckle would make a great frame. I had a printing mishap and ended up with three of the same photo, marred in different spots. By layering and framing, I was able to use all three. 

Twine Tucks ~ To fill in my clusters, I wired loops of jute twine and secured the wire under my clustered embellishments. 

Distressing ~ I used my favorite distressing tool on all the straight edges, my Donna Salazar Distrezz-It-All by Zutter. 

Thanks for stopping by! I treasure your comments.
~ Blessings ~

Saturday, December 22, 2012

"Mother" ~ ScrapThat! Dec. Kit ~

I'm here with another Christmasy layout. Our son, Joseph, and his beautiful Rachel were married last December with the church and reception filled with lovely Christmas decor, so this Christmas themed kit worked perfectly for a wedding page. This is one of the rare pages including a photo of myself. Part of their wedding ceremony included coming down and giving each of the mothers a rose with an opportunity for me to bless them on their new life together. I'm so glad the photographer got a shot of this special moment. 


Today I would like to share the details of my layout using the
"Mother"
Main Kit with Amy's December Sketch

Here is Amy's gorgeous sketch:

December is a busy month, so we have extended our ScrapThat! Sketch Challenge. You have until December 30 to enter your sketch project. Anyone can enter, and kit products are not required. Details can be found in our forum

Tips and Techniques:

Flowers ~ The focal red poppy and white poinsettia are gorgeous flowers included in the main kit. I inked the bright white poinsettia to fit with the vintage feel of the page. I also did a bit of inking to the smaller green poinsettia. I used the kit cardstock to create the roses using my Donna Salazar Bitty Blossoms Spellbinders die set. I just love the flowers this die set creates. This gorgeous bow is also in the main kit and so easy to add such a lovely touch to my page. 

Leaves ~ There were 3 of the small green holly leaves in the kit, but I wanted more, so used one as a template to cut several from the kit cardstock. With a bit of inking and pinching, they look just like the originals.

Wire ~ I just adore the wired balls that came in the kit. I wasn't sure how I would use them at first, but discovered that when looped and twisted they were perfect for my clusters. 


Modeling Paste Stem ~ I found a lovely leafy stencil in the paint section of a local craft store, and it was so perfect for this page. I used some distress re-inker to tint the modeling paste without watering it down too much to get the lovely dark green color. I added a few pearls colored with cranberry alcohol ink for the berries. 


Bells ~ Have I mentioned lately how much I enjoy playing with Chipboard. My friend, Dana, posted a review on our ScrapThat! forum about Sophisticated Finishes products. I just had to try them out on this bell using the copper and patina. First you paint on the metallic color and when nearly dry but still tacky add the patina green which actually reacts with the copper to get the verdigris effect. You'll definitely be seeing more of this product on future projects!! The bow and holly were colored with Copics and Spica markers, then gold paint rubbed lightly over the red bow. 

Corrugated Board ~ Corrugated board is another of my favorites. Here I applied another new to me product - white opaque flakes, then painted with gesso, stamped with a script, inked then more opaque flakes. The opaque flakes are white in a medium that dries clear, and I realize once I painted over them, that while the texture was there, I lost a lot of the visual impact of the flakes. That's why I applied them again as a final step. If you are looking to try this technique out, you could skip the first step and just apply them on top. 


Heat Embossing ~ I'm always looking to my stamps to see if I can find one to work as a title or sentiment. This one was perfect for my page title. Because I wanted it to pop, I heat embossed it with gold embossing powder. 

Thanks for stopping by! I treasure your comments! 
~ Blessing  ~

Have a blessed and wondrous Christmas with your loved ones. 

Friday, December 21, 2012

"Sweet Angel" ScrapThat! Dec. Kit

Only 4 more sleeps til Christmas! I wish each of you and your families a blessed and wondrous Christmas. I have several Christmas and winter layouts I will be sharing with you between now and Christmas. I hope you enjoy our celebrations of seasons past. 

Today I would like to share the details of a layout using the

"Sweet Angel"
Main, FAO, and EAO Kits

I have such wonderful memories of our children participating in a home school Christmas play so many years ago. I just adore this sweet photo of Elizabeth with her crooked little angel wings, so innocent and precious. I used several sheets of the gorgeous Kaisercraft Turtle Dove Collection. When I saw the angel paper and chipboard angels in the Embellishment Add-On Kit, I knew I would have to scrap this photo. 

Tips and Techniques: 

Chipboard Angel ~ My tutorial for these crackled and glittered chipboard angels can be found here

Snowy Mist ~ I have a couple Mister Huey Color Mists. These mists are chalky rather than glimmery and the white gives the snowy effect I used here on my background. 

Music Background ~ The center portion of the paper from the torn angel corner was a beautiful cream color. I stamped it in brown with a music stamp to peak through the die cut section. 

Painted "Photo Mat" ~ One of the sentiment blocks from the paper had the lovely green and red floral border which would be a perfect backdrop for this photo, that is if the sentiment wasn't in the center of it. I painted over the words in a sunburst pattern using a couple shades of cream to give a halo effect behind the photo. 

Wire ~ I curled the May Arts silver ball wire to add to my clusters. I snipped some of the wires off of the Prima kit flowers and coiled them to create the green vine tendrils. 

Berries ~ The red kit pearls were just a little bright for this page, so I painted some cranberry alcohol ink on them and when dry applied across my leaf stems as berries. 

Bridal Lace ~ My photo cut off the bottom of Elizabeth's beautiful dress, so I fussy cut the beaded lace flowers from a piece of bridal lace to trim out the bottom of the photo.


Flowers ~ The gorgeous jeweled flowers in the Flower Kit are by Prima, and I added some smaller white roses to the cluster that I cut from white cardstock, a staple in my stash, using my Donna Salazar Bitty Blossoms dies by Spellbinders. 

Leaves ~ I used a scrap of my kit paper to cut these beautiful leaf stems using the Spellbinder Foliage die. I used distress ink on the edges and a black marker to doodle the leaves and stems. 

Thanks for dropping by! I treasure your comments. 
~ Blessings ~

Monday, December 17, 2012

Birthday Card for BoBunny & Stuck On U Sketches

It's been a wonderful kind of busy around our home preparing for Christmas. It's so wonderful to reflect on the love of God sent to us in Christ. It's also a wonderful time of the year for us to gather and spend time as a family. I so look forward to that each year. 

Our sweet daughter, Rachel, (our son's wife) has a birthday coming up, and I created this card for her using BoBunny's Gabriel Collection for their December Card Challenge to use lace and ribbon on a card. 

I stopped by Stuck on U Sketches and just had to use their current card sketch. This is my first time to enter one of their challenges. They have some new card designers providing amazing inspiration so be sure to drop by their blog to be inspired. 

Here's Rachel's Birthday Card:

Using the gorgeous December 5 SOUS Card Sketch:

Tips and Techniques:

Lace ~ I used BoBunny's Gabrielle lace to create the strips across the card. I have found that for sheer lace like this, an acid free spray adhesive like Krylon works well. 

Inking ~ My favorite ink for aged/distressed edges continues to be Ranger Distress Ink. I inked around the medallion. 

Butterfly Trail ~ I used the pearl strand from BoBunny Gabriel to create the trail. I used Gabrielle Pollacco's suggestion of Tombo Multi Liquid adhesive to tack down portions of the pearls to hold them in place. 

Rub-On/Mulberry Paper ~ I wanted to use the rub-on birthday sentiment from the Gabrielle Card Kit, but thought the background was too busy to apply it directly to the card. I applied the sentiment to a scrap of mulberry paper. I then wet a q-tip and "painted" the water where I wanted the torn edges around the rub-on. While wet, it tore easily giving the wonderful feathered edges that mulberry paper does so beautifully. An old technique that still looks fresh today. I like that the mulberry paper is sheer and the background can still be seen without the sentiment getting lost. 

BoBunny Products:
Gabrielle Card Kit:
~ Card Base
~ Sentiment
~ Medallion
Gabrielle Lace
Gabrielle Pearl Strand
Gabrielle Chipboard Sticker Butterfly

Other Products:
Petaloo Flowers
Sheer ribbon from my stash
Dew Drops ~ Teal

Adhesives:
Krylon Spray Adhesive
Tombo Multi Liquid
Scotch ATG
Helmar 450

I've also entered this at:
Word Art Wednesday Challenge #58 ~ God will take care of you/anything goes.

Thanks for stopping by! I treasure your comments.
~ Blessings ~

Friday, December 14, 2012

Prayers

My prayers go out to the families of the Newtown tragedy. My heart is breaking for those who have lost loved ones. May our Lord give peace and comfort that surpasses our understanding.

~ Blessings ~

Sunday, December 9, 2012

Angel Chipboard Tutorial with ScrapThat! December Kit

If you haven't seen my 10 favorite chipboard projects, I'd love to know what you think of them!!

ScrapThat! is looking for a new design team member with Social Media Coordinator responsibilities. If you would enjoy creating with ScrapThat!'s beautiful shabby chic kits each month and have the skills to work with our Facebook and Pinterest accounts each month, check out our DT Call.

As Christmas approaches we all reflect on sweet memories of Christmas. This page with these anges is one when our children were small and in a home school Christmas pageant. Our daughter, Elizabeth, was the sweetest angel. Yes, she is the daughter who was married in October.

Today I would like to share a tutorial with you for the chipboard angels I created for my "Sweet Angel" page created with the December ScrapThat! Embellishment Add On (EAO) Kit. These angels are just so lovely and perfectly pair with the gorgeous Kaisercraft Turtle Dove collection.

Crackled, Glittered Angel Tutorial


Supplies:
~ FabScraps chipboard angel from the ScrapThat! December EAO Kit
~ Selection of paints including gold for wings and horn, skin tone for face/hands, and color of choice for hair.
~ Super fine glitter – I used Glitter Ritz
~ Distress Crackle Paint ~ Clear Rock Candy
~ Distress Ink ~ Frayed Burlap and Tattered rose or any ink in a light antique color and for the angel’s blush
~ Mix’d Media Inx ~ Jasmine
~ Mod Podge ~ Gloss
Not pictured
~ Gold Metallic Dazzle Thin Line Strips from December EAO Kit


Step 1: Start with your bare chipboard pieces. Plan your page arrangement so you know which side(s) to paint. I painted two angels facing each other, so my photos may look like they are in reverse at times, since I didn't photograph the same one throughout the process. :-)

Step 2: Paint the wings with metallic gold paint. Immediately while the paint is still wet, sprinkle with supper fine glitter, tap off excess and set aside to dry.

Step 3: Paint horn using gold metallic paint and hair the color of your choice. Set aside to dry.

Step 4: Use a small paint brush to apply Mix'd Media Jasmine ink on the dress. Of the white inks I've tried out Donna Salazar's Jasmine gives the best coverage by far. The reason I used ink here rather than paint is that I wanted a vintage look with bits of the chipboard showing through. You could also use antique white paint. 

Step 5: Apply Clear Rock Candy Distress Crackle Paint onto dress only. I put down a dollop of distress paint and spread it out with my finger, but if you prefer a brush, that would work too.  Set aside. It will form cracks as it dries. 

Step 6: When the crackle paint is completely dry, gently rub Frayed Burlap Distress ink into the cracks. Then brush a coat of gloss Mod Podge or other sealant of your choice over crackled dress. (I have found that unsealed crackle has a way of flaking off.)

Step 7: Paint face and hands with skin tone paint. If you are like me and don’t have a skin tone paint in your stash, try mixing antique white and just a touch a brown and pink or red.  Once dry, add blush by rubbing on a small bit of pink ink. 


Step 8: Cut a small section of one of the Dazzle strips and apply to the neckline. Fine gold cording could be substituted for the Dazzle strips, or it could be left off.


Once again here she is on my "Sweet Angel" page.


Even if you don't have one of these lovely angels, you can use the crackle or glittered paint on any chipboard piece. 

We are currently accepting new Kit Club Members.
For details please stop by our ScrapThat! Store.  

Thanks for stopping by! I treasure your comments.
~ Blessings ~