Pages

Monday, February 28, 2011

Dream Big

This layout is of our daughter, Grace taking first place honors at the Back to School with Cotton Contest a few years back.


ScrapFIT Workout #37 - Dream A Little Dream - We all have dreams! We use to dream as a child of what we wanted to be when we grew up! We now dream of our goals (vacation, fitness, job, house, etc), hopes for our children/family or maybe a new scrappy item to add to your collection! Lets create a layout based on a ‘dream’ we have had or currently have! Be creative

The Scrapping Stamper February Sketch by the talented Shannon White.

~ Blessings ~

Two Concettas

Maria "Concetta" was named after Aunt Connie, (her given Italian name is Concetta). Little did we know that Aunt Connie's middle name was Maria - so they have the same first and middle names flipped. Here is a precious photo of Aunt Connie holding Maria when she was a baby.


I created this for ScrapFit Challenge#38- Kick The Winter Blues

Everybody has a bit of cabin fever this time of year and needs to see some fresh colors! So lets do just that! Here is your color palette of your layout/card/project:

Green- Yellow-Orange- Red – White

I'll be adding more details later, but need to get this an a couple other items posted before a midnight deadline. 

Blessings

Thursday, February 10, 2011

Mom's Garden

My mom has such lovely flowers blooming in her garden every year.  These lupines were blooming at our Memorial Day gathering there a few years back.

Amy over at Scrap-Friendzy had a great pre-crop challenge posted this week.  Her recipe:
-The word "LOVE" ~ on the tag
-The color PINK (any shade) ~ photo mat and flower centers
-Distressed paper (either torn, tattered or inked) ~ photo mat, tag, and twisted wires
-An EMBOSSED element (dry or heat embossed) ~ leaves
-A NON-SCRAPPY element ~ chicken wire, twisted wire, old t-shirt, and gold tulle netting looped behind flower.

Here is my take on the challenge:
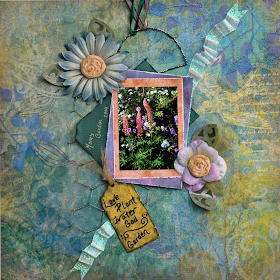

For the flower centers, I punched a 2 inch circle and put a small hole in the center.  I took a 6 inch strip of 1/2 inch wide, white ribbed T-shirt fabric and pulled one end through the circle.  Then I started twisting and as I twisted, I spread FabriTac glue on the circle to hold down the fabric as I formed the flower.  When I got to the end, I cut the cardstock circle down to size and glued the end of the fabric strip to the back of the circle.  To make them pink, I tapped my tattered rose Distress ink pad on my non-stick craft sheet.  When I had a nice layer of ink put down, I spritzed it lightly with water, then rubbed my rosettes in the pink ink.  To soften the color and spread it out more, I then spritzed the flower with water and played with them until I had the color I was looking for.  When dry, I spread tattered rose Distress Stickles on the raised portions of the rosettes.  At first I was going to make a flower cluster with them, but after playing around, ended up using them as flower centers for these larger fabric flowers.

For the leaves, I used a foam leaf stamp by coating it with adhesive from an embossing pad, then stamped on the green patterned paper.  I heat embossed clear embossing powder on the stamped image.  Once it cooled off I rubbed several colors of Distress ink into the paper around the embossed area which acted as a resist.  Then I cut out the leaves and curled them slightly for dimension. 


I also twisted craft wire to fashion the wire hanger at the top of the layout - to give it a distressed appearance, I brushed portions of it with black alcohol ink.

The photo mats and tag were distressed, and I added ink to the edges of the tag.

The focal background paper is from K & and Company as well as the paper for the tag.  
The photo mats and leaves were created from my scrap stash.  
The chicken wire was from my scrap friend, Brenda, who enabled me in my odd request last year when I asked for the wire to put on a page of us buying their DD's 4-H chickens.
The craft wire is left from my days of beading, and 
The ribbon is from my hoard of ribbon

I am also entering this layout in the following contests:
Cards and Things Color Challenge #65 to use concord crush ~ purple, bashful blue, and pear pizzazz ~ green.
Kabookle Doodles Challenge #53 ~ Break out that ribbon
Simon Says Stamp and Show some embossing ~ My leaves were heat embossed
Simon Says anything but a card ~ I am entering a scrapbook layout using Tim Holtz distress ink and stickles
Woodware USA ~ Use ribbon and/or bows in your creation ~ I used several kind of ribbon in my LO.
Sweet Stampin Challenge Blog ~ spring flowers ~ I used a stamp to emboss the leaves

Thanks for taking the time to stop by!
~ Blessings ~


Tuesday, February 1, 2011

Memories of Justin ~ Bo Bunny Layout Challenge Friday "Before and After"

The Lord laid on my heart the idea of holding a crop for our dear friends, the Reed family, who's 10 year old son, Justin, went to be with the Lord this summer.  The crop was held in October, and more than 100 pages of Justin's life were created by friends and family who attended the crop that weekend.  To date more than 125 pages have been given to the family.  

More layouts from the crop are scattered throughout my blog, but many of them are here.

Just a note of encouragement to my dear friends and followers.  So often the Lord has given me nudges to do something or say a certain word of encouragement to someone, and it is just so easy to push them to the side and ignore them.  I learned from this experience that when the Lord gives those nudges, it is really worth it to follow through on them.  What a joy to be clay in the Potter's hand.

The before for the Bo Bunny Challenge is the myriads of photos wonderfully 
organized by Holly.  Here are just two of the envelopes of pictures:

The after are all the beautiful layouts featuring Justin:

Here is a full size glance at the left side:

And here is the right:

The Picture Perfect Memories sticker got lost on the background paper, so I cut a rhinestone template on my Gazelle and used my I-Rock heat tool to put them around the sticker.  While I was at it I decided to embellish the letter stickers as well.

I have not felt like my previous attempts at banners have been all that successful, but I like the 
way this one came out.  I made a template for a shape I liked and then traced and cut the 
pieces from my Bo Bunny scraps, and stitched across the top.

I used the Bo Bunny Mama-Razzi collection to create this layout including:
Mama-Razzi - 2 sheets
Mama-Razzi Cutouts - scalloped block
Mama-Razzi Film - used to cut scalloped circle
Mama-Razzi Stripe
Mama-Razzi Word - 3 sheets including filmstrip word border and treasured memories film strip
Mama-Razzi Combo Stickers - title, blue scallop border, and picture perfect memories sticker
Also used on this layout are:
My sewing machine
EK Success Edger Punches - Intertwined Arches and Double Crochet Lace
Boss Kut Gazelle - to cut scalloped circle and template for rhinestones
Darice Hotfix rhinestones - clear
Imaginisce i-rock

For inspiration I used this gorgeous sketch found on Let's Scrap by the talented Cheri O'Neill.  
It was inspired by a gorgeous layout created by Sarah Mullanix

Here is the sketch:

And the layout that inspired it:

Thanks for stopping by!

~ Blessings ~